


Service的定义 :
1,Service运行在后台,没有界面,不可见,并且优先级要高于Actiivty。
2,和Activity一样,都是运行在主线程中,并且在Activity中 和 Service 中都不能进行耗时的操作,比如访问网络,但是,都可以开启一个新的线程用来进行耗时操作。
3, 和Activity 一样,Service 也是 Context 的一个子类。
Service的类型 :
1,本地服务(Local Service)
该Service是指一个应用程序内部的Service
---- 可以通过 startService , stopService , stopSelf , stopSelfResult 等方法开启该Service或者关闭该Service
---- 也可以通过 bindService , unBindService 来绑定该Service 或者 解绑该Service
2, 远程服务(Remote Service)
---- 该服务是Android系统中的几个应用程序之间的
---- 要想用Service实现几个应用程序之间的通信,则要定义好IBinder接口来暴露信息
start形式启动的Service的特点:
-----Service一旦启动就和启动源没关系了,也就得不到Service对象了
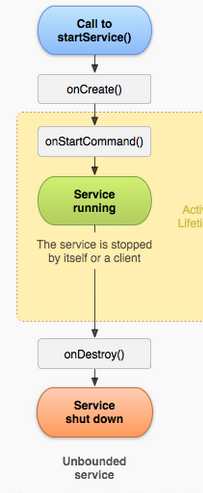
start形式启动的Service的生命周期图:
---- 使用startService() 方式启动的Service的生命周期是:
手动调用startService() ---> onCreate() --> onStartCommand() --> 开始运行 ---> 手动调用 stopService() --> onDestory()
以start形式使用Service的步骤是:
1,定义一个自己的服务类,继承Service,重写以start方式启动的生命周期函数
2,在MainActivity中通过startService(.) , stopService(.)来启动和停止服务
注意:
1,当调用了startService(.)后,系统会自动调用服务的onCreate()来开始生命周期,当调用了stopService(.)后,系统会自动调用服务的onDestory()来结束服务的生命周期。
2,Service只能被创建一次,当调用了startService(.)后服务会调用生命周期中的onCreate()函数,再次调用startServce(.)不会再调用onCreate()了,而是直接调用onStartCommand()函数。
3,在下面的demo测试后发现,虽然startService(.)和stopService(.)时,用的是两个不同的Intent,但是操作的却是同一个Service对象,这可以通过Service所在的线程id看出来。
下面附上一个start形式启动的Service的Demo:
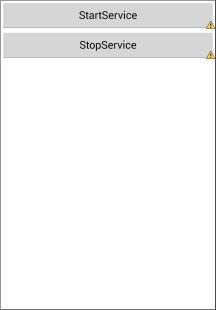
布局文件中的代码:
<LinearLayout xmlns:android="http://schemas.android.com/apk/res/android"
    xmlns:tools="http://schemas.android.com/tools"
    android:id="@+id/container"
    android:layout_width="match_parent"
    android:layout_height="match_parent"
    android:orientation="vertical"
    tools:context="com.jinying.startservice.MainActivity" >

    <Button
        android:layout_width="fill_parent"
        android:layout_height="50dp"
        android:text="StartService"
        android:onClick="onClick"
        android:id="@+id/startId"/>

    <Button
        android:layout_width="fill_parent"
        android:layout_height="50dp"
        android:text="StopService"
        android:onClick="onClick"
        android:id="@+id/stopId"/>

</LinearLayout>
Service类中的代码:
public class MyStartService extends Service {


	@Override
	public void onCreate() {
		// TODO Auto-generated method stub
		super.onCreate();
		Log.w("TAG", " ---- onCreate()");
		Log.w("TAG", " onCreate()  Thread id : "+Thread.currentThread().getId());
	}

	@Override
	public int onStartCommand(Intent intent, int flags, int startId) {
		// TODO Auto-generated method stub
		Log.w("TAG", " ---- onStartCommand()");
		return super.onStartCommand(intent, flags, startId);
	}

	@Override
	public void onDestroy() {
		// TODO Auto-generated method stub
		super.onDestroy();
		Log.w("TAG", " ---- onDestory()");
		Log.w("TAG", " onDestory()  Thread id : "+Thread.currentThread().getId());
	}

	@Override
	public IBinder onBind(Intent intent) {
		// TODO Auto-generated method stub
		return null;
	}

}
MainActivity中的代码:
public class MainActivity extends Activity {
@Override
protected void onCreate(Bundle savedInstanceState) {
super.onCreate(savedInstanceState);
setContentView(R.layout.activity_main);
/*
* 使用startService()启动的Service的生命周期是 :
* 手动调用startService() ---> onCreate() --> onStartCommand() --> 开始运行 --->
* 手动调用 stopService() --> onDestory()
*/
}
public void onClick(View view)
{
//经过测试后发现,虽然启动和关闭的是两个Intent,但是操作的却是同一个Service对象
switch(view.getId())
{
case R.id.startId:
Intent intent = new Intent(this, MyStartService.class);
startService(intent);
break;
case R.id.stopId:
Intent intent2 = new Intent(this, MyStartService.class);
stopService(intent2);
break;
}
}
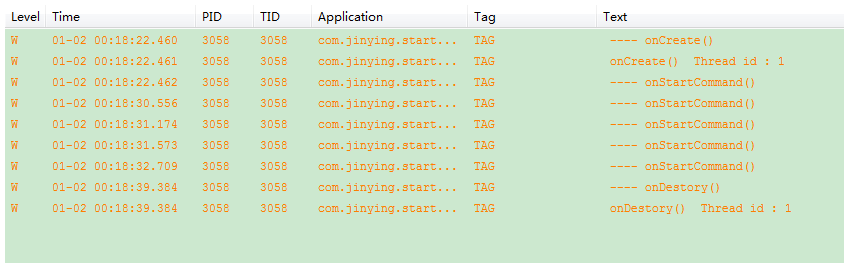
}运行的效果图 和 打印出的log:
---- 从log中可以看出来,多次点击startService时,onCreate()函数只会被调用一次,onStartCommand()函数会被多次调用,
---- 通过测试结果可以看出来,虽然startService(.)和stopService(.)用的是两个不同的Intent,但是操作的却是同一个Service对象。


 1823
1823

 被折叠的 条评论
为什么被折叠?
被折叠的 条评论
为什么被折叠?
 到【灌水乐园】发言


