


文章目录
Hadoop高手之路8-Flume日志采集
在大数据系统的开发中,数据收集工作无疑是开发者首要解决的一个难题,但由于生产数据的源头丰富多样,其中包含网站日志数据、后台监控数据、用户浏览网页数据等,数据工程师要想将它们分门别类的采集到HDFS系统中,就可以使用Apache Flume(数据采集)系统。

一、Flume概述
1. Flume简介
Flume原是Cloudera公司提供的一个高可用的、高可靠的、分布式海量日志采集、聚合和传输系统,而后纳入到了Apache旗下,作为一个顶级开源项目。Apache Flume不仅只限于日志数据的采集,由于Flume采集的数据源是可定制的,因此Flume还可用于传输大量事件数据,包括但不限于网络流量数据、社交媒体生成的数据、电子邮件消息以及几乎任何可能的数据源。
2. Flume运行机制
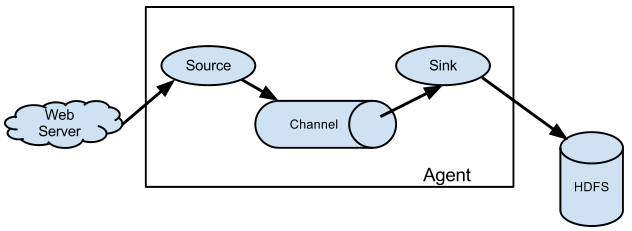
Flume的核心是把数据从数据源(例如Web服务器)通过数据采集器(Source)收集过来,再将收集的数据通过缓冲通道(Channel)汇集到指定的接收器(Sink)。

Flume基本架构中有一个Agent(代理),它是Flume的核心角色,Flume Agent是一个JVM进程,它承载着数据从外部源流向下一个目标的三个核心组件:Source、Channel和Sink。
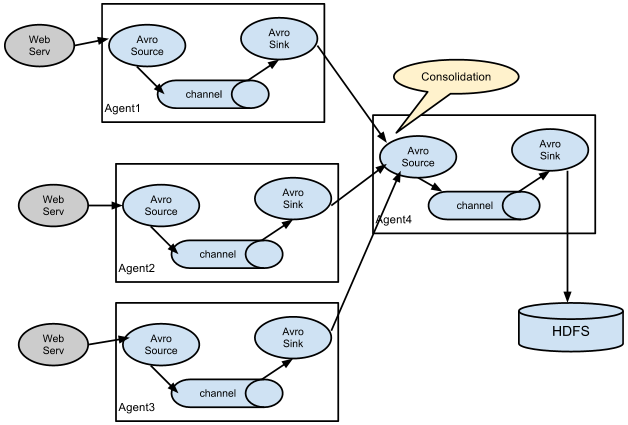
3. Flume日志采集系统结构图
在实际开发中, Flume需要采集数据的类型多种多样,同时还会进行不同的中间操作,所以根据具体需求,可以将Flume日志采集系统分为简单结构和复杂结构。
简单的Flume日志采集系统的结构
复杂的Flume日志采集系统的结构
二、Flume的搭建
1. 下载
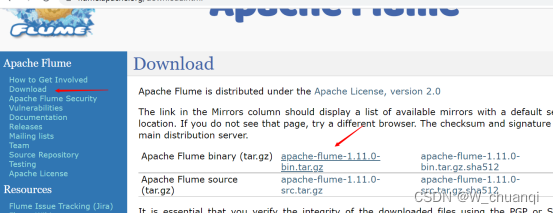
注意:使用1.9.0这个版本
2. 上传

3. 解压

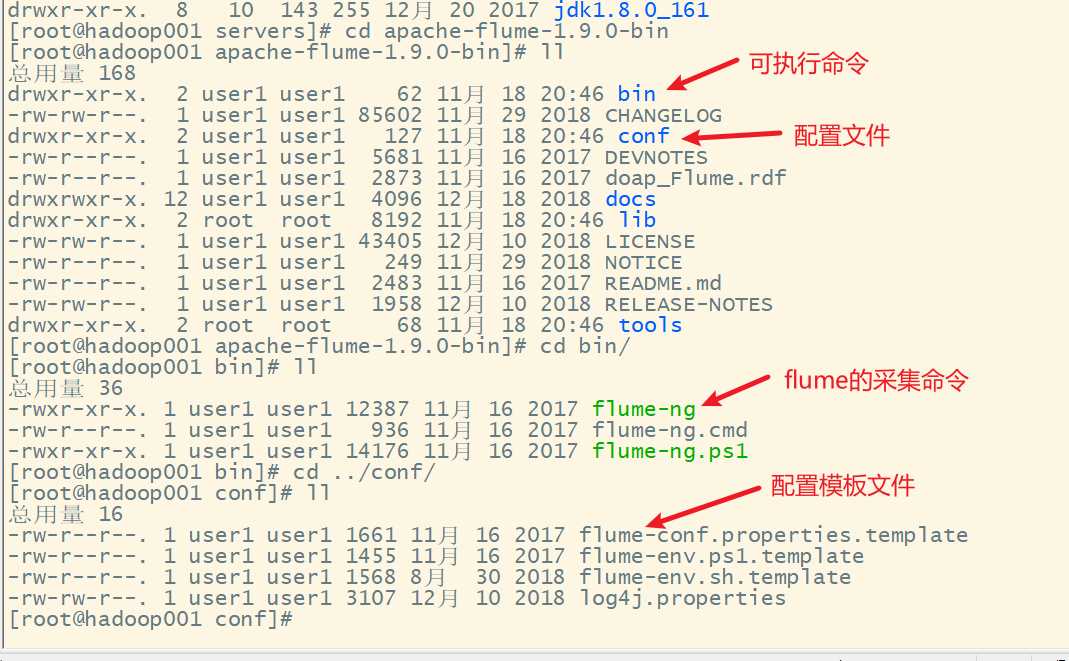
4. 配置环境变量

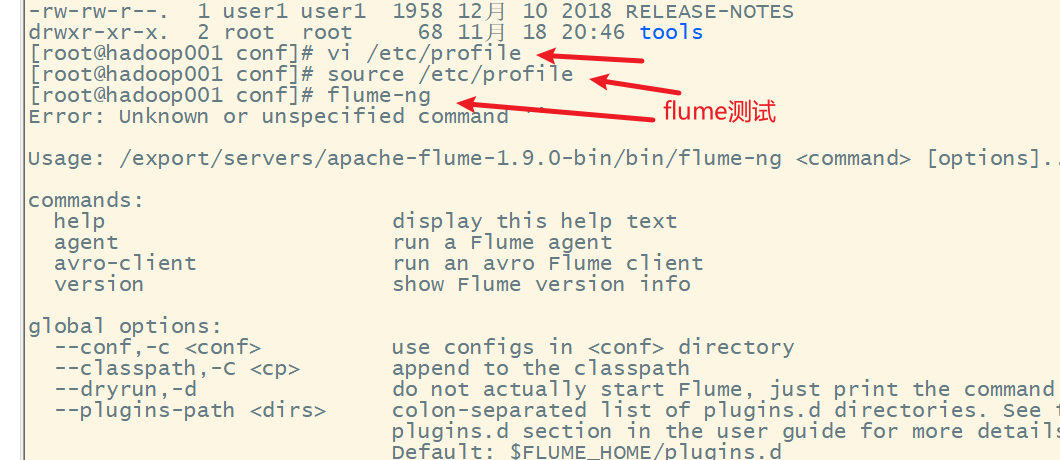
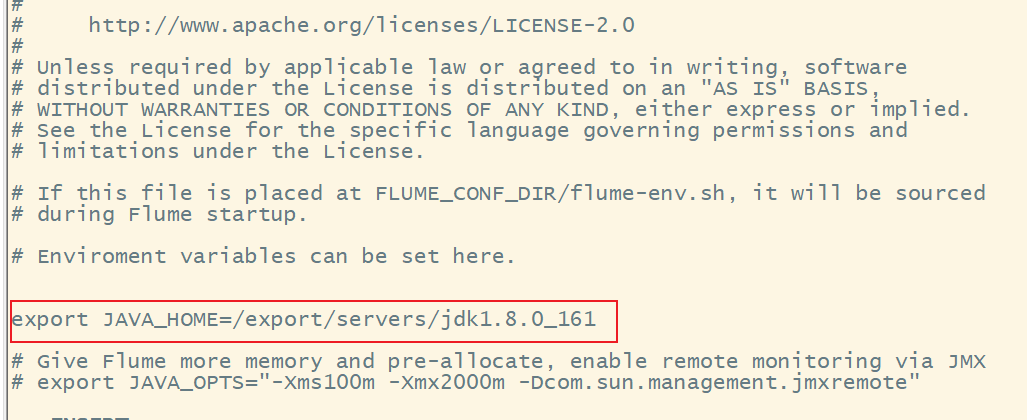
5. 配置flume
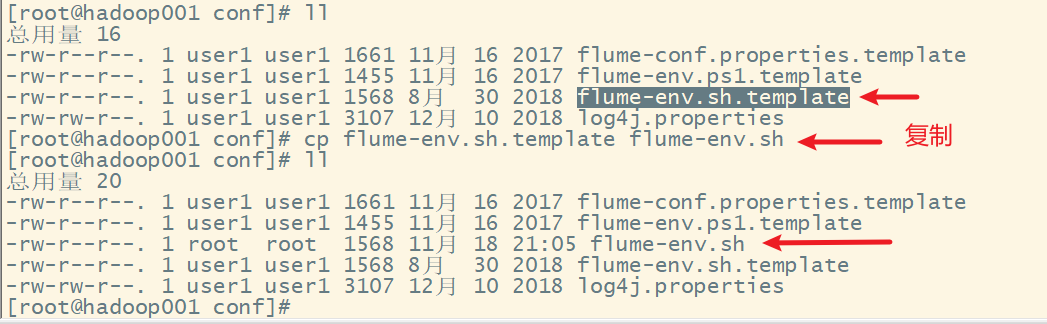
修改flume-env.sh文件

三、Flume入门使用
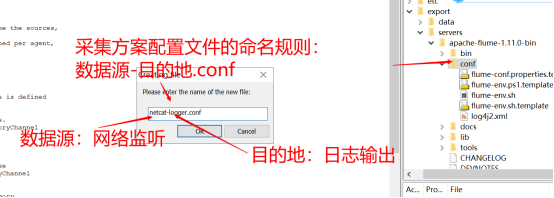
1. 配置数据采集方案
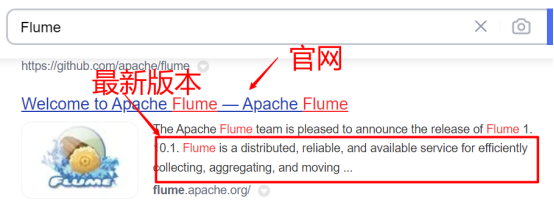
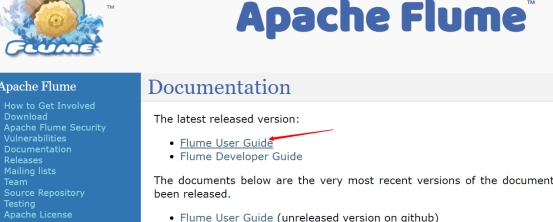
1) 查看官网

2) 案例需求
flume连接和监听服务器的某个端口,采集数据并显示
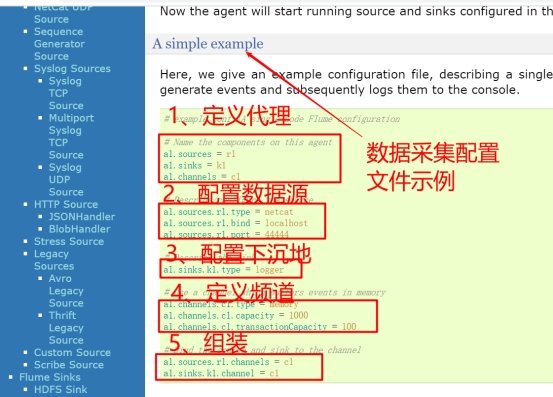
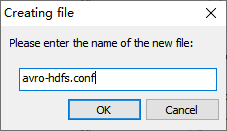
3) 创建新的配置文件
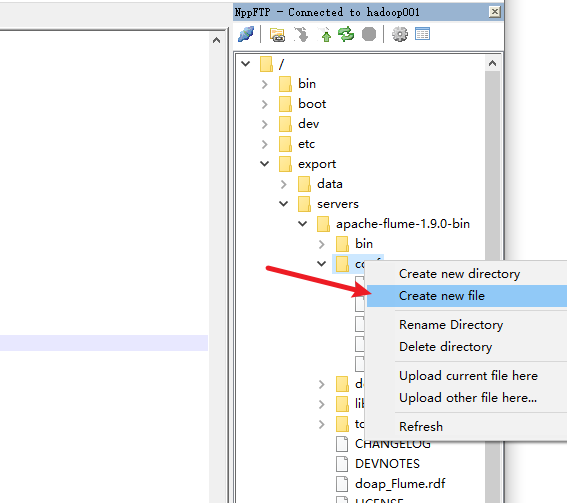
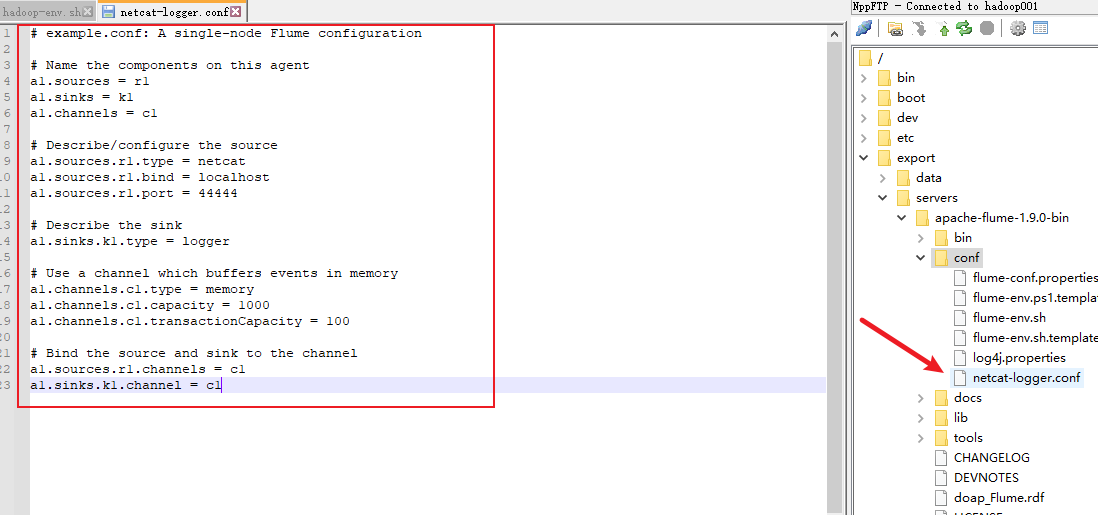
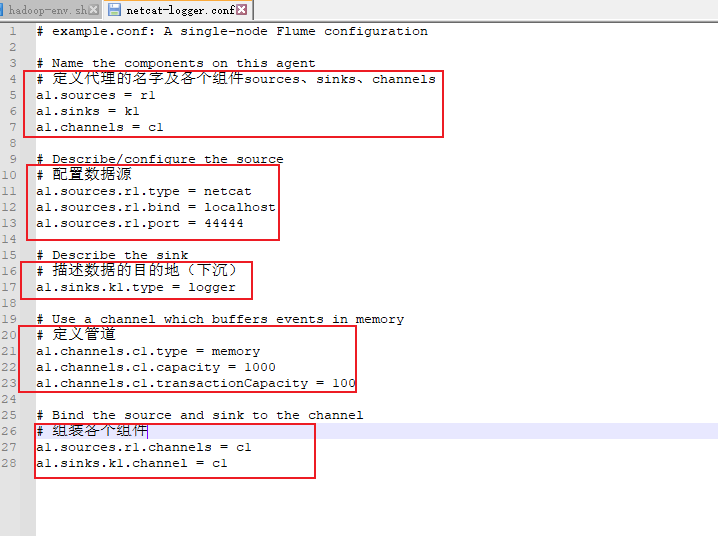
4) 复制官网的采集配置示例,在此基础上进行修改
# example.conf: A single-node Flume configuration

# Name the components on this agent
a1.sources = r1
a1.sinks = k1
a1.channels = c1

# Describe/configure the source
a1.sources.r1.type = netcat
a1.sources.r1.bind = localhost
a1.sources.r1.port = 44444

# Describe the sink
a1.sinks.k1.type = logger

# Use a channel which buffers events in memory
a1.channels.c1.type = memory
a1.channels.c1.capacity = 1000
a1.channels.c1.transactionCapacity = 100

# Bind the source and sink to the channel
a1.sources.r1.channels = c1
a1.sinks.k1.channel = c1
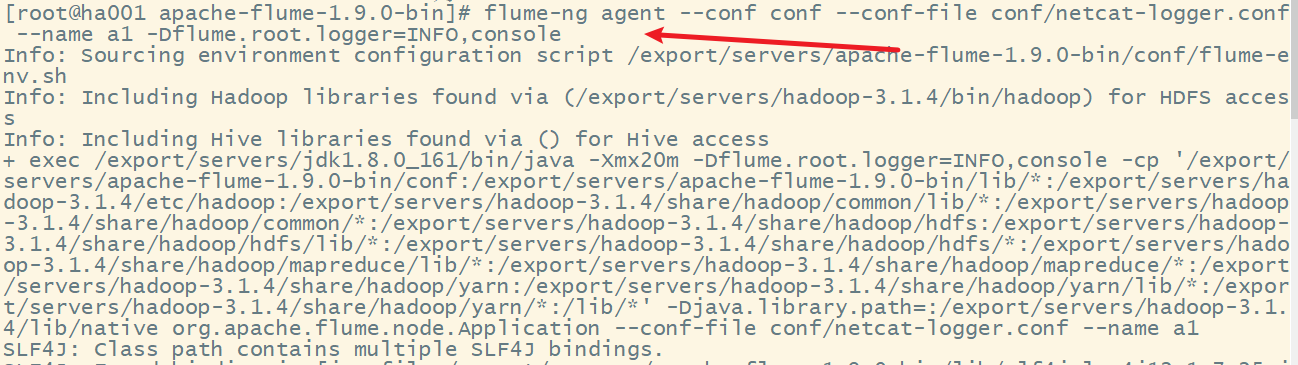
2. 启动flume进行采集
启动命令查看官网
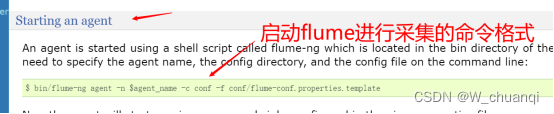

flume-ng agent --conf conf --conf-file conf/netcat-logger.conf --name a1 -Dflume.root.logger=INFO,console
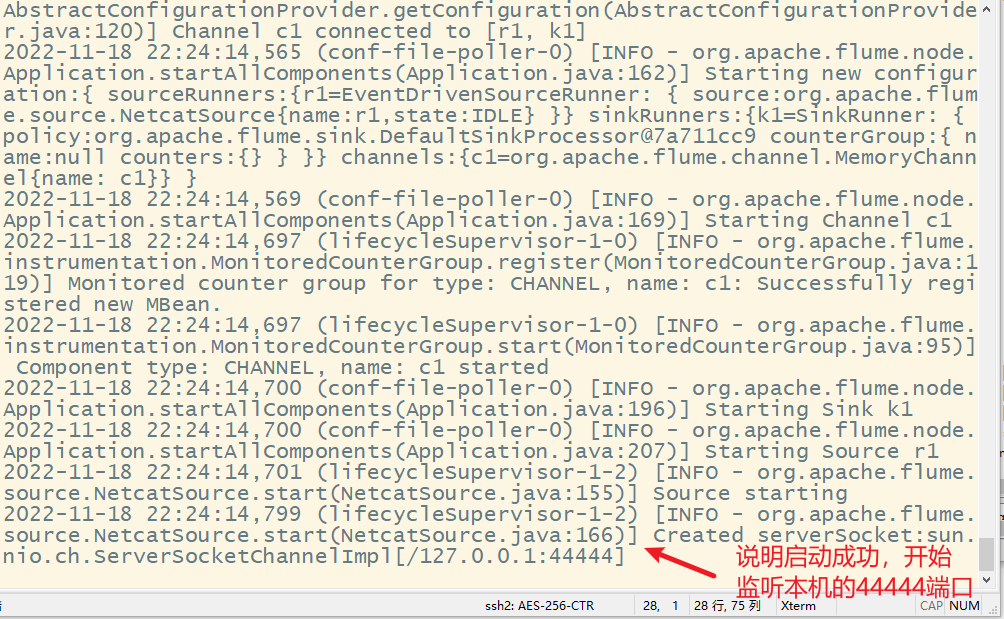
3. 采集数据测试
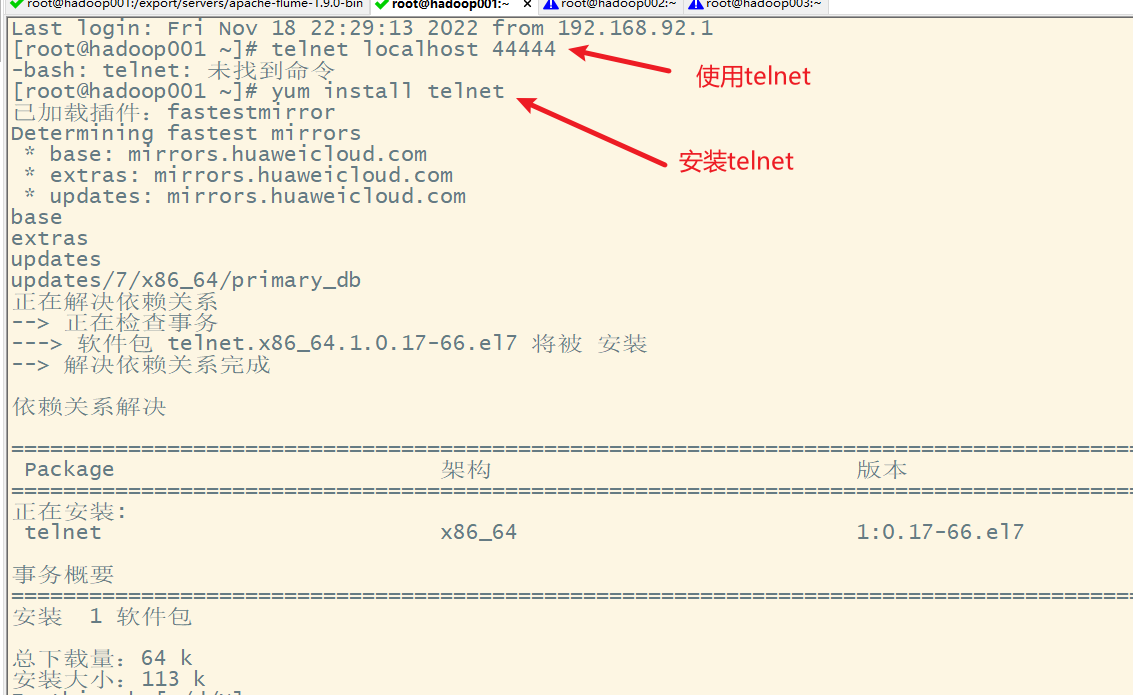
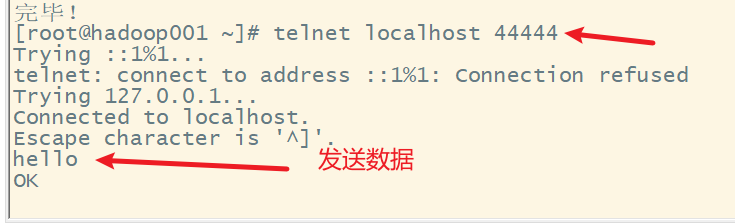
用telnet向本机的44444端口发送数据,模拟服务器产生数据
在使用之前,要先安装telnet
在telnet端发送数据
在flume端显示采集到的数据


四、Flume采集方案说明
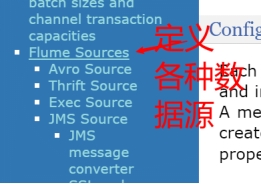
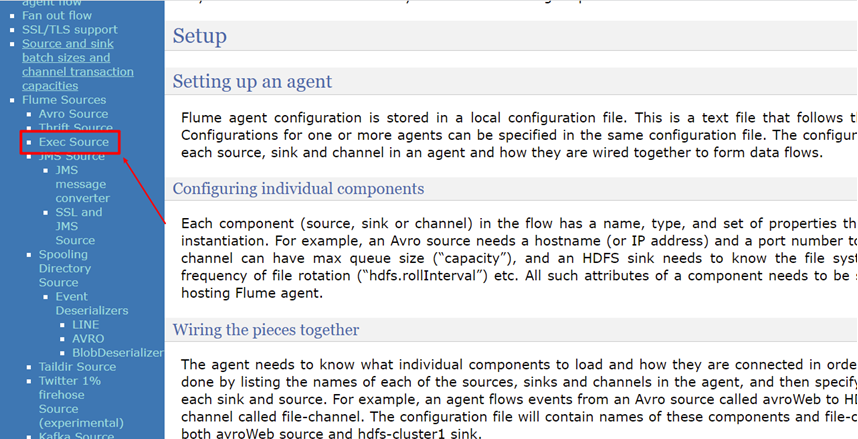
1. Flume Sources
在编写Flume采集方案时,首先必须明确采集的数据源类型、出处;接着,根据这些信息与Flume已提供支持的Flume Sources进行匹配,选择对应的数据采集器类型(即sources.type);再根据选择的数据采集器类型,配置必要和非必要的数据采集器属性,Flume提供并支持的Flume Sources种类如下所示。
| Avro Source | Thrift Source | Exec Source |
|---|---|---|
| JMS Source | Spooling Directory Source | Twitter 1% firehose Source |
| Kafka Source | NetCat TCP Source | NetCat UDP Source |
| Sequence Generator Source | Syslog TCP Source | Multiport Syslog TCP Source |
| Syslog UDP Source | HTTP Source | Stress Source |
| Avro Legacy Source | Thrift Legacy Source | Custom Source |
| Scribe Source | Taildir Source |
1) Avro Source
监听Avro端口并从外部Avro客户端流中接收event数据,当与另一个Flume Agent上的Avro Sink配对时,可创建分层集合拓扑,利用Avro Source可以实现多级流动、扇出流、扇入流等效果,Avro Source常用配置属性如下。
| 属性名称 | 默认值 | 相关说明 |
|---|---|---|
| channels | – | |
| type | – | 组件类型名需必须是avro |
| bind | – | 要监听的主机名或IP地址 |
| port | – | 要监听的服务端口 |
| threads | – | 要生成的工作线程的最大数目 |
| ssl | false | 将此设置为true以启用SSL加密,则还必须指定“keystore”和“keystore-password” |
| keystore | – | SSL所必需的通往Java秘钥存储路径 |
| keystore-password | – | SSL所必需的Java密钥存储的密码 |
2) Spooling Directory Source
Spooling Directory Source允许对指定磁盘上的文件目录进行监控来提取数据,它将查看文件的指定目录的新增文件,并将文件中的数据读取出来。Spooling Directory Source常用配置属性如下表所示。
| 属性名称 | 默认值 | 相关说明 |
|---|---|---|
| channels | – | |
| type | – | 组件类型名需必须是spooldir |
| spoolDir | – | 从中读取文件的目录 |
| fileSuffix | .COMPLETED | 附加到完全摄取的文件后缀 |
| deletePolicy | never | 何时删除已完成的文件:never或immediate |
| fileHeader | false | 是否添加存储绝对路径文件名的标头 |
| includePattern | ^.*$ | 正则表达式,指定要包含的文件 |
| ignorePattern | ^$ | 正则表达式指定要忽略的文件 |
3) Taildir Source
Taildir Source用于观察指定的文件,几乎可以实时监测到添加到每个文件的新行。如果文件正在写入新行,则此采集器将重试采集它们以等待写入完成,Source常用配置属性如下所示。
| 属性名称 | 默认值 | 相关说明 |
|---|---|---|
| channels | – | |
| type | – | 组件类型名需必须是TAILDIR |
| filegroups | – | 以空格分隔的文件组列表 |
| filegroups.<filegroupName> | – | 文件组的绝对路径 |
| idleTimeout | 120000 | 关闭非活动文件的时间(毫秒) |
| writePosInterval | 3000 | 写入位置文件上每个文件的最后位置的间隔时间 |
| batchSize | 100 | 一次读取和发送到通道的最大行数 |
| backoffSleepIncrement | 1000 | 当最后一次尝试未找到任何新数据时,每次重新尝试轮询新数据之间的最大时间延迟 |
| fileHeader | false | 是否添加存储绝对路径文件名的标头 |
| fileHeaderKey | file | 将绝对路径文件名附加到event header时使用的header关键字 |
| channels | – | |
| type | 组件类型名需必须是http | |
| port | – | 采集源要绑定的端口 |
| bind | 0.0.0.0 | 要监听绑定的主机名或IP地址 |
| handler | org.apache.flume.source.http.JSONHandler | handler类的全路径名 |
4) HTTP Source
HTTP Source可以通过HTTP POST和GET请求方式接收event数据,GET通常只能用于测试使用,POST请求发送的所有的events都被认为是一个批次,会在一个事务中插入channel,HTTP Source常用配置属性如下所示。
| 属性名称 | 默认值 | 相关说明 |
|---|---|---|
| channels | – | |
| type | 组件类型名需必须是http | |
| port | – | 采集源要绑定的端口 |
| bind | 0.0.0.0 | 要监听绑定的主机名或IP地址 |
| handler | org.apache.flume.source.http.JSONHandler | handler类的全路径名 |
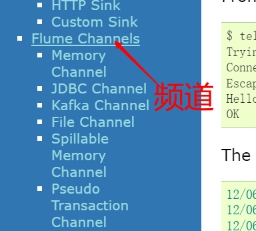
2. Flume Channels
Channels通道是event在Agent上暂存的存储库,Source向Channel中添加event,Sink在读取完数据后再删除它。在配置Channels时,需要明确的就是将要传输的sources数据源类型;根据这些信息结合开发中的实际需求,选择Flume已提供的支持的Flume Channels;再根据选择的Channel类型,配置必要和非必要的Channel属性,Flume提供并支持的Flume Channels种类如下所示。
| Memory Channel | JDBC Channel | Kafka Channel |
|---|---|---|
| File Channel | Spillable Memory Channel | Pseudo Transaction Channel |
| Custom Channel |
1) Memory Channel
Memory Channel会将event存储在具有可配置最大尺寸的内存队列中,适用于需要更高吞吐量的流量,但在Agent发生故障时会丢失部分阶段数据,下表为Memory Channel常用配置属性。
| 属性名称 | 默认值 | 相关说明 |
|---|---|---|
| type | – | 组件类型名需必须是memory |
| capacity | 100 | 存储在channel中的最大event数 |
| transactionCapacity | 100 | channel从source接收或向sink传递的每个事务中最大event数 |
| keep-alive | 3 | 添加或删除event的超时时间(秒) |
| byteCapacityBufferPercentage | 20 | 定义byteCapacity与channel中所有event所占百分比 |
| byteCapacity | 等于JVM可用的最大内存的80% | 允许此channel中所有event的的最大内存字节数总和 |
2) File Channel
File Channel是Flume的持久通道,它将所有event写入磁盘,因此不会丢失进程或机器关机、崩溃时的数据。File Channel通过在一次事务中提交多个event来提高吞吐量,做到了只要事务被提交,那么数据就不会有丢失,File Channel常用配置属性如下所示。
| 属性名称 | 默认值 | 相关说明 |
|---|---|---|
| type | – | 组件类型名需必须是file |
| checkpointDir | 1~/.flume/file-channel/checkpoint | 检测点文件所存储的目录 |
| useDualCheckpoints | false | 备份检测点如果设置为true,backupChec kpointDir必须设置 |
| backupCheckpointDir | – | 备份检查点目录。此目录不能与数据目录或检查点目录相同 |
| dataDirs | ~/.flume/file-channel/data | 数据存储所在的目录设置 |
| transactionCapacity | 10000 | 事务容量的最大值设置 |
| checkpointInterval | 30000 | 检测点之间的时间值设置(单位微秒) |
| maxFileSize | 2146435071 | 一个单一日志的最大值设置(以字节为单位) |
| capacity | 1000000 | channel的最大容量 |
| transactionCapacity | 10000 | 事务容量的最大值设置 |
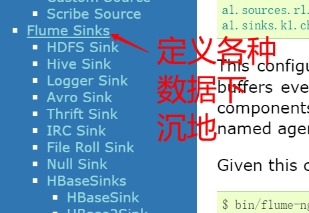
3. Flume Sinks
Flume Soures采集的数据通过Channels通道流向Sink中,此时Sink类似一个集结的递进中心,它需要根据需求进行配置,从而最终选择发送目的地。配置Sinks时,明确将要传输的数据目的地、结果类型;然后根据实际需求信息,选择Flume已提供支持的Flume Sinks;再根据选择的Sinks类型,配置必要和非必要的Sinks属性。Flume提供并支持的Flume Sinks种类如下所示。
| HDFS Sink | Hive Sink | Logger Sink |
|---|---|---|
| Avro Sink | Thrift Sink | IRC Sink |
| File Roll Sink | Null Sink | HBaseSink |
| AsyncHBase Sink | MorphlineSolr Sink | ElasticSearch Sink |
| Kite Dataset Sink | Kafka Sink | HTTP Sink |
| Custom Sink |
1) HDFS Sink
HDFS Sink将event写入Hadoop分布式文件系统(HDFS),它目前支持创建文本和序列文件,以及两种类型的压缩文件,下表为HDFS Sink常用配置属性。
| 属性名称 | 默认值 | 相关说明 |
|---|---|---|
| channel | – | |
| type | – | 组件类型名需必须是hdfs |
| hdfs.path | – | HDFS目录路径 |
| hdfs.filePrefix | FlumeData | 为在hdfs目录中由Flume创建的文件指定前缀 |
| hdfs.round | false | 是否应将时间戳向下舍入 |
| hdfs.roundValue | 1 | 舍入到此最高倍数,小于当前时间 |
| hdfs.roundUnit | second | 舍入值的单位 - 秒、分钟或小时 |
| hdfs.rollInterval | 30 | 滚动当前文件之前等待的秒数 |
| hdfs.rollSize | 1024 | 触发滚动的文件大小,以字节为单位 |
| hdfs.rollCount | 10 | 在滚动之前写入文件的事件数 |
2) Logger Sink
Logger Sink用于记录INFO级别event,它通常用于调试。Logger Sink接收器的不同之处是它不需要在“记录原始数据”部分中说明额外的配置,Logger Sink常用配置属性如下所示。
| 属性名称 | 默认值 | 相关说明 |
|---|---|---|
| channel | – | |
| type | – | 组件类型名需必须是logger |
| maxBytesToLog | 16 | 要记录的event body的最大字节数 |
3) Avro Sink
Avro Sink形成Flume分层收集支持的一半,发送到此接收器的Flume event转换为Avro event,并发送到对应配置的主机名/端口,event将从配置的channel中批量获取配置的批处理大小,Avro Sink常用配置属性如下所示。
| 属性名称 | 默认值 | 相关说明 |
|---|---|---|
| channel | – | |
| type | – | 组件类型名需必须是avro |
| hostname | – | 要监听的主机名或IP地址 |
| port | – | 要监听的服务端口 |
| batch-size | 100 | 要一起批量发送的event数 |
| connect-timeout | 20000 | 允许第一次(握手)请求的时间量(ms) |
| request-timeout | 20000 | 在第一个之后允许请求的时间量(ms) |
五、Flume采集数据案例一——监控文件夹的变化
1. 需求
监控服务器下的某个文件夹(日志输出文件夹),如果该文件夹下有新的文件,则采集该文件的内容上传到hadoop集群上。
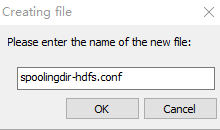
2. 编写数据采集配置方案
source的官网示例
sink的官网示例
# example.conf: A single-node Flume configuration
# Name the components on this agent
# 定义代理的名字及各个组件sources、sinks、channels
a1.sources = r1
a1.sinks = k1
a1.channels = c1
# Describe/configure the source
# 配置数据源
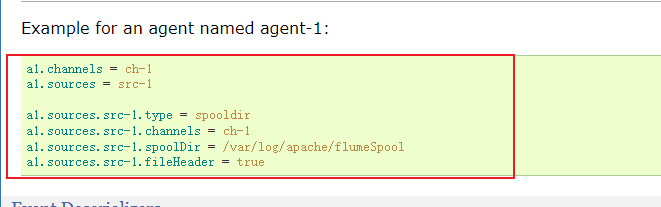
a1.sources.r1.type = spooldir
a1.sources.r1.spoolDir = /var/log/flumeSpool
a1.sources.r1.fileHeader = true
# Describe the sink
# 描述数据的目的地(下沉)
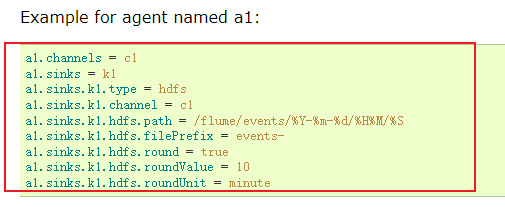
a1.sinks.k1.type = hdfs
a1.sinks.k1.hdfs.path = /flume/events/%Y-%m-%d/%H%M/%S
a1.sinks.k1.hdfs.filePrefix = events-
a1.sinks.k1.hdfs.round = true
a1.sinks.k1.hdfs.roundValue = 10
a1.sinks.k1.hdfs.roundUnit = minute
# Use a channel which buffers events in memory
# 定义管道
a1.channels.c1.type = memory
a1.channels.c1.capacity = 1000
a1.channels.c1.transactionCapacity = 100
# Bind the source and sink to the channel
# 组装各个组件
a1.sources.r1.channels = c1
a1.sinks.k1.channel = c1
# 启动命令
# flume-ng agent --conf conf --conf-file conf/spoolingdir-hdfs.conf --name a1 -Dflume.root.logger=INFO,console

3. 启动hdfs集群
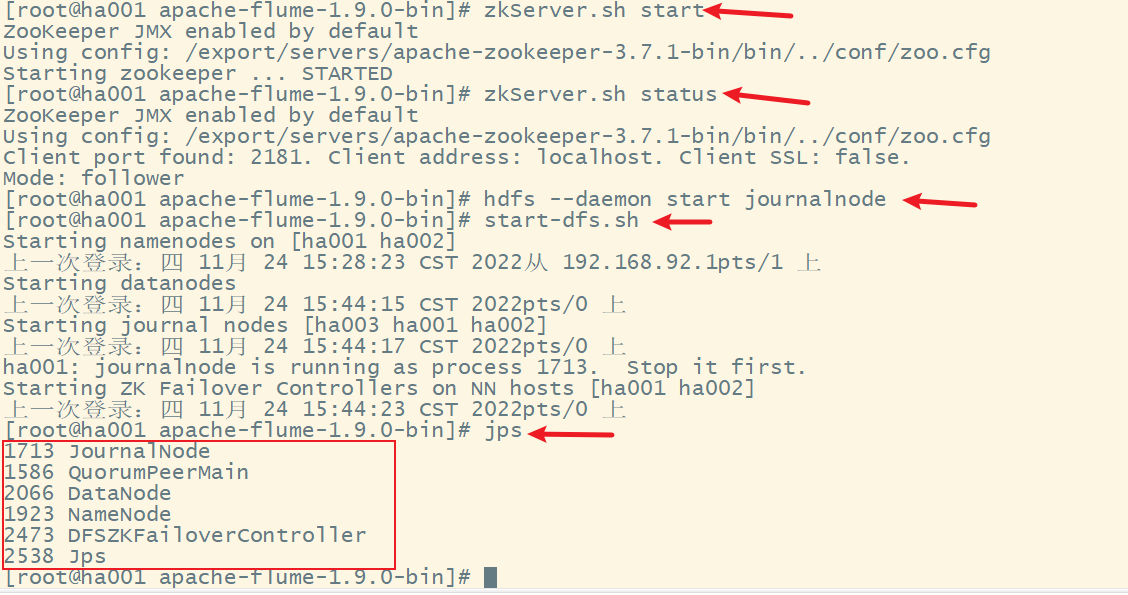
4. 启动flume
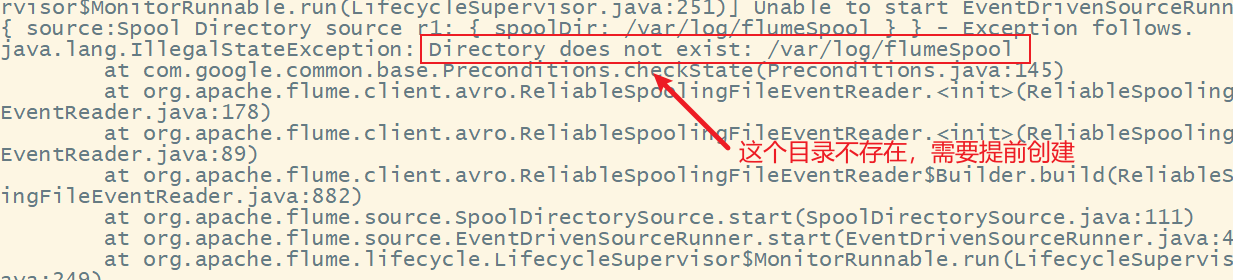
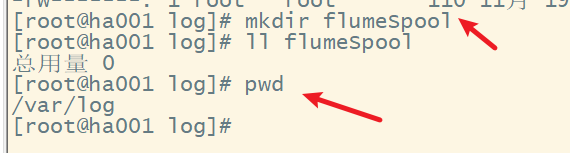
出现错误,提示监控目录不存在,需要提前创建
再次启动flume
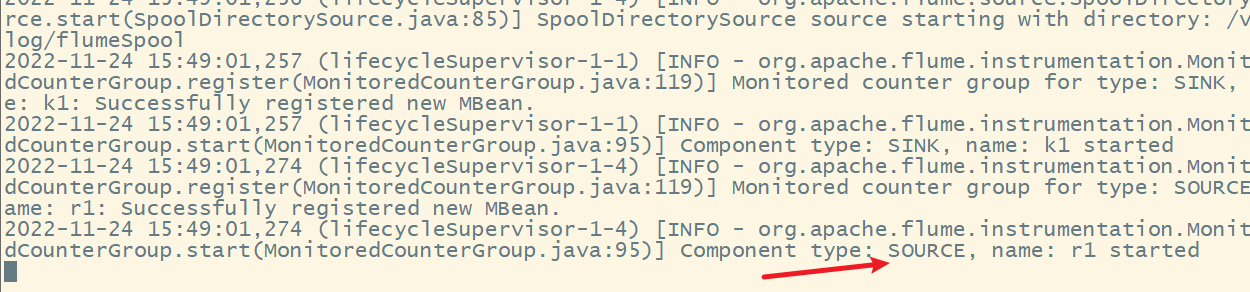
5. 测试flume数据采集
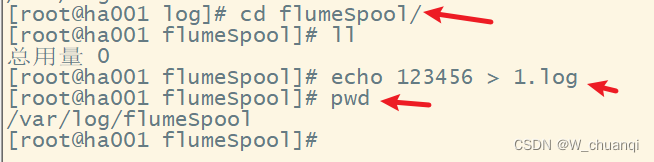
在/var/log/flumeSpool文件夹下添加一个新文件
出现错误,修改采集方案
再次启动flume测试

提示错误
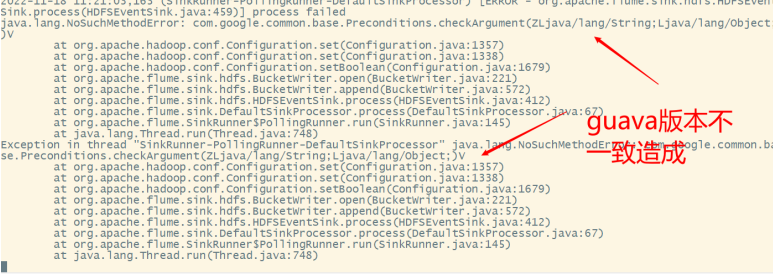

用hadoop的guava新版本替换flume的旧版本

再次启动flume,然后在/var/log/flumeSpool文件夹下添加一个新文件

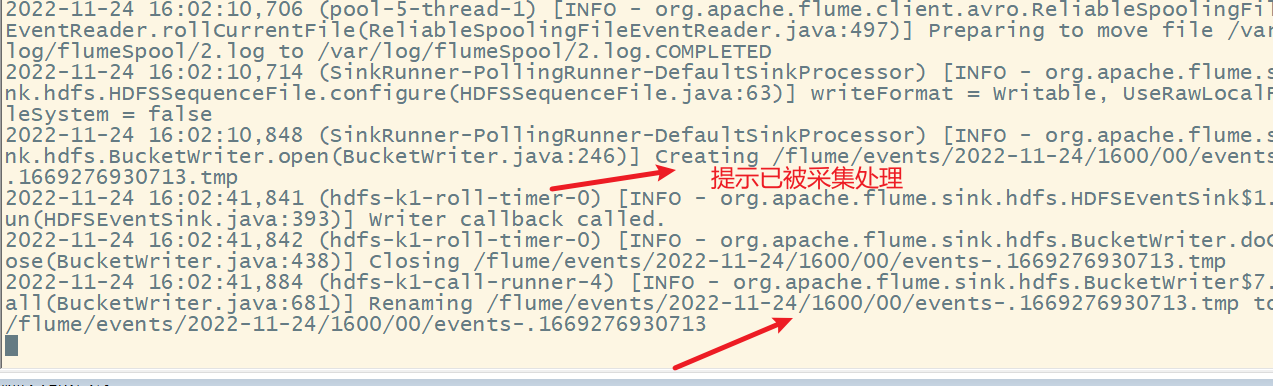
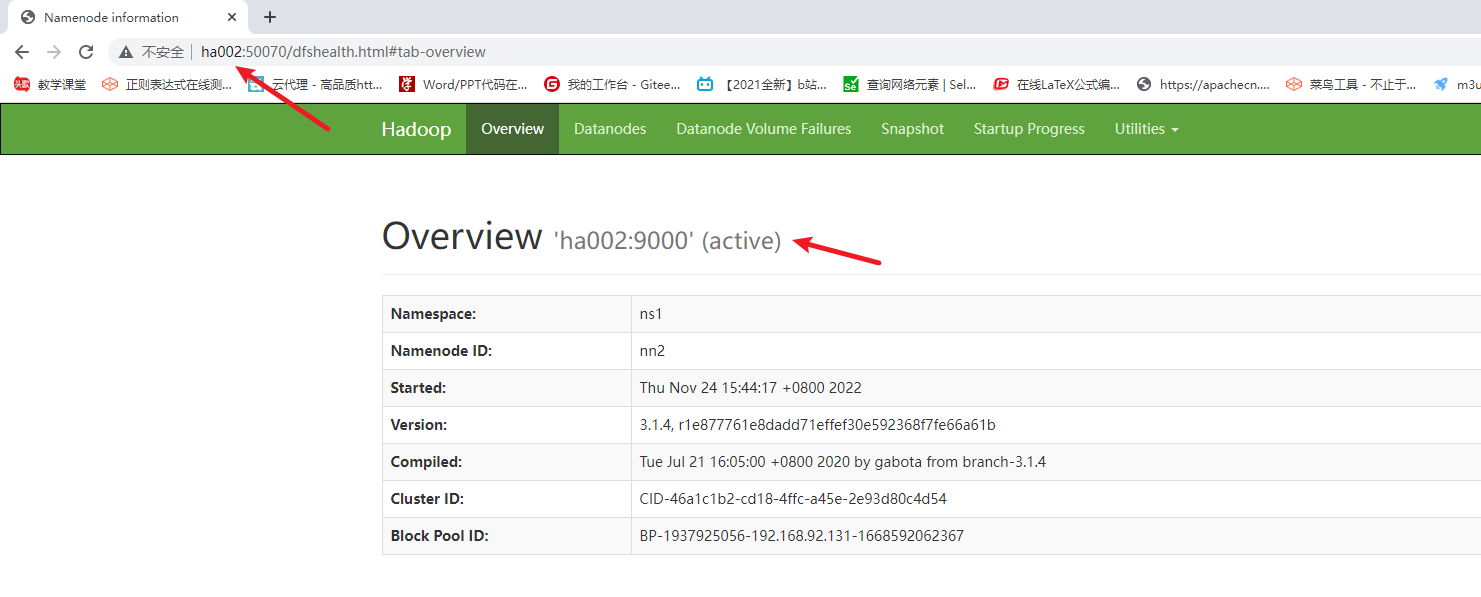
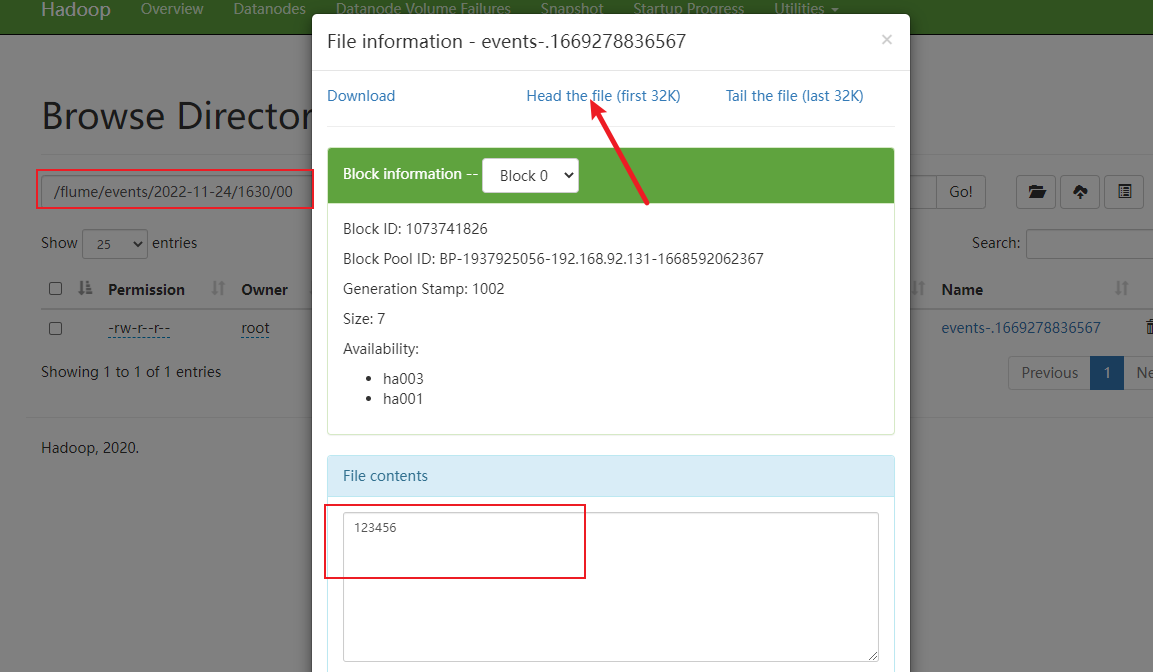
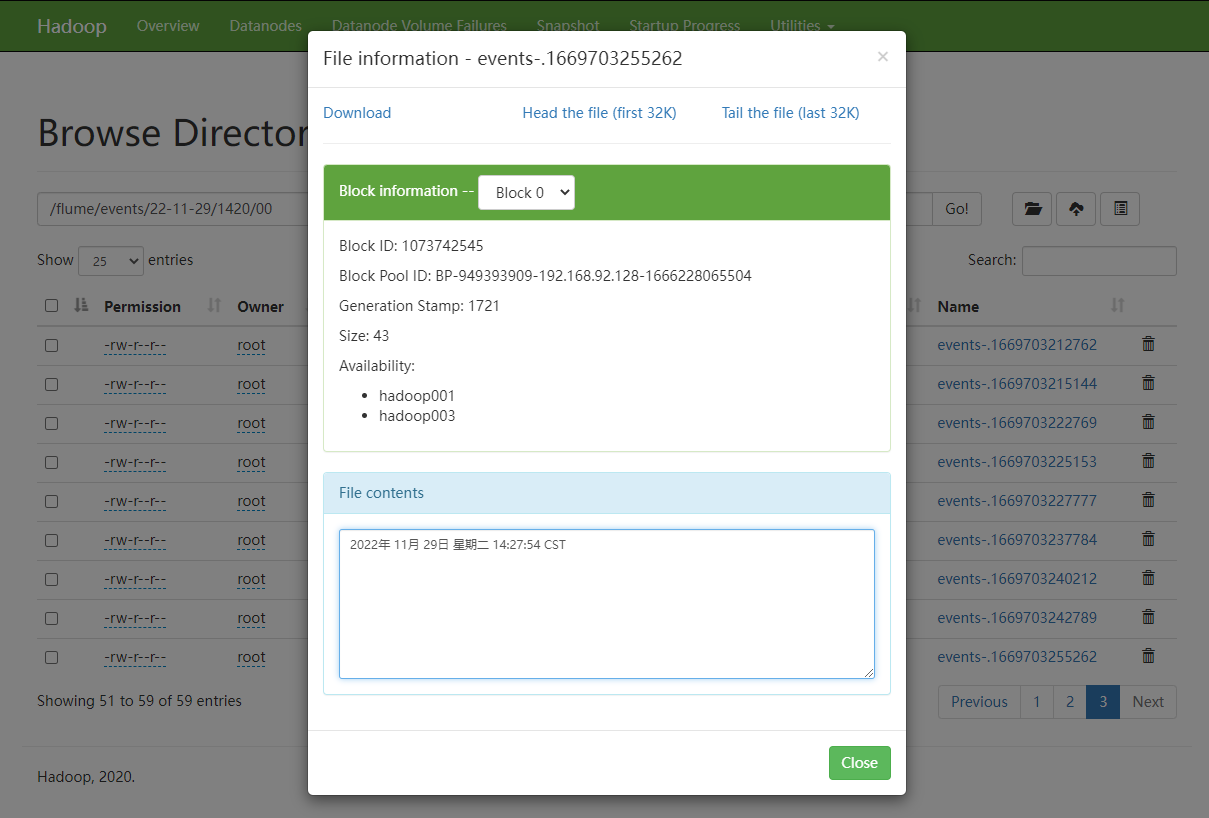
在hdfs集群上查看
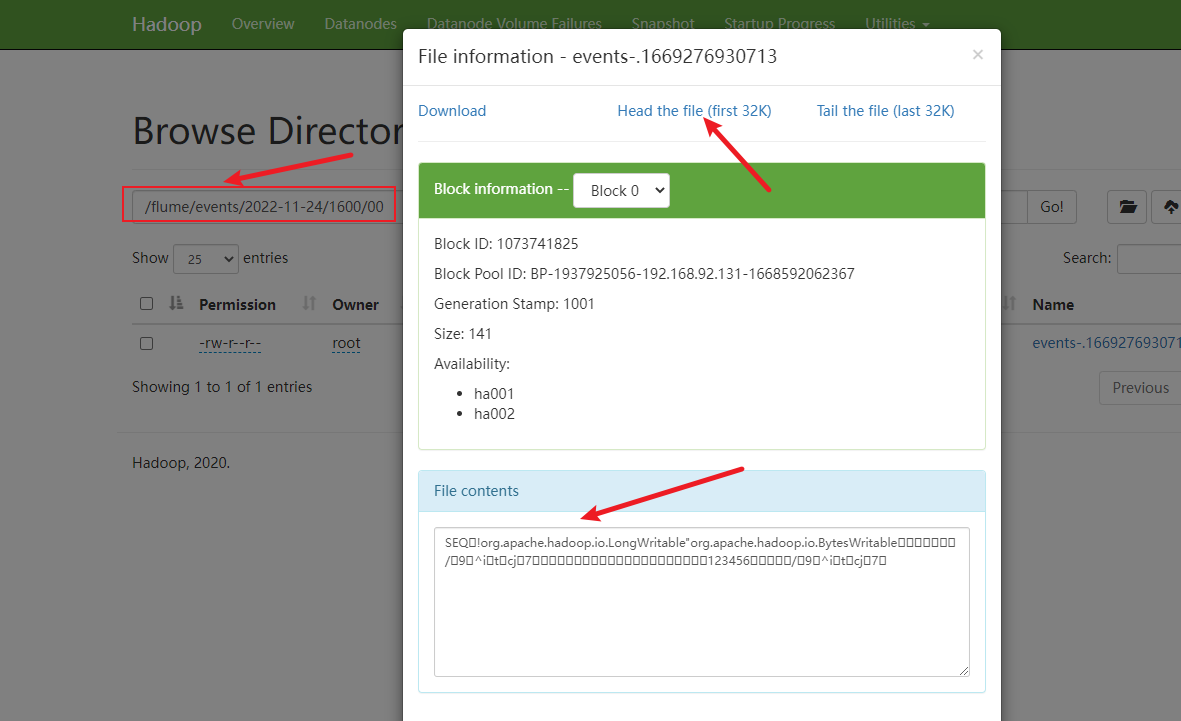
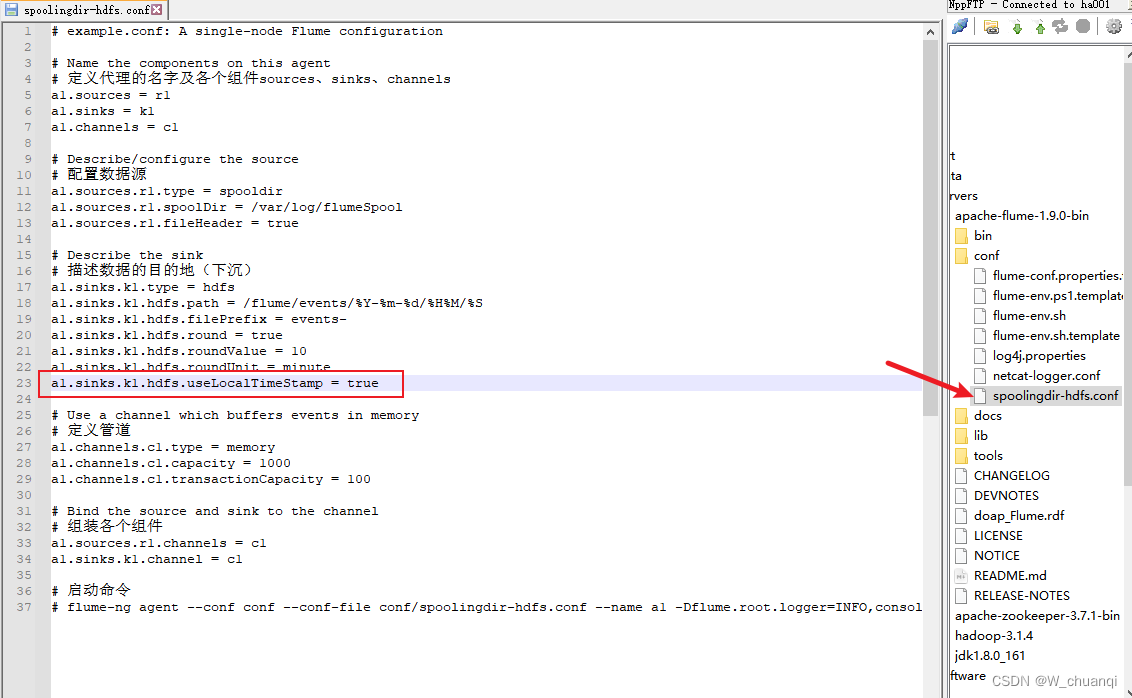
解决乱码,修改文件:
# example.conf: A single-node Flume configuration
# Name the components on this agent
# 定义代理的名字及各个组件sources、sinks、channels
a1.sources = r1
a1.sinks = k1
a1.channels = c1
# Describe/configure the source
# 配置数据源
a1.sources.r1.type = spooldir
a1.sources.r1.spoolDir = /var/log/flumeSpool
a1.sources.r1.fileHeader = true
# Describe the sink
# 描述数据的目的地(下沉)
a1.sinks.k1.type = hdfs
a1.sinks.k1.hdfs.path = /flume/events/%Y-%m-%d/%H%M/%S
a1.sinks.k1.hdfs.filePrefix = events-
a1.sinks.k1.hdfs.round = true
a1.sinks.k1.hdfs.roundValue = 10
a1.sinks.k1.hdfs.roundUnit = minute
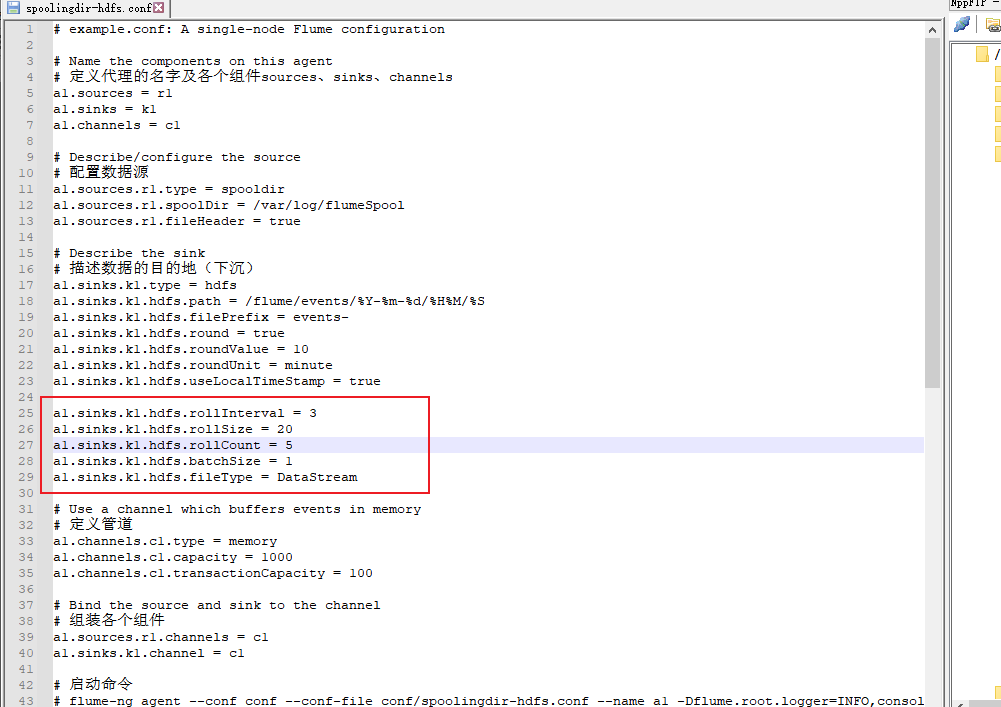
a1.sinks.k1.hdfs.useLocalTimeStamp = true
a1.sinks.k1.hdfs.rollInterval = 3
a1.sinks.k1.hdfs.rollSize = 20
a1.sinks.k1.hdfs.rollCount = 5
a1.sinks.k1.hdfs.batchSize = 1
a1.sinks.k1.hdfs.fileType = DataStream
# Use a channel which buffers events in memory
# 定义管道
a1.channels.c1.type = memory
a1.channels.c1.capacity = 1000
a1.channels.c1.transactionCapacity = 100
# Bind the source and sink to the channel
# 组装各个组件
a1.sources.r1.channels = c1
a1.sinks.k1.channel = c1
# 启动命令
# flume-ng agent --conf conf --conf-file conf/spoolingdir-hdfs.conf --name a1 -Dflume.root.logger=INFO,console
重新启动flume,在创建一个新的文件

这样结果就可以了。
六、Flume采集数据案例二——监控文件的变化
1.采集方案
数据源
数据下沉不要修改,采集配置方案如下:
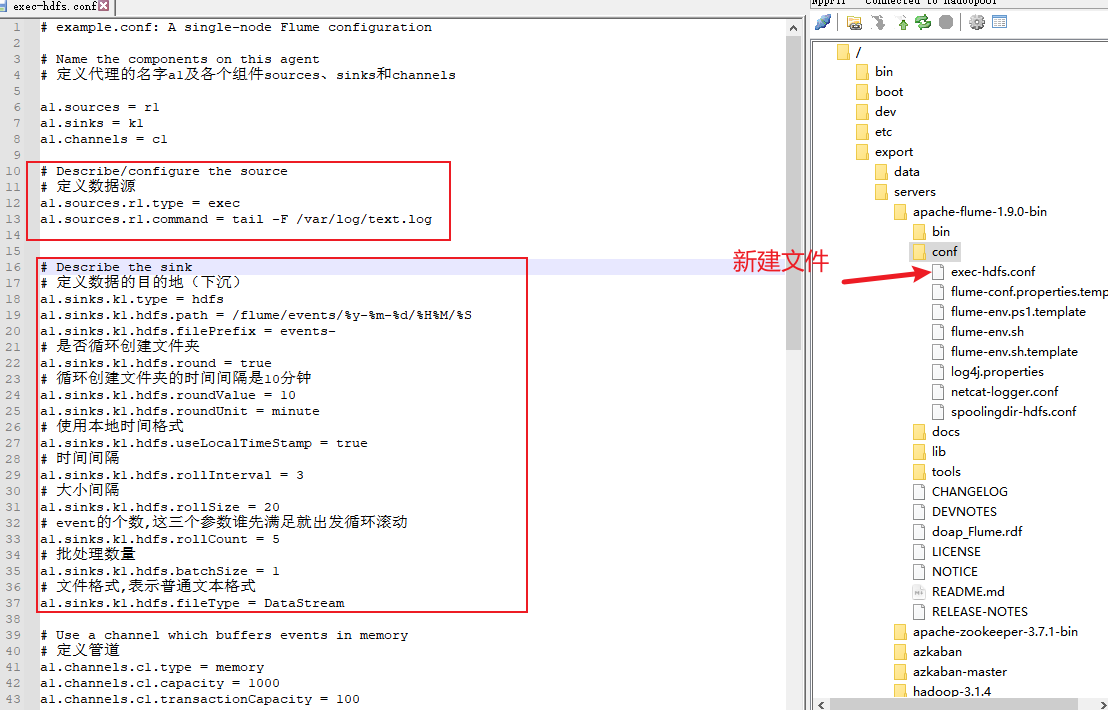
配置代码:
# example.conf: A single-node Flume configuration
# Name the components on this agent
# 定义代理的名字a1及各个组件sources、sinks和channels
a1.sources = r1
a1.sinks = k1
a1.channels = c1
# Describe/configure the source
# 定义数据源
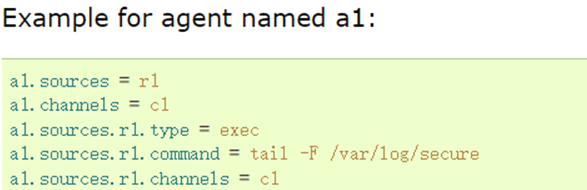
a1.sources.r1.type = exec
a1.sources.r1.command = tail -F /var/log/text.log
# Describe the sink
# 定义数据的目的地(下沉)
a1.sinks.k1.type = hdfs
a1.sinks.k1.hdfs.path = /flume/events/%y-%m-%d/%H%M/%S
a1.sinks.k1.hdfs.filePrefix = events-
# 是否循环创建文件夹
a1.sinks.k1.hdfs.round = true
# 循环创建文件夹的时间间隔是10分钟
a1.sinks.k1.hdfs.roundValue = 10
a1.sinks.k1.hdfs.roundUnit = minute
# 使用本地时间格式
a1.sinks.k1.hdfs.useLocalTimeStamp = true
# 时间间隔
a1.sinks.k1.hdfs.rollInterval = 3
# 大小间隔
a1.sinks.k1.hdfs.rollSize = 20
# event的个数,这三个参数谁先满足就出发循环滚动
a1.sinks.k1.hdfs.rollCount = 5
# 批处理数量
a1.sinks.k1.hdfs.batchSize = 1
# 文件格式,表示普通文本格式
a1.sinks.k1.hdfs.fileType = DataStream
# Use a channel which buffers events in memory
# 定义管道
a1.channels.c1.type = memory
a1.channels.c1.capacity = 1000
a1.channels.c1.transactionCapacity = 100
# Bind the source and sink to the channel
# 组装组件
a1.sources.r1.channels = c1
a1.sinks.k1.channel = c1
# 启动命令
# flume-ng agent --conf conf --conf-file conf/exec-hdfs.conf --name a1 -Dflume.root.logger=INFO,console
2. 测试采集功能
模拟场景
先写一个shell脚本,持续输出当前日期到监控文件/var/log/test.log中,模拟服务器日志的文件
while true;do date >> /var/log/text.log;done

3. 再克隆一个会话,查看新增的内容

4. 启动flume
flume-ng agent --conf conf --conf-file conf/exec-hdfs.conf --name a1 -Dflume.root.logger=INFO,console
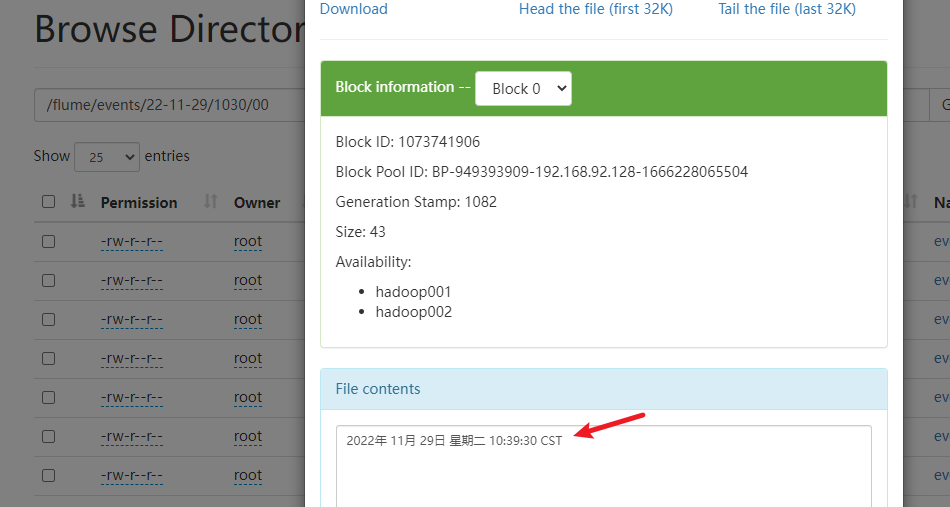
5. 查看HDFS上的结果
七、Flume的可靠性保证-负载均衡
1. 概念
配置的采集方案是通过唯一一个Sink作为接收器接收后续需要的数据,但会出现当前Sink故障或数据收集请求量较大的情况,这时单一Sink配置可能就无法保证Flume开发的可靠性。因此,Flume 提供Flume Sink Processors解决上述问题。
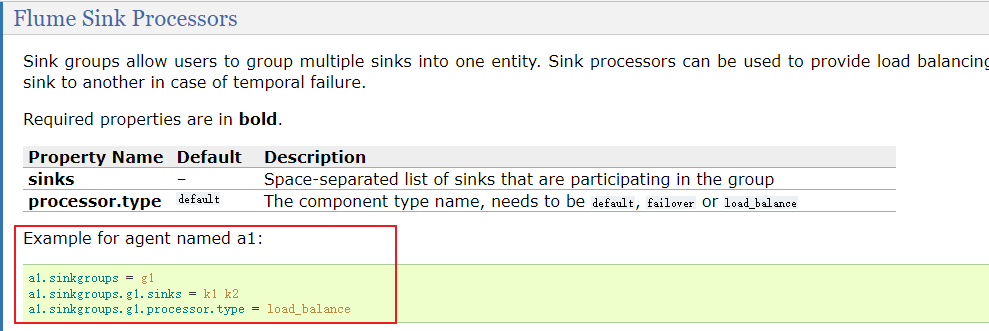
Sink处理器允许定义Sink groups,将多个sink分组到一个实体中,Sink处理器就可通过组内多个sink为服务提供负载均衡功能。
负载均衡接收器处理器(Load balancing sink processor)提供了在多个sink上进行负载均衡流量的功能,它维护一个活跃的sink索引列表,需在其上分配负载,还支持round_robin(轮询)和random(随机)选择机制进行流量分配,默认选择机制为round_robin。Load balancing sink processor提供的配置属性如下所示。
| 属性名称 | 默认值 | 相关说明 |
|---|---|---|
| sinks | – | 以空格分隔的参与sink组的sink列表 |
| processor.type | default | 组件类型名需必须是load_balance |
| processor.backoff | false | 设置失败的sink进入黑名单 |
| processor.selector | round_robin | 选择机制 |
| processor.selector.maxTimeOut | 30000 | 失败sink放置在黑名单的超时时间 |
2. 搭建并配置flume集群
三台服务器的flume集群:hadoop01、hadoop02、hadoop03
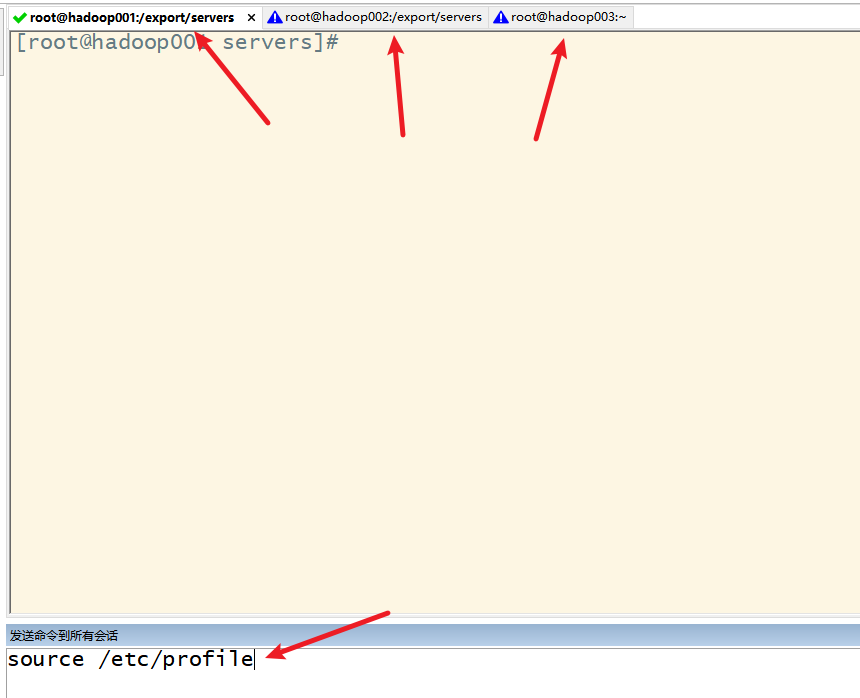
1) 分发hadoop01上的flume文件到hadoop02和hadoop03上


2) 分发环境变量配置文件

3) 使环境变量起作用
3. 配置采集方案
两级配置方案
查看官方文档的示例
1) 在hadoop001上配置第一级采集方案
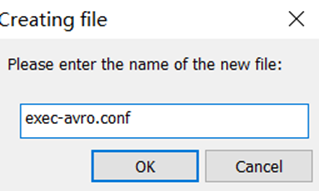
在conf下编写采集方案exec-avro.conf
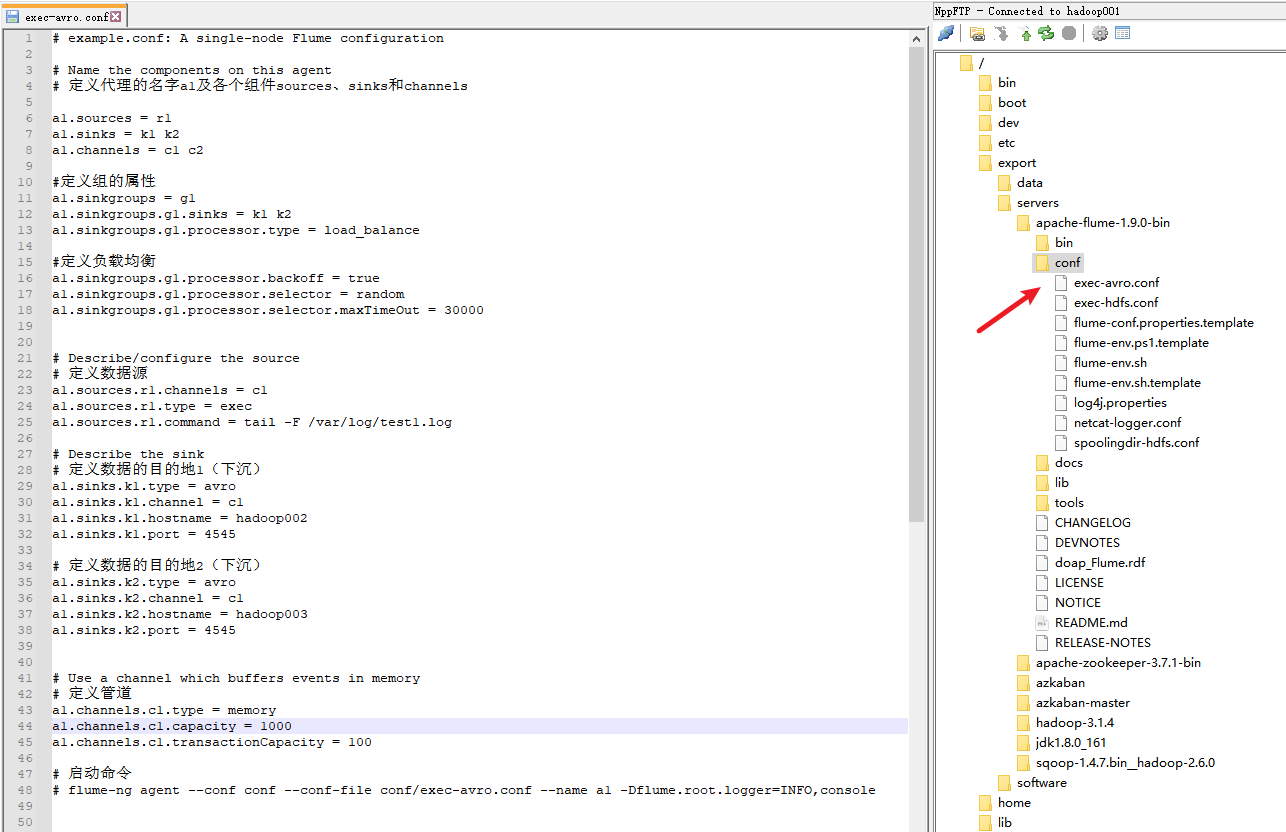
代码如下:
# example.conf: A single-node Flume configuration
# Name the components on this agent
# 定义代理的名字a1及各个组件sources、sinks和channels
a1.sources = r1
a1.sinks = k1 k2
a1.channels = c1 c2
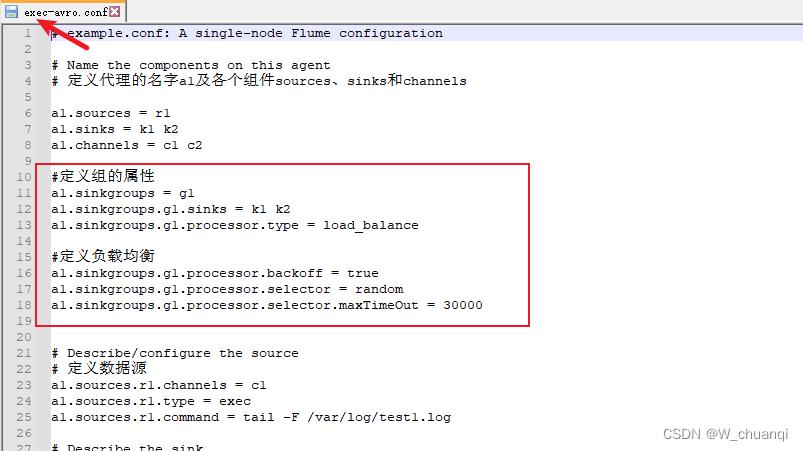
#定义组的属性
a1.sinkgroups = g1
a1.sinkgroups.g1.sinks = k1 k2
a1.sinkgroups.g1.processor.type = load_balance
#定义负载均衡
a1.sinkgroups.g1.processor.backoff = true
a1.sinkgroups.g1.processor.selector = random
a1.sinkgroups.g1.processor.selector.maxTimeOut = 30000
# Describe/configure the source
# 定义数据源
a1.sources.r1.channels = c1
a1.sources.r1.type = exec
a1.sources.r1.command = tail -F /var/log/test1.log
# Describe the sink
# 定义数据的目的地1(下沉)
a1.sinks.k1.type = avro
a1.sinks.k1.channel = c1
a1.sinks.k1.hostname = hadoop002
a1.sinks.k1.port = 4545
# 定义数据的目的地2(下沉)
a1.sinks.k2.type = avro
a1.sinks.k2.channel = c1
a1.sinks.k2.hostname = hadoop003
a1.sinks.k2.port = 4545
# Use a channel which buffers events in memory
# 定义管道
a1.channels.c1.type = memory
a1.channels.c1.capacity = 1000
a1.channels.c1.transactionCapacity = 100
# 启动命令
# flume-ng agent --conf conf --conf-file conf/exec-avro.conf --name a1 -Dflume.root.logger=INFO,console
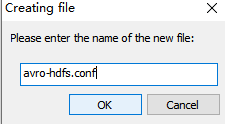
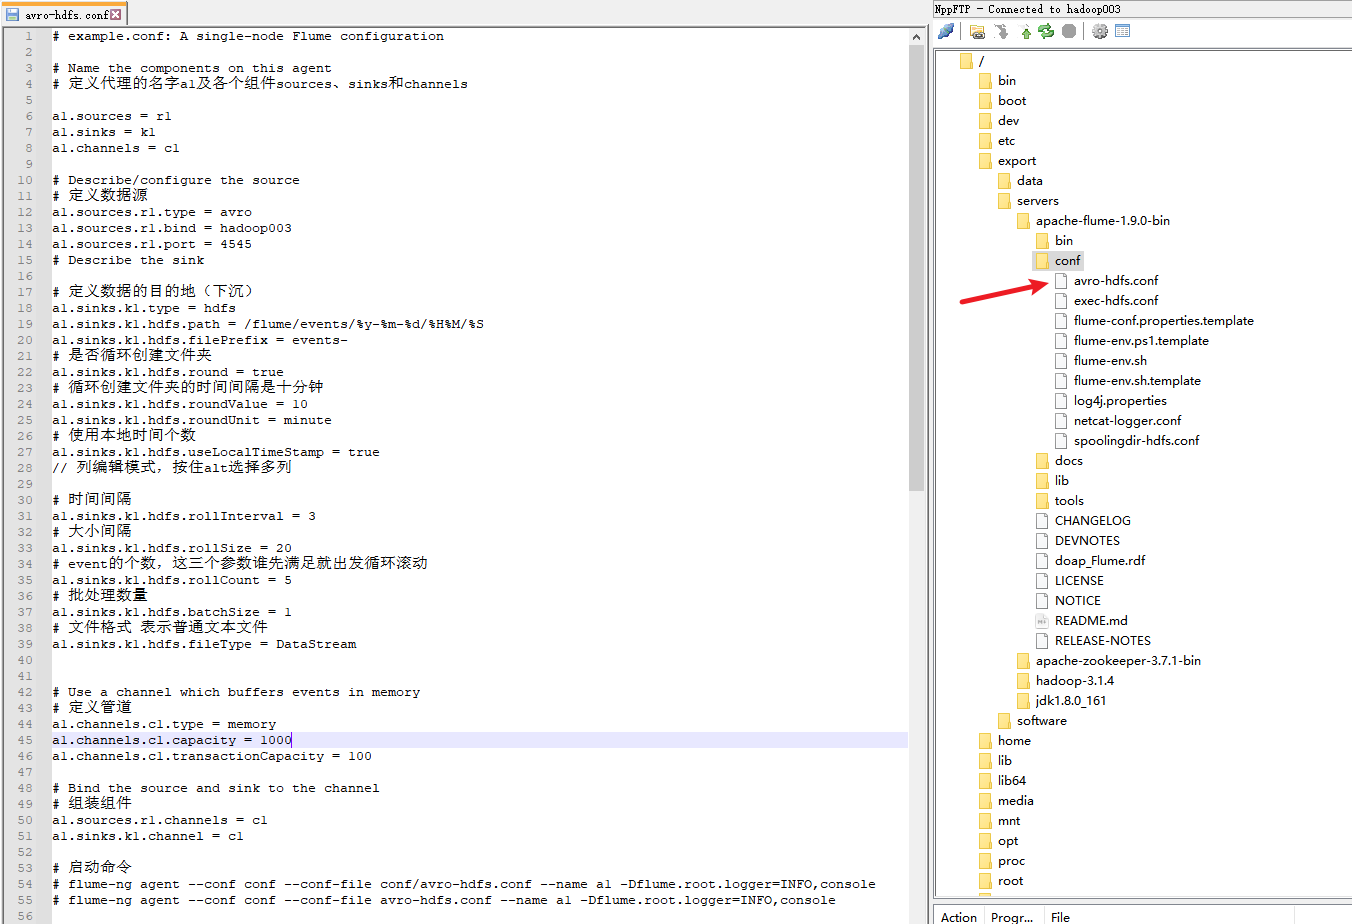
2)在hadoop002和hadoop003上配置第二级采集方案
hadoop002
# example.conf: A single-node Flume configuration

# Name the components on this agent
# 定义代理的名字a1及各个组件sources、sinks和channels

a1.sources = r1
a1.sinks = k1
a1.channels = c1

# Describe/configure the source
# 定义数据源
a1.sources.r1.type = avro
a1.sources.r1.bind = hadoop002
a1.sources.r1.port = 4545
# Describe the sink

# 定义数据的目的地(下沉)
a1.sinks.k1.type = hdfs
a1.sinks.k1.hdfs.path = /flume/events/%y-%m-%d/%H%M/%S
a1.sinks.k1.hdfs.filePrefix = events-
# 是否循环创建文件夹
a1.sinks.k1.hdfs.round = true
# 循环创建文件夹的时间间隔是十分钟
a1.sinks.k1.hdfs.roundValue = 10
a1.sinks.k1.hdfs.roundUnit = minute
# 使用本地时间个数
a1.sinks.k1.hdfs.useLocalTimeStamp = true
// 列编辑模式,按住alt选择多列

# 时间间隔
a1.sinks.k1.hdfs.rollInterval = 3
# 大小间隔
a1.sinks.k1.hdfs.rollSize = 20
# event的个数,这三个参数谁先满足就出发循环滚动
a1.sinks.k1.hdfs.rollCount = 5
# 批处理数量
a1.sinks.k1.hdfs.batchSize = 1
# 文件格式 表示普通文本文件
a1.sinks.k1.hdfs.fileType = DataStream


# Use a channel which buffers events in memory
# 定义管道
a1.channels.c1.type = memory
a1.channels.c1.capacity = 1000
a1.channels.c1.transactionCapacity = 100

# Bind the source and sink to the channel
# 组装组件
a1.sources.r1.channels = c1
a1.sinks.k1.channel = c1

# 启动命令
# flume-ng agent --conf conf --conf-file conf/avro-hdfs.conf --name a1 -Dflume.root.logger=INFO,console
# flume-ng agent --conf conf --conf-file avro-hdfs.conf --name a1 -Dflume.root.logger=INFO,console
hadoop003
# example.conf: A single-node Flume configuration

# Name the components on this agent
# 定义代理的名字a1及各个组件sources、sinks和channels

a1.sources = r1
a1.sinks = k1
a1.channels = c1

# Describe/configure the source
# 定义数据源
a1.sources.r1.type = avro
a1.sources.r1.bind = hadoop003
a1.sources.r1.port = 4545
# Describe the sink

# 定义数据的目的地(下沉)
a1.sinks.k1.type = hdfs
a1.sinks.k1.hdfs.path = /flume/events/%y-%m-%d/%H%M/%S
a1.sinks.k1.hdfs.filePrefix = events-
# 是否循环创建文件夹
a1.sinks.k1.hdfs.round = true
# 循环创建文件夹的时间间隔是十分钟
a1.sinks.k1.hdfs.roundValue = 10
a1.sinks.k1.hdfs.roundUnit = minute
# 使用本地时间个数
a1.sinks.k1.hdfs.useLocalTimeStamp = true
// 列编辑模式,按住alt选择多列

# 时间间隔
a1.sinks.k1.hdfs.rollInterval = 3
# 大小间隔
a1.sinks.k1.hdfs.rollSize = 20
# event的个数,这三个参数谁先满足就出发循环滚动
a1.sinks.k1.hdfs.rollCount = 5
# 批处理数量
a1.sinks.k1.hdfs.batchSize = 1
# 文件格式 表示普通文本文件
a1.sinks.k1.hdfs.fileType = DataStream


# Use a channel which buffers events in memory
# 定义管道
a1.channels.c1.type = memory
a1.channels.c1.capacity = 1000
a1.channels.c1.transactionCapacity = 100

# Bind the source and sink to the channel
# 组装组件
a1.sources.r1.channels = c1
a1.sinks.k1.channel = c1

# 启动命令
# flume-ng agent --conf conf --conf-file conf/avro-hdfs.conf --name a1 -Dflume.root.logger=INFO,console
# flume-ng agent --conf conf --conf-file avro-hdfs.conf --name a1 -Dflume.root.logger=INFO,console
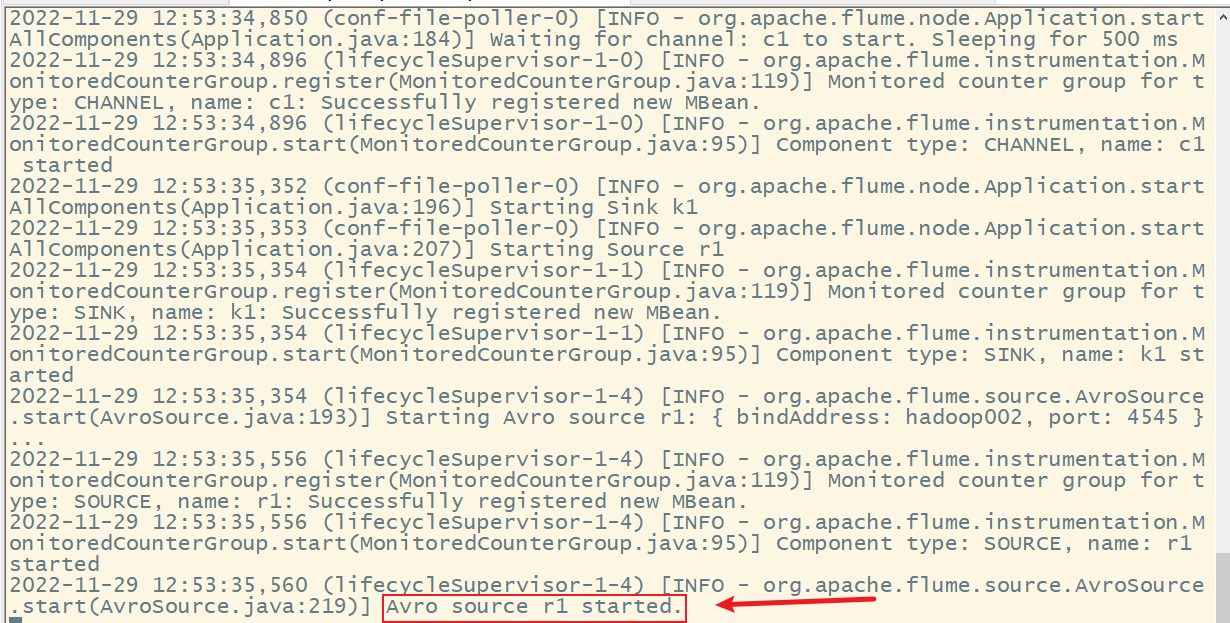
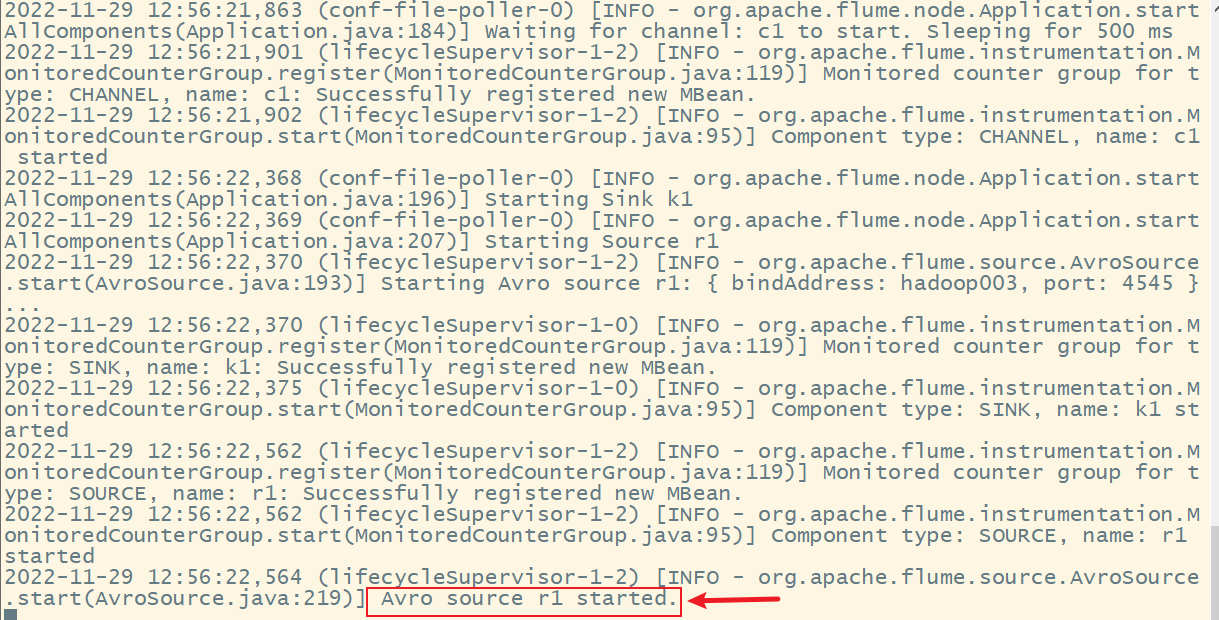
4. 启动flume
1) 在hadoop002和hadoop003上flume
从最后一级开始启动flume
hadoop002

hadoop003

2) 在hadoop001上启动flume

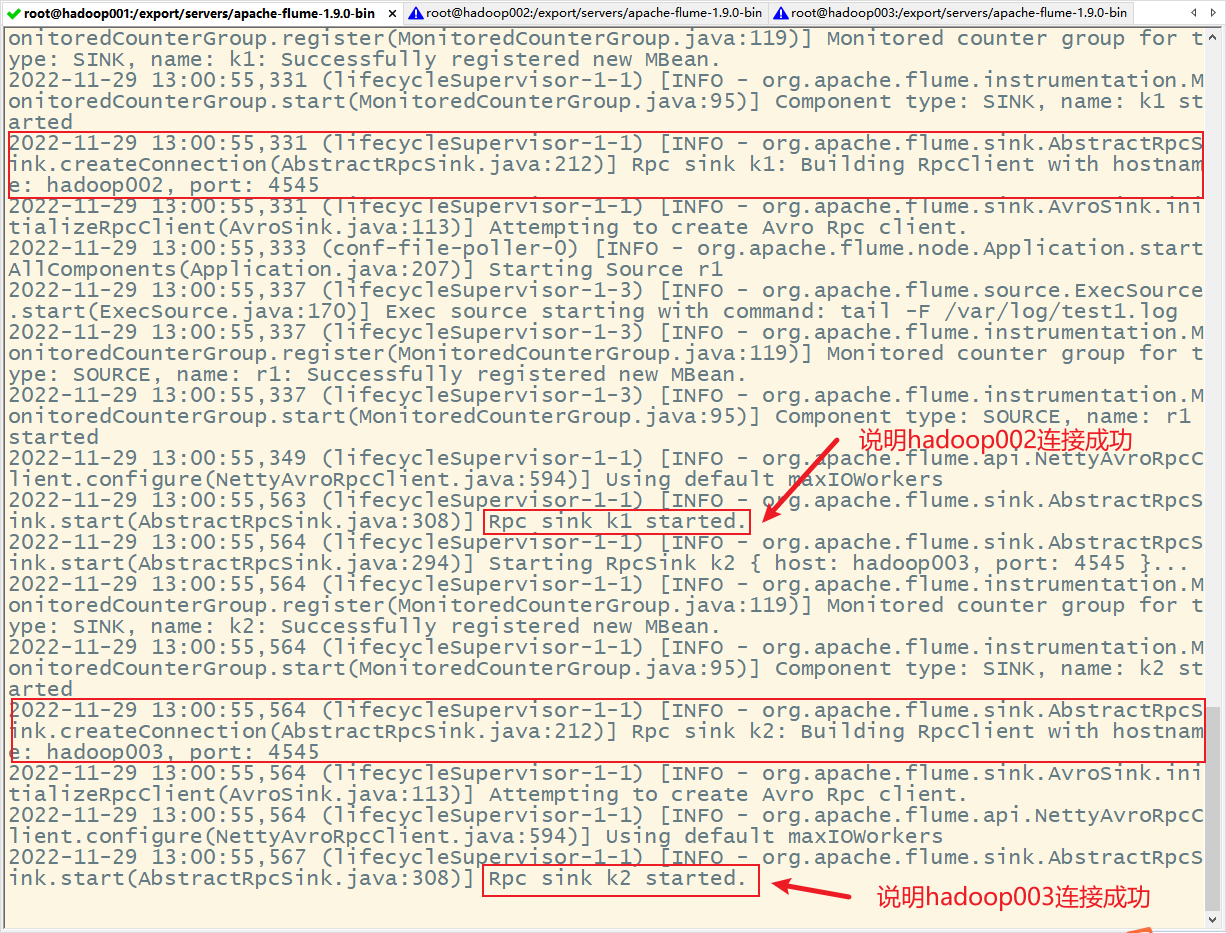
同时在hadoop002和hadoop003上也提示连接成功


5. 负载均衡的测试
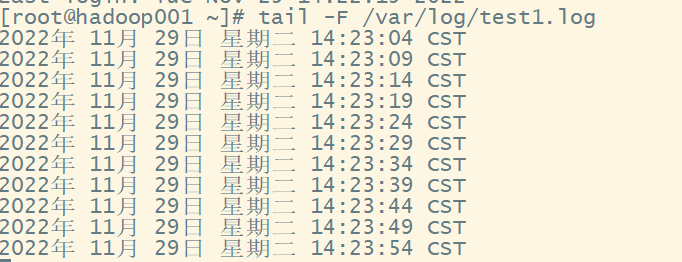
1) 克隆hadoop001的会话,编写脚本并运行
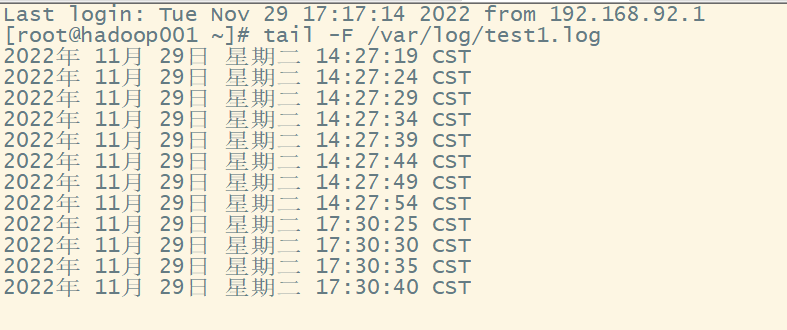
while true;do date >> /var/log/test1.log;sleep 5;done

2) 克隆hadoop001的会话,查看文件变化
tail -F /var/log/test1.log
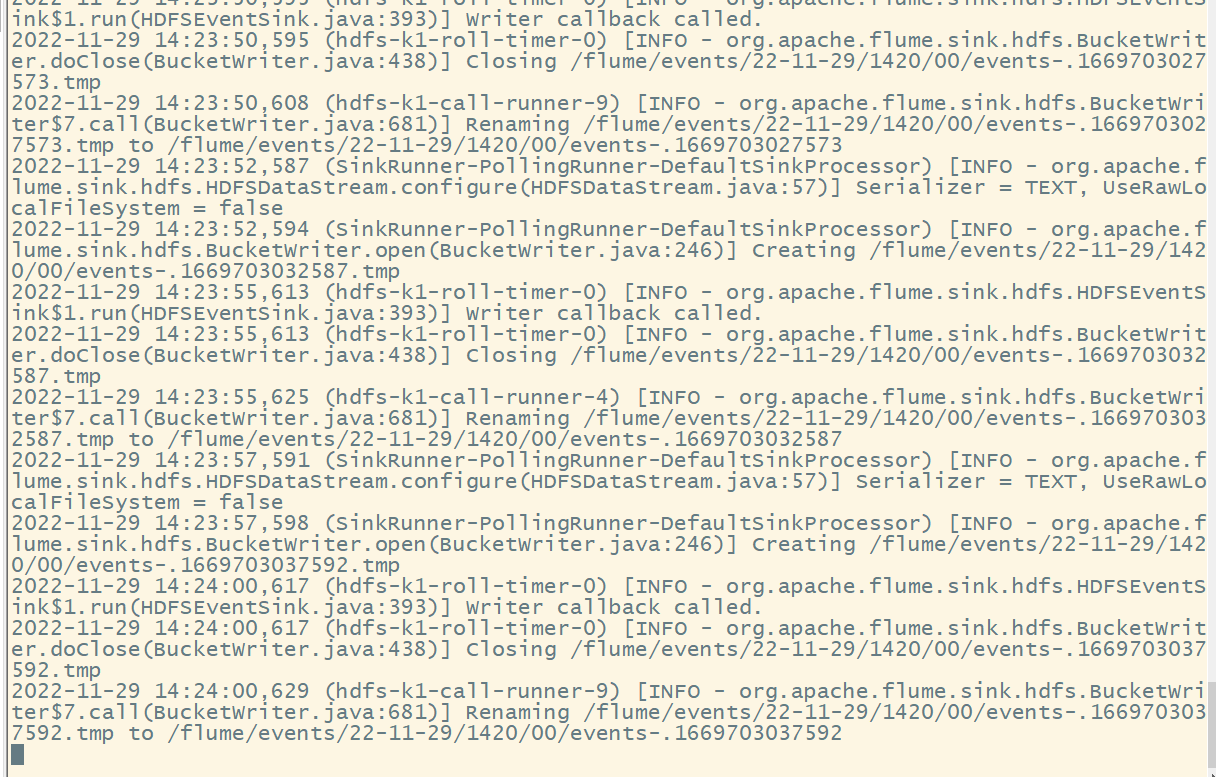
6. 查看结果
1)hadoop002
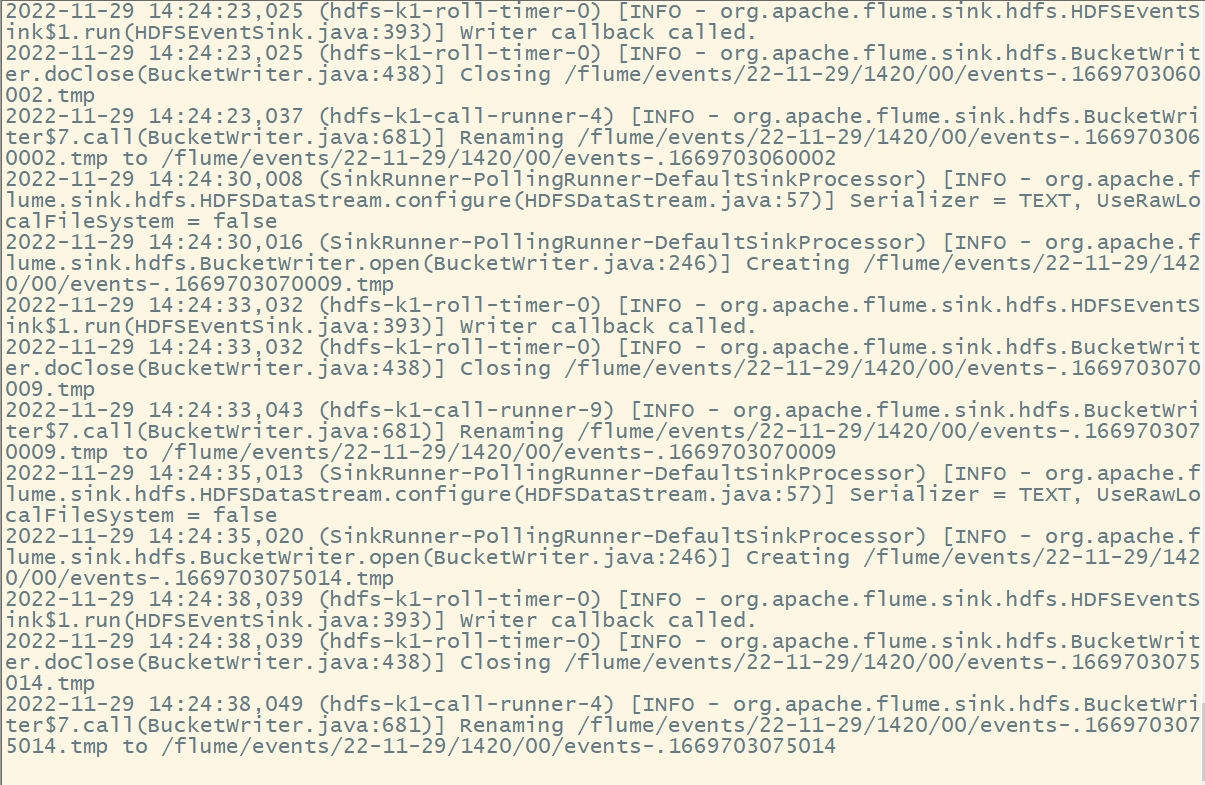
2)hadoop003
3) 在hadoop集群上
八、Flume的可靠性保证-故障恢复
1. 概念
故障转移接收器处理器(Failover Sink Processor)维护一个具有优先级的sink列表,保证在处理event时,只需有一个可用的sink即可。
故障转移机制工作原理是将故障的sink降级到故障池中,在池中为它们分配一个冷却期,在重试之前冷却时间会增加,当sink成功发送event后,它将恢复到活跃池中。Failover Sink Processor提供的配置属性如下所示。
| 属性名称 | 默认值 | 相关说明 |
|---|---|---|
| sinks | – | 以空格分隔的参与sink组的sink列表 |
| processor.type | default | 组件类型名需必须是failover |
| processor.priority. | – | 设置sink的优先级取值 |
| processor.maxpenalty | 30000 | 失败sink的最大退避时间 |

2. 配置采集方案
只需要改动第一级采集方案部分内容
改为故障恢复:
代码如下:
# example.conf: A single-node Flume configuration
# Name the components on this agent
# 定义代理的名字a1及各个组件sources、sinks和channels
a1.sources = r1
a1.sinks = k1 k2
a1.channels = c1 c2
#定义组的属性
a1.sinkgroups = g1
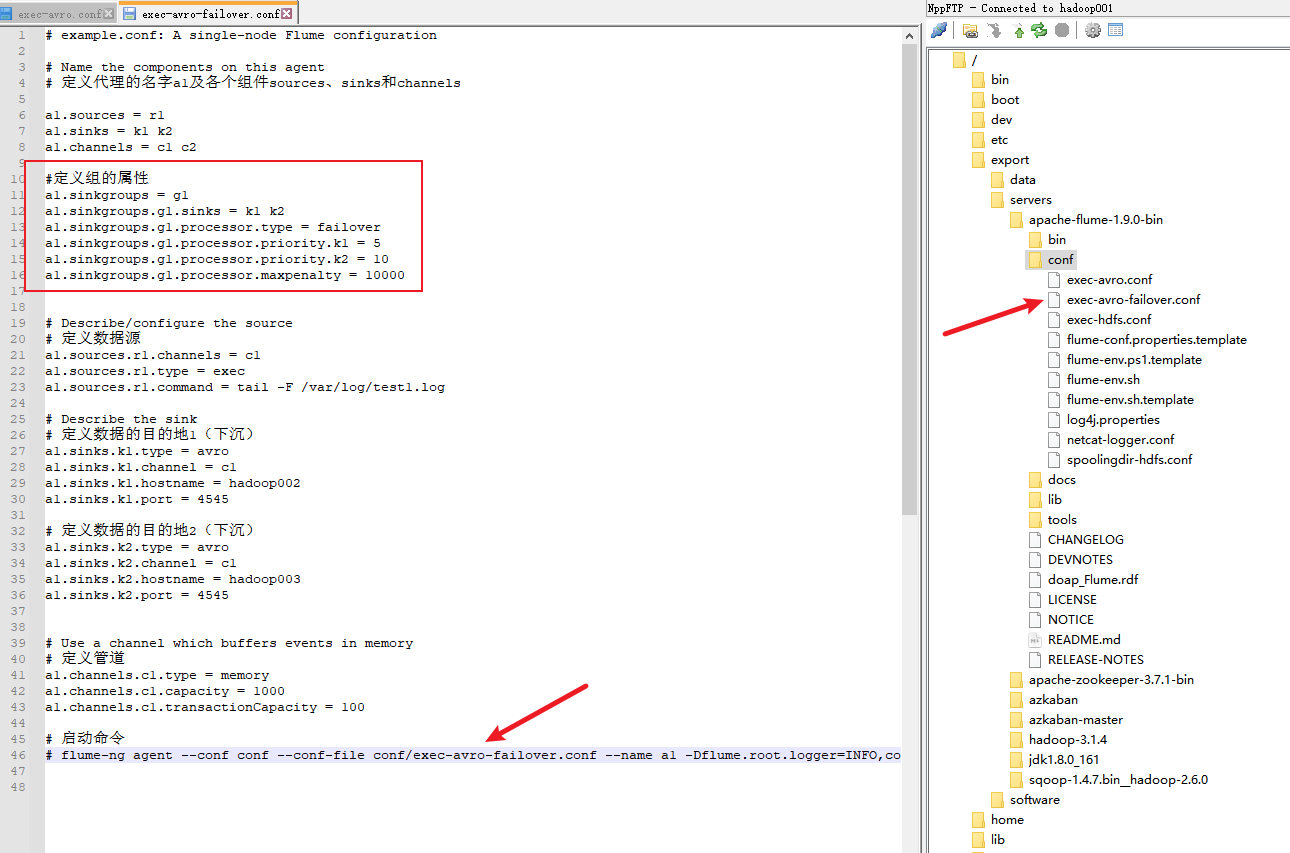
a1.sinkgroups.g1.sinks = k1 k2
a1.sinkgroups.g1.processor.type = failover
a1.sinkgroups.g1.processor.priority.k1 = 5
a1.sinkgroups.g1.processor.priority.k2 = 10
a1.sinkgroups.g1.processor.maxpenalty = 10000
# Describe/configure the source
# 定义数据源
a1.sources.r1.channels = c1
a1.sources.r1.type = exec
a1.sources.r1.command = tail -F /var/log/test1.log
# Describe the sink
# 定义数据的目的地1(下沉)
a1.sinks.k1.type = avro
a1.sinks.k1.channel = c1
a1.sinks.k1.hostname = hadoop002
a1.sinks.k1.port = 4545
# 定义数据的目的地2(下沉)
a1.sinks.k2.type = avro
a1.sinks.k2.channel = c1
a1.sinks.k2.hostname = hadoop003
a1.sinks.k2.port = 4545
# Use a channel which buffers events in memory
# 定义管道
a1.channels.c1.type = memory
a1.channels.c1.capacity = 1000
a1.channels.c1.transactionCapacity = 100
# 启动命令
# flume-ng agent --conf conf --conf-file conf/exec-avro-failover.conf --name a1 -Dflume.root.logger=INFO,console
注意:启动命令也要做对应的修改。
第二级采集方案不用修改。
3. 启动flume
从最后一级开始启动flume。
启动hadoop002和hadoop003:


由于hadoop003的优先级比hadoop002高,所以hadoop003先工作,hadoop002处于待机状态。
启动hadoop001

4. 启动测试脚本
克隆hadoop001的会话,运行测试脚本。
while true;do date >> /var/log/test1.log;sleep 5;done

5. 故障恢复
把hadoop03的flume关闭,等待十秒钟(超时时间,在采集方案中进行的定义)
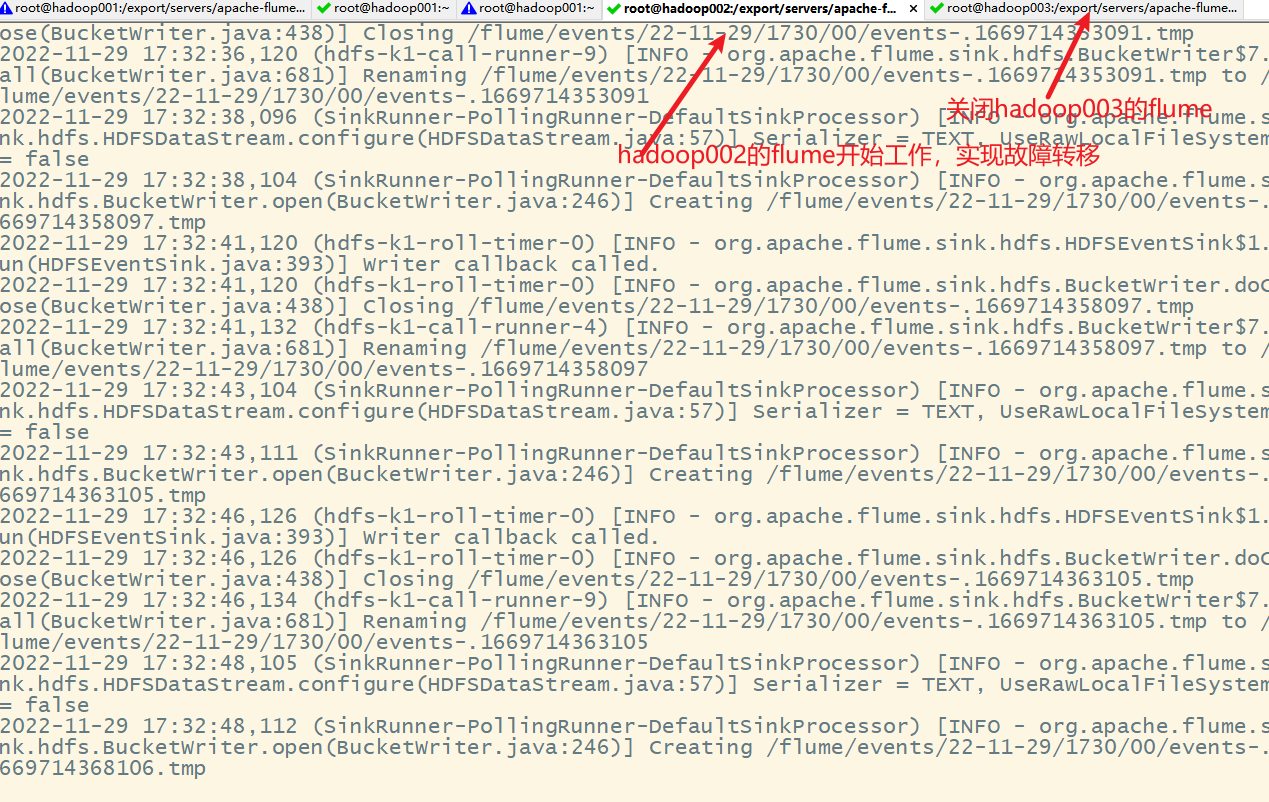
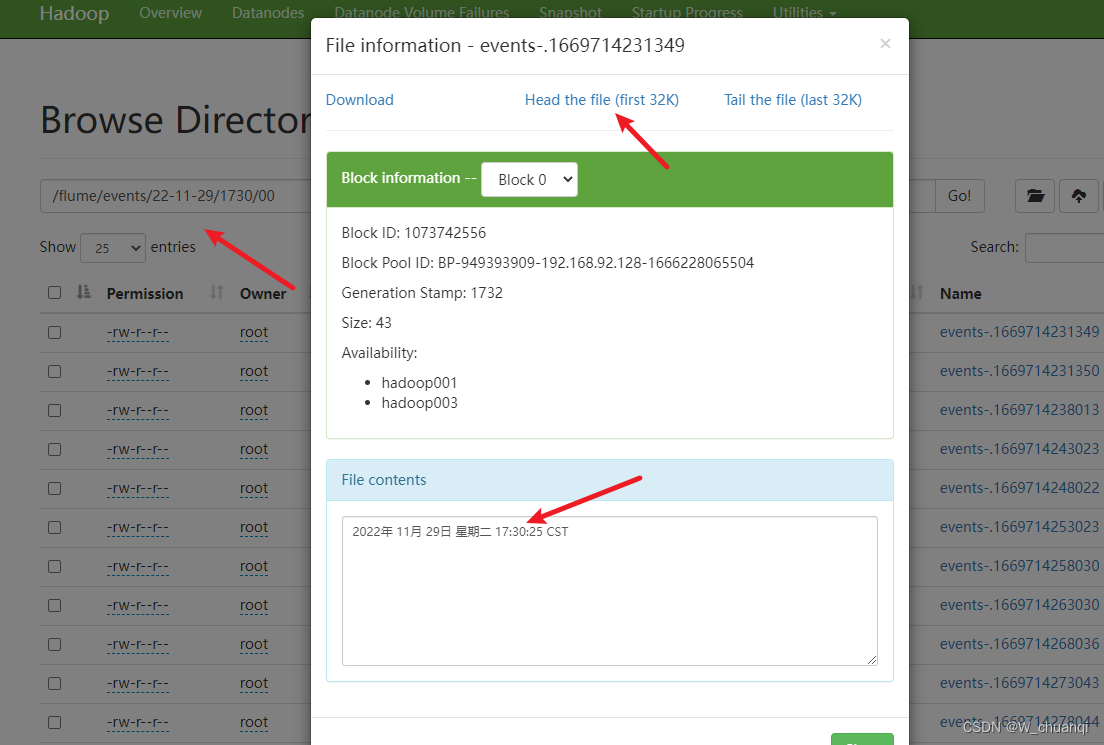
查看hadoop集群
九、Flume拦截器
1. 概念
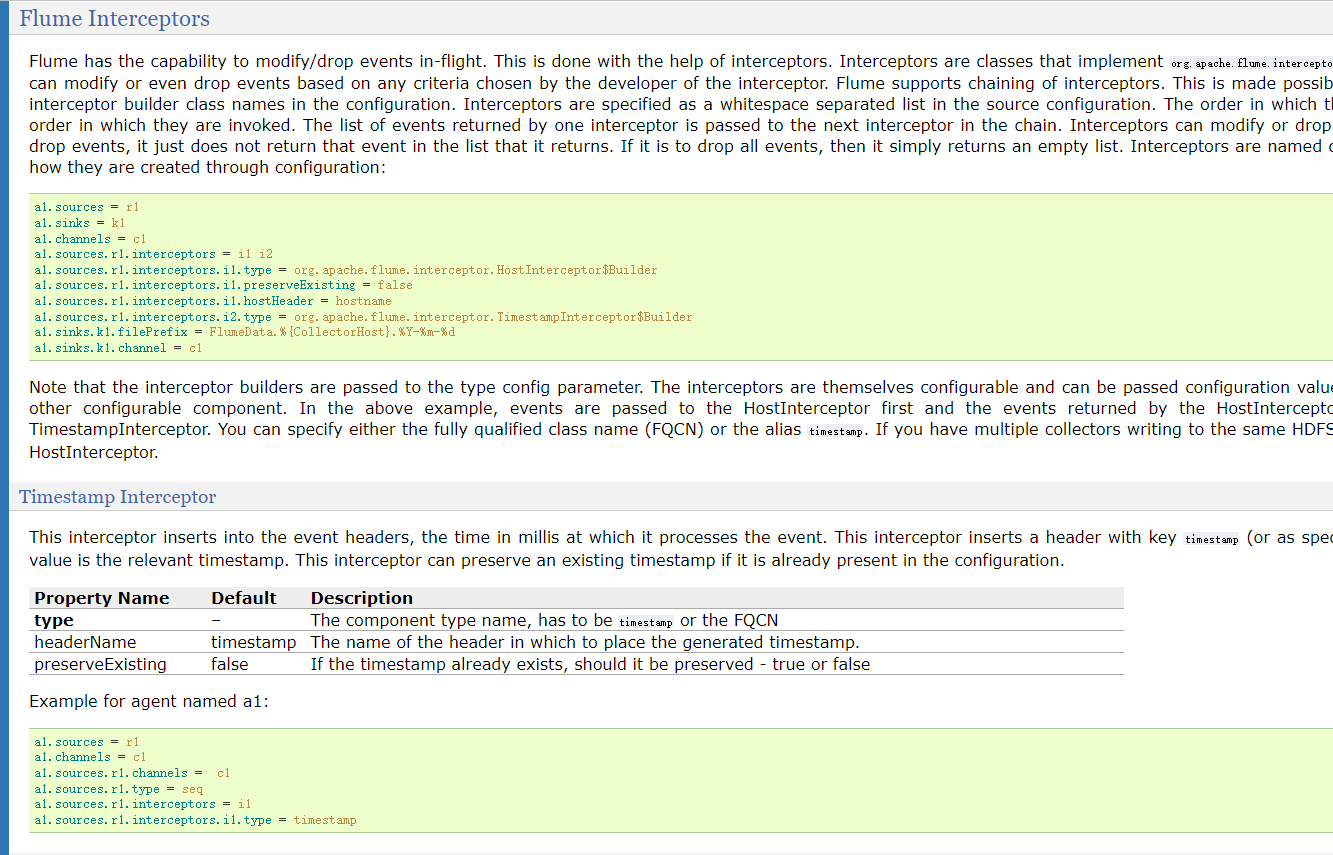
Flume Interceptors(拦截器)用于对Flume系统数据流中event的修改操作。使用Flume拦截器时,只需参考官方配置属性在采集方案中选择性的配置即可,当涉及到配置多个拦截器时,拦截器名称间需用空格分隔,且拦截器配置顺序就是拦截顺序。Flume 1.8.0版本中,Flume提供并支持的拦截器有很多,具体如下所示。
| Timestamp Interceptor | Host Interceptor | Static Interceptor |
|---|---|---|
| Remove Header Interceptor | UUID Interceptor | Morphline Interceptor |
| Search and Replace Interceptor | Regex Filtering Interceptor | Regex Extractor Interceptor |
1) Timestamp Interceptor
Timestamp Interceptor(时间戳拦截器)将流程执行时间插入到event的header头部,此拦截器插入带有timestamp键的标头,其值为对应时间戳。若配置中已存在时间戳时,此拦截器可保留现有时间戳,Timestamp Interceptor提供的常用配置属性如下所示。
| 属性名称 | 默认值 | 相关说明 |
|---|---|---|
| type | – | 组件类型名需必须是timestamp |
| header | timestamp | 用于放置生成的时间戳的标头的名称 |
| preserveExisting | false | 如果时间戳已存在,是否应保留, true或false |
2) Static Interceptor
Static Interceptor(静态拦截器)允许用户将具有静态值的静态头附加到所有event。当前不支持一次指定多个header头,但是用户可定义多个Static Interceptor来为每一个拦截器都追加一个header,Static Interceptor提供的常用配置属性如下所示。
| 属性名称 | 默认值 | 相关说明 |
|---|---|---|
| type | – | 组件类型名需必须是static |
| preserveExisting | true | 如果配置的header已存在,是否应保留 |
| key | key | 应创建的header的名称 |
| value | value | 应创建的header对应的静态值 |
2. 场景
在实际开发的应用场景中,两台服务器A、B在实时产生日志数据,日志类型主要为access.log、nginx.log和web.log。现需要将A、B两台服务器产生的日志数据access.log、nginx.log和web.log采集汇总到服务器C上,并统一收集并上传到HDFS文件系统进行保存。在HDFS中保存日志数据的文件必须按照以下要求进行归类统计(20180723表示收集日志数据的当前日期):
- /source/logs/access/20180723/**
- /source/logs/nginx/20180723/**
- /source/logs/web/20180723/**
3. 日志数据采集流程图

根据案例需求启动3台服务器,同时搭建Flume系统和Hadoop集群。此案例将hadoop002和hadoop003分别作为A服务器和B服务器进行第一阶段的日志数据采集,将hadoop001作为C服务器进行日志数据汇总并上传至HDFS。
4. hadoop002和hadoop003的配置文件
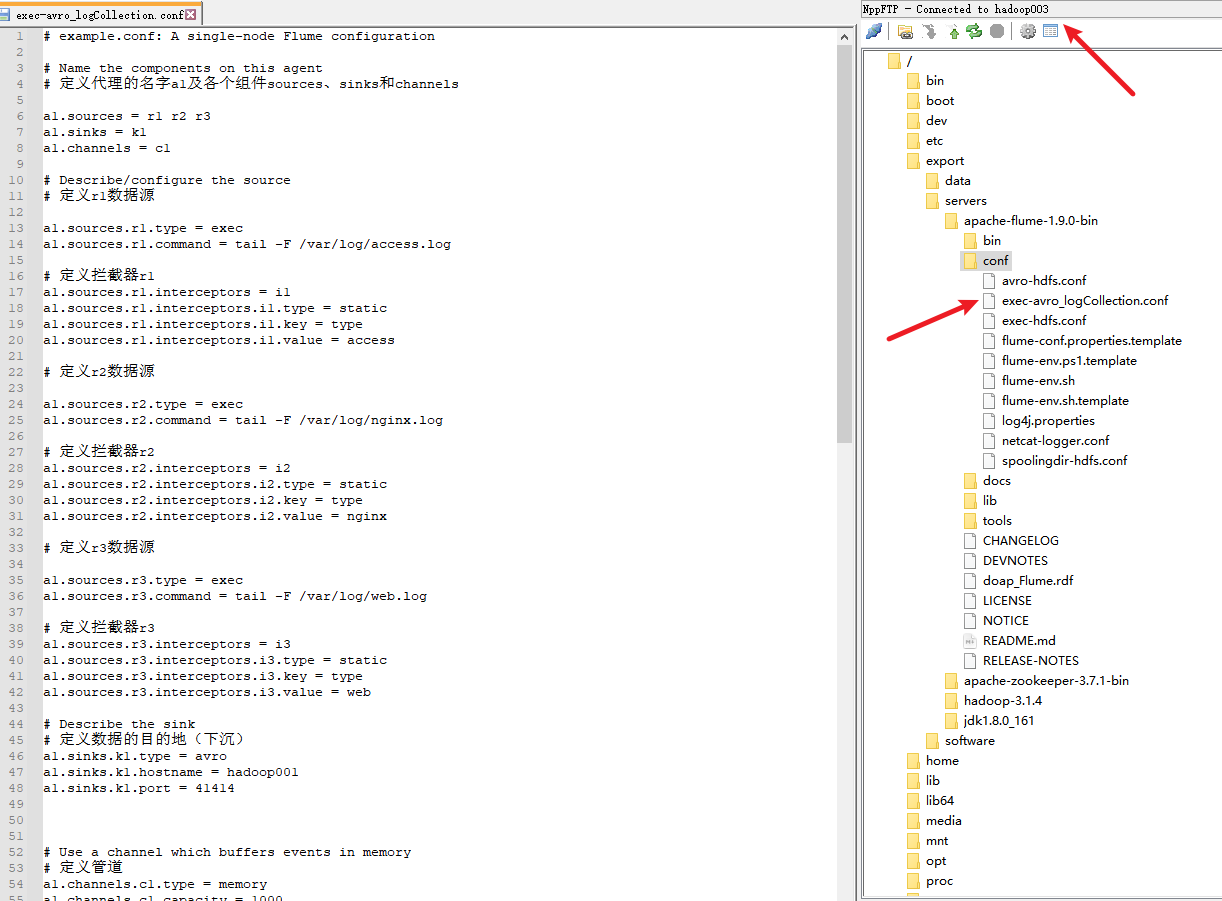
在hadoop002和hadoop003的conf目录下编写相同日志采集方案exec-avro_logCollection.conf。
# example.conf: A single-node Flume configuration

# Name the components on this agent
# 定义代理的名字a1及各个组件sources、sinks和channels

a1.sources = r1 r2 r3
a1.sinks = k1
a1.channels = c1

# Describe/configure the source
# 定义r1数据源

a1.sources.r1.type = exec
a1.sources.r1.command = tail -F /var/log/access.log

# 定义拦截器r1
a1.sources.r1.interceptors = i1
a1.sources.r1.interceptors.i1.type = static
a1.sources.r1.interceptors.i1.key = type
a1.sources.r1.interceptors.i1.value = access

# 定义r2数据源

a1.sources.r2.type = exec
a1.sources.r2.command = tail -F /var/log/nginx.log

# 定义拦截器r2
a1.sources.r2.interceptors = i2
a1.sources.r2.interceptors.i2.type = static
a1.sources.r2.interceptors.i2.key = type
a1.sources.r2.interceptors.i2.value = nginx

# 定义r3数据源

a1.sources.r3.type = exec
a1.sources.r3.command = tail -F /var/log/web.log

# 定义拦截器r3
a1.sources.r3.interceptors = i3
a1.sources.r3.interceptors.i3.type = static
a1.sources.r3.interceptors.i3.key = type
a1.sources.r3.interceptors.i3.value = web

# Describe the sink
# 定义数据的目的地(下沉)
a1.sinks.k1.type = avro
a1.sinks.k1.hostname = hadoop001
a1.sinks.k1.port = 41414


# Use a channel which buffers events in memory
# 定义管道
a1.channels.c1.type = memory
a1.channels.c1.capacity = 1000
a1.channels.c1.transactionCapacity = 100

# Bind the source and sink to the channel
# 组装组件
a1.sources.r1.channels = c1
a1.sources.r2.channels = c1
a1.sources.r3.channels = c1
a1.sinks.k1.channel = c1

# 启动命令
# flume-ng agent --conf conf --conf-file conf/exec-avro_logCollection.conf --name a1 -Dflume.root.logger=INFO,console
在hadoop002上创建
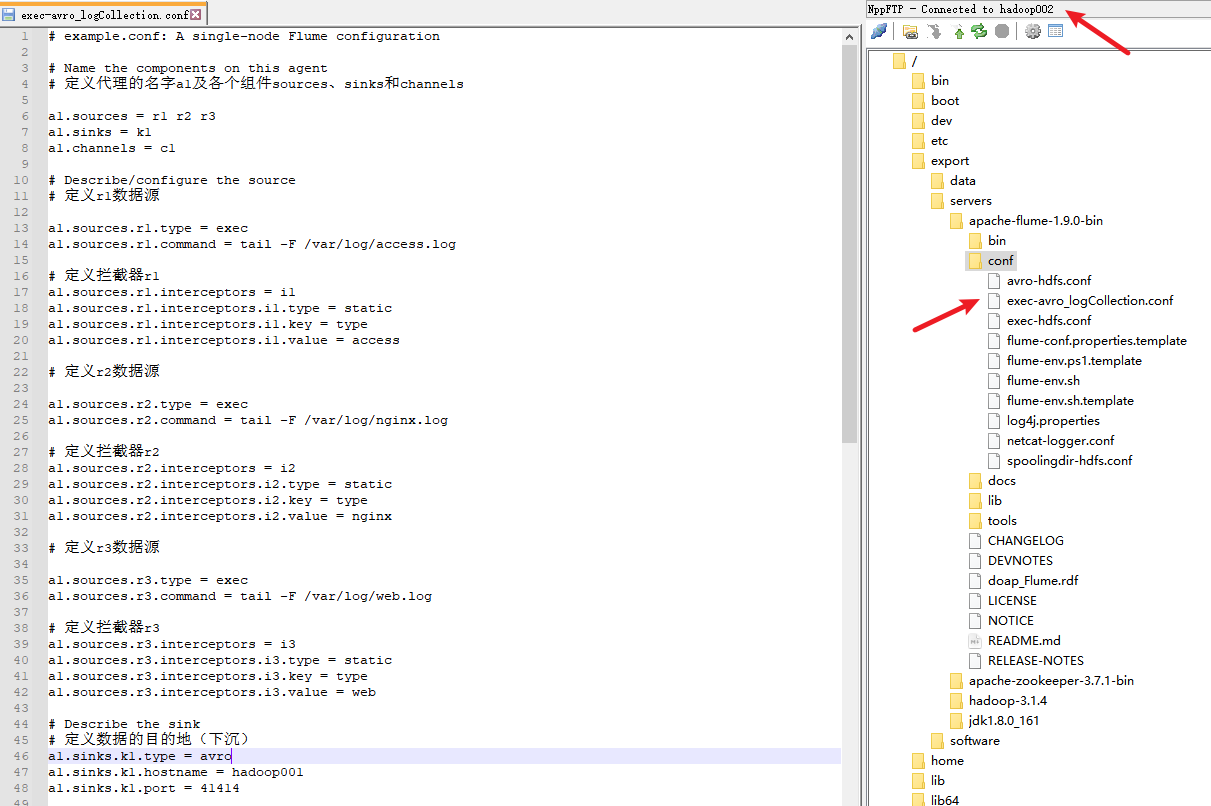
在hadoop003上创建
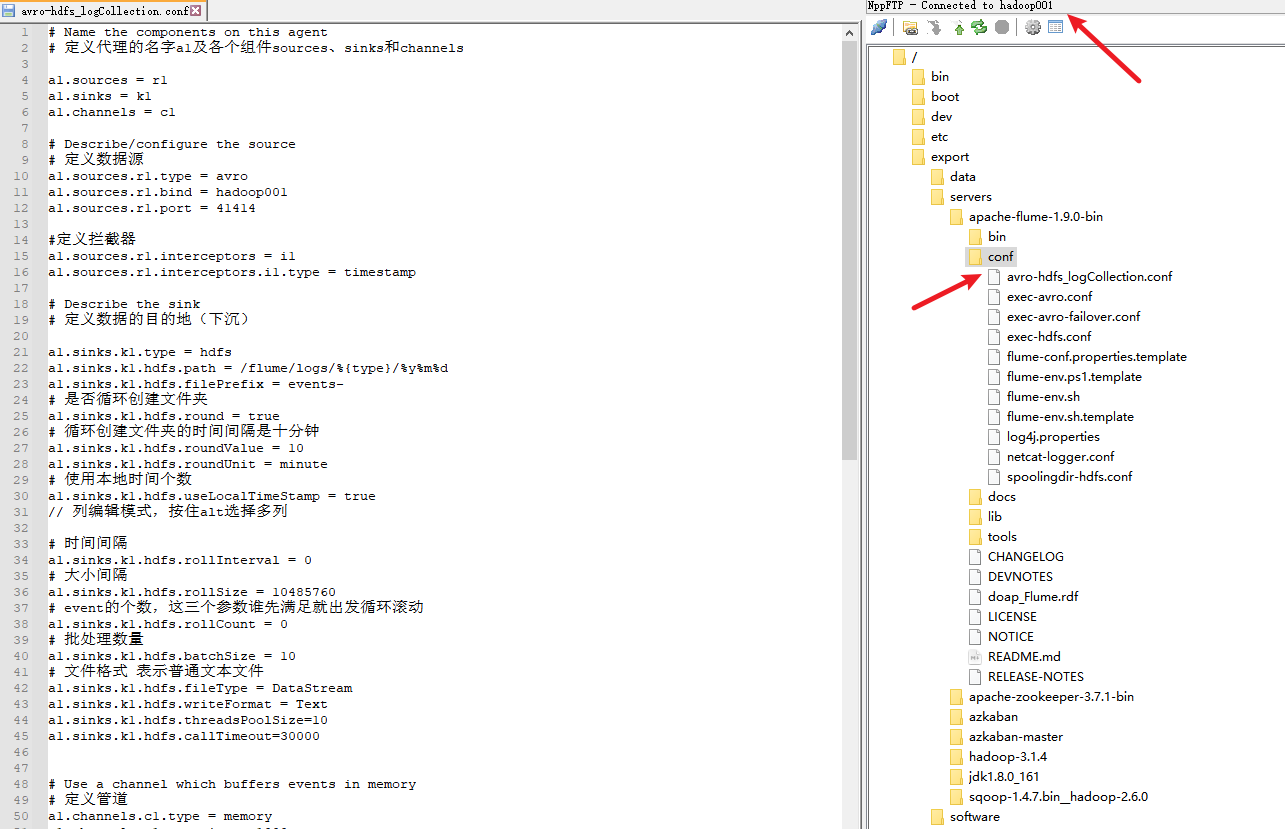
5. hadoop001的配置文件
在hadoop001机器的conf目录下编写第二级日志采集方案avro-hdfs_logCollection.conf
# Name the components on this agent
# 定义代理的名字a1及各个组件sources、sinks和channels

a1.sources = r1
a1.sinks = k1
a1.channels = c1

# Describe/configure the source
# 定义数据源
a1.sources.r1.type = avro
a1.sources.r1.bind = hadoop001
a1.sources.r1.port = 41414

#定义拦截器
a1.sources.r1.interceptors = i1
a1.sources.r1.interceptors.i1.type = timestamp

# Describe the sink
# 定义数据的目的地(下沉)

a1.sinks.k1.type = hdfs
a1.sinks.k1.hdfs.path = /flume/logs/%{type}/%y%m%d
a1.sinks.k1.hdfs.filePrefix = events-
# 是否循环创建文件夹
a1.sinks.k1.hdfs.round = true
# 循环创建文件夹的时间间隔是十分钟
a1.sinks.k1.hdfs.roundValue = 10
a1.sinks.k1.hdfs.roundUnit = minute
# 使用本地时间个数
a1.sinks.k1.hdfs.useLocalTimeStamp = true
// 列编辑模式,按住alt选择多列

# 时间间隔
a1.sinks.k1.hdfs.rollInterval = 0
# 大小间隔
a1.sinks.k1.hdfs.rollSize = 10485760
# event的个数,这三个参数谁先满足就出发循环滚动
a1.sinks.k1.hdfs.rollCount = 0
# 批处理数量
a1.sinks.k1.hdfs.batchSize = 10
# 文件格式 表示普通文本文件
a1.sinks.k1.hdfs.fileType = DataStream
a1.sinks.k1.hdfs.writeFormat = Text
a1.sinks.k1.hdfs.threadsPoolSize=10
a1.sinks.k1.hdfs.callTimeout=30000


# Use a channel which buffers events in memory
# 定义管道
a1.channels.c1.type = memory
a1.channels.c1.capacity = 1000
a1.channels.c1.transactionCapacity = 100

# Bind the source and sink to the channel
# 组装组件
a1.sources.r1.channels = c1
a1.sinks.k1.channel = c1

# 启动命令
# flume-ng agent --conf conf --conf-file conf/avro-hdfs_logCollection.conf --name a1 -Dflume.root.logger=INFO,console
6. 启动flume
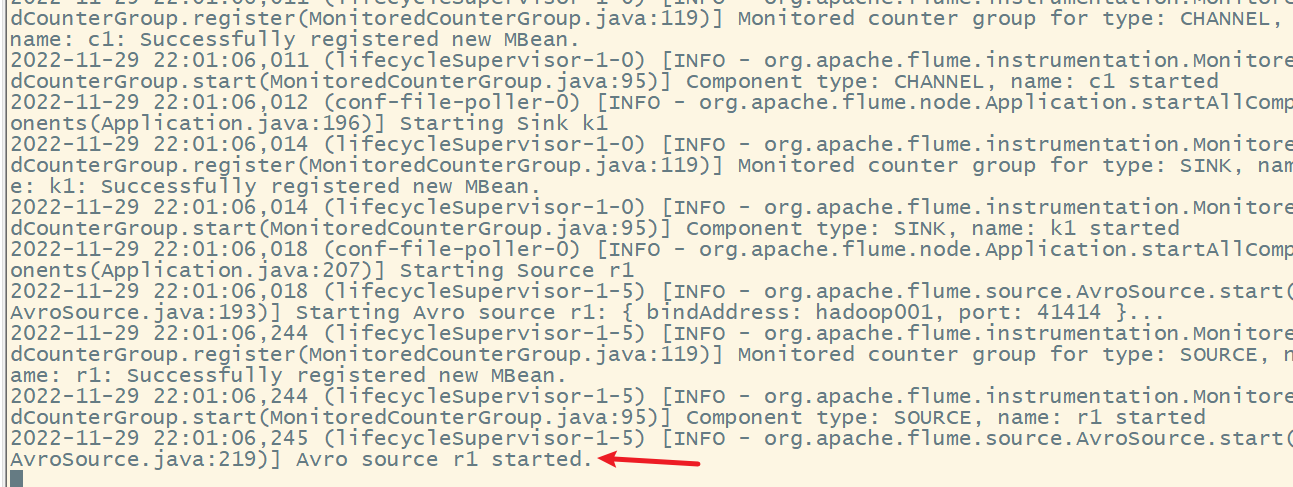
1) 先启动hadoop01上的flume

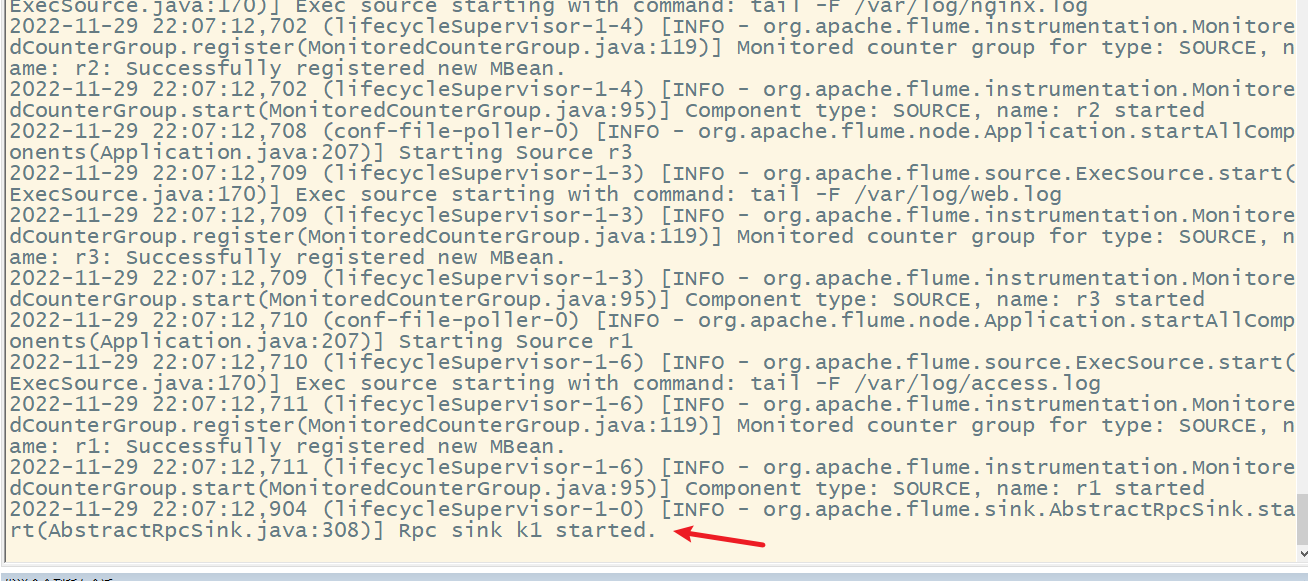
2) 启动hadoop002和hadoop003
启动hadoop002


启动hadoop003

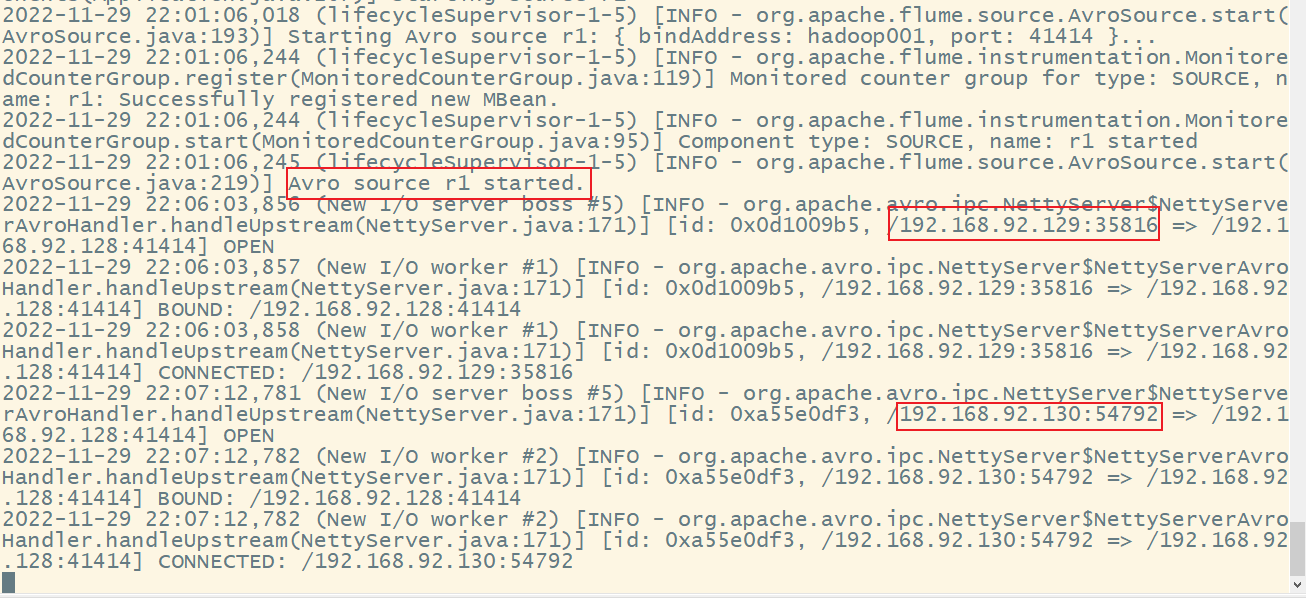
3) 查看hadoop001
7. 测试效果
1) 执行脚本文件
在hadoop002和hadoop003上分别克隆三个会话,分别执行以下三个脚本,用来产生生产日志数据:
while true;do echo "access access ……" >> /var/log/access.log;sleep 5;done
while true;do echo "nginx nginx ……" >> /var/log/nginx.log;sleep 5;done
while true;do echo "web web ……" >> /var/log/web.log;sleep 5;done
在窗口中分别执行上述指令后,会不断循环产生数据,为了后续更好查看效果,执行一会后就可以直接关停上述三个指令。
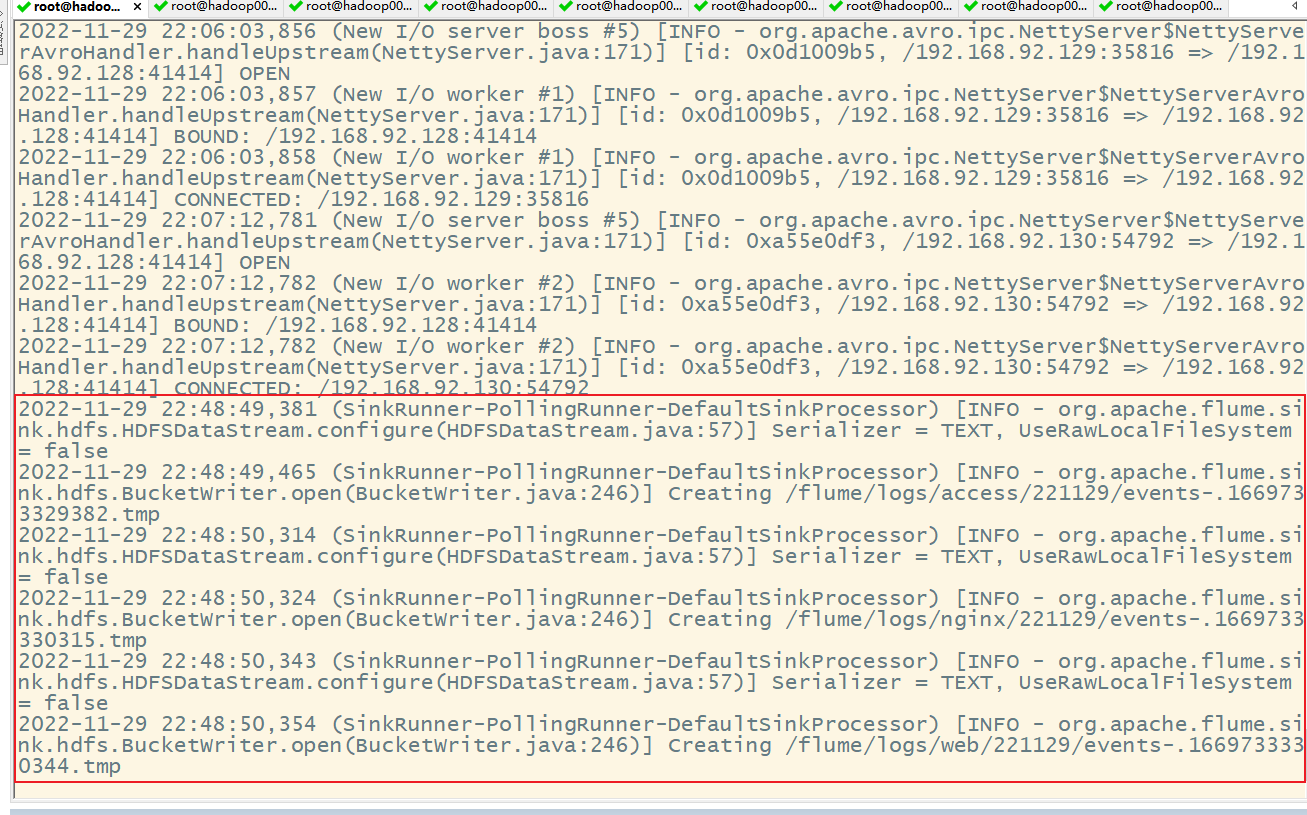
2) 查看hadoop001结果
关闭上述指令后查看hadoop001
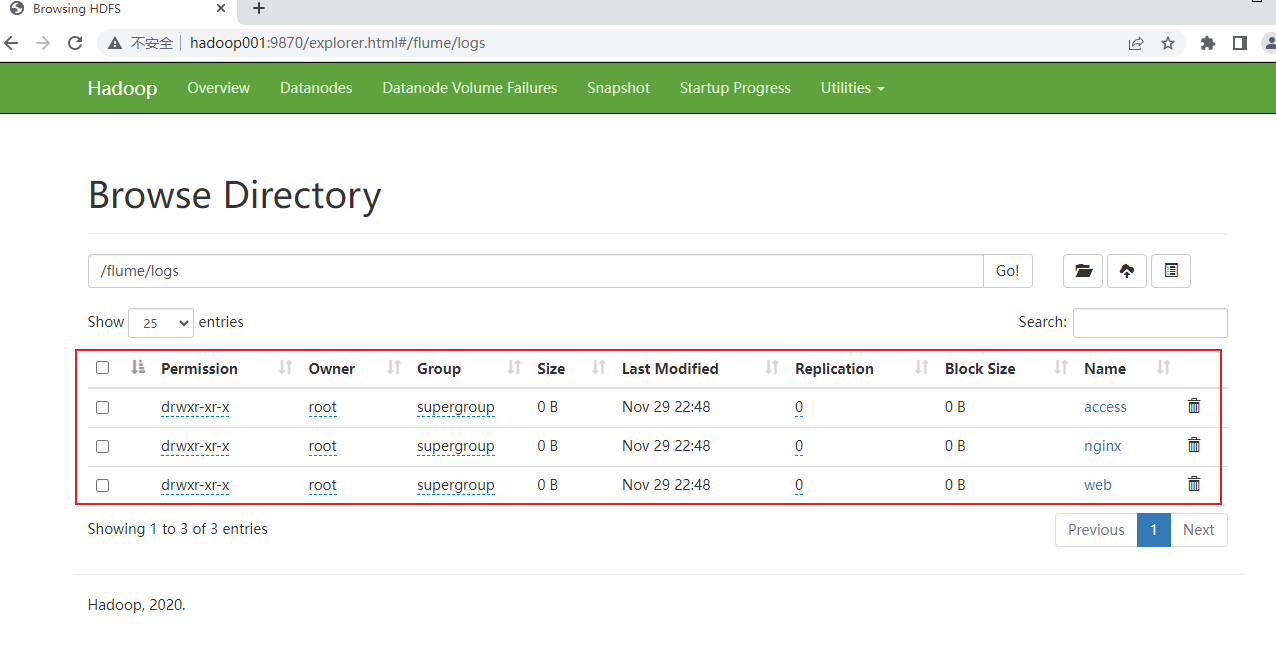
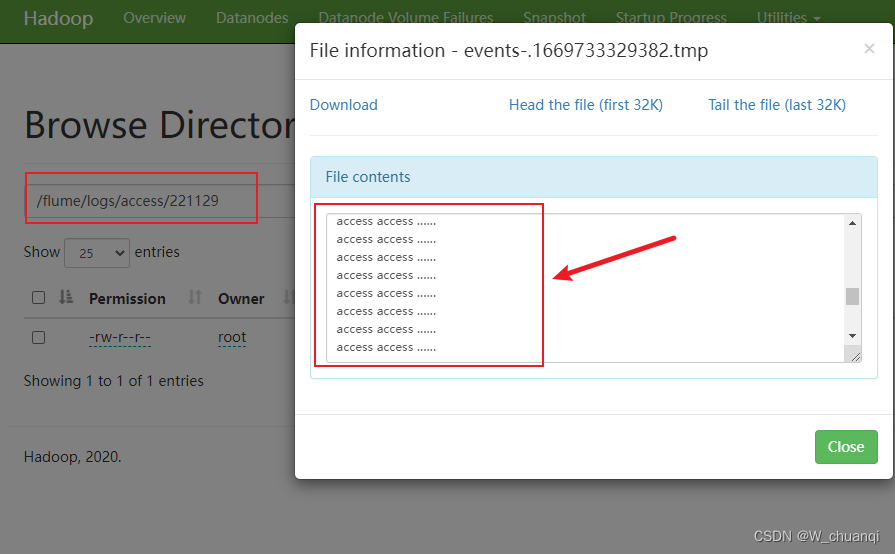
3) 查看hadoop集群


 3213
3213


 被折叠的 条评论
为什么被折叠?
被折叠的 条评论
为什么被折叠?
 到【灌水乐园】发言


