


什么是HTTPS
什么是HTTPS
HTTPS是安全的超文本传输协议
现在大部分站点都是通过HTTPS来实现站点的安全
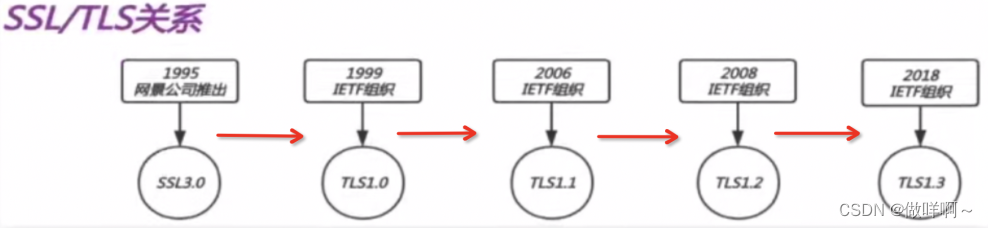
早期景网公司设计了SSL安全套接层协议,主要用于对HTTP协议的数据进行加密
而现在很多时候都在使用TLS传输层安全协议
TLS是SSL的继任者
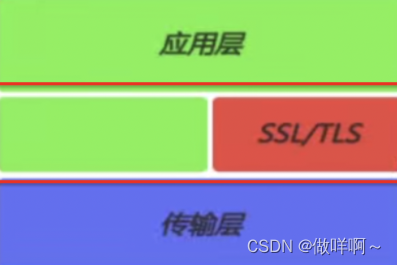
TLS/SSL是如何实现加密的
TLS/SSL协议工作在OSI模型中,在应用层与传输层之间
1.提供数据安全:保证数据不被泄露
2.提供数据完整性:保证数据在传输过程中不被篡改
3.对应用层交给传输层的数据进行加密与解密
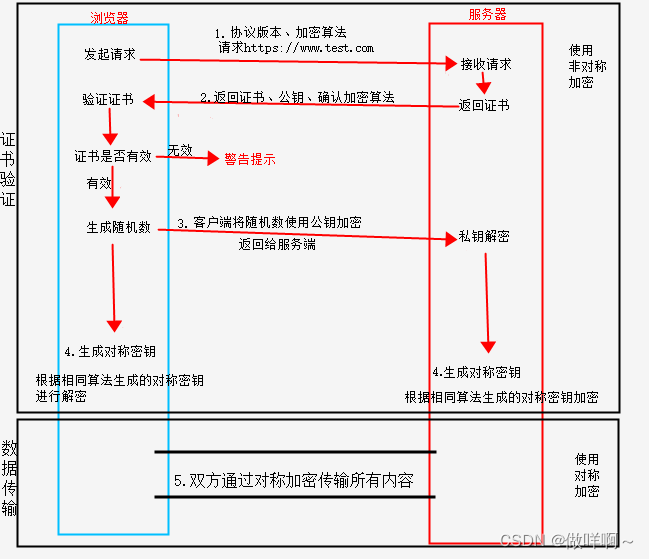
HTTPS加密模型
HTTPS加密分为对称加密以及非对称加密
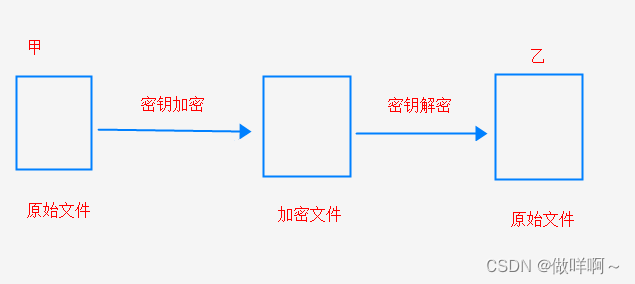
对称加密
对称加密,两个相互通讯的人持有相同的密钥,进行加密与解密
加密:密钥+明文=密文
解密:密文+密钥=明文
例如,甲将一份原始文件使用密钥加密后生成一份加密文件
乙在拿到加密文件后,通过相同的密钥进行解密,即可得到原始文件
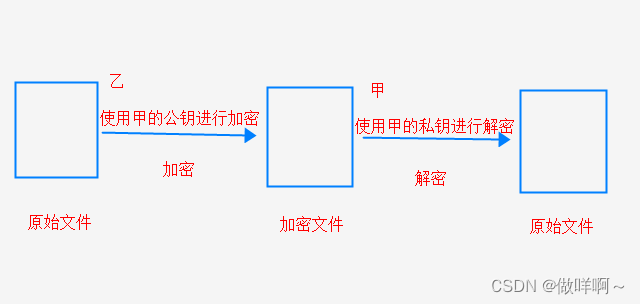
非对称加密
非对称加密,它根据数学原理,生成一对密钥(公钥与私钥)
公钥加密,私钥解密,并且只能实现单方向
私钥:私钥自己使用,不会对外开放
公钥:公钥开放给大家使用
例如,甲有一对密钥(公钥/私钥),甲将公钥给了乙一份
当乙要传输一份文件给甲时,乙就可以使用甲给的公钥对文件进行加密
当甲收到加密的文件后,就可以使用自己的私钥,对加密文件进行解密即可得到原始文件
这里甲必须知道乙发来的文件是真正的乙发来的,这个信任的问题,在通讯过程中,必须有一个公信机构来验证双方的身份,这个机构就是CA机构.
CA机构颁发证书过程
CA机构是可信任的组织机构,主要用来颁发证书
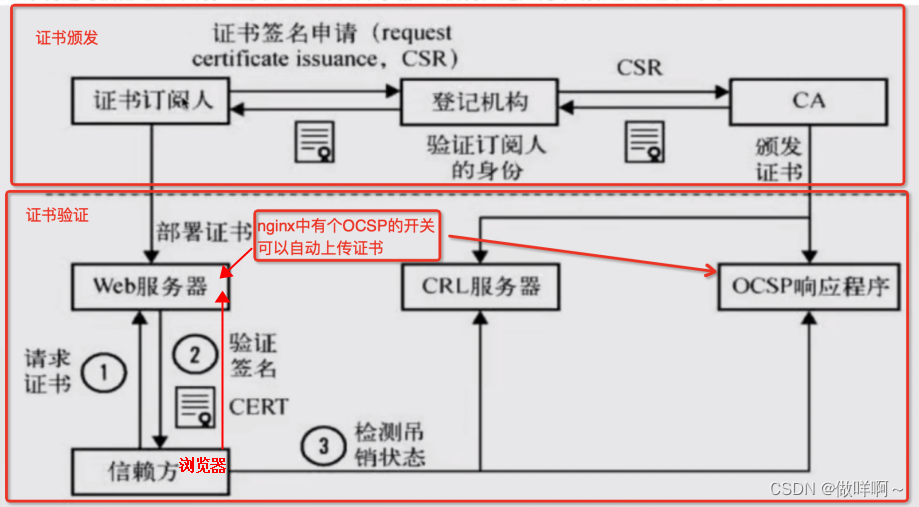
证书验证过程:

1.当浏览器访问我们的HTTPS站点时候,它会先去请求我们的证书

2.nginx会将我们的证书包含公钥回传给浏览器

3.浏览器会去验证我们的证书是否有效

4.CA机构会将过期的证书放在CRL服务器,但是CRL的验证效率非常低,
  于是CA机构推出了OCSP响应程序,用来查询证书是否过期,
  所以浏览器可以直接查询OCSP,但是OCSP的性能还不是很高.

5.nginx有一个OCSP的开关,当开启后,nginx会主动上OCSP上查询,
  这样客户端也可以直接从nginx上得知证书是否有效.
HTTPS加密解密过程
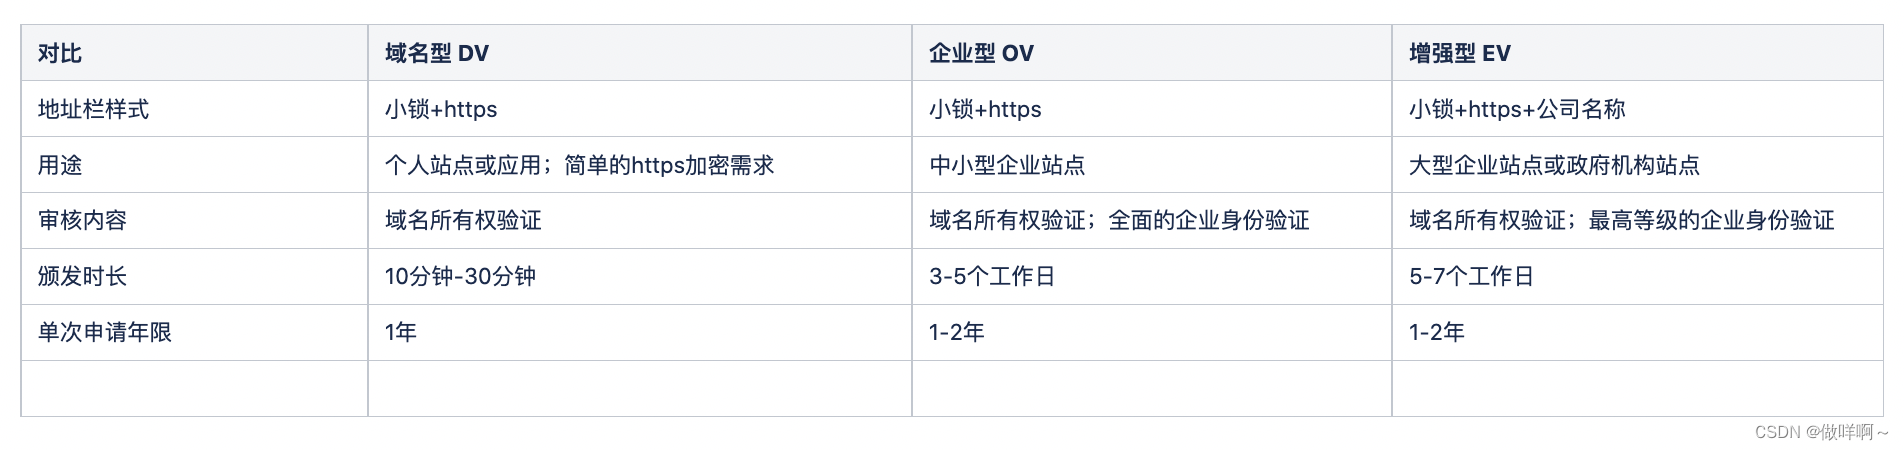
HTTPS证书类型
证书保护
保护一个域名:www
保护五个域名:www 、test、cdn、ss、a
通配符域名:*.test.com 可以加密多个站点,价格高
https注意项
https不支持续费,证书到期后,需要重新申请并且进行替换
https不支持三级域名解析,例如sss.w.test.com
https显示绿色,说明整个网站的URL都是https的,都是安全的
https显示黄色,说明网站代码中部分的URL是http不安全协议的
https显示红色,说明网站的证书要么是假的,要么是过期的
单节点https测试
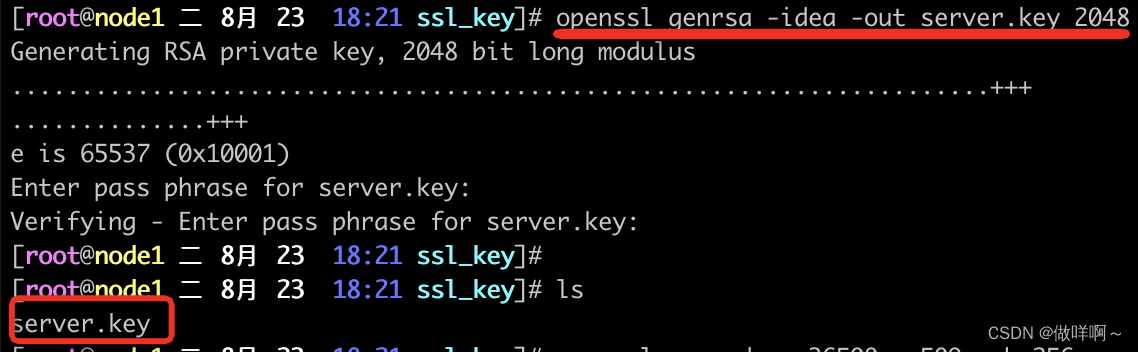
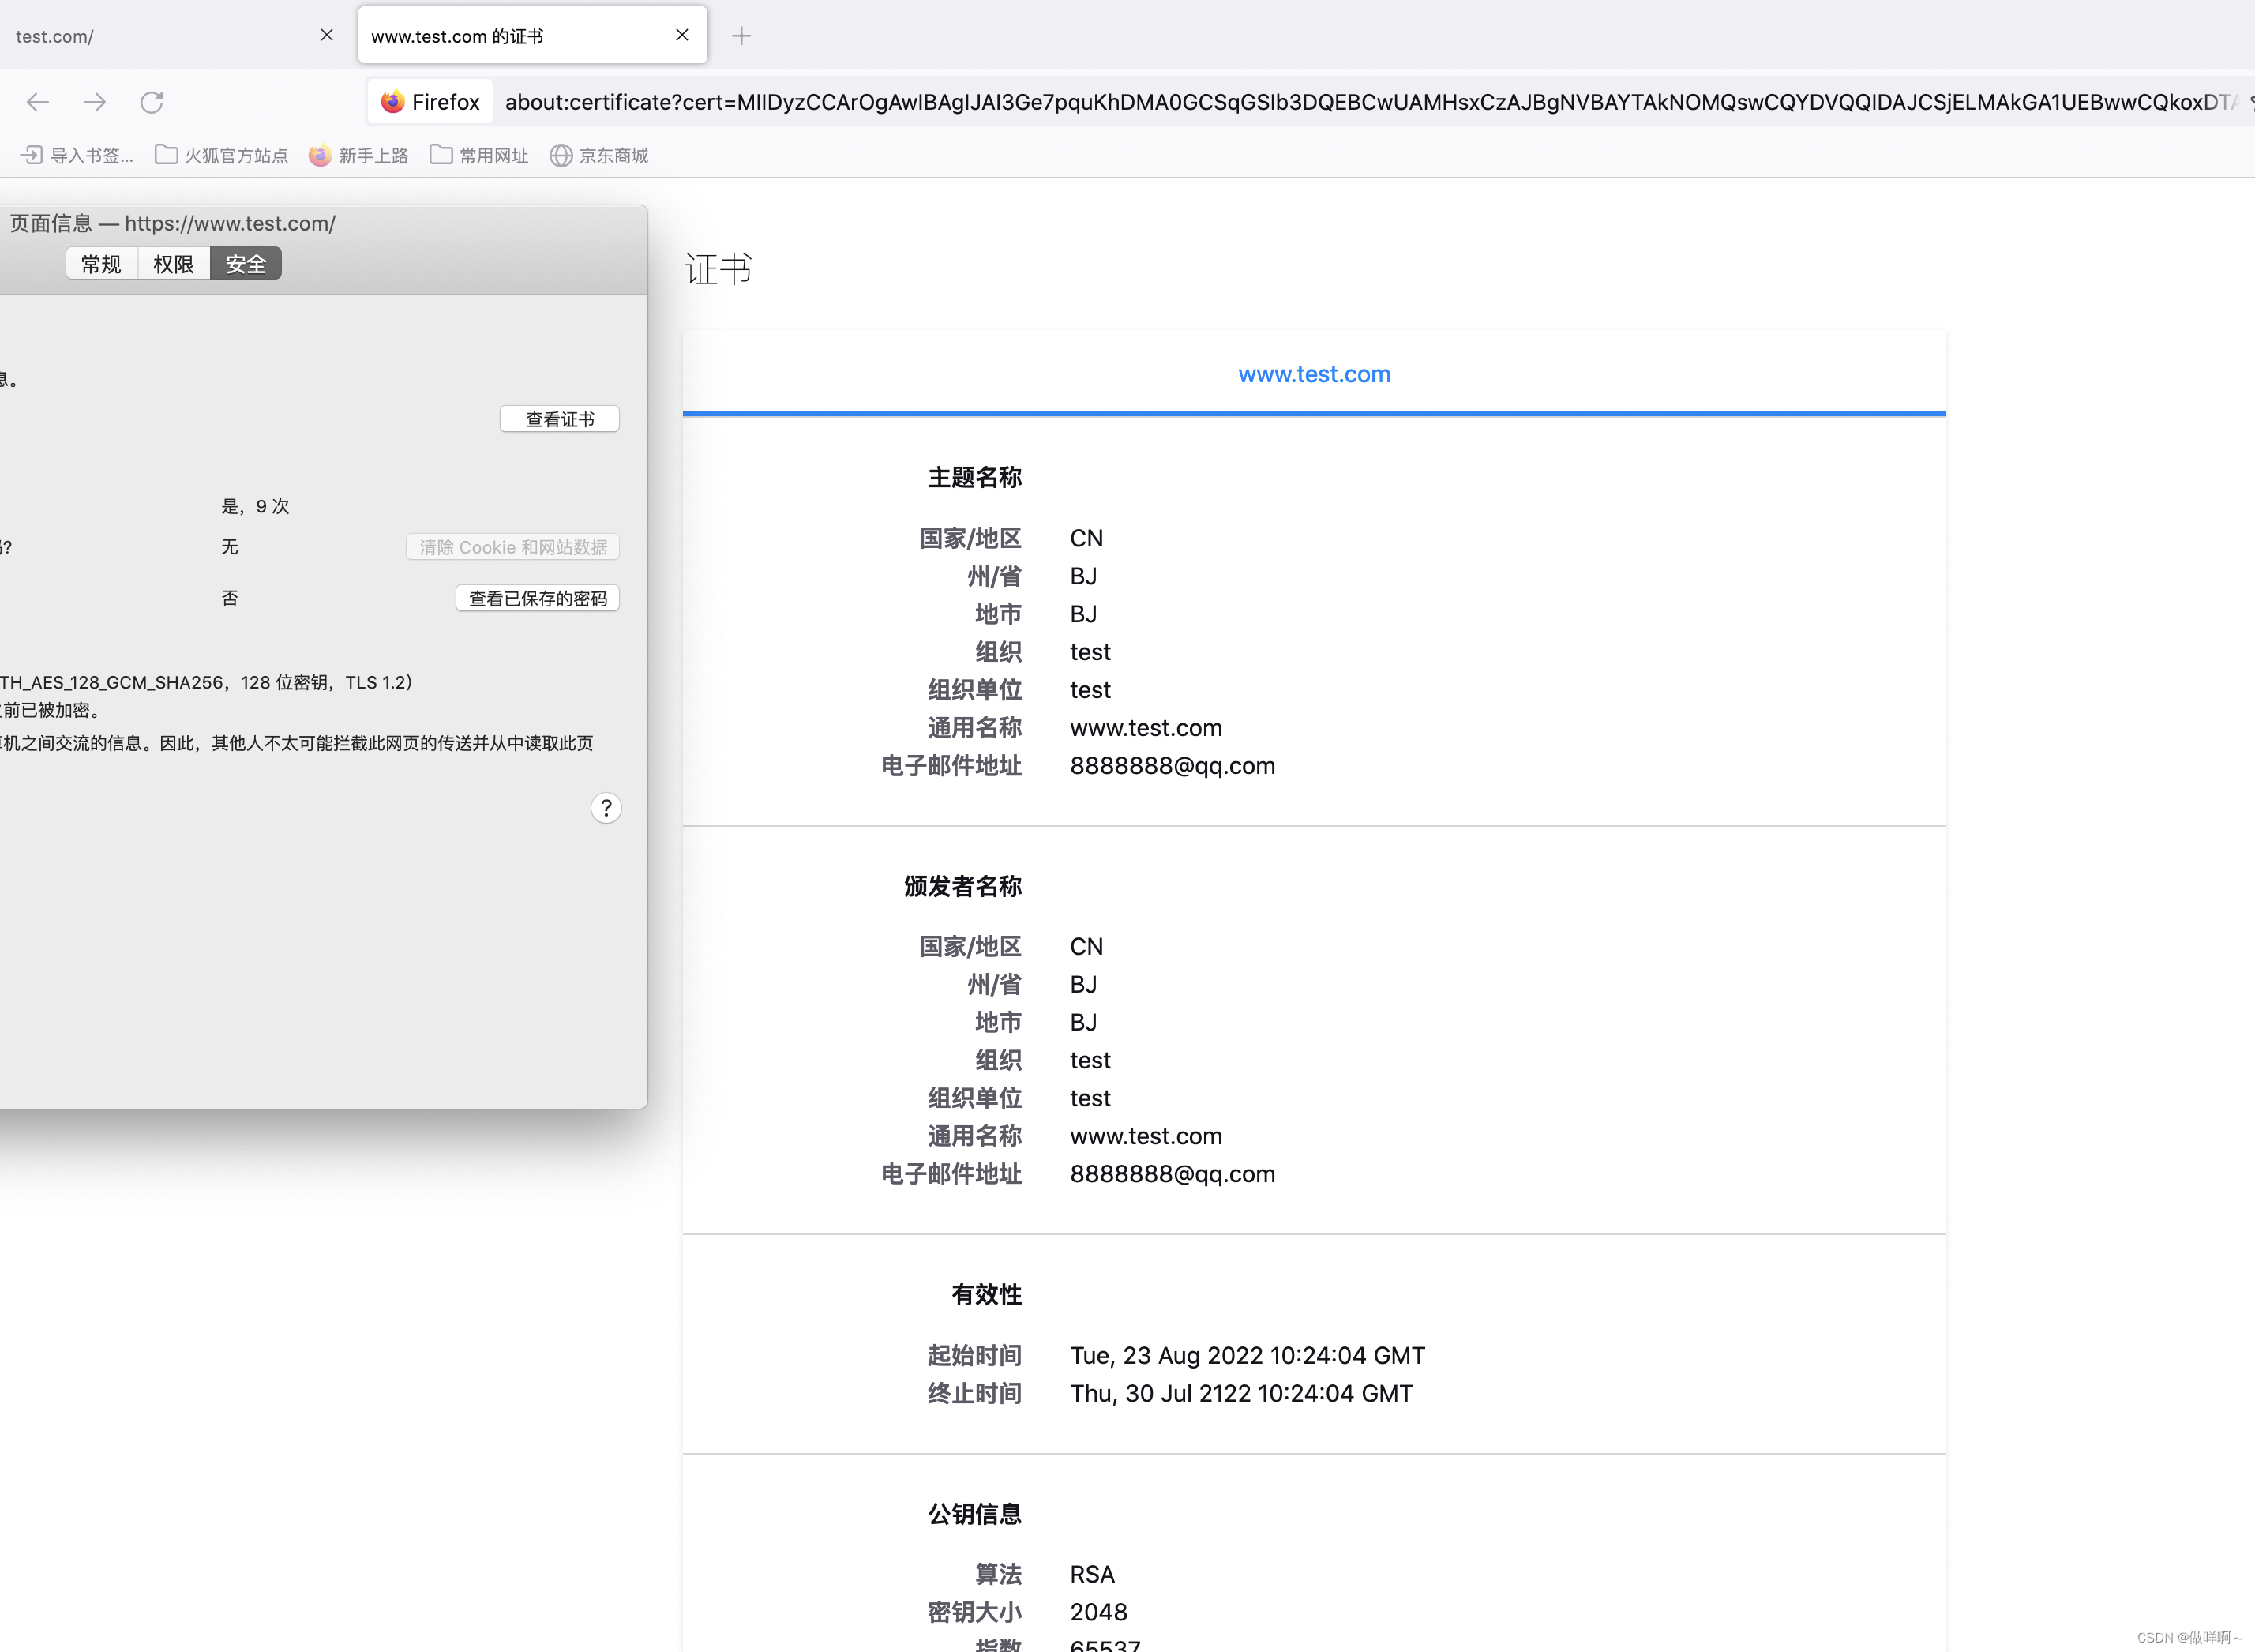
1.准备测试时使用的证书(测试使用,自己生成一份)
申请证书( 私钥和公钥)使用openssl生成
mkdir -p /etc/nginx/ssl_key #创建存放证书的路径
cd /etc/nginx/ssl_key/ #进入该路径下

创建私钥和公钥
openssl genrsa -idea -out server.key 2048 #输⼊1234
openssl req -days 36500 -x509 -sha256 -nodes -newkey rsa:2048 -keyout server.key -out server.crt

2.编辑nginx配置文件
server {
        listen 443 ssl;    #https端口号
        server_name www.test.com;
        ssl_certificate ssl_key/server.crt;    #配置公钥的位置
        ssl_certificate_key ssl_key/server.key;  #配置私钥的位置
        root /html;

        location / {
                index index.html;

        }

}
3.重载nginx
nginx -t
systemctl reload nginx
4.查看测试结果
查看一下我们临时测试的证书
协议跳转 (http跳转到https)
正常人输入域名的时候,很少会去补全https://www.test.com,一般都是输入www.test.com这种格式,
如何让用户输入的域名跳转到https?
做个协议层面的跳转即可
编辑nginx配置文件
server {
        listen 443 ssl;
        server_name www.test.com;
        ssl_certificate ssl_key/server.crt;
        ssl_certificate_key ssl_key/server.key;
        root /html;

        location / {
                index index.html;

        }

}

server {    #做个协议层面的跳转
        listen 80;
        server_name www.test.com;
        return 302 https://$server_name$request_uri;       #$server_name:请求的域名,$request_uri:用户请求的URI

}


#或者使用这种匹配也可以,$1代表前面匹配到的内容
rewrite ^(.*)$ https://www.test.com/$1

注意:跳转只是协议变了,但是不能影响人正常使用,不能将用户请求的URI丢掉,不然用户始终都无法访问目标资源
例如,将$request_uri去掉, 变成:return 302 https://$server_name;
那么用户不管访问什么页面,最终访问到的始终都是固定的默认页面index.html;
重载nginx
nginx -t
systemctl reload nginx
当我们输入http的域名,就会自动跳转到https的域名
集群构建HTTPS
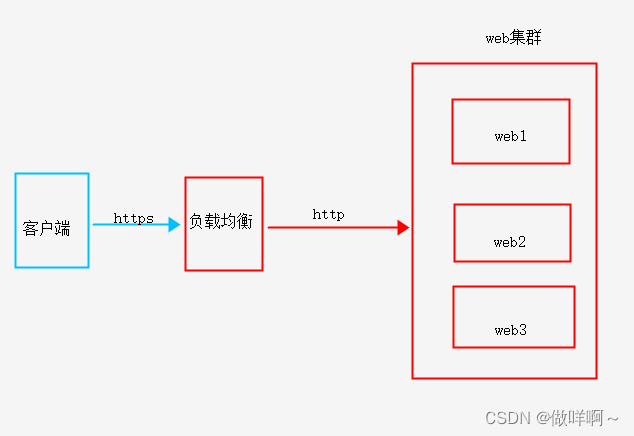
客户端到负载均衡使用https,负载均衡返回给客户端也用https
负载均衡与web集群属于内网,用http就可以了
所以我们在负载均衡上配置https即可
记得把公钥/私钥放到对应路径下
1.编辑负载均衡配置文件
vim /etc/nginx/conf.d/lb.conf

upstream test {
	server 192.168.51.163:80;
	server 192.168.51.165:80;

}

server {
	listen 443 ssl;
	server_name www.test.com;
	ssl_certificate ssl_key/server.crt;
	ssl_certificate_key ssl_key/server.key;

	location / {
		proxy_pass http://test;
		include proxy_params;
	}
}

server {
	listen 80;
	server_name www.test.com;
	return 302 https://$server_name$request_uri;

}


重载nginx
nginx -t
systemctl reload nginx
2.web节点1准备
#编辑nginx配置文件
vim /etc/nginx/conf.d/web.conf
server {
listen 80;
server_name www.test.com;
root /html;
location / {
index index.html;
}
}
#准备默认页面内容
vim /html/index.html
<meta charset="utf-8">
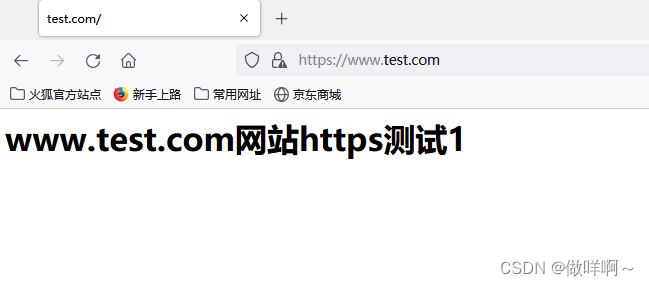
<h1>www.test.com网站https测试1</h1>
#重载nginx
nginx -t
systemctl reload nginx
3.web节点2准备
#编辑nginx配置文件
vim /etc/nginx/conf.d/web.conf
server {
listen 80;
server_name www.test.com;
root /html;
location / {
index index.html;
}
}
#准备默认页面内容
vim /html/index.html
<meta charset="utf-8">
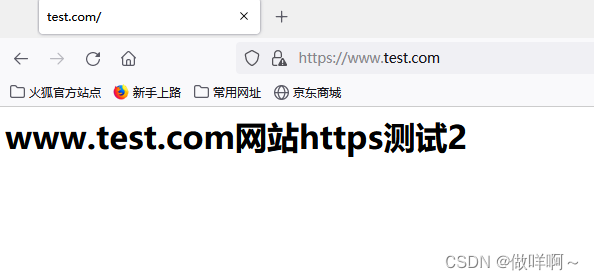
<h1>www.test.com网站https测试2</h1>
#重载nginx
nginx -t
systemctl reload nginx
4.查看测试结果
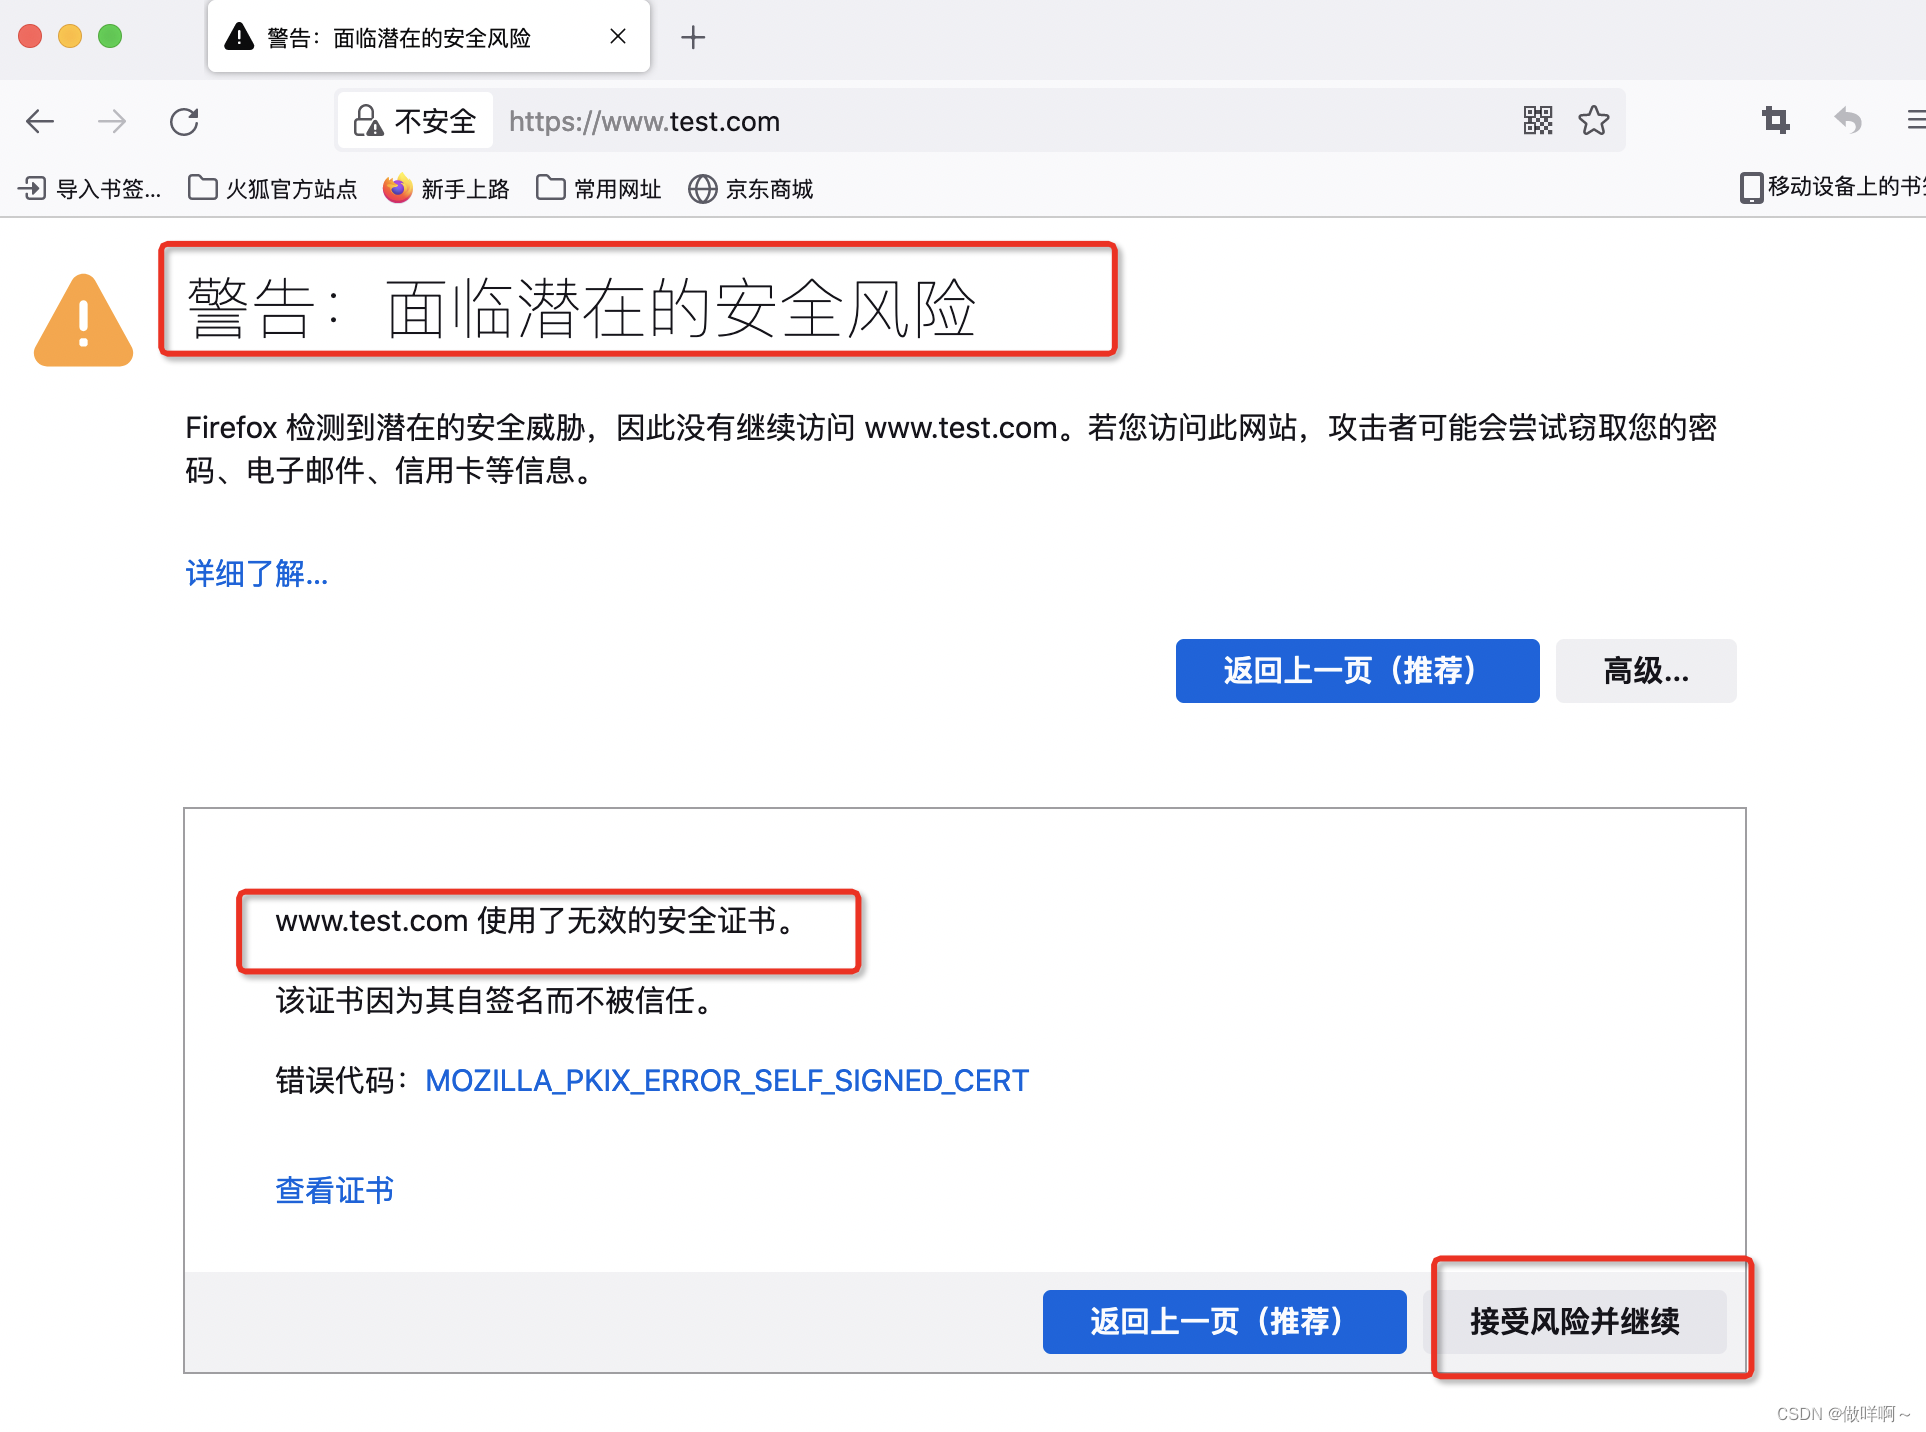
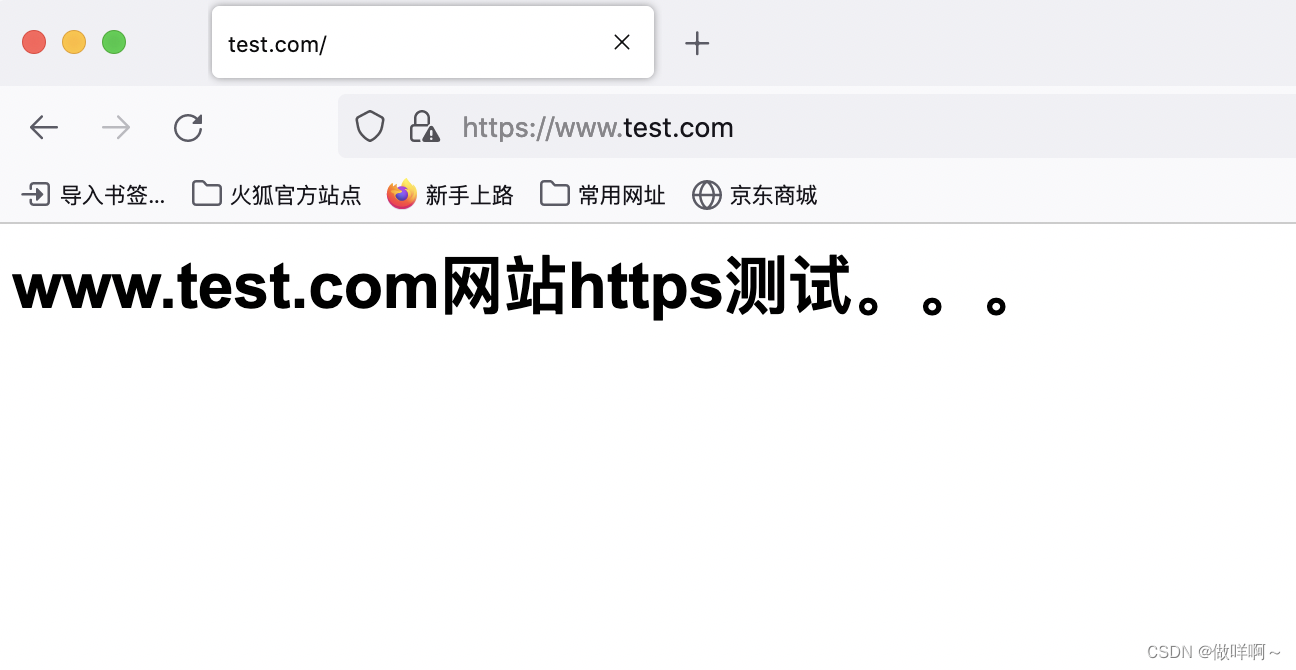
访问www.test.com的时候,会提示风险,点击继续访问后
会跳转到https://www.test.com的第一个节点
刷新后跳转到https://www.test.com第二个节点
结合php
1.编辑nginx配置文件
server {
	listen 443 ssl;
	server_name php.test.com;
	root /html;
	ssl_certificate ssl_key/server.crt;
	ssl_certificate_key ssl_key/server.key;

	location / {
		index index.php index.html;

	}

	location ~ \.php$ {                    #通过location进行匹配,访问的URI为.php结尾的都走这个location
		fastcgi_pass 127.0.0.1:9000;       #将php结尾的请求文件都传递给本地php服务端处理
		fastcgi_param SCRIPT_FILENAME $document_root$fastcgi_script_name;     #为SCRIPT_FILENAME变量设定值(具体要解析的文件路径)
		fastcgi_param HTTPS on;            #让php程序知道使⽤了https协议
		include fastcgi_params;

	}
}

server {
	listen 80;
	server_name php.test.com;
	return 302 https://$server_name$request_uri;

}
2.初始化本地目录文件
vim /html/info.php

 <?php phpinfo(); ?>
3.语法检测,重载nginx
nginx -t
systemctl reload nginx
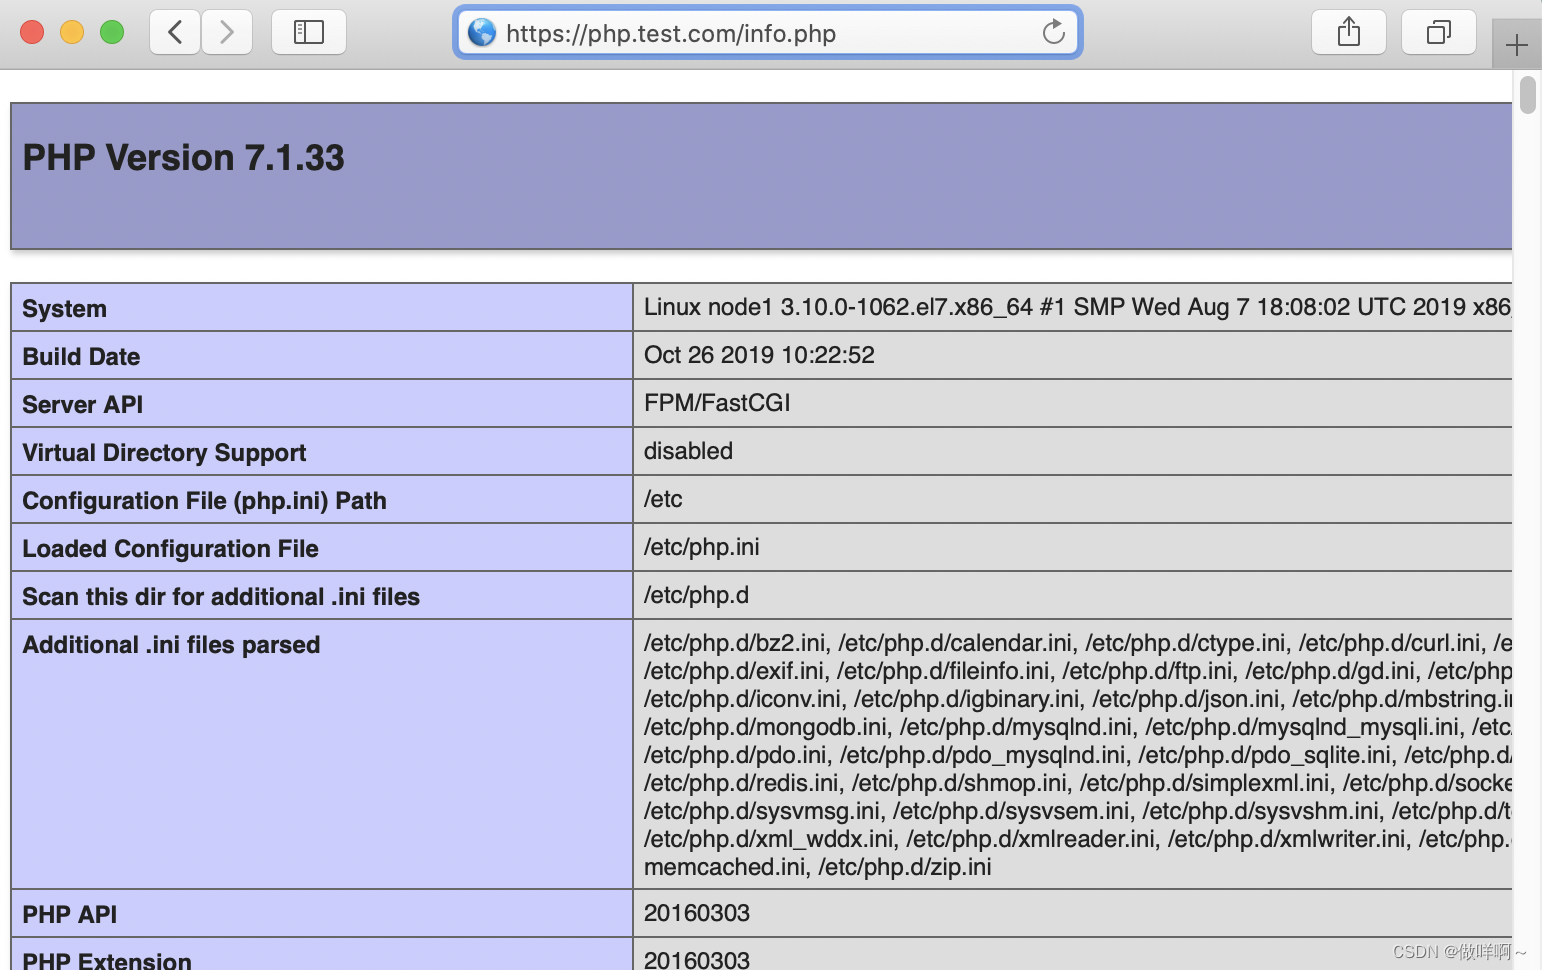
4.查看测试结果
访问php.test.con/info.php时,自动跳转到https://php.test.com/info.php
HTTPS优化
set the number of worker processes equal to the number of processors,
#设置worker的数量与cpu核⼼⼀致
#配置实例: worker_processes auto;

enable keep-alive connections,
#默认是启⽤keeplaive⻓连接的,这里可以设置一个长连接的超时时间
#配置实例:keepalive_timeout 70;


enable the shared session cache, (by default, 5 minutes)
disable the built-in session cache,

#这两个是搭配使用的
#配置实例:
ssl_session_cache shared:SSL:10m;  #设置缓存空间大小
ssl_session_timeout 1440m;    #设置超时时间

#建⽴https握⼿后。如果在session_timeout 时间内还要再次连接,
⽆需再次建⽴握⼿,可直接复⽤之前缓存的连接。
1M大概可以存储4000个session
#配置实例
worker_processes auto;  #设置worker的数量与cpu核⼼⼀致

http {
 ...
 server {
 listen 443 ssl;
 keepalive_timeout 70;   #设置长连接超时时间
 ssl_protocols TLSv1 TLSv1.1 TLSv1.2;   #协议版本
 ssl_ciphers AES128-SHA:AES256-SHA:RC4-SHA:DES-CBC3-SHA:RC4-MD5;
 ssl_certificate /usr/local/nginx/conf/cert.pem;
 ssl_certificate_key /usr/local/nginx/conf/cert.key;
 ssl_session_cache shared:SSL:10m;    #设置缓存空间大小
 ssl_session_timeout 1440m;     #设置超时时间
 ...
 }


 6532
6532


 被折叠的 条评论
为什么被折叠?
被折叠的 条评论
为什么被折叠?
 到【灌水乐园】发言


