


目标检测中的边界框(x,y,w,h形式转换与绘制)
之前做了个关于yolov4的目标检测项目, 对这个领域产生了兴趣, 决定系统的学习一下
记录来源: 李沐老师: 动手学深度学习
在线阅读 https://zh-v2.d2l.ai/
目标检测起到的效果是找到物体的位置并且预测其类别, 效果如下图
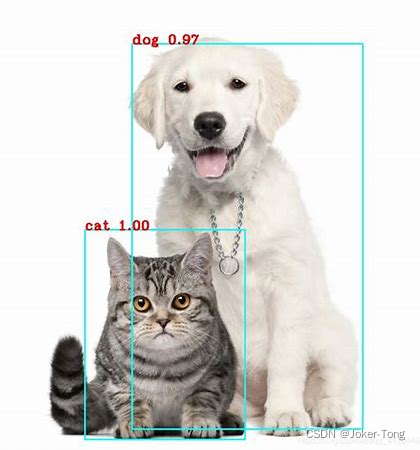
我们通常使用边界框(bounding box)来描述对象的空间位置,也就是图中的蓝色框
而常见的对bounding box的描述形式有两种
x, y, w, h表示了框的中心坐标/左上角坐标 + 长 + 宽x1,y1,x2,y2表示了框的左上角坐标 + 右下角坐标
边框表现形式转换
下面的函数起到了对这两种形式转换的作用
def box_corner_to_center(boxes):
    """从(左上,右下)转换到(中间,宽度,高度)"""
    x1, y1, x2, y2 = boxes[:, 0], boxes[:, 1], boxes[:, 2], boxes[:, 3]
    cx = (x1 + x2) / 2
    cy = (y1 + y2) / 2
    w = x2 - x1
    h = y2 - y1
    boxes = torch.stack((cx, cy, w, h), axis=-1)
    return boxes


def box_center_to_corner(boxes):
    """从(中间,宽度,高度)转换到(左上,右下)"""
    cx, cy, w, h = boxes[:, 0], boxes[:, 1], boxes[:, 2], boxes[:, 3]
    x1 = cx - 0.5 * w
    y1 = cy - 0.5 * h
    x2 = cx + 0.5 * w
    y2 = cy + 0.5 * h
    boxes = torch.stack((x1, y1, x2, y2), axis=-1)
    return boxes
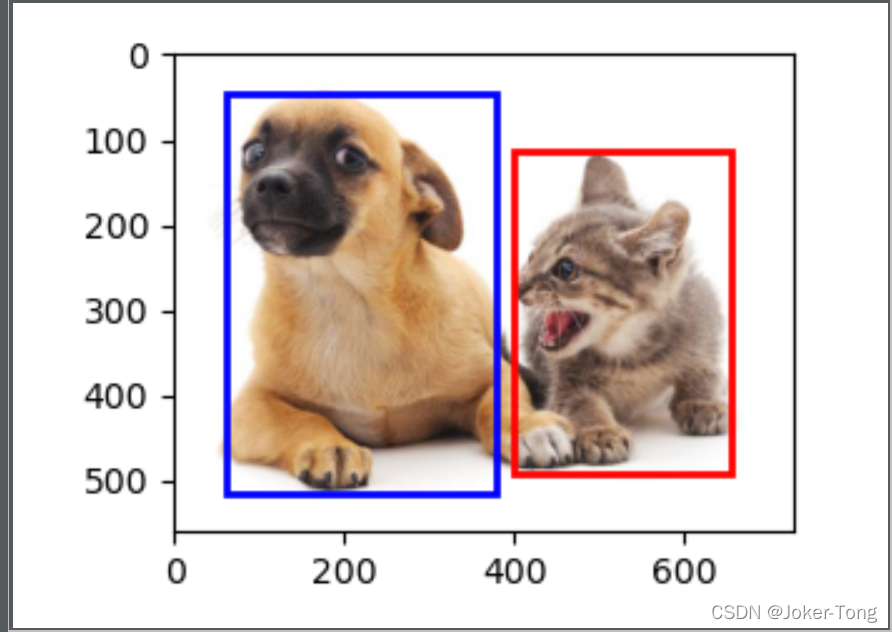
举例, 先给出猫和狗的框
dog_bbox, cat_bbox = [60, 45, 378, 516], [400, 114, 655, 493]
box = torch.tensor((dog_bbox, cat_bbox))
print(box)
'''
tensor([[ 60,  45, 378, 516],
        [400, 114, 655, 493]])
'''
验证一下转换的函数是否正确
print(box_center_to_corner(box_corner_to_center(box)) == box)
'''
tensor([[True, True, True, True],
        [True, True, True, True]])
'''
边框绘制
将框绘制在图像中, 这里使用的是plt.Rectangle, 使用cv2也可以达到同样的效果
def bbox_to_rect(bbox, color):
    # 将边界框(左上x,左上y,右下x,右下y)格式转换成matplotlib格式:
    # ((左上x,左上y),宽,高)
    return d2l.plt.Rectangle(
        xy=(bbox[0], bbox[1]), width=bbox[2] - bbox[0], height=bbox[3] - bbox[1],
        fill=False, edgecolor=color, linewidth=2)
tips 保存图片时关闭plt自带的坐标轴
d2l.plt.axis('off')
fig = d2l.plt.savefig('catdogbox.jpg')
全代码
import d2lzh as d2l
from PIL import Image
import torch

d2l.set_figsize()
img = Image.open('catdog.jpg')
d2l.plt.imshow(img)
d2l.plt.show()

# bbox是bounding box的缩写
# [左上角x,左上角y,右下角x,右下角y]
dog_bbox, cat_bbox = [60, 45, 378, 516], [400, 114, 655, 493]
box = torch.tensor((dog_bbox, cat_bbox))
print(box)


def box_corner_to_center(boxes):
    """从(左上,右下)转换到(中间,宽度,高度)"""
    x1, y1, x2, y2 = boxes[:, 0], boxes[:, 1], boxes[:, 2], boxes[:, 3]
    cx = (x1 + x2) / 2
    cy = (y1 + y2) / 2
    w = x2 - x1
    h = y2 - y1
    boxes = torch.stack((cx, cy, w, h), axis=-1)
    return boxes


def box_center_to_corner(boxes):
    """从(中间,宽度,高度)转换到(左上,右下)"""
    cx, cy, w, h = boxes[:, 0], boxes[:, 1], boxes[:, 2], boxes[:, 3]
    x1 = cx - 0.5 * w
    y1 = cy - 0.5 * h
    x2 = cx + 0.5 * w
    y2 = cy + 0.5 * h
    boxes = torch.stack((x1, y1, x2, y2), axis=-1)
    return boxes


def bbox_to_rect(bbox, color):
    # 将边界框(左上x,左上y,右下x,右下y)格式转换成matplotlib格式:
    # ((左上x,左上y),宽,高)
    return d2l.plt.Rectangle(
        xy=(bbox[0], bbox[1]), width=bbox[2] - bbox[0], height=bbox[3] - bbox[1],
        fill=False, edgecolor=color, linewidth=2)


print(box_center_to_corner(box_corner_to_center(box)) == box)
'''
tensor([[True, True, True, True],
        [True, True, True, True]])
'''
fig = d2l.plt.imshow(img)
fig.axes.add_patch(bbox_to_rect(dog_bbox, 'blue'))
fig.axes.add_patch(bbox_to_rect(cat_bbox, 'red'))
d2l.plt.axis('off')
fig = d2l.plt.savefig('catdogbox.jpg')


 被折叠的 条评论
为什么被折叠?
被折叠的 条评论
为什么被折叠?
 到【灌水乐园】发言


