


软件参数
Eclipse:Mars.1 Release (4.5.1)
Tomcat: 8.0.36
JDK:1.8.0_60
Spring-framework: 4.0.4.RELEASE
- 创建web工程
如下图创建动态web工程:
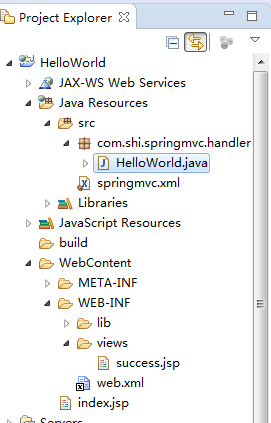
 创建效果如下图:
- 代码
web.xml:
<?xml version="1.0" encoding="UTF-8"?>
<web-app xmlns:xsi="http://www.w3.org/2001/XMLSchema-instance"
    xmlns="http://java.sun.com/xml/ns/javaee"
    xsi:schemaLocation="http://java.sun.com/xml/ns/javaee http://java.sun.com/xml/ns/javaee/web-app_2_5.xsd"
    id="WebApp_ID" version="2.5">

    <!-- 配置DispatchcerServlet -->
    <servlet>
        <servlet-name>springDispatcherServlet</servlet-name>
        <servlet-class>org.springframework.web.servlet.DispatcherServlet</servlet-class>
        <!-- 配置Spring mvc下的配置文件的位置和名称 -->
        <init-param>
            <param-name>contextConfigLocation</param-name>
            <param-value>classpath:springmvc.xml</param-value>
        </init-param>
        <load-on-startup>1</load-on-startup>
    </servlet>

    <servlet-mapping>
        <servlet-name>springDispatcherServlet</servlet-name>
        <url-pattern>/</url-pattern>
    </servlet-mapping>
</web-app>
springmvc.xml:
<?xml version="1.0" encoding="UTF-8"?>
<beans xmlns="http://www.springframework.org/schema/beans"
	xmlns:xsi="http://www.w3.org/2001/XMLSchema-instance"
	xmlns:mvc="http://www.springframework.org/schema/mvc"
	xmlns:context="http://www.springframework.org/schema/context"
	xmlns:aop="http://www.springframework.org/schema/aop"
	xmlns:tx="http://www.springframework.org/schema/tx"
    xsi:schemaLocation="http://www.springframework.org/schema/beans
    	http://www.springframework.org/schema/beans/spring-beans-3.2.xsd
        http://www.springframework.org/schema/context
        http://www.springframework.org/schema/context/spring-context-3.2.xsd
        http://www.springframework.org/schema/mvc
        http://www.springframework.org/schema/mvc/spring-mvc-3.2.xsd
        http://www.springframework.org/schema/aop
		http://www.springframework.org/schema/aop/spring-aop-3.2.xsd
		http://www.springframework.org/schema/tx
		http://www.springframework.org/schema/tx/spring-tx-3.2.xsd ">


	<!-- 编写配置信息位置 -->
    <bean class="org.springframework.web.servlet.handler.BeanNameUrlHandlerMapping" />
    <bean class="org.springframework.web.servlet.mvc.SimpleControllerHandlerAdapter" />

    <!-- 配置自动扫描的包 -->
	<context:component-scan base-package="com.shi.springmvc.handlers"></context:component-scan>
	<!-- 默认的注解映射的支持  -->
	<mvc:annotation-driven/>
	<mvc:default-servlet-handler/>
    <bean class="org.springframework.web.servlet.view.InternalResourceViewResolver">
    	<property name = "prefix" value="/WEB-INF/views/"></property>
		<property name = "suffix" value = ".jsp"></property>
	</bean>
</beans>
index.jsp:
<%@ page language="java" contentType="text/html; charset=UTF-8"
    pageEncoding="UTF-8"%>
<!DOCTYPE html PUBLIC "-//W3C//DTD HTML 4.01 Transitional//EN" "http://www.w3.org/TR/html4/loose.dtd">
<html>
<head>
<meta http-equiv="Content-Type" content="text/html; charset=UTF-8">
<title>界面标题</title>
</head>
<body>

<a href="helloworld">hello</a>

</body>
</html>
success.jsp:
<%@ page language="java" contentType="text/html; charset=UTF-8"
    pageEncoding="UTF-8"%>
<!DOCTYPE html PUBLIC "-//W3C//DTD HTML 4.01 Transitional//EN" "http://www.w3.org/TR/html4/loose.dtd">
<html>
<head>
<meta http-equiv="Content-Type" content="text/html; charset=ISO-8859-1">
<title>成功界面</title>
</head>
<body>恭喜您成功
</body>
</html>
HelloWorld.java:
package com.shi.springmvc.handlers;

import org.springframework.stereotype.Controller;
import org.springframework.web.bind.annotation.RequestMapping;

@Controller
public class HelloWorld {

	@RequestMapping("/helloworld")
	public String hello() {
        System.out.println("hello world");
        return "success";
    }
}
- 需要注意的是:1首先安装好tomcat;2导入framework;3导入springMVC需要的jar包


 3629
3629


 被折叠的 条评论
为什么被折叠?
被折叠的 条评论
为什么被折叠?
 到【灌水乐园】发言


