


C语言数字图像处理系列继续更新~
这一章节的完整代码在:9. Thresholding, Roberts, Prewitt, Sobel, and Edge Detection
如果你喜欢这个系列的文章或者感觉对你有帮助,请给我的仓库一个⭐️。
1. 图像梯度和阈值处理
1.1 Roberts算子
Roberts 边缘提取算子有一个 2x2 的模板(mask),它使用两个对角相邻像素之间的差异,然后取两个对角像素之间差异的平方和。 模板如下:

算法为:

图像和结果对比 (headCT_Vandy.pgm, building_original.pgm, noisy_fingerprint):
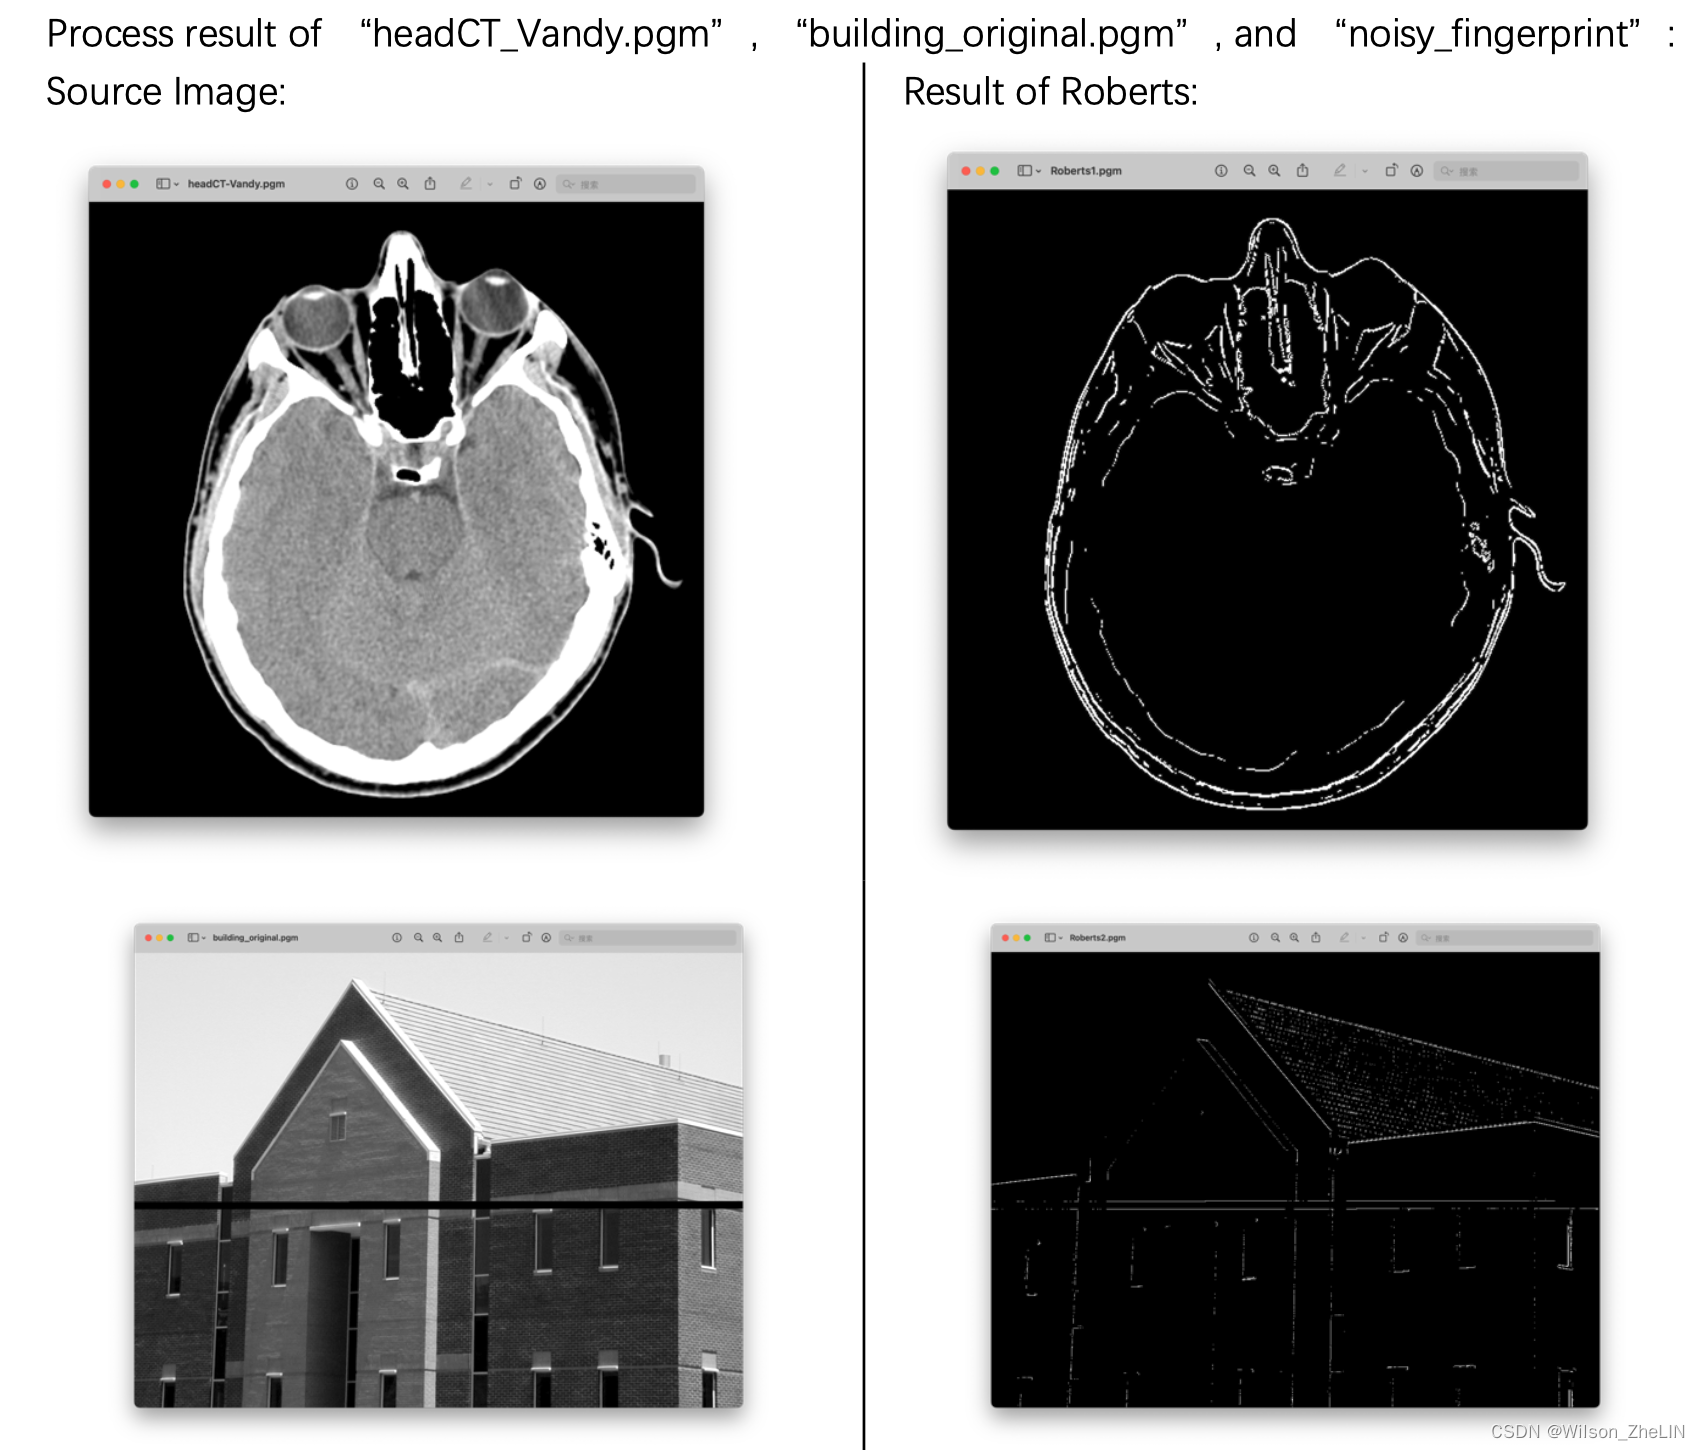

结果分析:
Roberts 算法使用局部差分算子来查找边缘。 当图像中的边缘接近+45度或-45度时,该算法效果更好。 Roberts算子对边缘的定位精度较高。 从处理结果来看,Roberts 算法对噪声比较敏感,因此适合于边缘比较明显、噪声较少的图像分割。
代码实现:
void Roberts(Image *image) {
    unsigned char *tempin, *tempout;
    float temp1, temp2;
    Image *outimage;
    outimage = CreateNewImage(image, (char*)"#testing function");
    tempin = image->data;
    tempout = outimage->data;

    for(int i = 0; i < image->Height-1; i++) {
        for(int j = 0; j < image->Width-1; j++) {
            temp1 = pow((float)tempin[image->Width * i + j] - (float)tempin[image->Width * (i+1) + j + 1], 2);
            temp2 = pow((float)tempin[image->Width * i + j + 1] - (float)tempin[image->Width * (i+1) + j], 2);
            tempout[image->Width * i + j] = (int)sqrt(temp1 + temp2);
        }
    }
    outimage = Threshold(outimage);
    SavePNMImage(outimage, (char*)"Roberts.pgm");
}
1.2 Prewitt算子:
Prewitt算子使用3×3的模板来计算区域内的值,其公式为:

相应的公式为:

图像和结果对比 (headCT_Vandy.pgm, building_original.pgm, noisy_fingerprint):


结果分析:
Prewitt算子采用3×3的模板来计算区域内的像素值,因此其边缘检测结果在水平和垂直方向上都比Robert算子明显。 Prewitt算子对噪声有一定的抑制作用。 抑制噪声的原理是像素平均,但Prewitt算子在定位边缘方面不如Roberts算子,而且可能会产生宽度为多个像素的边缘。 因此,Prewitt算子适合识别有一定噪声、灰度梯度明显的图像。
代码实现(完整代码见顶部GitHub):
for(int i = 0; i < image->Height; i++) {
    for(int j = 0; j < image->Width; j++) {
        index = 0;
        // record the values in the 3x3 square:
        for(int m = -1; m <= 1; m++) {
            for(int n = -1; n <= 1; n++) {
                // use boundary check:
                square[index++] = boundaryCheck(j + n, i + m, image->Width, image->Height) ? tempin[image->Width * (i + m) + (j + n)] : 0;
            }
        }
        temp1 = square[2] + square[5] + square[8] - square[0] - square[3] - square[6];
        temp2 = square[0] + square[1] + square[2] - square[6] - square[7] - square[8];
        tempout[image->Width * i + j] = abs(temp1) + abs(temp2);
    }
}
1.3 Sobel算子
Sobel 算子是一阶微分算子:

其中表示在
处最大变化率的方向。 我们用的水平和垂直卷积分别是:
然后结合每个像素的水平和垂直灰度值来计算新的灰度值:
图像和结果对比 (headCT_Vandy.pgm, building_original.pgm, noisy_fingerprint):
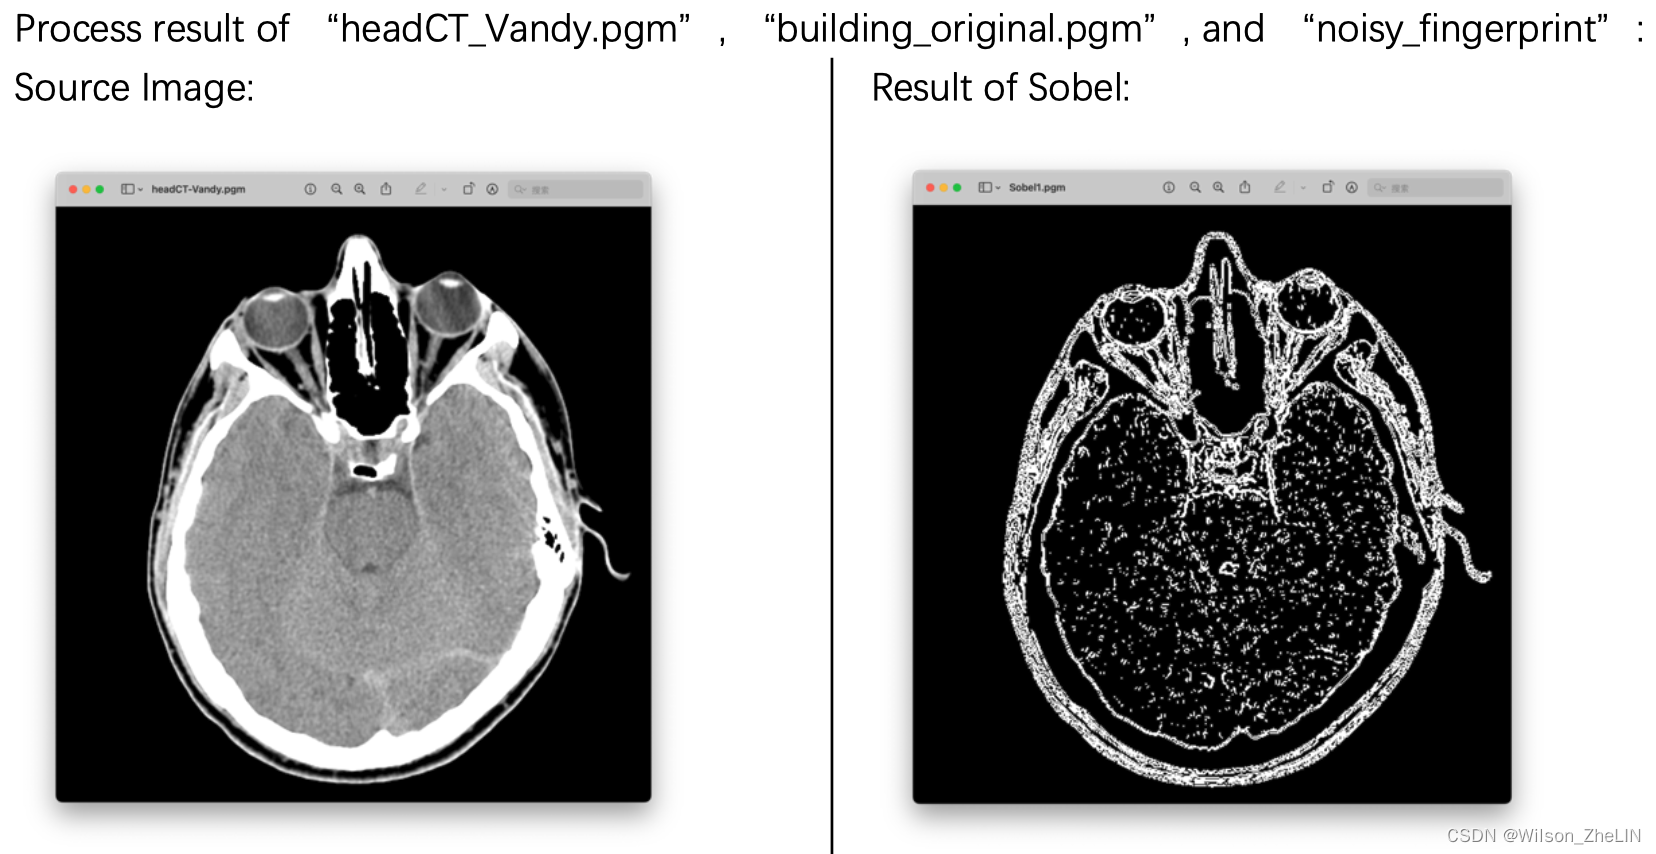
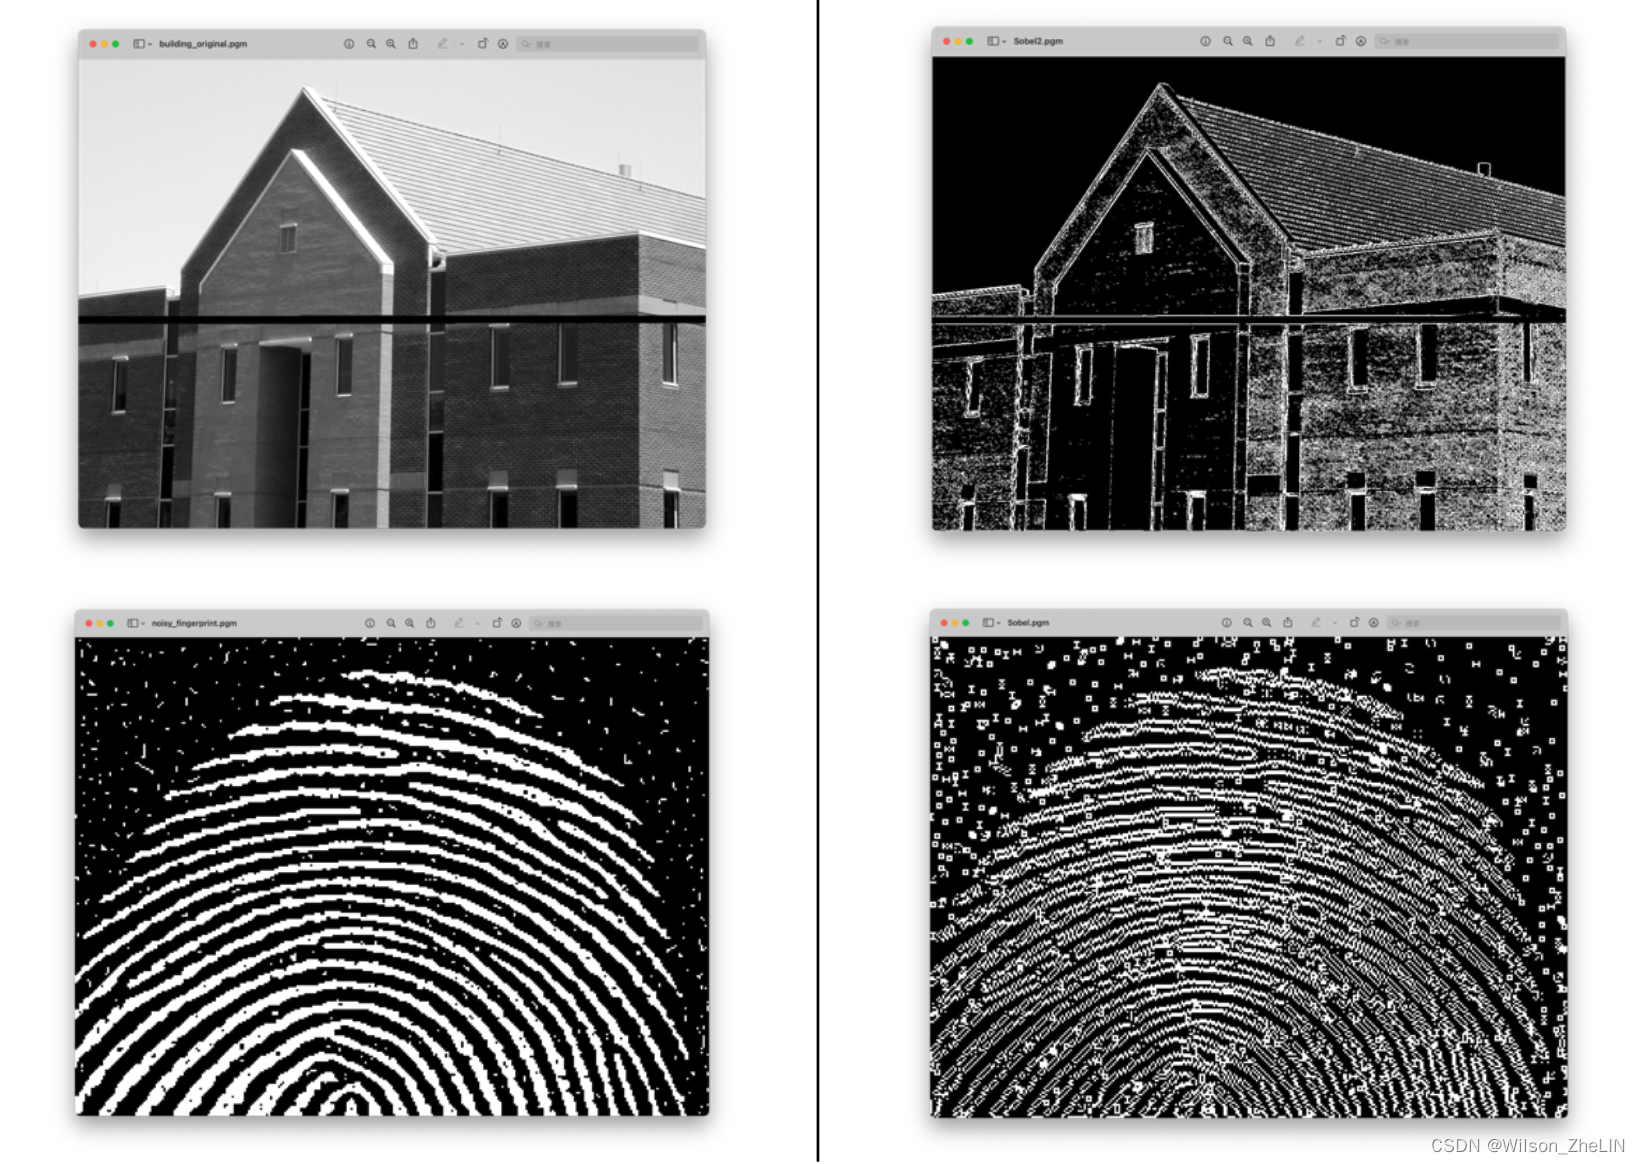
结果分析:
Sobel算子是根据该像素上下、左右邻近像素的强度的加权差在边缘处达到极值来检测边缘的。 由于Sobel算子结合了高斯平滑和微分求导,因此其结果具有更强的抗噪声能力。 并且由于它对像素位置的影响进行加权,因此 Sobel 比 Prewitt 和 Roberts 具有更好的边缘方向信息。
代码实现(完整代码见顶部GitHub):
for(int i = 0; i < image->Height; i++) {
    for(int j = 0; j < image->Width; j++) {
        index = 0;
        // record the values in the 3x3 square:
        for(int m = -1; m <= 1; m++) {
            for(int n = -1; n <= 1; n++) {
                // use boundary check:
                square[index++] = boundaryCheck(j + n, i + m, image->Width, image->Height) ? tempin[image->Width * (i + m) + (j + n)] : 0;
            }
        }
        temp1 = abs((float)square[2] + (float)square[5]*2 + (float)square[8] - (float)square[0] - (float)square[3]*2 - (float)square[6]);
        temp2 = abs((float)square[6] + (float)square[7]*2 + (float)square[8] - (float)square[0] - (float)square[1]*2 - (float)square[2]);
        tempout[image->Width * i + j] = (int)sqrt(pow(temp1, 2) + pow(temp2, 2));
    }
}
1.4 阈值处理
它遍历图像中的所有像素并获得最大强度,并乘以一个因子(在以下代码里面设为33%)以获得所需阈值。 如果原始像素的强度大于阈值,我们将其设置为白色(255),否则为黑色(0)。
*阈值处理的结果已包含在上述3种算法中。
代码实现:
Image *Threshold(Image *image) {
    unsigned char *tempin, *tempout;
    Image *outimage;
    int size = image->Width * image->Height, max = 0;
    outimage = CreateNewImage(image, (char*)"#testing function");
    tempin = image->data;
    tempout = outimage->data;

    for(int i = 0; i < size; i++) {
        if(tempin[i] > max) max = tempin[i];
    }
    int threshold = round((float)max * 0.33);

    for(int i = 0; i < size; i++) {
        if(tempin[i] >= threshold) tempout[i] = 255;
        else tempout[i] = 0;
    }
    return(outimage);
}
2. 边缘检测算法
2.1 Canny:
Canny的算法主要有四个步骤:
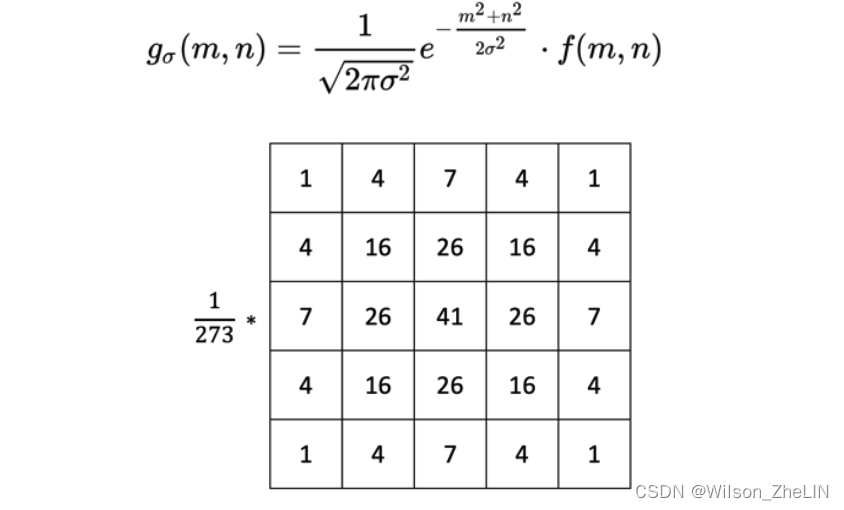
(1) 高斯滤波器:目的是抑制噪声。 导数的计算对噪声敏感,因此必须使用滤波器来提高噪声相关边缘检测器的性能。 这里使用的算法和模板是:

(2)计算梯度大小和方向:使用Sobel算子, 梯度大小和方向的公式为:

其中 是不同方向的梯度值。
(3)非极大值滤波:如果某个像素点属于边缘,则该像素点在梯度方向上的梯度值最大, 否则就不是边缘,其值应设置为0。总共有4个方向,中心方向应为最大值:
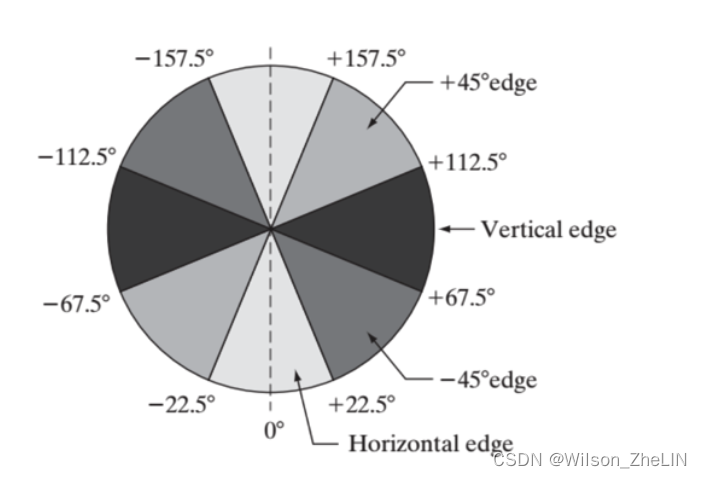
其中方向由上一步获得的角度确定。
(4) 双阈值算法检测:大于𝑚𝑎𝑥𝑉𝑎𝑙的像素被检测为边缘,低于𝑚𝑖𝑛𝑣𝑎𝑙的像素被检测为非边缘。 对于中间的像素,如果与判定为边缘的像素相邻,则判定为边缘,否则判定为非边缘。

图像和结果对比 (headCT_Vandy, noisy_fingerprint):


结果分析:
总体来说Canny 是一种优秀的边缘检测算法。 它几乎找到了所有边缘,并且检测到的边缘点都是单个的。 不同尺度下边缘点的位置偏差几乎相同。 它具有一定的抗噪能力,但无法处理“noise_fingerprint”这个程度。 此外,Canny算子可以更好地检测弱边缘。
代码按以下的顺序实现(完整代码见顶部GitHub中的`void Canny(Image *image)`):
(1) Step 1: Gaussian Filter
(2) Step 2: Sobel Operator and obtain the directions
(3) Step 3: Non-maximum suppression
(4) Step 4: Detection with double threshold algorithm
2.2 LoG算法
LoG算法包含三个主要的步骤:
(1) 高斯滤波器:与Canny中相同:
(2) 计算拉普拉斯算子:

其中使用的 3x3 模板为:
(3) 在步骤 2 生成的图像中找零交叉点(Zero Crossings)。以 𝑃 为中心的 3*3 掩模,有四种情况要考虑:左/右、上/下,和两个对角。 如果任一方向上相对的一对像素之间的强度绝对差超过预设阈值,并且中心像素 𝑃 本身的强度足够高,则认为𝑃 是一个零交叉点。
图像和结果对比 (headCT_Vandy, noisy_fingerprint):


结果分析:
为了更有效地检测不同尺度的边缘,建议采用具有不同尺度参数的拉普拉斯高斯(LoG)算子。相较于Canny边缘检测器,LoG算子在定位边缘点时更为精确。然而,它的一个主要缺陷是对噪声较为敏感,这可能导致误检测虚假边缘,尤其是在弯曲边缘区域,定位误差可能更加显著。LoG检测器利用二阶导数的过零点来识别边缘,噪声的影响相对较大。不过,通过在LoG算子之前应用高斯滤波进行图像平滑处理,可以有效减少噪声的影响,从而提升边缘检测的准确性和可靠性。
代码实现(完整代码见顶部GitHub):
void LoG(Image *image) {
    unsigned char *tempin, *tempout, *tempout1;
    Image *outimage, *outimage1;
    int index, square[9];

    outimage = CreateNewImage(image, (char*)"#testing function");
    outimage1 = CreateNewImage(image, (char*)"#testing function");
    tempout1 = outimage1->data;

    // Step 1: Gaussian Blur:
    image = Gaussian(image);
    tempin = image->data;

    // Step 2: Laplacian:
    outimage = Laplacian(image);
    tempout = outimage->data;
    SavePNMImage(outimage, (char*)"Laplacian.pgm");

    // Step 3: Find zero crossings:
    for(int i = 0; i < image->Height; i++) {
        for(int j = 0; j < image->Width; j++) {
            index = 0;
            // record the values in the 3x3 square:
            for(int m = -1; m <= 1; m++) {
                for(int n = -1; n <= 1; n++) {
                    // use boundary check:
                    square[index++] = boundaryCheck(j + n, i + m, image->Width, image->Height) ? tempin[image->Width * (i + m) + (j + n)] : 0;
                }
            }
            if(square[4] > 80 && (abs(square[8]-square[0]) > 60 || abs(square[7]-square[1]) > 60 || abs(square[6]-square[2]) > 60 || abs(square[5]-square[3]) > 60))  {
                tempout1[image->Width * i + j] = 200;
            }
            else tempout1[image->Width * i + j] = 0;

        }
    }
    SavePNMImage(outimage1, (char*)"LoG.pgm");
}
3. 全局阈值处理
全局阈值法的核心思想是选择一个阈值 𝑇,将图像像素划分为两个明确的部分,基本上是将图像分割为前景和背景。
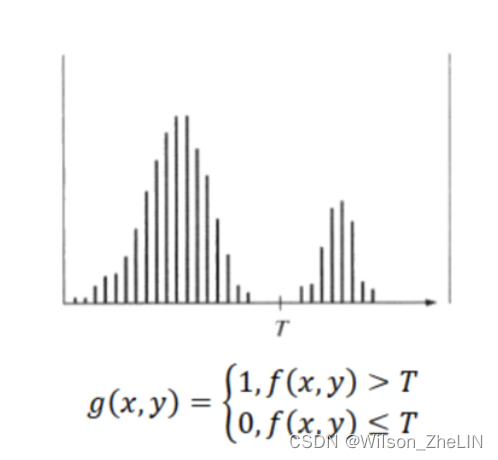
全局阈值法的原则是将所有亮度值大于阈值 𝑇 的像素赋值为255,其他像素则被忽略。确定适当的 𝑇 需要经过以下步骤:
- 为全局阈值 𝑇 选择一个初始估计值
- 使用 𝑇 对图像进行分割,得到两组像素:𝐺1 包含所有大于 𝑇 的像素,而 𝐺2 包含所有小于或等于 𝑇 的像素
- 分别计算 𝐺1和 𝐺2 像素的平均亮度值 𝑚1 和 𝑚2
- 将 𝑇 更新为 𝑚1 和 𝑚2 的平均值,具体为 𝑇 = 1/2 ∗ (𝑚1 + 𝑚2)
- 重复步骤 2 至 4,直到 𝑇 在连续迭代中稳定下来
图像和结果对比 (polymersomes, noisy_fingerprint):

结果分析:
全局阈值法利用阈值 𝑇 来分割图像,有效地提取出暗背景下的亮对象。当图像前景和背景的直方图之间有一个明显的低谷时,这种方法特别有效。然而,这种方法不适用于具有固有噪声的二值图像,比如“noisy_fingerprint”,在这种图像中,所有白色部分的值都会超过阈值,因此在分割后不会有任何区别。
代码实现:
void GlobalThreshold(Image *image) {
    unsigned char *tempin, *tempout;
    Image *outimage;
    float T = 128; // provide an initial T
    int size = image->Width * image->Height, times = 0;
    outimage = CreateNewImage(image, (char*)"#testing function");
    tempin = image->data;
    tempout = outimage->data;

    while(times < 30) {
        float count1 = 0, count2 = 0, sum1 = 0, sum2 = 0;
        times++;

        for(int i = 0; i < size; i++) {
            if(tempin[i] >= T) {
                sum2 += tempin[i];
                count2++;
            }
            else {
                sum1 += tempin[i];
                count1++;
            }
        }
        float average1 = sum1 / count1;
        float average2 = sum2 / count2;
        T = (average1 + average2) / 2.0;// update the T1
    }
    // output the image:
    for(int i = 0; i < size; i++) {
        if(tempin[i] >= T) tempout[i] = 255;
        else tempout[i] = 0;
    }
    SavePNMImage(outimage, (char *)"Global Threshold.pgm");
}
4. 完整代码
这一章节的完整代码在:9. Thresholding, Roberts, Prewitt, Sobel, and Edge Detection
更多关于数字图像处理的章节,以及所有的原图像在:Introduction to Digital Image Processing
如果你喜欢这个系列的文章或者对你有帮助,请给我的仓库一个⭐️。
-END-


 1万+
1万+


 被折叠的 条评论
为什么被折叠?
被折叠的 条评论
为什么被折叠?
 到【灌水乐园】发言


