


文章目录
基于Spring Boot和百度智能云的人脸识别功能的设计与实现
1、前言
最近在Android的课程设计,老师要求一定要用手机传感器,并自己设计一个题目。我思来想去,最后想着用人脸识别做一个登录模块,一开始没有头绪嘛,但是无意中进到百度智能云的界面,了解到百度智能云有提供第三方的API,因此,我就用Spring Boot整合了第三方的API(百度智能云人脸识别API)完成这个功能模块的开发。
注:此处只提供人脸识别的后台接口的实现,读者可将此模块加到自己的项目中,由Web前端或者App端传递一张人脸照片进行验证,或者使用项目中的单元测试进行验证。
2、实现

2.1、百度智能云的人脸识别API
-
创建应用

-
可以选择自己想要使用的接口:比如人脸识别、语音技术等,本次项目采用的是人脸识别,官方也默认选择了人脸识别的全部接口,所以也不需要做改动,只需要填写应用名称即可!

-
获取密钥
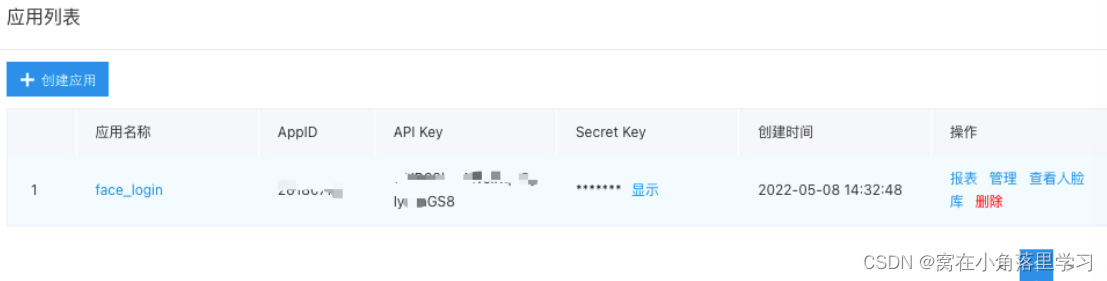
官网文档:人脸识别-百度智能云
3、实现
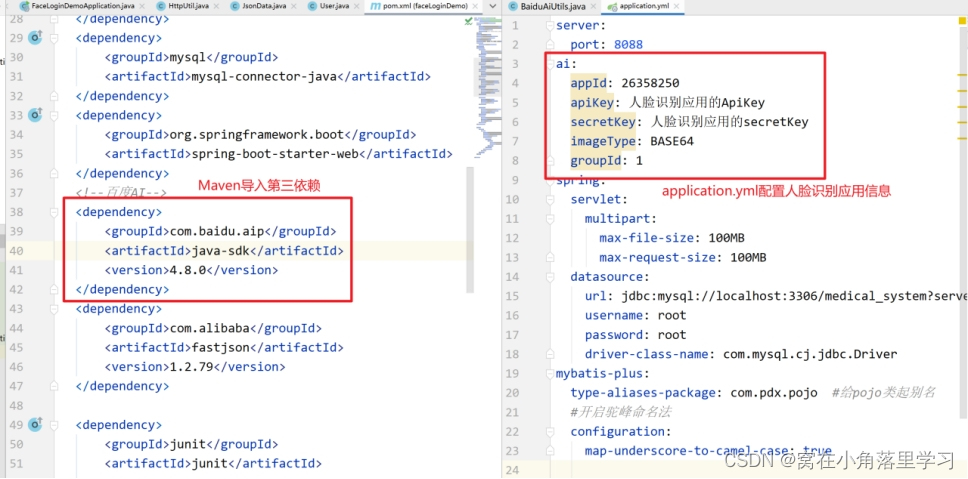
3.1、导入依赖
<dependency>
  <groupId>com.baidu.aip</groupId>
  <artifactId>java-sdk</artifactId>
  <version>4.9.0</version>
</dependency>
3.2、人脸注册
/**
 * 人脸注册测试
 *
 * @throws IOException
 */
@Test
public void testFaceRegister() throws IOException {
    String appId = "26358250";
    String apiKey = "你的百度云APIKey";
    String secretKey = "你的百度云secretKey";
    String imageType = "BASE64";
    String groupId = "1";
    String userId = "face_test";
    /*
     * 1. 创建Java代码和百度云交互的Client对象
     */
    AipFace client = new AipFace(appId, apiKey, secretKey);
    /*
     * 2. 参数设置
     */
    HashMap<String, String> map = new HashMap<>();
    //图片质量
    map.put("quality_control", "NORMAL");
    //活体检测
    map.put("liveness_control", "LOW");
    /*
     * 3. 构造图片
     * 上传的图片  两种格式:url地址 Base64字符串形式
     */
    String path = "本地照片的路径";
    byte[] bytes = Files.readAllBytes(Paths.get(path));
    String encode = Base64Util.encode(bytes);
    /*
     * 4. 调用api方法完成人脸注册
     * 参数1:图片的url或者base64字符串
     * 参数2:图片形式(URL,BASE64)
     * 参数3:组Id(固定一个字符串)
     * 参数4:用户Id
     * 参数5:hashMap基本参数配置
     */
    JSONObject res = client.addUser(encode, imageType, groupId, "1001", map);
    System.out.println(res.toString());
}
运行后,res这个JSON字符中中会有一个“error_code”的字段,其值为0则表示成功。
其他字段的详细意思见官方文档。
3.3、人脸检测
/**
 * 人脸检测 判断图片中是否有面部信息
 */
@Test
public void testFaceCheck() throws IOException {
    String appId = "26358250";
    String apiKey = "你的百度云APIKey";
    String secretKey = "你的百度云secretKey";
    String imageType = "BASE64";
    String groupId = "1001";
    String userId = "face_test";
    //1. 创建Java代码和百度云交互的Client对象
    AipFace client = new AipFace(appId, apiKey, secretKey);
    //2. 构造图片
    String path = "本地照片的路径";
    //上传的图片  两种格式:url地址 Base64字符串形式
    byte[] bytes = Files.readAllBytes(Paths.get(path));
    String encode = Base64Util.encode(bytes);
    //调用Api方法进行人脸检测
    /*
     * 参数1:图片的url或者base64字符串
     * 参数2:图片形式(URL,BASE64)
     * 参数3:hashMap中的基本参数配置(null:使用默认配置)
     */
    JSONObject result = client.detect(encode, imageType, null);
    System.out.println(result.toString(2));
}
响应结果:
![[外链图片转存失败,源站可能有防盗链机制,建议将图片保存下来直接上传(img-gGiRw3Nc-1657454128434)(E:\File\Blog\项目\6_基于百度智能云的人脸识别模块\人脸识别.assets\wps1.jpg)]](https://img-blog.csdnimg.cn/edd00986e8aa4d6a9ac67ba4f1b4dcc6.jpeg)
3.4、人脸搜索
/**
 * 人脸搜索:根据用户上传的图片和指定人脸库中的所有人脸进行比较
 * score:相似度评分(80分以上可以认为是同一个人)
 */
@Test
public void testFaceSearch() throws IOException {
    String appId = "26358250";
    String apiKey = "你的百度云APIKey";
    String secretKey = "你的百度云secretKey";
    String imageType = "BASE64";
    String groupId = "1";
    String userId = "face_test";
    //1. 创建Java代码和百度云交互的Client对象
    AipFace client = new AipFace(appId, apiKey, secretKey);
    //2. 构造图片
    String path = "本地照片的路径";
    //上传的图片  两种格式:url地址 Base64字符串形式ee
    byte[] bytes = Files.readAllBytes(Paths.get(path));
    String encode = Base64Util.encode(bytes);
    //人脸搜索
    JSONObject res = client.search(encode, imageType, groupId, null);
    System.out.println(res.toString(2));
}
3、整合
3.2、配置application.yml
3.2、第三方API二次封装
我们对百度智能云提供的第三方API进行二次封装,封装成一个BaidiAiUtils.java工具类,并且加上@Component注解,将其注册到Spring容器中,在Spring Boot应用启动后将自动实例化该类,我们只需要在需要时注入并使用即可,BaiduAiUtils.java的源码如下:
package edu.zhku.utils;

import com.baidu.aip.face.AipFace;
import edu.zhku.common.Const;
import lombok.extern.slf4j.Slf4j;
import org.json.JSONObject;
import org.springframework.beans.factory.annotation.Value;
import org.springframework.stereotype.Component;

import javax.annotation.PostConstruct;
import java.util.HashMap;


/**
 * @author Zhang
 * @date 2022-06-08 17:05
 * @description 百度智能云人脸识别API工具类
 */
@Slf4j
@Component
public class BaiduAiUtils {
    @Value("${ai.appId}")
    private String appId;
    @Value("${ai.apiKey}")
    private String apiKey;
    @Value("${ai.secretKey}")
    private String secretKey;
    @Value("${ai.imageType}")
    private String imageType;
    @Value("${ai.groupId}")
    private String groupId;

    /**
     * 客户端
     */
    private AipFace client;

    private HashMap<String, String> option;


    /**
     * Spring容器初始化自动执行该方法
     */
    @PostConstruct
    public void init() {
        client = new AipFace(appId, apiKey, secretKey);
        option = new HashMap<>(16);
        //图片质量
        option.put("quality_control", "NORMAL");
        //活体检测
        option.put("liveness_control", "LOW");
    }

    /**
     * 人脸注册,将用户照片存入人脸库中
     *
     * @param userId 用户id
     * @param image  图片的URL或者BASE64字符串
     * @return true-成功,反之
     */
    public Boolean faceRegister(String userId, String image) {
        /*
         * 人脸注册
         * image:图片的URL或者BASE64字符串
         * imageType:图片形式(URL,BASE64)
         * groupId:组Id(固定一个字符串)
         * userId:用户Id
         * option:hashMap基本参数配置
         */
        JSONObject res = client.addUser(image, imageType, groupId, userId, option);
        log.debug("BaiduAiUtils--faceRegister");
        log.debug(res.toString());
        return res.getInt("error_code") == 0;
    }

    /**
     * 人脸更新,更新人脸库中的用户照片
     *
     * @param userId 用户id
     * @param image  图片的URL或者BASE64字符串
     * @return true-成功,反之
     */
    public Boolean faceUpdate(String userId, String image) {
        /*
         * 人脸更新
         * image:图片的URL或者BASE64字符串
         * imageType:图片形式(URL,BASE64)
         * groupId:组Id(固定一个字符串)
         * userId:用户Id
         * option:hashMap基本参数配置
         */
        JSONObject res = client.updateUser(image, imageType, groupId, userId, null);
        //获取error_code,其值为0则表示测试成功
        return res.getInt("error_code") == 0;
    }

    /**
     * 人脸检测。判断上传的图片中是否具有面部信息
     *
     * @param image 图片的URL或者BASE64字符串
     * @return true-成功,反之
     */
    public Boolean faceCheck(String image) {
        JSONObject res = client.detect(image, imageType, null);
        if (res.has(Const.ERROR_CODE) && res.getInt(Const.ERROR_CODE) == 0) {
            //获取"result"域的数据
            JSONObject resultObject = res.getJSONObject("result");
            //result域的face_num为1,则表示检验成功
            return resultObject.getInt("face_num") == 1;
        } else {
            return false;
        }
    }

    /**
     * 人脸查找:查找人脸库中最相似的人脸并返回数据
     * 处理:用户的匹配得分(score)大于80分,即可认为是同一个人
     *
     * @param image 图片的URL或者BASE64字符串
     * @return userId
     */
    public JSONObject faceSearch(String image) {
        JSONObject res = client.search(image, imageType, groupId, null);
        log.info("BaiduAiUtils--faceSearch");
        return res;
//        if (res.has(Const.ERROR_CODE) && res.getInt(Const.ERROR_CODE) == 0) {
//            //获取"result"域数据
//            JSONObject resultObject = res.getJSONObject("result");
//            //获取"result"下"user_list"的数据
//            JSONArray userList = resultObject.getJSONArray("user_list");
//            if (userList.length() > 0) {
//                JSONObject user = userList.getJSONObject(0);
//                double score = user.getDouble("score");
//                if (score >= Const.USER_CHECKED_SCORE) {
//                    return user.getString("user_id");
//                }
//            }
//        }
    }
}
3.3、数据接口
/**
* 人脸识别登录
* @param file
* @return
* @throws IOException
*/
@PostMapping("/upload/image")
public String login(@RequestParam("file") MultipartFile file) throws I
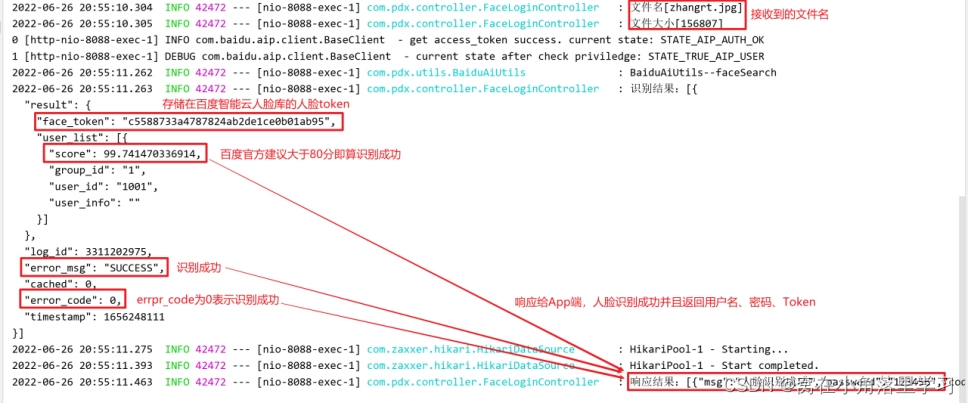
log.info("[{}]", file.getName());
log.info("FaceLoginController--login3");
log.info("文件不为空");
log.info("文件名[{}]", file.getOriginalFilename());
log.info("文件大小[{}]", file.getSize());
byte[] bytes = file.getBytes();
Map<String, Object> resultMap = new HashMap<>(16);
String imageBase64 = null;
try {
//压缩文件并转换成Base64编码
imageBase64 = Base64Util.encode(ImageUtils.imageSet(bytes));
} catch (Exception e) {
e.printStackTrace();
}
JSONObject res = baiduAiUtils.faceSearch(imageBase64);
log.info("识别结果:[{}]", res.toString(2));
if (res.has(Const.ERROR_CODE) && res.getInt(Const.ERROR_CODE) == 0
JSONObject resultObject = res.getJSONObject("result");
// 获取 "result" 下 "user_list" 的数据
JSONArray userList = resultObject.getJSONArray("user_list");
if (userList.length() > 0) {
JSONObject user = userList.getJSONObject(0);
double score = user.getDouble("score");
if (score >= Const.USER_CHECKED_SCORE) {
User login = userService.login(user.getInt("group_id")
resultMap.put("msg", "人脸识别成功");
resultMap.put("code", "200");
resultMap.put("userName", login.getAccount());
resultMap.put("password", login.getPassword());
}
}
} else {
resultMap.put("msg", "人脸识别失败");
resultMap.put("code", "500");
}
log.info("响应结果:[{}]", JSON.toJSONString(resultMap));
return JSON.toJSONString(resultMap);
}
日志打印:
4、报错调试
4.1、API报错 oauth get error
在调用第三方API进行人脸识别时,报出以下错误:
0 [main] WARN com.baidu.aip.client.BaseClient  - oauth get error, current state: STATE_TRUE_CLOUD_USER
{
  "error_msg": "IAM Certification failed",
  "error_code": 14
}
解决方法:仔细检查APP_ID、API_KEY、SECRET_KEY字符串,一般都是直接复制所以复制出错的概率很低,但是字符串首尾中是否有空格这一点很容易忽视。
4.2、图片过大导致无法识别
我们在接收App端传过来的人脸图像,编码后调用百度智能云的API进行人脸识别时,会显示图片过大,因为我们一般照片都是在几十到几百KB,但是因为现在相机的像素比较高(我的应用场景是调用手机设摄像头拍摄进行人脸识别登录),一张照片基本都在几MB左右,我们要需要对照片进行压缩处理,然后再将图片转为Base64编码,再调用第三方接口。
这里提供一个工具ImageUtils.java,传入图像的字节数组即可完成压缩,返回图像压缩后的字节数组,ImageUtils.java工具类源码如下:
package edu.zhku.utils;

import javax.imageio.ImageIO;
import java.awt.image.BufferedImage;
import java.awt.image.ImageObserver;
import java.io.ByteArrayInputStream;
import java.io.ByteArrayOutputStream;
import java.io.InputStream;

/**
 * @author Zhang
 * @date 2022/6/24 14:06
 * @description 图像处理工具类
 */
public class ImageUtils {

    /**
     * 压缩图片
     *
     * @param fromPath1 byte直接文件图片
     * @return 剪切后的byte文件
     */
    public static byte[] imageSet(byte[] fromPath1) throws Exception {
        return imageChangeSize(fromPath1, 470, 635);
    }

    /**
     * @param data   byte类型图片
     * @param max_wi 图片修改后最大的宽
     * @param max_he 图片修改后最大的高
     * @return
     * @throws Exception
     * @Description 更改图片内容的大小 byte【】 类型
     */
    public static byte[] imageChangeSize(byte[] data, int max_wi, int max_he) throws Exception {
        ImageIO io = null;
        float rate = 1;
        /*图片的原始宽 120*/
        int oldwi;
        /*图片的原始高 120*/
        int oldhe;
        /*图片修改后的宽 0*/
        int new_wi = 0;
        /*图片修改后的高 0*/
        int new_he = 0;
        /*拿到byte图片*/
        InputStream is = new ByteArrayInputStream(data);
        BufferedImage bufImg = ImageIO.read(is);
        /*图片的原始宽度*/
        oldwi = bufImg.getWidth();
        /*图片的原始高度*/
        oldhe = bufImg.getHeight();
        //
        rate = (float) oldwi / (float) oldhe;
        /*
         * 如果图片的原宽大于最大宽度,并且原高小于等于最大高度。
         * 则证明图片过宽了,将图片宽度设置为最大宽度,此时需要等比例减小高度
         */
        if (oldwi > max_wi && oldhe <= max_he) {
            new_wi = max_wi;
            new_he = new Float((float) new_wi / rate).intValue();
            /*
             * 如果图片的原宽和原高都大于或者都小于其所对应的最大值,
             * 则以任意一方为主(此处以最大高度为主)
             */
        } else if (oldwi >= max_wi && oldhe >= max_he || oldwi <= max_wi && oldhe <= max_he) {
            new_he = max_he;
            new_wi = new Float(new_he * rate).intValue();
            /*
             * 如果图片的原宽小于于最大宽度,并且原高大于等于最大高度。
             * 则证明图片过高了,将图片宽度设置为最大高度,此时需要等比例减小宽度
             */
        } else if (oldwi <= max_wi && oldhe > max_he) {
            new_he = max_he;
            new_wi = new Float(new_he * rate).intValue();
        }
        /*
         * 开始改变大小
         */
        ImageObserver ser = null;
        BufferedImage bf = new BufferedImage(new_wi, new_he, BufferedImage.TYPE_INT_RGB);
        bf.getGraphics().drawImage(bufImg, 0, 0, new_wi, new_he, null);
        ByteArrayOutputStream out = new ByteArrayOutputStream();
        //转换编码格式JPEG
        ImageIO.write(bf, "jpeg", out);
        return out.toByteArray();
    }
}


 1898
1898


 被折叠的 条评论
为什么被折叠?
被折叠的 条评论
为什么被折叠?
 到【灌水乐园】发言


