


Spring概述与架构
Spring核心之一——Ioc/DI(一)
1 Spring下载
spring-framework-4.1.2下载地址:
http://download.csdn.net/download/winston_d/10046400
spring-framework-3.2.0.RELEASE-dependencies(依赖包)下载地址:
http://download.csdn.net/download/winston_d/10046413
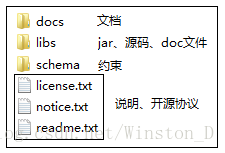
spring-4.1.2目录结构
2 Spring核心
Spring核心包括控制反转(IoC)、依赖注入(DI)和AOP。其中控制反转(IoC)和依赖注入(DI)是同一概念。
3 IoC/DI
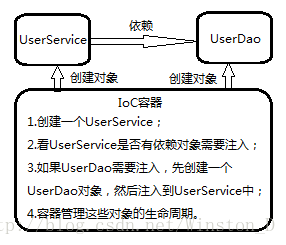
IoC(Inversion of Control):控制反转,是一种设计思想。在开发中,IoC意味着将设计好的对象交给容器来创建和注入。
传统的Java程序设计中,我们直接在对象内部通过new进行创建对象,这是程序主动去创建依赖对象;而IoC是有专门的容器来控制对象的创建。所谓反转是依赖对象的获取被反转了,容器来帮助我们创建和注入依赖对象,而对象只是被动的接受依赖对象。相对的程序中对象主动控制获取依赖对象叫作正转。
DI(Dependency Injection):依赖注入,容器的管理对象对于外部资源(对象、资源、常量数据等)的依赖由IoC容器来管理和注入。
组件之间依赖关系由容器在运行期决定,即容器会动态的将某个依赖关系注入到组件中。依赖注入的目的不是为应用程序带来更多功能,而是为了提升组件的重用性,通过简单的配置就可以搭建一个灵活的、可扩展的应用。
IoC和DI是同一个概念的不同角度描述,由于控制反转概念比较含糊(可能只是理解为容器控制对象,很难想到谁来维护对象关系),所以04年Martin Fowler又给出了一个新的名字“依赖注入”,明确描述了被注入对象依赖IoC容器配置依赖对象。
4 BeanFactory
IoC容器负责实例化、配置应用程序中的对象及建立这些对象间的依赖关系。IoC容器通过读取配置文件中的数据来对各个对象进行实例化和装配。一般基于xml配置文件配置,也可以通过注解的方式进行配置。
Ioc容器的代表是spring-beans包中的BeanFactory接口。BeanFactory接口提供了IoC容器最基本功能,而spring-context包中的ApplicationContext接口继承了BeanFactory接口,还扩提供了与Spring AOP集成、国际化处理(I18N)、文本信息解析工具、事件传播等功能。
4.1 BeanFactory接口源码
public interface BeanFactory {
    String FACTORY_BEAN_PREFIX = "&";
    // 根据name获取Bean
    Object getBean(String name) throws BeansException;
    // 根据name和Class获取Bean
    <T> T getBean(String name, Class<T> requiredType) throws BeansException;
    // 根据Class获取Bean
    <T> T getBean(Class<T> requiredType) throws BeansException;
    // 根据name和其它信息获取Bean
    Object getBean(String name, Object... args) throws BeansException;
    // 根据Class和其它信息获取Bean
    <T> T getBean(Class<T> requiredType, Object... args) throws BeansException;
    // 判断容器是否包含某个Bean
    boolean containsBean(String name);
    // 判断Bean是否是单例
    boolean isSingleton(String name) throws NoSuchBeanDefinitionException;
    // 判断Bean是否是多例
    boolean isPrototype(String name) throws NoSuchBeanDefinitionException;
    // 判断某个Bean是否是某个Class类型
    boolean isTypeMatch(String name, Class<?> targetType) throws NoSuchBeanDefinitionException;
    // 获取Class的类型
    Class<?> getType(String name) throws NoSuchBeanDefinitionException;
    // 获取别名
    String[] getAliases(String name);
}
4.2 获取BeanFactory
XmlBeanFactory:BeanFactory的实现,提供基本的IoC容器功能,可以从文件系统或classpath路径获取资源,但该方法已过时。
// 1.读取文件系统
File file = new File("fileSystemConfig.xml");
Resource resource = new FileSystemResource(file);
// 2.获取核心对象BeanFactory
BeanFactory beanFactory = new XmlBeanFactory(resource);
// 1.读取资源文件
Resource resource = new ClassPathResource("classpath.xml");
// 2.拿到核心对象 BeanFactory
BeanFactory factory = new XmlBeanFactory(resource);4.3 BeanFactory获取bean的方式
方式一:通过配置的id直接获取,但需要强转。
// 通过xml中配置的id
MyBean bean = (MyBean)factory.getBean("myBean");
方式二:通过class获取,但这个class类在配置中只能出现一次。
// 通过类的class
MyBean bean = factory.getBean(MyBean.class);
方式三:通过id与class获取,不需要强转。
// 通过xml中配置的id与class
MyBean bean = factory.getBean("myBean",MyBean.class);
5 ApplicationContext
ApplicationContext接口继承了BeanFactory接口,可以通过ApplicationContext的实现类来获取BeanFactory。
使用ApplicationContext必须导入spring-context-4.1.2.RELEASE.jar与spring-expression-4.1.2.RELEASE.jar,xml中有时会写表达式。
5.1 获取BeanFactory
FileSystemXmlApplicationContext
ApplicationContext的实现,从文件系统获取配置文件。
BeanFactory beanFactory = new FileSystemXmlApplicationContext("fileSystemConfig.xml");
// 或者
ApplicationContext context = new FileSystemXmlApplicationContext("fileSystemConfig.xml");
ClassPathXmlApplicationContext
ApplicationContext的实现,从classpath获取配置文件。
BeanFactory beanFactory = new ClassPathXmlApplicationContext("classpath.xml");
// 或者
ApplicationContext context = new ClassPathXmlApplicationContext("classpath.xml");
5.2 ApplicationContext获取Bean
ApplicationContext接口获取Bean的方法:
1.Object getBean(String name):根据name返回一个Bean,需要强转;
2.T getBean(String name, Class requiredType):根据name和指定的类型返回一个Bean,不需要强转;
3.T getBean(Class requiredType):根据指定的类型返回一个Bean,不需要强转;
4.Map<String, T> getBeansOfType(Class type):根据指定的类型返回一个键为name和值为Bean对象的 Map,如果没有Bean对象则返回空的Map。
相对于BeanFactory获取Bean,ApplicationContext多了一个获取Map集合的方法。
5.3 ApplicationContext与BeanFactory的区别
ApplicationContext是BeanFactory的子类,拥有更多的功能。ApplicationContext在启动时就创建了Bean,所以启动速度慢,运行速度快;而BeanFactory是在使用Bean时才创建。
使用ApplicationContext的时候,可以通过配置让它也变成与BeanFactory一样的懒加载模式:
1.default-lazy-init让所有Bean都变成懒加载
<?xml version="1.0" encoding="UTF-8"?>
<beans xmlns="http://www.springframework.org/schema/beans"
    xmlns:xsi="http://www.w3.org/2001/XMLSchema-instance"
    xmlns:context="http://www.springframework.org/schema/context"
    xsi:schemaLocation="
        http://www.springframework.org/schema/beans
        http://www.springframework.org/schema/beans/spring-beans.xsd
        http://www.springframework.org/schema/context
        http://www.springframework.org/schema/context/spring-context.xsd"
        default-lazy-init="true">

    <bean id="myBean" class="cn.wenwen.bean.MyBean"></bean>
</beans>
2.lazy-init让其中一个Bean变成懒加载
<bean id="myBean" class="cn.wenwen.domain.MyBean" lazy-init="true"></bean>6 Bean
由IoC容器管理的对象称作Bean。即Bean就是由Spring容器初始化、装配及管理的对象。Spring容器会根据配置文件来决定如何实例化Bean并管理Bean之间的关系。
6.1 Bean的配置信息
Bean将根据配置文件中的Bean定义进行创建,Bean定义在容器内部由BeanDefinition对象表示,该定义主要包含以下信息:
1.全限定类名(FQN):用于定义Bean的实现类;
2.Bean行为定义:定义Bean在容器中的行为,包括作用域(单例、原型创建)、是否惰性初始化(懒加载)及生命周期等;
3.Bean创建方式定义:通过构造器还是工厂方法创建Bean;
4.Bean之间关系定义:对其它bean的引用,即依赖关系定义;
Bean定义只有“全限定类名”在使用构造器或静态工厂方法进行实例化bean时是必须的,其他都是可选的定义。
6.2 Bean的命名
<bean id="myBean" class="cn.wenwen.domain.MyBean"></bean>在<bean>中,name与id是一样的。在配置文件通常使用id,name只在一些老项目(Struts1)中使用。在整个容器中Bean的id应该是唯一的。多个单词组成的id可采用驼峰式命名。class为配置的全限定类名。
使用<alias>标签可以指定bean的别名:
<bean name="myBean" class="cn.wenwen.domain.MyBean"></bean>
<alias name="myBean" alias="bean"/>
6.3 Bean对象的作用域scope
在面向对象中作用域一般指对象或变量之间的可见范围。而在Spring容器中是指其创建的Bean对象相对于其他Bean对象的请求可见范围。
| 作用域类别 | 描述 |
|---|---|
| singleton单例 | 在Spring IoC容器中只存在一个bean实例 |
| prototype多例 | 每次从容器中调用bean时,都会创建一个bean,返回这个新实例。 |
| request请求 | 每次HTTP请求都会创建一个新的bean。 |
| session会话 | 同一个HTTP Session共享同一个bean。 |
| globalSession全局会话 | 通常用于Porlet应用环境,分布式系统存在全局session概念,如果不是Porlet环境,等同于session。 |
Spring提供了”singleton”和”prototype”两种基本作用域,还提供了”request”、”session”、”global session”三种web作用域,此外Spring还允许用户定制自己的作用域。
在Spring中的Bean默认都是单例(Dao、Service、DataSource、SessionFactory…),一些多例的对象不交给Spring管理(Domain、Util、Query、PageList…)。而Struts2中的Action是多例,Action会交给Spring管理,需要在<bean>中配置scope=”prototype”。
<!-- Struts2中的Action交给Spring管理,需要配置为prototype -->
<bean id="myAction" class="cn.wenwen.action.MyAction" scope="prototype"></bean>
6.4 Bean对象的生命周期
Spring会自动管理bean的构造、初始化、运行和销毁,一般不需要作配置。
<bean id="myBean" class="cn.wenwen.domain.MyBean" init-method="init" destroy-method="destory"></bean> init-method:初始化方法
destory-method:销毁方法
6.5 实例化Bean的三种方式
传统应用程序可以通过new和反射方式进行实例化。而Spring IoC容器则需要根据Bean定义中的配置使用反射机制来创建Bean。实例化Bean有四种方式:构造器、静态工厂、实例工厂。
7 获取bean示例
项目搭建
1.在eclipse中创建一个动态web项目;

2.修改项目的classpath路径,右键项目→Build Path→Configure Build Path;

Spring环境搭建
1.所需的jar包:
spring-core-4.1.2.RELEASE.jar(核心包)
spring-beans-4.1.2.RELEASE.jar(bean包)
spring-context-4.1.2.RELEASE.jar(context包)
spring-expression-4.1.2.RELEASE.jar(表达式包)
需要导入com.springsource.org.apache.commons.logging-1.1.1.jar核心依赖包(日志包)。
2.创建一个resources文件夹,然后创建一个applicationContext.xml文件,导入对应的配置信息。
<?xml version="1.0" encoding="UTF-8"?>
<beans xmlns="http://www.springframework.org/schema/beans"
    xmlns:xsi="http://www.w3.org/2001/XMLSchema-instance"
    xmlns:context="http://www.springframework.org/schema/context"
    xmlns:aop="http://www.springframework.org/schema/aop"
    xmlns:tx="http://www.springframework.org/schema/tx"
    xsi:schemaLocation="
        http://www.springframework.org/schema/beans
        http://www.springframework.org/schema/beans/spring-beans.xsd
        http://www.springframework.org/schema/context
        http://www.springframework.org/schema/context/spring-context.xsd
        http://www.springframework.org/schema/tx
        http://www.springframework.org/schema/tx/spring-tx.xsd
        http://www.springframework.org/schema/aop
        http://www.springframework.org/schema/aop/spring-aop.xsd">

</beans>
在配置文件中,根据需要添加约束:beans、context。
获取Bean
1.在包中(cn.wenwen.bean)创建一个Mybean类
public class MyBean {}2.配置文件中添加一个<bean>
<?xml version="1.0" encoding="UTF-8"?>
<beans xmlns="http://www.springframework.org/schema/beans"
    xmlns:xsi="http://www.w3.org/2001/XMLSchema-instance"
    xmlns:context="http://www.springframework.org/schema/context"
    xsi:schemaLocation="
        http://www.springframework.org/schema/beans
        http://www.springframework.org/schema/beans/spring-beans.xsd
        http://www.springframework.org/schema/context
        http://www.springframework.org/schema/context/spring-context.xsd">
    <!-- 配置需要的Bean -->
    <bean id="myBean" class="cn.wenwen.bean.MyBean"></bean>
</beans>
3.创建一个测试类,来获取bean
import org.junit.Test;
import org.springframework.context.ApplicationContext;
import org.springframework.context.support.ClassPathXmlApplicationContext;
import cn.wenwen.bean.MyBean;

public class SpringTest {
    @Test
    public void testSpring() throws Exception {
        // 1.读取资源文件
        ApplicationContext context = new ClassPathXmlApplicationContext("applicationContext.xml");
        // 2.获取Bean对象
        MyBean bean = (MyBean)context.getBean("myBean");
        System.out.println(bean);
    }
}
运行结果

项目结构


 210
210

 被折叠的 条评论
为什么被折叠?
被折叠的 条评论
为什么被折叠?
 到【灌水乐园】发言


