


目录
1.开启binlog参数并设置server_id的值(随便设置,区分作用)
一、环境准备
准备两台主机,其中一台为主(master),一台为从(slave),并且都装有MySQL数据库

示例:
主库 MySQL master:ip 为192.168.198.140/24,port端口为3306
从库 MySQL slave:ip为192.168.168.141/24,port端口为3306
二、主库配置
1.开启binlog参数并设置server_id的值(随便设置,区分作用)
vim /etc/my.cnf
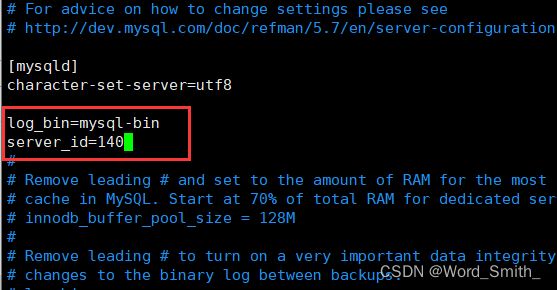
保存退出,并且重启数据库

2.建立同步账号
mysql> grant replication slave on *.* to 'rep'@'192.168.198.%' identified by '#BenJM123';
Query OK, 0 rows affected, 1 warning (0.02 sec)

mysql> show grants for 'rep'@'192.168.198.%';
+---------------------------------------------------------+
| Grants for rep@192.168.198.%                            |
+---------------------------------------------------------+
| GRANT REPLICATION SLAVE ON *.* TO 'rep'@'192.168.198.%' |
+---------------------------------------------------------+
1 row in set (0.00 sec)
3.锁表设置只读
--为后后面备份做准备,注意:生产环境要提前申请停机时间
mysql> flush tables with read lock;
Query OK, 0 rows affected (0.00 sec)

--提示:如果超过设置时间不操作会自动解锁
mysql> show variables like '%timeout%';
+-----------------------------+----------+
| Variable_name               | Value    |
+-----------------------------+----------+
| connect_timeout             | 10       |
| delayed_insert_timeout      | 300      |
| have_statement_timeout      | YES      |
| innodb_flush_log_at_timeout | 1        |
| innodb_lock_wait_timeout    | 50       |
| innodb_rollback_on_timeout  | OFF      |
| interactive_timeout         | 28800    |
| lock_wait_timeout           | 31536000 |
| net_read_timeout            | 30       |
| net_write_timeout           | 60       |
| rpl_stop_slave_timeout      | 31536000 |
| slave_net_timeout           | 60       |
| wait_timeout                | 28800    |
+-----------------------------+----------+
13 rows in set (0.00 sec)
4.查看主库状态
即当前日志文件名和二进制日志偏移量
mysql> show master status;
+------------------+----------+--------------+------------------+-------------------+
| File             | Position | Binlog_Do_DB | Binlog_Ignore_DB | Executed_Gtid_Set |
+------------------+----------+--------------+------------------+-------------------+
| mysql-bin.000006 |     1074 |              |                  |                   |
+------------------+----------+--------------+------------------+-------------------+
1 row in set (0.00 sec)
5.备份数据库数据
-- 示例:我这里用school数据库做演示
mysql> show databases;
+--------------------+
| Database           |
+--------------------+
| information_schema |
| mysql              |
| performance_schema |
| school             |
| sys                |
+--------------------+
6 rows in set (0.00 sec)

mysql> use school;
Database changed

mysql> show tables;
+------------------+
| Tables_in_school |
+------------------+
| score            |
| student          |
+------------------+
2 rows in set (0.00 sec)
使用mysqldump工具对school数据库进行备份
#创建一个/backup文件用来存放备份数据
[root@master ~]# mkdir /backup

#备份
[root@master ~]# mysqldump -uroot -p'#BenJM123' -B school > /backup/mysql_bak.$(date +%F).sql.gz
mysqldump: [Warning] Using a password on the command line interface can be insecure.

#查看
[root@master ~]# ll /backup/
total 4
-rw-r--r-- 1 root root 3447 Jul 21 13:28 mysql_bak.2023-07-21.sql.gz
6.解锁
mysql> unlock tables;
Query OK, 0 rows affected (0.00 sec)
7.主库备份数据上传到从库
[root@master ~]# scp /backup/mysql_bak.2023-07-21.sql.gz 192.168.198.141:/backup/
root@192.168.198.141's password:
scp: /backup/: Is a directory
发现失败,是因为从库slave没有创建/backup目录,需要去创建
[root@slave ~]# mkdir /backup现在就可以了,正确输入密码即可
[root@master ~]# scp /backup/mysql_bak.2023-07-21.sql.gz 192.168.198.141:/backup/
root@192.168.198.141's password:
mysql_bak.2023-07-21.sql.gz                                    100% 3447     2.1MB/s   00:00
查看,成功上传到从库
#从库
[root@slave ~]# ll /backup/
total 4
-rw-r--r-- 1 root root 3447 Jul 21 13:38 mysql_bak.2023-07-21.sql.gz
三、从库上设置
1.关闭binlog参数并设置server-id
其中,没有binlog参数则无需添加,server-id不能和master主库一样,
vim /etc/my.cnf
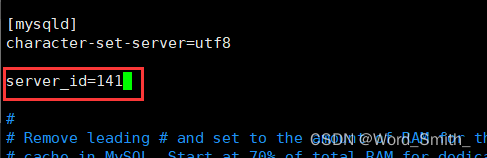
重启数据库

2.还原从主库备份数据
检查从库数据库
mysql> show databases;
+--------------------+
| Database           |
+--------------------+
| information_schema |
| mysql              |
| performance_schema |
| sys                |
+--------------------+
4 rows in set (0.00 sec)
还原操作
[root@slave ~]# cd /backup/
[root@slave backup]# ll
total 4
-rw-r--r-- 1 root root 3447 Jul 21 13:38 mysql_bak.2023-07-21.sql.gz
[root@slave backup]# mysql -uroot -p'#BenJM123' < mysql_bak.2023-07-21.sql.gz
mysql: [Warning] Using a password on the command line interface can be insecure.
检查还原的数据库,成功还原school库
mysql> show databases;
+--------------------+
| Database           |
+--------------------+
| information_schema |
| mysql              |
| performance_schema |
| school             |
| sys                |
+--------------------+
5 rows in set (0.00 sec)
3.设定从主库同步
首先,再次去master主机上查看主库状态
mysql> show master status;
+------------------+----------+--------------+------------------+-------------------+
| File             | Position | Binlog_Do_DB | Binlog_Ignore_DB | Executed_Gtid_Set |
+------------------+----------+--------------+------------------+-------------------+
| mysql-bin.000006 |     1074 |              |                  |                   |
+------------------+----------+--------------+------------------+-------------------+
1 row in set (0.00 sec)
由主库状态表知,从库上的MASTER_LOG_FILE参数的值就是mysql-bin.000006,MASTER_LOG_POS参数的值为1047
mysql> change master to
    -> MASTER_HOST='192.168.198.140',
    -> MASTER_PORT=3306,
    -> MASTER_USER='rep',
    -> MASTER_PASSWORD='#BenJM123',
    -> MASTER_LOG_FILE='mysql-bin.000006',
    -> MASTER_LOG_POS=1074;
4.修改server-uuid
如果从库是从主库克隆而来的(不是克隆的可忽略此步),所以server-uuid也和主库一样,所以需要修改,改为不一样的
vim /var/lib/mysql/auto.cnf
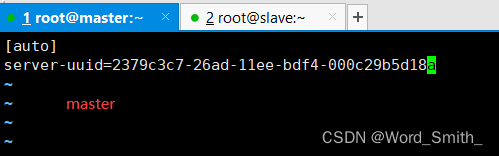
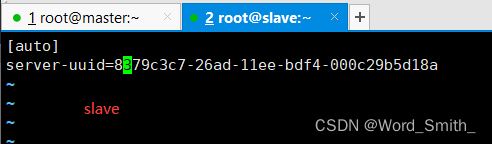
再重启数据库


5.启动从库同步开关
mysql> start slave;
Query OK, 0 rows affected (0.00 sec)
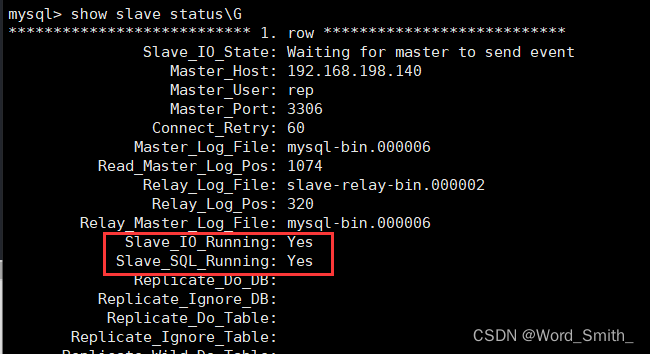
检查状态
mysql> show slave status\G
*************************** 1. row ***************************
               Slave_IO_State: Waiting for master to send event
                  Master_Host: 192.168.198.140
                  Master_User: rep
                  Master_Port: 3306
                Connect_Retry: 60
              Master_Log_File: mysql-bin.000006
          Read_Master_Log_Pos: 1074
               Relay_Log_File: slave-relay-bin.000002
                Relay_Log_Pos: 320
        Relay_Master_Log_File: mysql-bin.000006
             Slave_IO_Running: Yes
            Slave_SQL_Running: Yes
              Replicate_Do_DB:
          Replicate_Ignore_DB:
           Replicate_Do_Table:
       Replicate_Ignore_Table:
      Replicate_Wild_Do_Table:
  Replicate_Wild_Ignore_Table:
                   Last_Errno: 0
                   Last_Error:
                 Skip_Counter: 0
          Exec_Master_Log_Pos: 1074
              Relay_Log_Space: 527
              Until_Condition: None
               Until_Log_File:
                Until_Log_Pos: 0
           Master_SSL_Allowed: No
           Master_SSL_CA_File:
           Master_SSL_CA_Path:
              Master_SSL_Cert:
            Master_SSL_Cipher:
               Master_SSL_Key:
        Seconds_Behind_Master: 0
Master_SSL_Verify_Server_Cert: No
                Last_IO_Errno: 0
                Last_IO_Error:
               Last_SQL_Errno: 0
               Last_SQL_Error:
  Replicate_Ignore_Server_Ids:
             Master_Server_Id: 140
                  Master_UUID: 2379c3c7-26ad-11ee-bdf4-000c29b5d18a
             Master_Info_File: /var/lib/mysql/master.info
                    SQL_Delay: 0
          SQL_Remaining_Delay: NULL
      Slave_SQL_Running_State: Slave has read all relay log; waiting for more updates
           Master_Retry_Count: 86400
                  Master_Bind:
      Last_IO_Error_Timestamp:
     Last_SQL_Error_Timestamp:
               Master_SSL_Crl:
           Master_SSL_Crlpath:
           Retrieved_Gtid_Set:
            Executed_Gtid_Set:
                Auto_Position: 0
         Replicate_Rewrite_DB:
                 Channel_Name:
           Master_TLS_Version:
1 row in set (0.00 sec)
其中Slave_IO_Running和Slave_SQL_Running两个参数后面必须是双Yes才算成功
如果不是,失败的可能原因是主从库的配置文件server-id一样、server-uuid一样、密码与同步账号的密码不一致
四、测试
创建测试
在master主库上
随便创建一个数据库db1,建立表tb1,随便插入几个数据
mysql> create database db1;
Query OK, 1 row affected (0.00 sec)

mysql> use db1;
Database changed
mysql> create table tb1(
    -> id int(11),
    -> name varchar(20)
    -> );
Query OK, 0 rows affected (0.01 sec)

mysql> insert into tb1 values(001,'zhangsan'),
    -> (002,'lisi'),
    -> (003,'wangwu');
Query OK, 3 rows affected (0.00 sec)
Records: 3  Duplicates: 0  Warnings: 0

mysql> select * from tb1;
+------+----------+
| id   | name     |
+------+----------+
|    1 | zhangsan |
|    2 | lisi     |
|    3 | wangwu   |
+------+----------+
3 rows in set (0.00 sec)
在从库slave上
检查是否有db1数据库,并且是否有数据
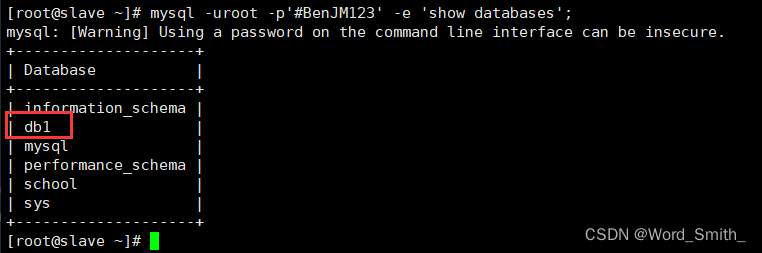
mysql> show databases;
+--------------------+
| Database           |
+--------------------+
| information_schema |
| db1                |
| mysql              |
| performance_schema |
| school             |
| sys                |
+--------------------+
6 rows in set (0.00 sec)

mysql> use db1;
Reading table information for completion of table and column names
You can turn off this feature to get a quicker startup with -A

Database changed
mysql> show tables;
+---------------+
| Tables_in_db1 |
+---------------+
| tb1           |
+---------------+
1 row in set (0.00 sec)

mysql> select * from tb1;
+------+----------+
| id   | name     |
+------+----------+
|    1 | zhangsan |
|    2 | lisi     |
|    3 | wangwu   |
+------+----------+
3 rows in set (0.00 sec)
最后,我们看到从库上也自动和主库上保存一致了,也有了新建的数据,这样就成功啦
删除测试
执行删除操作也是一样的
主库上删除

从库上检验
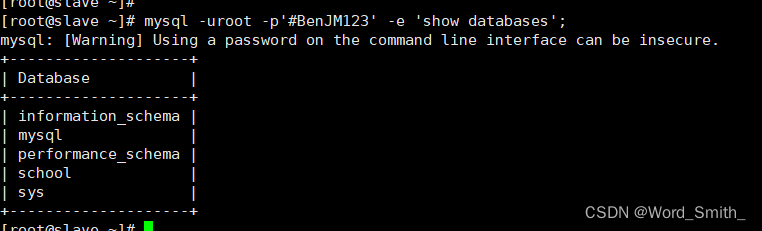
db1数据库确实被删除了
结束!


 4081
4081


 被折叠的 条评论
为什么被折叠?
被折叠的 条评论
为什么被折叠?
 到【灌水乐园】发言


