


ELK实例----使用filebeat收集tomcat日志到ES并利用kibana展示
1.0 环境拓扑图

1.1 环境准备
| 节点名称 | 节点名称 | ip地址 |
|---|---|---|
| kibana | kibana | 10.0.0.100 |
| elasticsearch | elasticsearch | 10.0.0.101 |
| filebeat | filebeat | 10.0.0.102 |
1.2 安装
- elasticsearch、Kibana、metricbeat、filebeat版本要一致,如都是7.17.5版本
1.2.1 安装elasticsearch
- CPU 2C 内存4G或更多
10.0.0.101机器上
安装jdk8
apt update;apt -y install openjdk-8-jdk

安装elasticsearch
wget https://mirrors.tuna.tsinghua.edu.cn/elasticstack/7.x/apt/pool/main/e/elasticsearch/elasticsearch-7.17.5-amd64.deb
dpkg -i elasticsearch-7.17.5-amd64

修改配置文件,单节点配置
cat >> /etc/elasticsearch/elasticsearch.yml  <<EOF
node.name: node-1
network.host: 0.0.0.0
discovery.seed_hosts: ["$LOCAL_IP"]
cluster.initial_master_nodes: ["node-1"]
EOF

mkdir -p /etc/systemd/system/elasticsearch.service.d/
cat > /etc/systemd/system/elasticsearch.service.d/override.conf <<EOF
[Service]
LimitMEMLOCK=infinity
EOF

加载配置
systemctl daemon-reload
systemctl enable  elasticsearch.service

修改内核参数
echo "vm.max_map_count = 262144" >> /etc/sysctl.conf
sysctl  -p

启动elasticsearch服务
systemctl start elasticsearch
1.2.2 安装 Kibana
10.0.0.100机器上
下载kibana
wget https://mirrors.tuna.tsinghua.edu.cn/elasticstack/7.x/apt/pool/main/k/kibana/kibana-7.17.5-amd64.deb
安装kibana
dpkg -i kibana-7.17.5-amd64.deb

修改下面几行就行
root@es-node1:~# grep "^[a-Z]" /etc/kibana/kibana.yml
server.port: 5601
server.host: "0.0.0.0"
elasticsearch.hosts: ["http://10.0.0.101:9200"]
i18n.locale: "zh-CN"

启动kibana服务
systemctl enable --now kibana
1.2.3 安装metricbeat
10.0.0.102机器上
下载
wget https://mirrors.tuna.tsinghua.edu.cn/elasticstack/7.x/apt/pool/main/m/metricbeat/metricbeat-7.17.5-amd64.deb
安装
dpkg -i metricbeat-7.17.5-amd64.deb

修改配置文件,修改kibana和elasticsearch的配置
root@es-node2:~# grep -Ev "#|^$" /etc/metricbeat/metricbeat.yml
metricbeat.config.modules:
  path: ${path.config}/modules.d/*.yml
  reload.enabled: false
setup.template.settings:
  index.number_of_shards: 1
  index.codec: best_compression
setup.kibana:
  host: "10.0.0.100:5601"	#kibana的ip
output.elasticsearch:
  hosts: ["10.0.0.101:9200"]	#elasticsearch的ip,可以多个用逗号分开,如["10.0.0.101:9200","10.0.0.111:9200"]
processors:
  - add_host_metadata: ~
  - add_cloud_metadata: ~
  - add_docker_metadata: ~
  - add_kubernetes_metadata: ~

启动metricbeat服务
systemctl enable --now metricbeat.service
1.2.3 安装filebeat
10.0.0.102机器上
下载
wget https://mirrors.tuna.tsinghua.edu.cn/elasticstack/7.x/apt/pool/main/f/filebeat/filebeat-7.17.5-amd64.deb
安装
dpkg -i filebeat-7.17.5-amd64.deb

创建配置
vim /etc/filebeat/stdin.yml
1.2.4 安装Nginx
apt update
apt -y install nginx

默认开启nginx的错误日志,但如果是ubuntu,还需要修改下面行才能记录错误日志
[root@elk-web1 ~]#vim /etc/nginx/sites-available/default
   location / {
        # First attempt to serve request as file, then
        # as directory, then fall back to displaying a 404.
        #try_files $uri $uri/ =404; #将此行注释

重启nginx服务
systemctl restart nginx
1.2.5 安装tomcat
apt update
apt -y install tomcat9
修改 Tomcat 的访问日志为Json格式
vim /etc/tomcat9/server.xml
<Valve className="org.apache.catalina.valves.AccessLogValve" directory="logs"
prefix="tomcat_access_log" suffix=".txt"
pattern="{"clientip":"%h","ClientUser":"%l","authenticated":"%u","AccessTime":"%t","method":"%r","status":"%s","SendBytes":"%b","Query?string":"%q","partner":"%{Referer}i","AgentVersion":"%{User-Agent}i"}"/>
重启服务
systemctl restart tomcat9
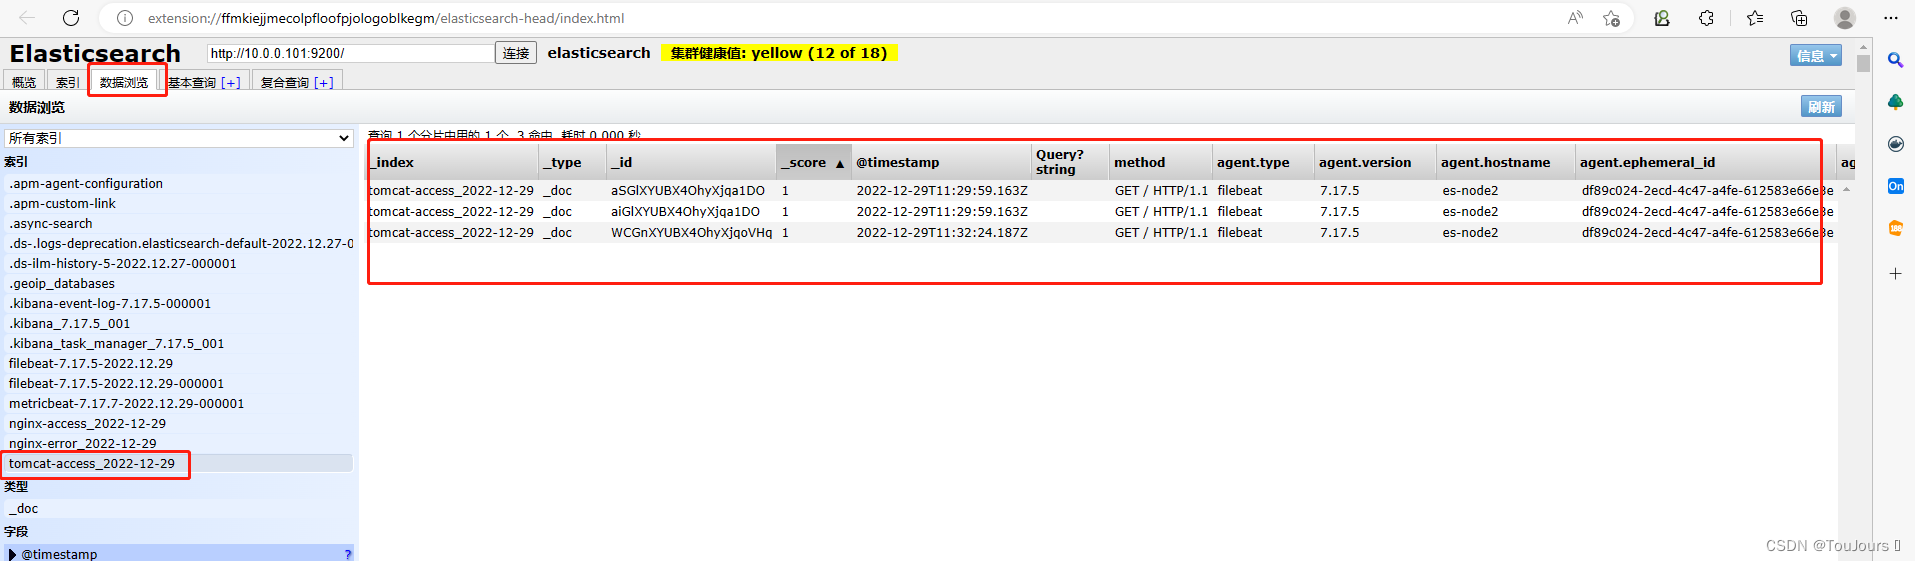
tomcat成功的日志
ll /var/log/tomcat9/tomcat_access_log.2022-12-29.txt

1.3 修改 Filebeat 配置文件
yaml格式检查 https://www.bejson.com/validators/yaml_editor/
- yaml格式不正确,Filebeat启动会报错
10.0.0.102机器上
-------------------------tomcat---
[root@logsj ~]# vim /etc/filebeat/filebeat.yml
filebeat.inputs:
- type: log
  enable: true
  paths:
    - /var/log/tomcat9/tomcat_access_log.*
  json.keys_under_root: true
  json.overwrite_keys: true
  tags: ["tomcat-access"]
- type: log
  enable: true
  paths:
    - /var/log/tomcat9/catalina.*.log
  tags: ["tomcat-error"]
output.elasticsearch:
  hosts: ["10.0.0.101:9200"]
  indices:
    - index: "tomcat-access_%{+YYYY-MM-dd}"
      when.contains:
        tags: "tomcat-access"
    - index: "tomcat-error_%{+YYYY-MM-dd}"
      when.contains:
        tags: "tomcat-error"
setup.template.enabled: false
setup.template.name: "tomcat"
setup.template.pattern: "tomcat-*"
setup.template.overwrite: true

-------------------
重启服务
systemctl restart filebeat.service
查看服务
root@es-node2:~# systemctl status filebeat.service
● filebeat.service - Filebeat sends log files to Logstash or directly to Elasticsearch.
     Loaded: loaded (/lib/systemd/system/filebeat.service; disabled; vendor preset: enabled)
     Active: active (running) since Thu 2022-12-29 11:29:49 UTC; 2s ago
       Docs: https://www.elastic.co/beats/filebeat
   Main PID: 17799 (filebeat)
      Tasks: 8 (limit: 4575)
1.4 测试
web浏览器访问http://10.0.0.102:8080/
1.4.1 head插件查看
1.4.2 Kibana插件查看
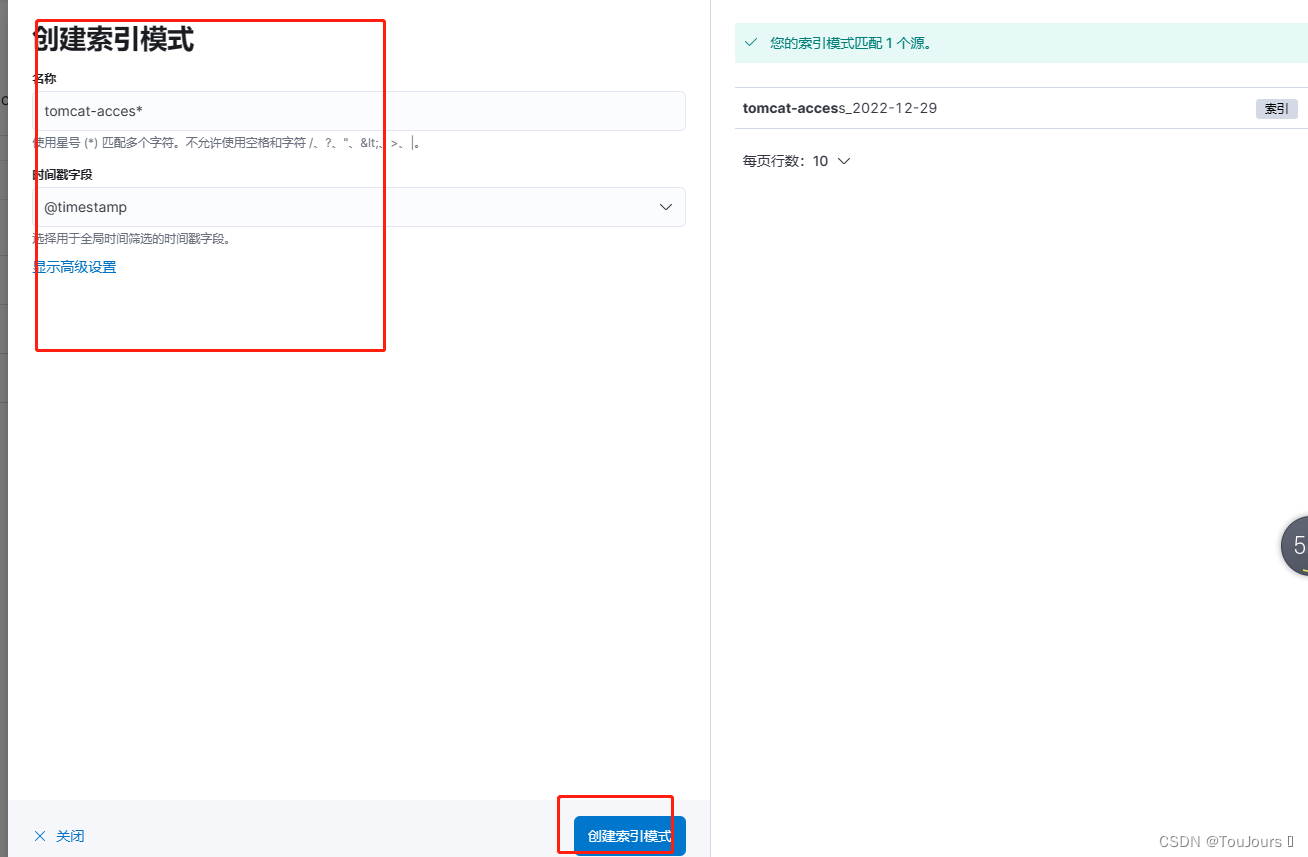
创建索引
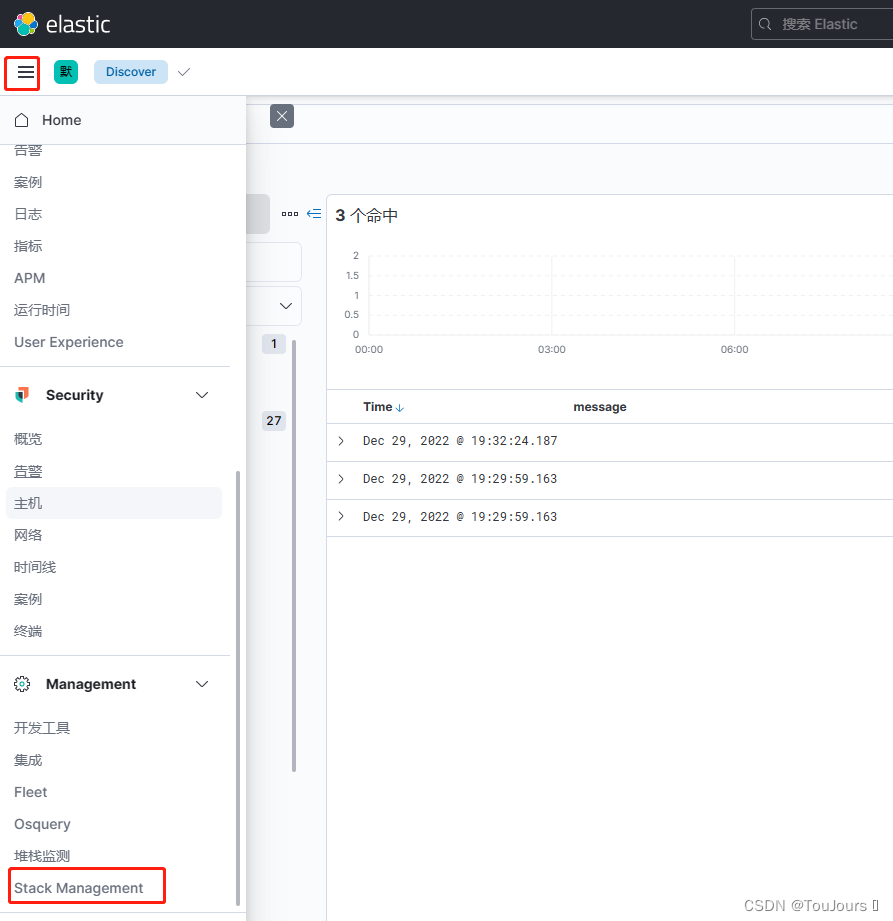
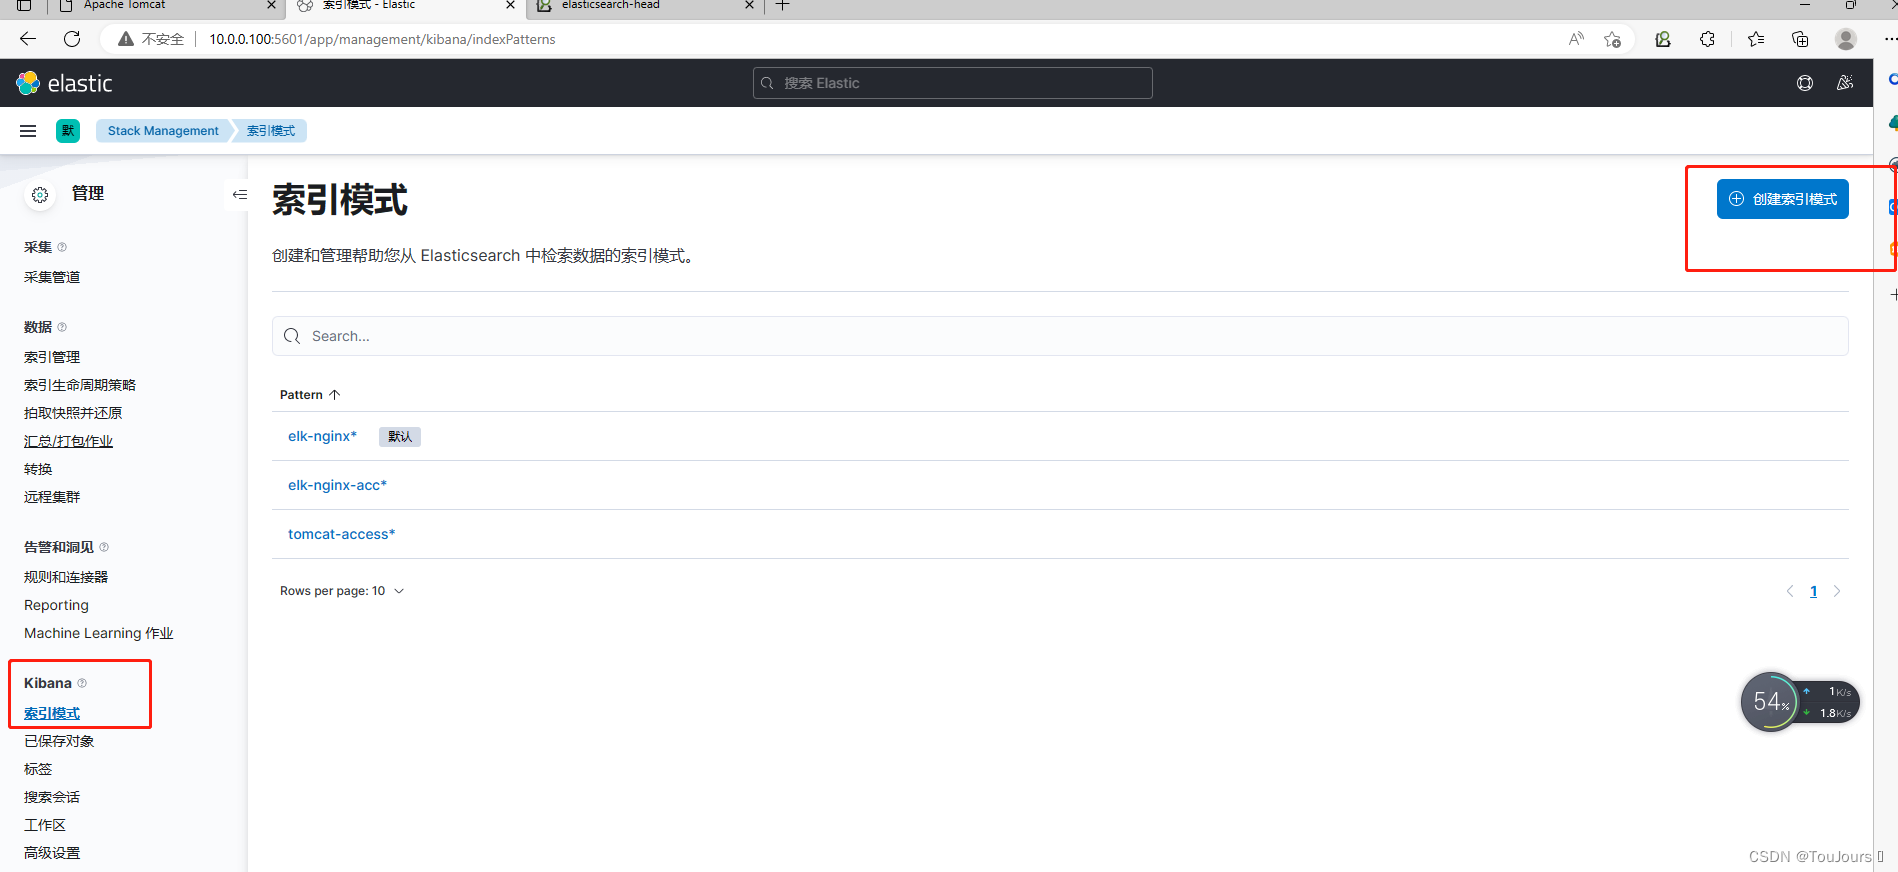
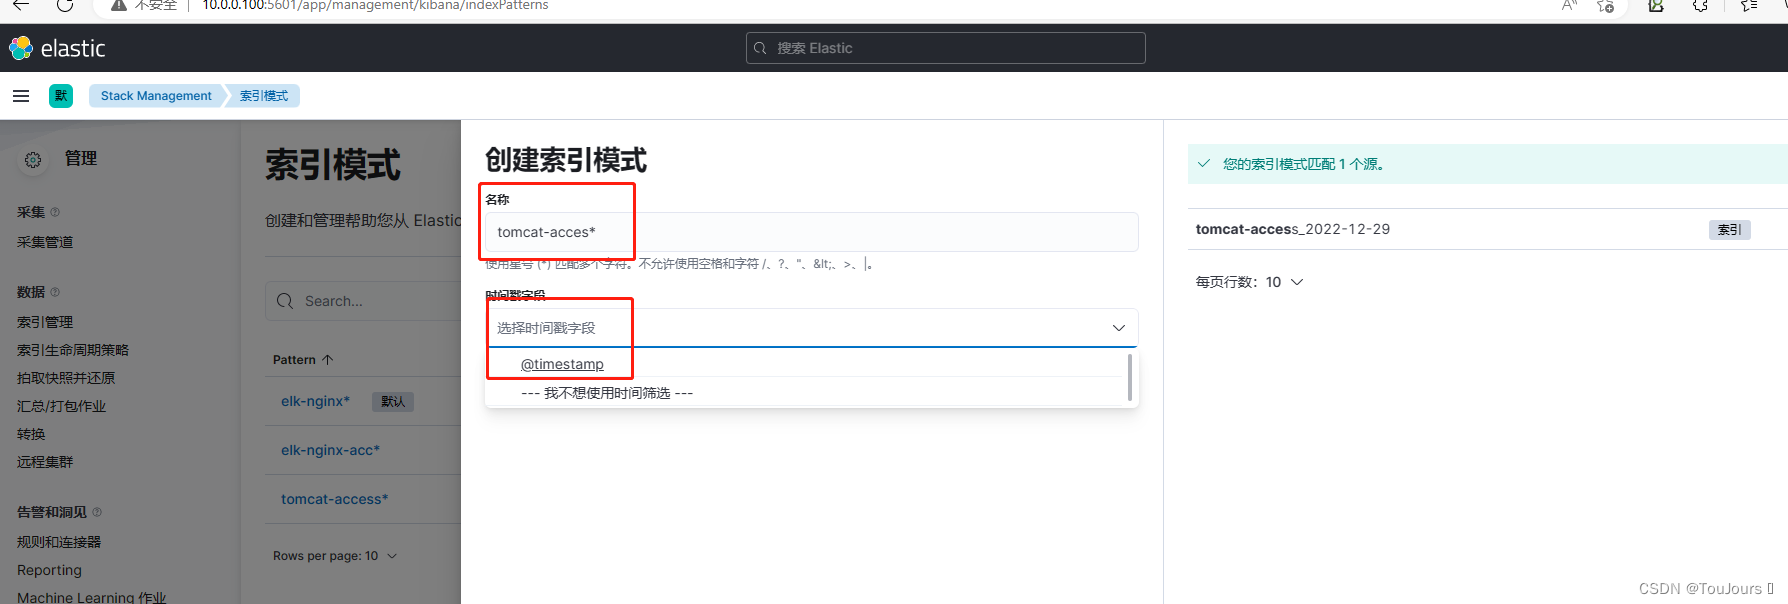
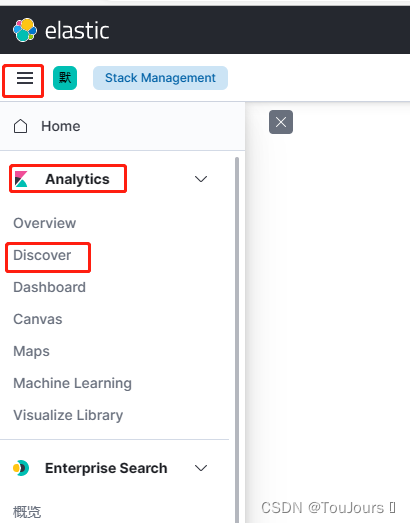
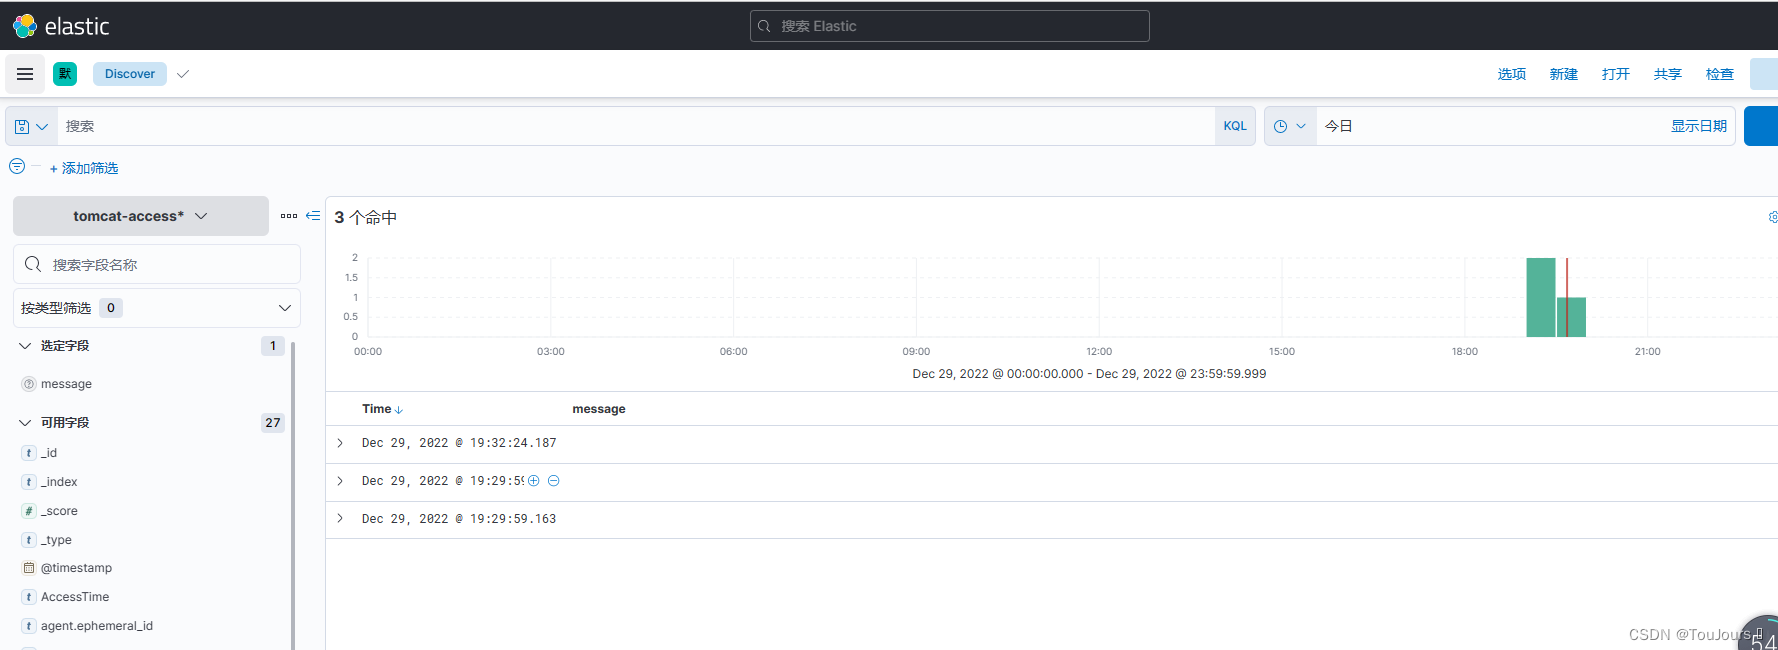
discover查看
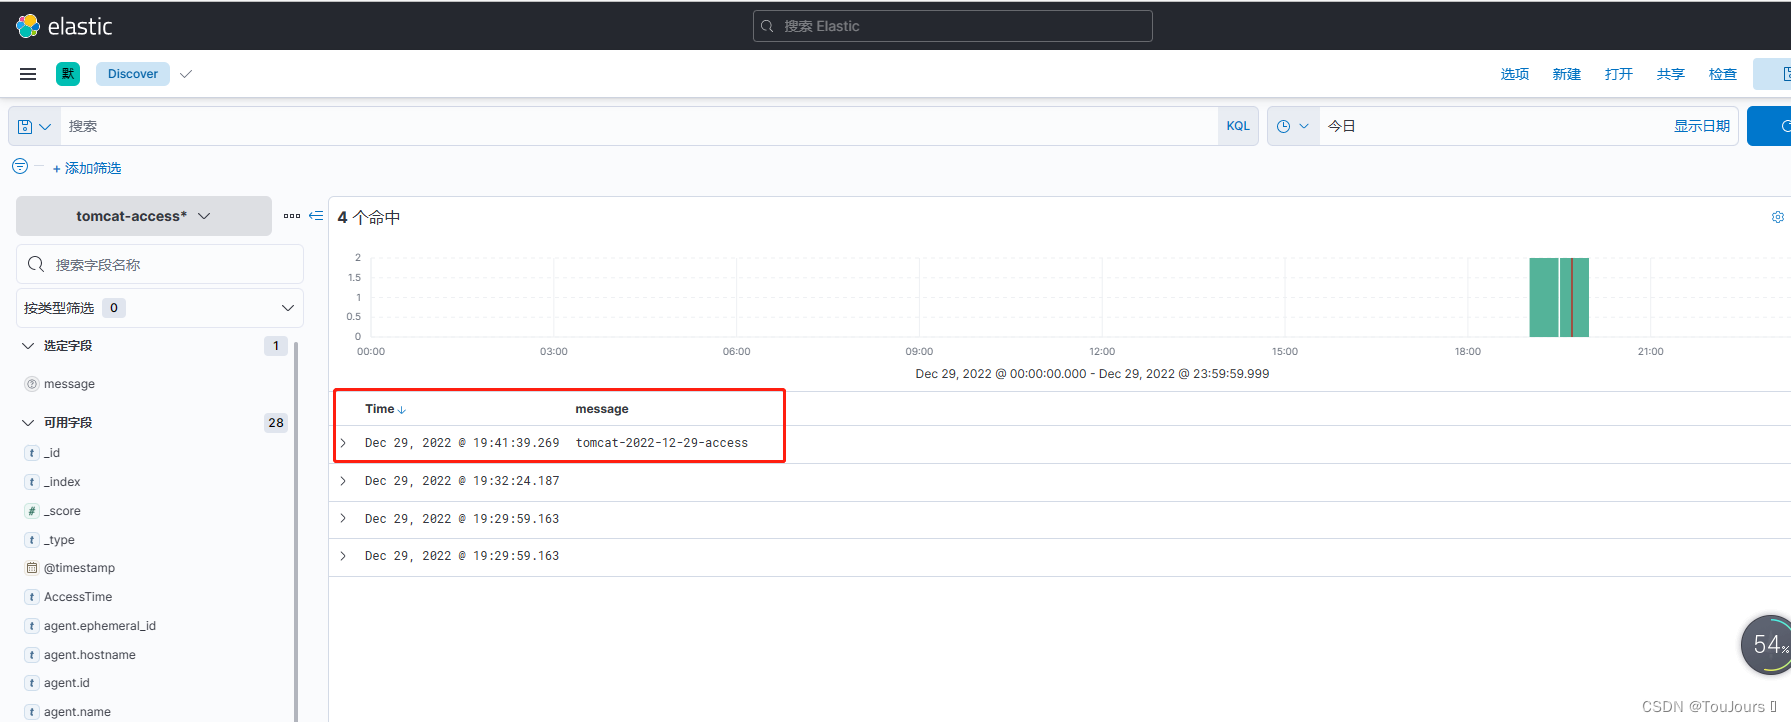
1.4.2.1 手动将模拟的成功数据插入tomcat日志中
echo tomcat-2022-12-29-access >> /var/log/tomcat9/tomcat_access_log.*
Kibana插件查看
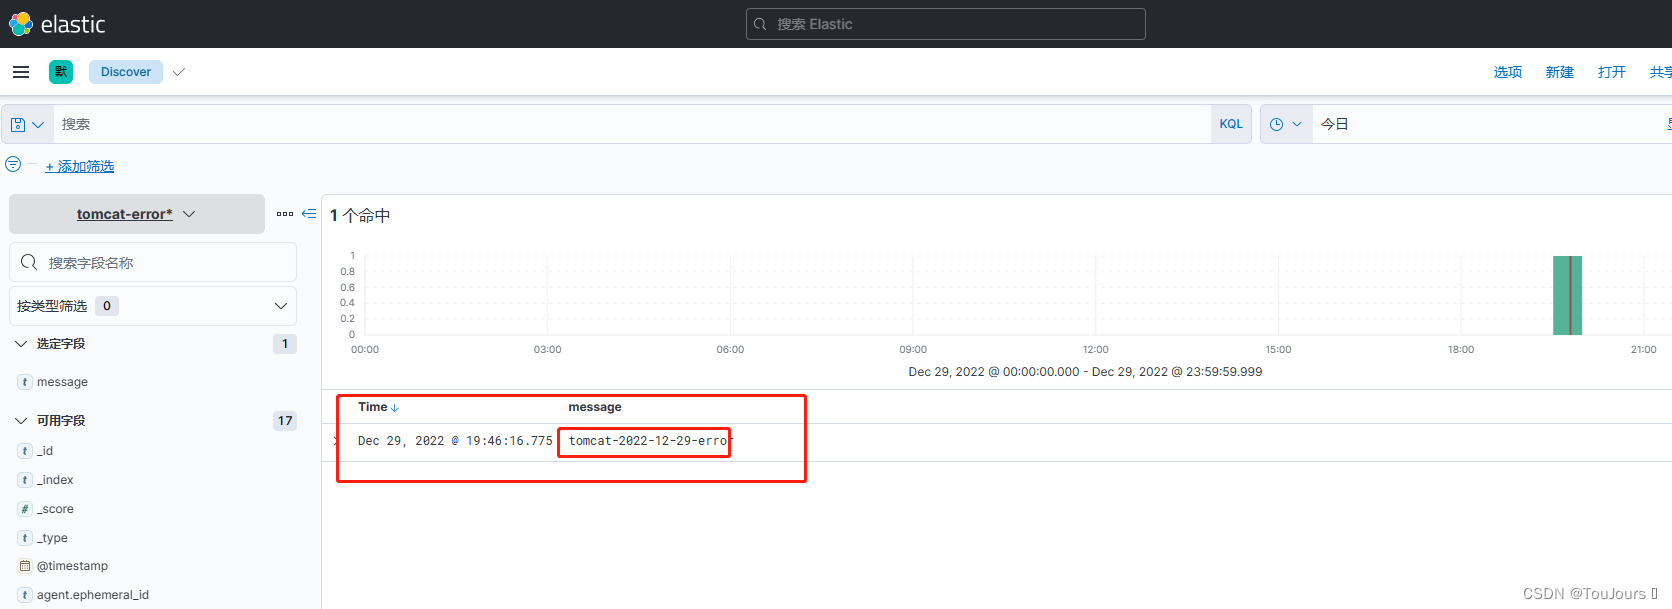
1.4.2.1 手动将模拟的失败数据插入tomcat日志中
echo tomcat-2022-12-29-error >> /var/log/tomcat9/catalina.*.log
Kibana插件查看
1.5 收集nginx日志到ES并利用kibana展示
root@es-node2:/etc/filebeat# cat filebeat.yml.nginx.bak
filebeat.inputs:
- type: log
  enable: true
  paths:
    - /var/log/nginx/access.log
  json.keys_under_root: true
  json.overwrite_keys: true
  tags: ["nginx-access"]
- type: log
  enable: true
  paths:
    - /var/log/nginx/error.log
  tags: ["nginx-error"]
output.elasticsearch:
  hosts: ["10.0.0.101:9200"]
  indices:
    - index: "nginx-access_%{+YYYY-MM-dd}"
      when.contains:
        tags: "nginx-access"
    - index: "nginx-error_%{+YYYY-MM-dd}"
      when.contains:
        tags: "nginx-error"
setup.template.enabled: false
setup.template.name: "nginx"
setup.template.pattern: "nginx-*"
setup.template.overwrite: true
Kibana插件查看

1.6 收集nginx日志到Redis
1.6.1 redis安装和配置
10.0.0.100机器上安装
apt update
apt -y install redis
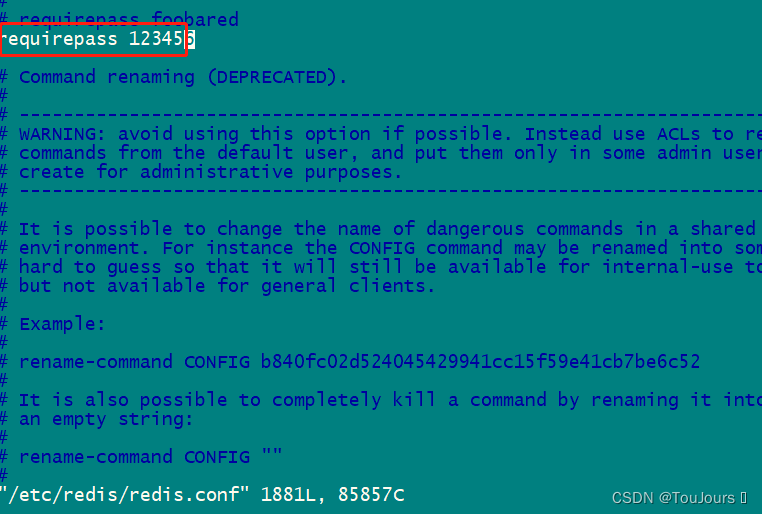
修改redis配置
sed -i.bak '/^bind.*/c bind 0.0.0.0' /etc/redis/redis.conf
vi /etc/redis/redis.conf
requirepass 123456
重启服务
systemctl restart redis
1.6.2 修改 Filebeat 配置文件
-------------------------redis---
[root@logsj ~]# vim /etc/filebeat/filebeat.yml
filebeat.inputs:
- type: log
  enable: true
  paths:
    - /var/log/nginx/access.log
  json.keys_under_root: true
  json.overwrite_keys: true
  tags: ["nginx-access"]
- type: log
  enable: true
  paths:
    - /var/log/nginx/error.log
  tags: ["nginx-error"]
output.redis:
  hosts: ["10.0.0.100:6379"]
  key: "filebeat"
  password: "123456"
  #db: 0
1.6.3 测试
1.6.3.1 插入数据到nginx日志
echo access,lec,2022-12-29 >> /var/log/nginx/access.log
1.6.3.2 登录redis查看
root@es-docker:~# redis-cli -a 123456
Warning: Using a password with '-a' or '-u' option on the command line interface may not be safe.

127.0.0.1:6379> llen filebeat
(integer) 1
127.0.0.1:6379> type filebeat
list
127.0.0.1:6379> lpop filebeat
"{\"@timestamp\":\"2022-12-29T13:21:26.761Z\",\"@metadata\":{\"beat\":\"filebeat\",\"type\":\"_doc\",\"version\":\"7.17.5\"},\"log\":{\"offset\":2793,\"file\":{\"path\":\"/var/log/nginx/access.log\"}},\"json\":{},\"message\":\"access,lec,2022-12-29\",\"tags\":[\"nginx-access\"],\"input\":{\"type\":\"log\"},\"ecs\":{\"version\":\"1.12.0\"},\"host\":{\"name\":\"es-node2\"},\"agent\":{\"ephemeral_id\":\"5760374c-4ec8-469f-b94d-8b6744d0b12f\",\"id\":\"8511b925-05e6-4f07-9559-f7f02dc23c8c\",\"name\":\"es-node2\",\"type\":\"filebeat\",\"version\":\"7.17.5\",\"hostname\":\"es-node2\"}}"


 3612
3612


 被折叠的 条评论
为什么被折叠?
被折叠的 条评论
为什么被折叠?
 到【灌水乐园】发言


