


想要实现完整的博客系统,需要实现前端的页面(博客列表页+博客详情页+登录页+博客编辑页)和后端代码(部署到服务器+连接到数据库)。并且对博客系统的登录页进行功能测试和性能测试,对博客编辑页和博客详情页进行功能测试。
一.测试
1.博客系统登录页测试
博客系统的登录操作是最重要的测试部分,必须保证正确的用户名对应正确的密码,保证登 录操作正常,并且对密码长度也有一定的要求。除了对登录页进行最基本的功能测试之外,还要在功能测试通过后对其性能进行测试。
(1)登录页功能测试
不管是对哪方面进行测试,都必须首先打开浏览器,且在最后关闭浏览器。所以创建了一个初始化类来进行启动和关闭浏览器的操作:
import org.junit.jupiter.api.AfterAll;
import org.junit.jupiter.api.BeforeAll;
import org.openqa.selenium.WebDriver;
import org.openqa.selenium.chrome.ChromeDriver;
import org.openqa.selenium.edge.EdgeDriver;
import org.openqa.selenium.ie.InternetExplorerDriver;


public class InitAndEnd {
    static WebDriver webDriver=null;
    @BeforeAll
    public static void init(){
        webDriver=new ChromeDriver();
    }
    @AfterAll
    public static void end(){
        webDriver.close();
    }
}
这串代码使用init方法来启动浏览器,使用end方法来关闭浏览器,若想在其他所有代码中最先运行init方法,最后运行end方法,就需要在方法上加@BeforeAll和@Afterll注解,被@BeforeAll修饰的方法就可以保证在所有代码运行前最先运行;被@AfterAll修饰的方法就可以保证在所有代码运行后最后运行。然后进行登录页测试:
import org.junit.jupiter.api.*;
import org.junit.jupiter.params.ParameterizedTest;
import org.junit.jupiter.params.provider.CsvFileSource;
import org.openqa.selenium.By;
import java.util.concurrent.TimeUnit;
/**
* Created with IntelliJ IDEA.
* Description:
* User: DELL
* Date: 2023-09-20
* Time: 17:57
*/
@TestMethodOrder(MethodOrderer.OrderAnnotation.class)
//这个注解可以解锁下面的@Order注解
public class LoginTest extends InitAndEnd{
//继承InitAndEnd类以便可以打开/关闭浏览器
@Order(1)
//顺序1,最先执行
//测试输入用户名和密码是否可以正确登录
@ParameterizedTest
//使用参数化
@CsvFileSource(resources = "dataLoginSuccess.csv")
public void LoginSuccessTest(String ExpectedUserName,String ExpectedPassWord,String ExpectedUrl) throws InterruptedException {
webDriver.get("http://127.0.0.1:8080/BlogSystem/login.html");
webDriver.findElement(By.cssSelector("#username")).sendKeys(ExpectedUserName);
//强制等待
Thread.sleep(1000);
webDriver.findElement(By.cssSelector("#password")).sendKeys(ExpectedPassWord);
Thread.sleep(1000);
webDriver.findElement(By.cssSelector("#submit")).click();
Thread.sleep(1000);
String ActualUrl=webDriver.getCurrentUrl();
Assertions.assertEquals(ExpectedUrl,ActualUrl);
Thread.sleep(1000);
String ActualUserName=webDriver.findElement(By.cssSelector("body > div.container > div.container-left > div > h3")).getText();
Assertions.assertEquals(ExpectedUserName,ActualUserName);
webDriver.manage().timeouts().implicitlyWait(3, TimeUnit.SECONDS);
}
//测试输入错误的用户名或者密码可不可以登录
//顺序2,第二个执行
@Order(2)
@ParameterizedTest
@CsvFileSource(resources = "dataLoginFailed.csv")
public void LoginFailedTest(String ExpectUserName,String ExpectPassWord,String ExpectUrl) throws InterruptedException {
webDriver.get("http://127.0.0.1:8080/BlogSystem/login.html");
webDriver.findElement(By.cssSelector("#username")).sendKeys(ExpectUserName);
Thread.sleep(1000);
webDriver.findElement(By.cssSelector("#password")).sendKeys(ExpectPassWord);
Thread.sleep(1000);
webDriver.findElement(By.cssSelector("#submit")).click();
webDriver.manage().timeouts().implicitlyWait(3,TimeUnit.SECONDS);
Assertions.assertNotEquals(ExpectUrl,"http://127.0.0.1:8080/BlogSystem/login");
webDriver.manage().timeouts().implicitlyWait(3,TimeUnit.SECONDS);
}
//测试5,6,7位密码长度以及11,12,13位密码长度是否符合要求
//顺序3,第三个执行
@Order(3)
@ParameterizedTest
@CsvFileSource(resources ="dataPassWord.csv")
public void PassWordLengthTest(String ExpectUserName,String ExpectPassWord,String ExpectUrl) throws InterruptedException {
webDriver.get("http://127.0.0.1:8080/BlogSystem/login.html");
webDriver.findElement(By.cssSelector("#username")).sendKeys(ExpectUserName);
Thread.sleep(1000);
webDriver.findElement(By.cssSelector("#password")).sendKeys(ExpectPassWord);
Thread.sleep(1000);
webDriver.findElement(By.cssSelector("#submit")).click();
Thread.sleep(1000);
String ActualUrl=webDriver.getCurrentUrl();
Assertions.assertEquals(ExpectUrl,ActualUrl);
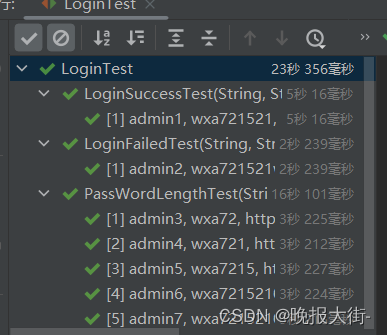
}首先对登陆成功的显示进行测试,也就是去测试登录成功后是否可以正常跳转到博客详情页,使用了断言的方法来判断预期URL和实际URL,方便易懂。确定了博客可以正常登录,接下来就可以测试用户名和密码,对密码的长度进行测试,尤其是对边界附近的长度进行测试。这几条测试类使用了参数化的方法,将需要测试的用例写到CSV文件中:
LoginSuccessTest文件:
admin1,wxa721521,http://127.0.0.1:8080/BlogSystem/blog_list.htmlLoginFailedTest文件:
admin2,wxa721521w,http://127.0.0.1:8080/BlogSystem/blog_list.htmlPassWordLengthTest文件:
admin3,wxa72,http://127.0.0.1:8080/BlogSystem/login
admin4,wxa721,http://127.0.0.1:8080/BlogSystem/blog_list.html
admin5,wxa7215,http://127.0.0.1:8080/BlogSystem/blog_list.html
admin6,wxa72152100,http://127.0.0.1:8080/BlogSystem/blog_list.html
admin7,wxa7215210000,http://127.0.0.1:8080/BlogSystem/login
运行测试类结果如下:
(2)登录页性能测试
登录页功能测试成功后对其进行性能测试。测试使用的工具是LoadRunner三件套。首先使用Virtual User Generator对脚本进行录制,然后用Controller设计场景,最后用Analysis分析结果。
1)VUG录制脚本及脚本加强
首先打开Virtual User Generator,然后对其录制操作进行设置:

把录制地址改为博客登录页,然后选择录制的浏览器,我这里选择的是FireFox浏览器。点击录制后就可以自动跳转到博客登录页,录制完毕后即可生成代码,对代码进行删减,保留有用的部分即可:
Action()
{
web_url("login.html",
"URL=http://127.0.0.1:8080/BlogSystem/login.html",
"Resource=0",
"Referer=http://127.0.0.1:8080/BlogSystem/blog_list.html",
"Snapshot=t1.inf",
"Mode=HTML",
LAST);
web_submit_data("login",
"Action=http://127.0.0.1:8080/BlogSystem/login",
"Method=POST",
"Referer=http://127.0.0.1:8080/BlogSystem/login.html",
"Snapshot=t3.inf",
"Mode=HTML",
ITEMDATA,
"Name=username", "Value=admin1", ENDITEM,
"Name=password", "Value=wxa721521", ENDITEM,
EXTRARES,
"Url=login", "Referer=http://127.0.0.1:8080/BlogSystem/blog_list.html", ENDITEM,
"Url=blog", "Referer=http://127.0.0.1:8080/BlogSystem/blog_list.html", ENDITEM,
LAST);
return 0;
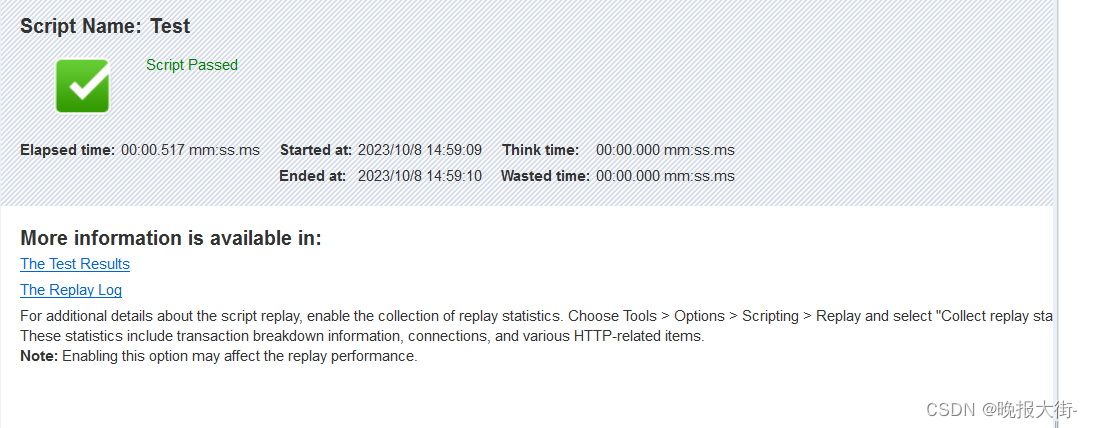
}接下来可以对脚本进行加强。给代码加上事务,集合点,以及参数化操作:
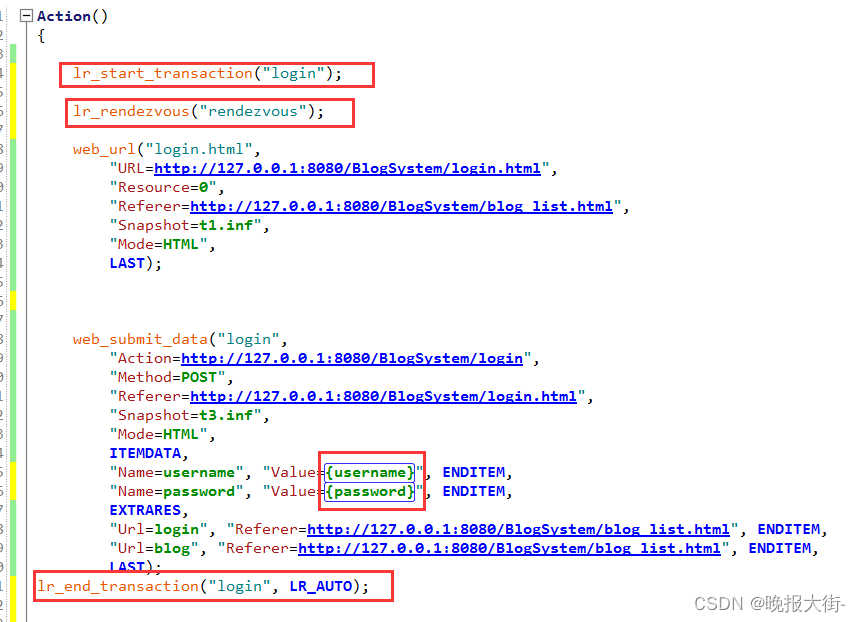
参数中分别放了不同的用户和对应的密码。运行脚本显示代码通过:
2)Controller设计场景并运行
录制并且加强完脚本后就可以进入到Controller中进行环境设计:
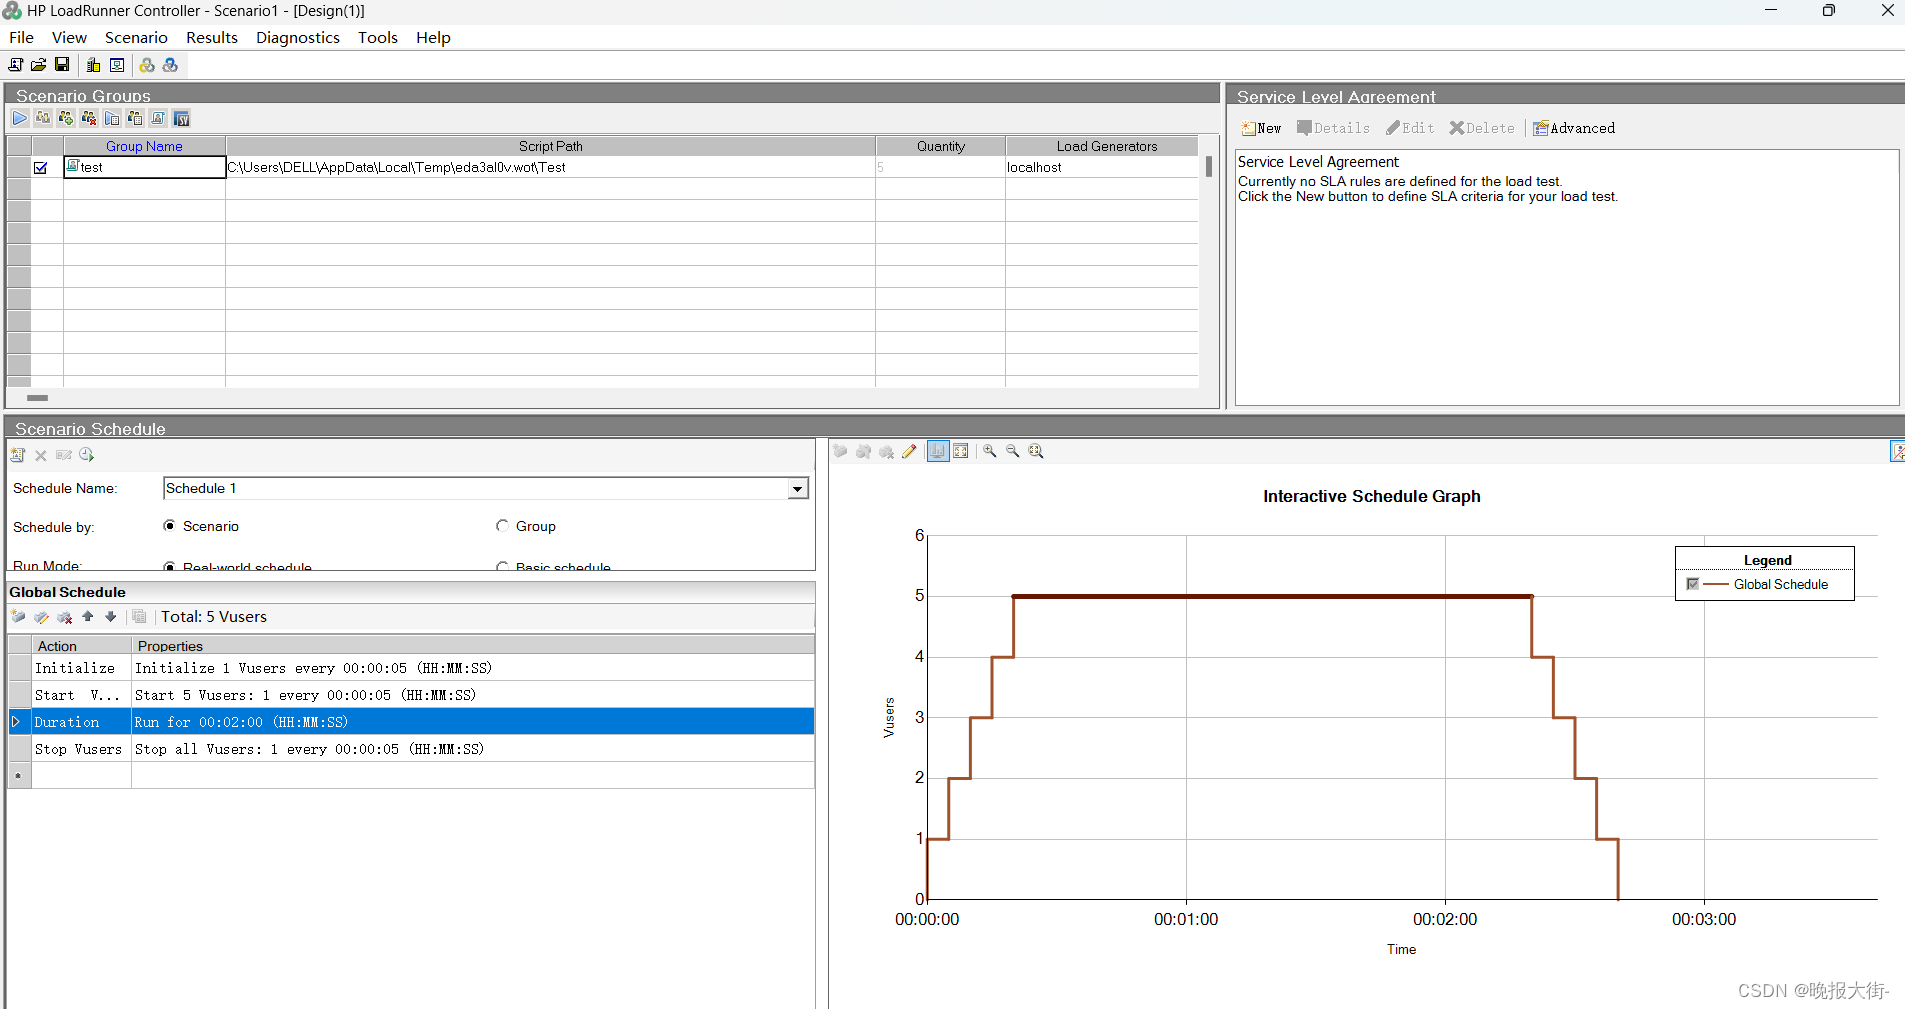
在这个环境中,我设计了5个用户并发,每5秒初始化一个虚拟用户,在全部初始化完成后,每5秒启动一个虚拟用户。都启动完毕后需要全部到达集合点,持续运行两分钟,运行结束后每5秒关闭一个虚拟用户,至此运行结束。打开Run界面点击运行:

运行后得到图表结果:
然后点击如下按钮进入到Analysis分析结果:
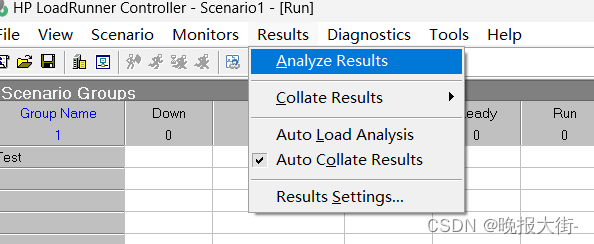
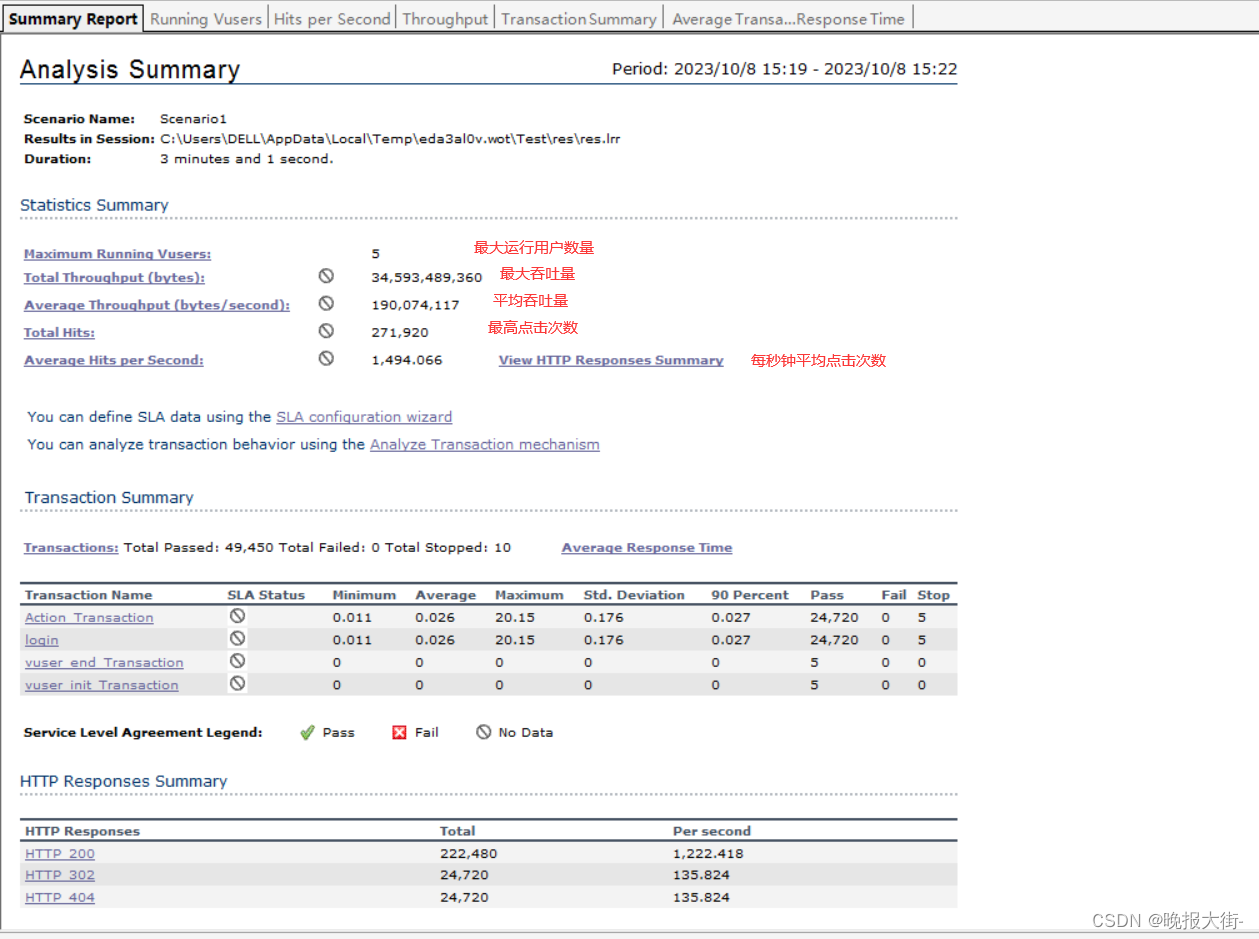
3)Analysis分析结果
进入到Analysis后可以看到软件生成的测试报告:
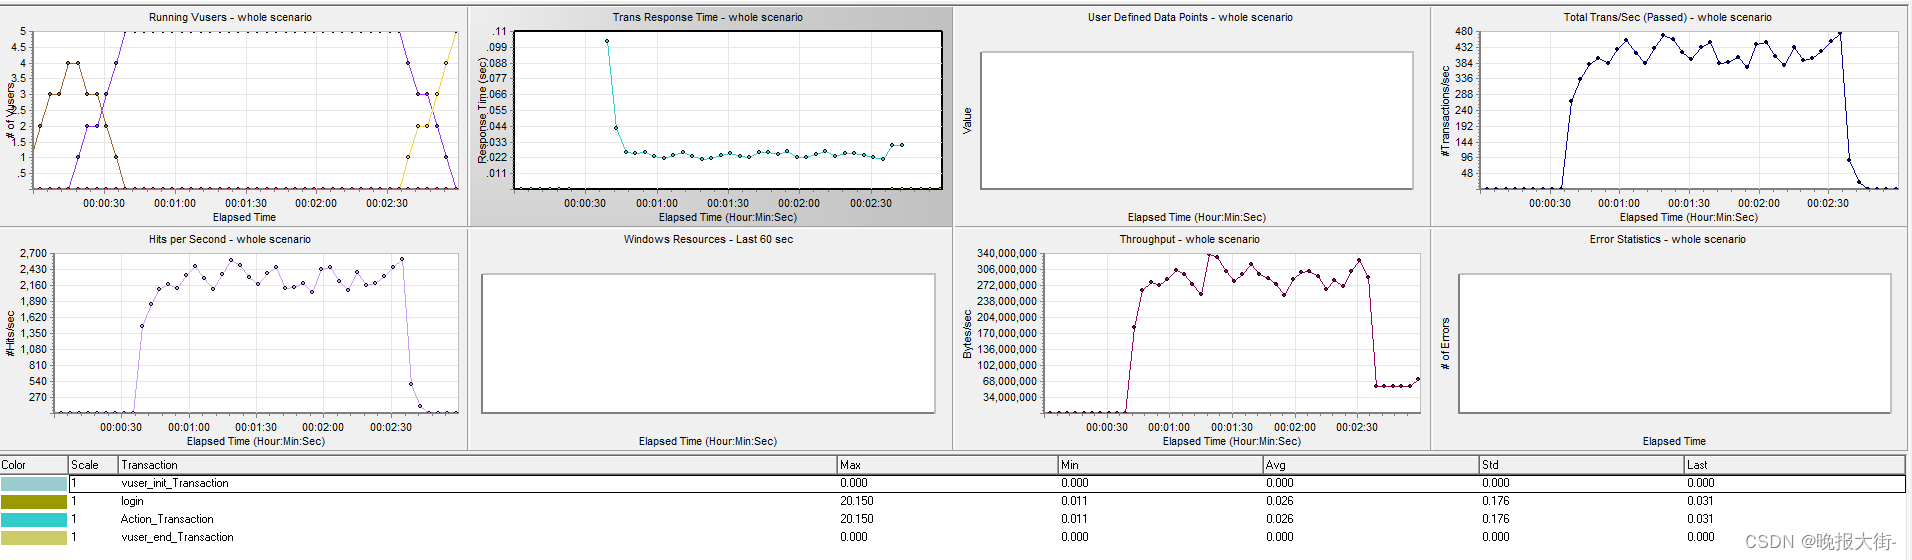
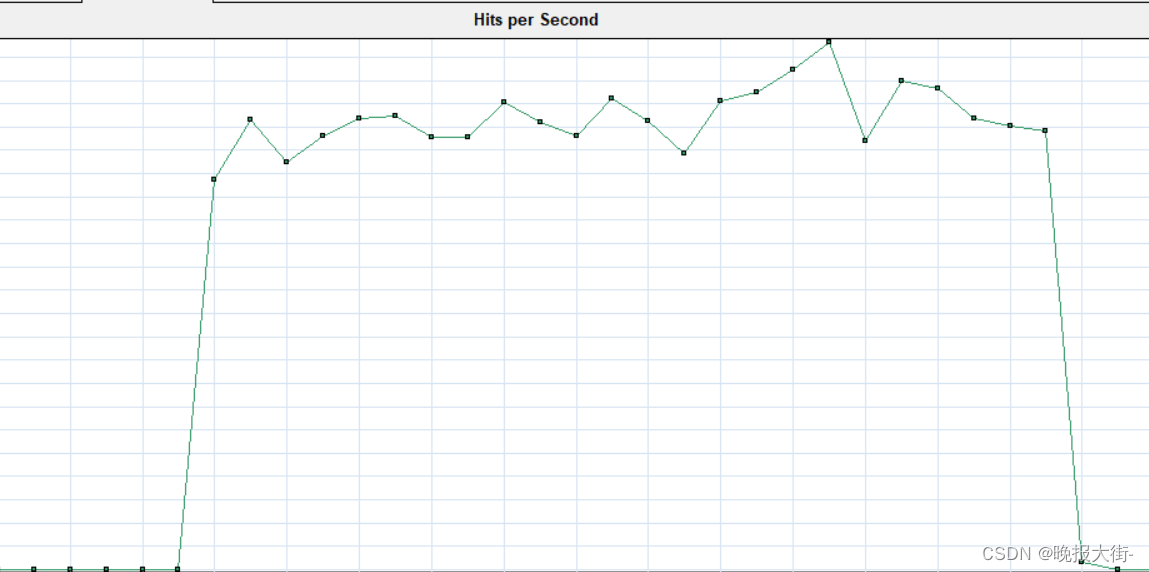
还可以看到点击率,吞吐量等图表信息:
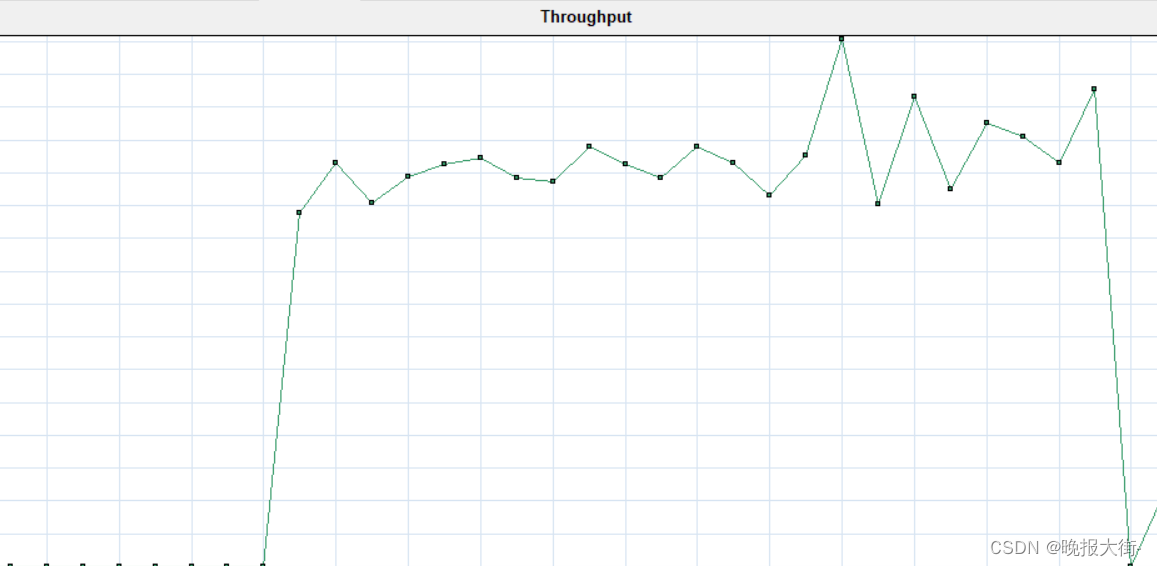
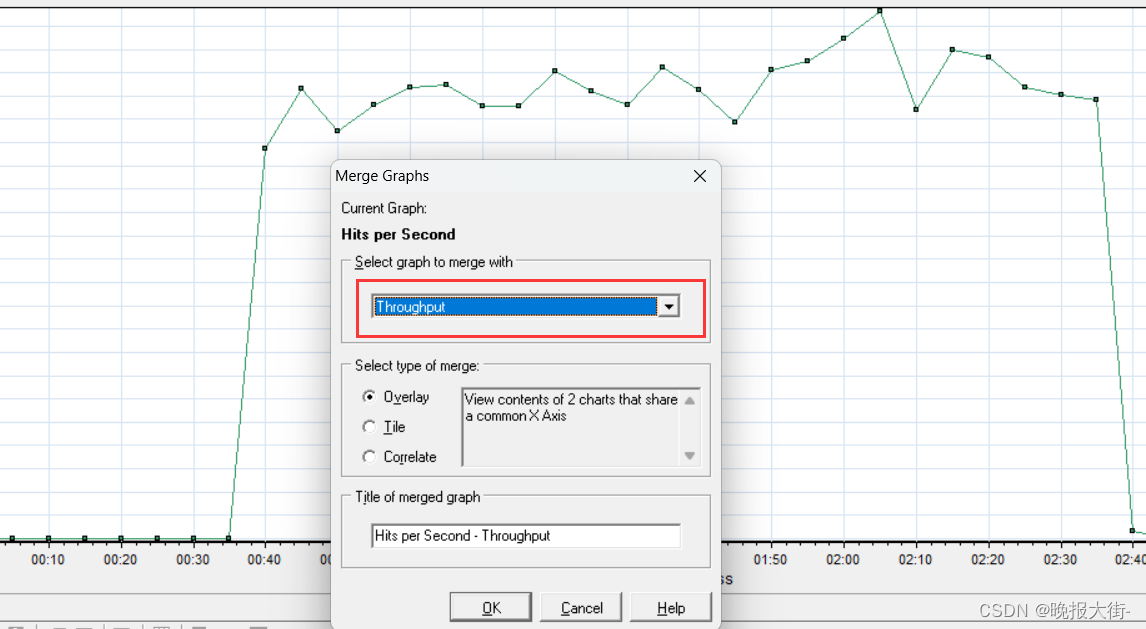
可以将这两个表组合起来观察:
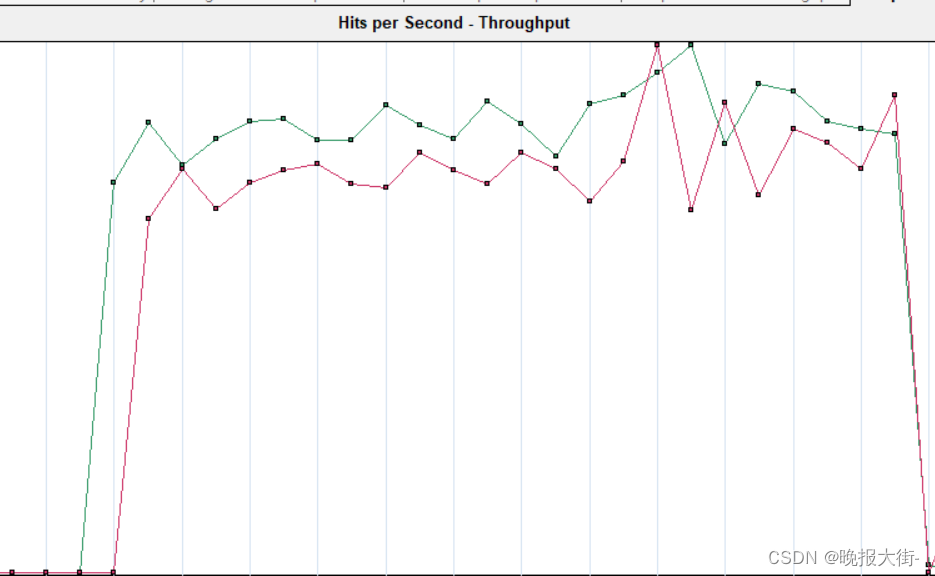
可以看到,随着点击率的增加,吞吐量也是跟着增加的。至此,对博客系统登录页简单的性能测试结束。
2.博客系统列表页测试
登录测试完成后对博客列表页进行测试,测试博客的数量是否为0,点击“查看全文”按钮是否跳转到博客详情页,以及验证跳转到博客列表页的URL,title等是否和预期一样:
import org.junit.jupiter.api.*;
import org.junit.jupiter.params.ParameterizedTest;
import org.junit.jupiter.params.provider.Arguments;
import org.junit.jupiter.params.provider.MethodSource;
import org.openqa.selenium.By;
import org.openqa.selenium.Dimension;
import org.openqa.selenium.WebDriver;
import org.openqa.selenium.WebElement;

import java.util.List;
import java.util.concurrent.TimeUnit;
import java.util.stream.Stream;

/**
 * Created with IntelliJ IDEA.
 * Description:
 * User: DELL
 * Date: 2023-09-20
 * Time: 19:59
 */
@TestMethodOrder(MethodOrderer.OrderAnnotation.class)
public class BlogListTest extends InitAndEnd{
    //判断博客数量是否不是0
    @Order(1)
    @Test
    public void BlogListNumber() throws InterruptedException {
        webDriver.get("http://127.0.0.1:8080/BlogSystem/login.html");
        webDriver.findElement(By.cssSelector("#username")).sendKeys("admin1");
        Thread.sleep(1000);
        webDriver.findElement(By.cssSelector("#password")).sendKeys("wxa721521");
        Thread.sleep(1000);
        webDriver.findElement(By.cssSelector("#submit")).click();
        List<WebElement> elements = webDriver.findElements(By.cssSelector("body > div.container > div.container-right > div:nth-child(1) > div.title"));
        //元素不为0,测试通过
        System.out.println(elements.size());
        Assertions.assertNotEquals(elements.size(),0);
    }
    public static Stream<Arguments> Generator() {
        return Stream.of(Arguments.arguments("http://127.0.0.1:8080/BlogSystem/blog_detail.html?blogId=1","博客详情页","111"));
    }
    @Order(2)
    //点击查看全文跳转到博客详情页
    @ParameterizedTest
 最低0.47元/天 解锁文章


 513
513


 被折叠的 条评论
为什么被折叠?
被折叠的 条评论
为什么被折叠?
 到【灌水乐园】发言


