


目录
今天来学学gcc的主要使用方法。
一.在Linux中创建静态库和动态库
1.编辑程序hello.c,hello.h,main.c
首先打开我们的老朋友,Ubuntu虚拟机!
在桌面打开终端,创建一个文件夹,并创建三个文件,然后使用命令打开并编辑
mkdir test2
cd test2
touch hello.c
touch hello.h
touch main.c
sudo gedit ./hello.h
sudo gedit ./hello.c
sudo gedit ./main.c
其中hello.h,hello.c,main.c按顺序代码分别为
#ifndef HELLO_H
#define HELLO_H
void hello(const char *name);
#endif //HELLO_H
#include<stdio.h>
void hello(const char*name)
{
        printf("Hello%s!\n",name);
}
#include"hello.h"
int main()
{
	hello("everyone");
	return 0;
}
2.将hello.c编译为hello.o文件
使用gcc编译生成hello.o文件并用ls指令查看当前test2文件夹中存在的文件,可以看到总共有四个文件,说明运行成功。
gcc -c hello.c
3.用hello.o文件生成静态库
静态库文件名的命名规范是以 lib 为前缀,紧接着跟静态库名,扩展名为.a。例如:我们将创建的静态库名为 myhello,则静态库文件名就是 libmyhello.a。在创建和使用静态库时, 需要注意这点。创建静态库用 ar 命令。在系统提示符下键入以下命令将创建静态库文件libmyhello.a。并用ls指令查看当前test2文件夹中存在的文件
ar -crv libmyhello.a hello.o
ls
4.在程序中使用静态库
gcc会在静态库名前加上前缀 lib,然后追加扩展名.a 得到的静态库文件名来查找静态库文件。
gcc -o hello main.c -L. -lmyhello
ls![]()
删除静态库文件试试公用函数hello是否真的连接到目标文件hello中了。

5.用hello.o文件生成动态库文件
动态库文件名命名规范和静态库文件名命名规范类似,也是在动态库名增加前缀 lib,但其 文件扩展名为.so。例如:我们将创建的动态库名为 myhello,则动态库文件名就是 libmyh ello.so。用 gcc 来创建动态库。
gcc -shared -fPIC -o libmyhello.so hello.o
ls
6.在程序中使用动态库
运行 gcc 命令生成目标文件,再运行它看看结果
![]()
出错,大问题!。。。。。才怪,有解决方法的,都是小问题,先将文件 libmyhello.so 复制到目录/vmware-tools-distrib/caf/usr/lib 中,终端输入sudo su进入管理员状态,手动删除.c 和.h 外的所有文件,然后输入gcc -c hello.c,输入ar -cr libmyhello.a hello.o和gcc -shared -fPIC -o libmyhello.so hello.o创建静态库文件 libmyhello.a 和动态库文件 libmyhello.so,接着输入gcc -o hello main.c -L. -lmyhello,就可以了。
二.Linux静态库.a与.so库文件的生成与使用
1.创建目录

2.用 vim文本编辑器编辑生成所需要的四个文件

这里编辑完成之后按Ctrl+esc,然后输入:wq可以退出编辑并保存。其中A1.c,A2.c,A.h,test.c的内容分别是
#include <stdio.h>
void print1(int arg)
{
	printf("A1 print arg:%d\n",arg);
}
#include <stdio.h>
void print2(char *arg)
{
	printf("A2 printf arg:%s\n", arg);
}
#ifndef A_H
#define A_H
void print1(int);
void print2(char *);
#endif
#include <stdlib.h>
#include "A.h"
int main()
{
print1(1);
print2("test");
exit(0);
}
3.静态库.a文件的生成和使用
这里原理同上,运行图和命令奉上(主要是有些累,偷点懒,这里祝各位悟性高,能看明白。)
gcc -c A1.c A2.c
ar crv libafile.a A1.o A2.o
gcc -o test test.c libafile.a
./test
4.共享库.so 文件的生成与使用
gcc -c -fPIC A1.c A2.c
gcc -shared *.o -o libsofile.so
gcc -o test test.clibsofile.so
sudo cp libsofile.so /usr/lib
./test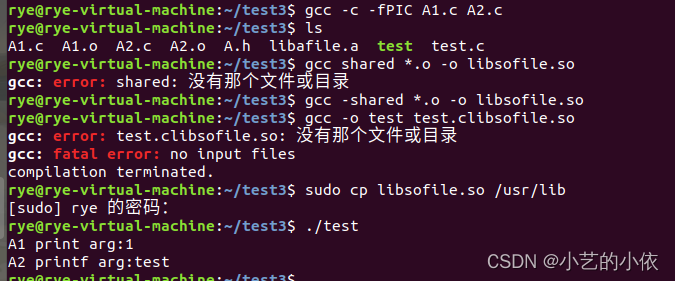
5.生成静态库和静态库的程序编写及大小比较
(1)静态库大小比较
建立所需文件

其中按顺序的代码分别是:
#ifndef MAIN_H
#define MAIN_H
float x2x(int a,int b);
float x2y(int a,int b);
#endif
#include<stdio.h>
float x2x(int a,int b)
{
        float c=0;
        c=a+b;
        return c;
}
float x2y(int a,int b)
{
        float c=0;
        c=a/b;
        return c;
}
#include<stdio.h>
#include"main.h"
void main()
{
        int a=8,b=4;
        printf("%d\n",x2x(a,b));
        printf("%d\n",x2y(a,b));
}

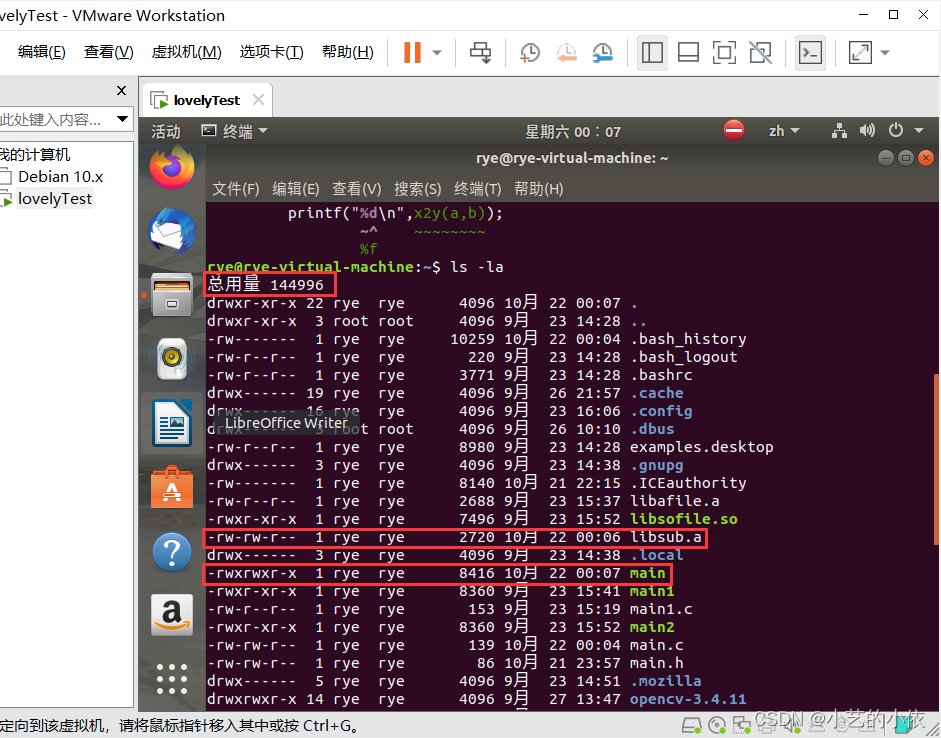
(2)动态库大小比较
生成动态库
gcc -shared -fpic -o libsub.so sub1.o sub2.o
gcc -o main_t main.c libsub.so
三.Linux中gcc常用指令
1.简单编译
vim test.c
gcc test.c -o test
./test
其中test.c
#include <stdio.h>
int main(void)
{
	printf("Hello World!\n");
	return 0;
}
gcc的重用指令有
指令为gcc test.c -o test(预处理,编译,汇编,链接)
预处理(gcc -E test.c -o test.i或gcc -E test.c)
编译(gcc -S test.i -o test.s)
汇编(gcc -c test.s -o test.o)
链接(gcc test.o -o test)
2.多个程序文件的编译
(gcc test1.c test2.c -o test)
3.检错
(gcc -pedantic illcode.c -o illcode)
(gcc -Wall illcode.c -o illcode)
4.库文件链接
编译成可执行文件(gcc –c –I /usr/dev/mysql/include test.c –o test.o)
链接(gcc –L /usr/dev/mysql/lib –lmysqlclient test.o –o test)
强制链接时使用静态链接库(gcc –L /usr/dev/mysql/lib –static –lmysqlclient test.o –o test)
静态库链接时搜索路径顺序
1.ld 会去找 GCC 命令中的参数-L
2.再找 gcc 的环境变量 LIBRARY_PATH
3.再找内定目录 /lib /usr/lib/usr/local/lib
动态链接时,执行时搜索路径顺序
1.编译目标代码时指定的动态库搜索路径
2.环境变量 LD_LIBRARY_PATH 指定的动态库搜索路径
3.配置文件/etc/ld.so.conf 中指定的动态库搜索路径
4.默认的动态库搜索路径/lib
5.默认的动态库搜索路径/usr/lib
5.GCC常用命令
1.-E:仅作预处理,不进行编译、汇编和链接
2.-S:仅编译到汇编语言,不进行汇编和链接
3.-c:编译、汇编到目标代码(也就是计算机可识别的二进制)
4.-o:执行命令后文件的命名
5.-g:生成调试信息
6.-w:不生成任何警告
7.-Wall:生成所有的警告
四.Linux中的第三方库-curses
1.安装curses库
sudo apt-get install libncurses5-dev2.编译生成可执行程序
创建hello.asm文件
vim hello.asm其内容为
; hello.asm
section .data            ; 数据段声明
        msg db "Hello, world!", 0xA     ; 要输出的字符串
        len equ $ - msg                 ; 字串长度
section .text            ; 代码段声明
global _start            ; 指定入口函数
_start:                  ; 在屏幕上显示一个字符串
        mov edx, len     ; 参数三:字符串长度
        mov ecx, msg     ; 参数二:要显示的字符串
        mov ebx, 1       ; 参数一:文件描述符(stdout)
        mov eax, 4       ; 系统调用号(sys_write)
        int 0x80         ; 调用内核功能
                         ; 退出程序
        mov ebx, 0       ; 参数一:退出代码
        mov eax, 1       ; 系统调用号(sys_exit)
        int 0x80         ; 调用内核功能
生成hello.o文件,hello可执行文件,运行,顺便把大小也看看。
sudo rm -rf /usr/bin/python3
sudo ln -s /usr/bin/python3m /usr/bin/python3
sudo apt install nasm//这三步是运行下一步有问题的才使用
nasm -f elf64 hello.asm
ld -s -o hello hello.o
./hello
size hello
结语
说实话,这次实验还是有点曲折的,前面还有点热情,后来越来越累,文章质量也下降了不少, 但是就结果而言,还是不错的,望谅解。拜了个拜~


 4365
4365


 被折叠的 条评论
为什么被折叠?
被折叠的 条评论
为什么被折叠?
 到【灌水乐园】发言


