


目录
0.写在开头
本篇文章旨在实现各种数据结构,实现为主,介绍为辅(或者说基本不介绍),要看具体详情可以参考《在 JavaScript 中学习数据结构与算法》这篇博客
1.栈
栈(Stack):后进先出LIFO
class Stack {
  constructor(items){
    this.items = items||[]
  }
  push(el){ // 入栈
    this.items.push(el)
  }
  pop(){ // 出栈
    return this.items.pop()
  }
  clear(){ //清空
    this.items=[]
  }

  get peek(){ // 末位
    return this.items[this.items.length-1]
  }
  get isEmpty(){
    return !this.items.length
  }
  get size(){
    return this.items.length
  }

}
2.队列
队列(Queue):先进先出FIFO
class Queue {
  constructor(items){
    this.items = items || []
  }
  addEl(el){ // 入队
    this.items.push(el)
  }
  delEl(){ // 出队
    return this.items.shift()
  }
  clear(){ // 清空
    this.items = []
  }

  get header(){ // 首位
    return this.items[0]
  }
  get isEmpty(){
    return !this.items.length
  }
  get size(){
    return this.items.length
  }
}
2.1 优先队列
优先队列是队列的变种,由项的priority的值决定其在队列中的优先级
class PriorityQueue extends Queue {
  constructor(items){
    super(items)
  }
  addEl(el,priority){ // priority越小优先级越高
    const queueEl = {el,priority}
    let preIndex = this.items.findIndex(item=>item.priority>queueEl.priority)
    if(preIndex>-1) this.items.splice(preIndex,0,queueEl)
    else this.items.push(queueEl)
  }
}
2.2 循环队列
循环队列是队列的另一个变种,可以实现队列索引循环
class LoopQueue extends Queue {
  constructor(items){
    super(items)
  }
  getIndex(index){
    let len = this.items.length
    return index>len?(index%len):index
  }
  find(index){
    return this.items[this.getIndex(index)]
  }
}
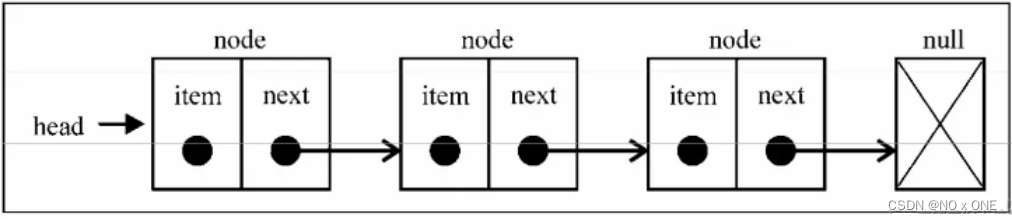
3.链表
链表(LinkedList):每个元素都有一个next保存下一个元素的指针,第一个元素为head,如下图所示:
class LinkedList {
  constructor(){
    this.head = null
    this.length = 0
  }
  static createNode(el){
    const node = Object.create(null)
    node.el = el
    node.next = null
    return node
  }
  append(el){ // 添加
    const node = LinkedList.createNode(el)
    if(!this.head) this.head = node
    else{
      let preNode = this.head
      while(preNode.next) preNode = preNode.next
      preNode.next = node
    }
    this.length++
  }
  insert(index,el){ // 插入
    if(index>=0&&index<=this.length){
      const node = LinkedList.createNode(el)
      let curEl = this.head
      if(index===0){
        this.head = node
        node.next = curEl
      }
      else{
        let preEl = null
        let curIndex = 0
        while (curIndex++ < index) {
          preEl = curEl
          curEl = curEl.next
        }
        preEl.next = node
        node.next = curEl
      }
      this.length++
      return true
    }
    return false
  }
  removeAt(index){
    if(index>=0&&index<length){
      let curEl = this.head
      if(index===0){
        this.head = curEl.next
      }
      else{
        let preEl = null
        let curIndex = 0
        while (curIndex++ < index) {
          preEl = curEl
          curEl = curEl.next
        }
        preEl.next = curEl.next
      }
      this.length--
      return curEl.el
    }
    return null
  }
  remove(el){
    return this.removeAt(this.findIndex(el))
  }
  findIndex(el){
    let curEl = this.head
    let index = -1
    while (curEl) {
      if(el===curEl.el) return index+1
      index++
      curEl = curEl.next
    }
    return index
  }
  selectNode(cb){ // 筛选
    let curNode = this.head
    while(curNode){
      if(cb(curNode.el)) return curNode
      curNode = curNode.next
    }
    return null
  }
  get isEmpty(){
    return !this.length
  }
  get size(){
    return this.length
  }
}
3.1 双向链表
指定最后一个元素为end,
class DoublyLinkedList extends LinkedList {
  constructor(){
    super()
    this.end = null
  }
  insert(el,index){
    if(index>=0&&index<=this.length){
      const node = super.createNode(el)
      let curNode = this.head
      let preNode = null
      let curIndex = 0
      if(index===0){ // 首位
        if(!this.head){
          this.head = node
          this.end = node
        }else{
          this.head = node
          node.next = curNode
          curNode.pre = node
        }
      }
      else if(index ===this.length){ // 末位
        curNode = this.end
        this.end = node
        curNode.next = node
        node.pre = curNode
      }
      else{ // 中间
        while (curIndex++ < this.length) {
          preNode = curNode
          curNode = curNode.next
        }
        preNode.next = node
        node.pre = preNode
        node.next = curNode
        curNode.pre = node
      }
      this.length++
      return true
    }
    return false
  }
}
// 循环链表、双向循环链表(略)
4.集合
集合(set):每一个元素形如{value:value},无key,每个元素都是唯一的
class Set {
  constructor(){
    this.items = Object.create(null)
  }
  has(value){
    return this.items.hasOwnProperty(value)
  }
  add(value){
    if(!this.has(value)){ // 保证唯一
      this.items[value] = value
      return true
    }
    return false
  }
  remove(value){
    if(this.has(value)){
      delete this.items[value]
      return true
    }
    return false
  }
  get size(){
    return Object.keys(this.items).length
  }
  get isEmpty(){
    return !this.size
  }
  get values(){
    return Object.keys(this.items)
  }
  union(set){ // 并集
    let res = new Set()
    this.values.forEach((key,val)=>res.add(val))
    set.values.forEach((key,val)=>res.add(val))
    return res
  }
  intersection(set){ // 交集
    let res = new Set()
    this.values.forEach((key,val)=>set.has(val)&&res.add(val))
    return res
  }
  difference(set){ // 差集
    let res = new Set()
    this.values.forEach((key,val)=>!set.has(val)&&res.add(val))
    return res
  }
  isSubsetOf(set){ // 子集
    return this.size<=set.size && this.values.every((key,val)=>set.has(val))
  }
}
5.字典
字典(Dictionary):每一个元素形如{ key: value },且能保证每个key-value是唯一的
class Dictionary {
  constructor(){
    this.items = {}
  }
  set(key,val){
    this.items[key] = val
    return this // 链式调用
  }
  get(key){
    return this.items[key]
  }
  remove(key){
    delete this.items[key]
    return this
  }
  get keys(){
    return Object.keys(this.items)
  }
  get values(){
    return Object.values(this.items) // ES7
	// **
    return Object.keys(this.items).reduce((pre,cur)=>{
       pre.push(this.items[cur])
       return pre
     },[])
    // **
  }
}
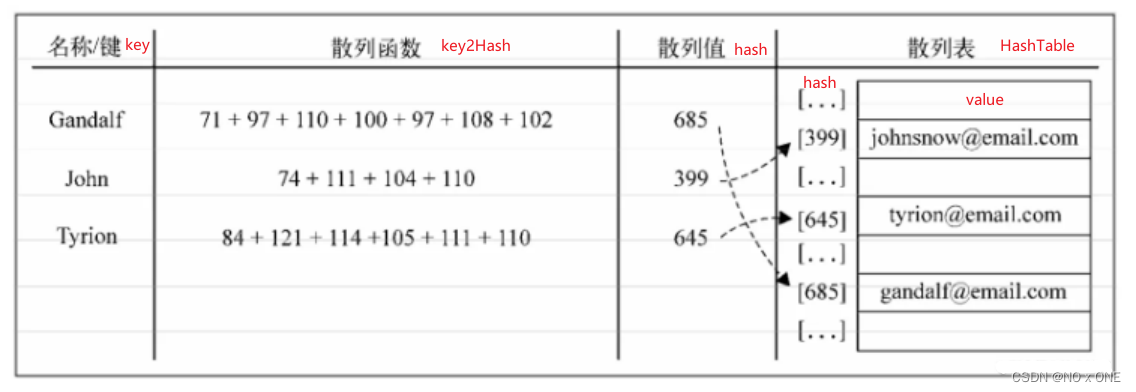
6.哈希表
哈希表(HashTable):使用hash值代替key,使用[]代替{key:value},从而避免遍历整个数据结构来达到最快取值的功能,典型的牺牲空间换取时间,如下图所示:
class HashTable{
  constructor(){
    this.table = []
  }
  static key2Hash(key){
    let hash = 0
    for(let code of key) hash += code.charCodeAt()
    return hash%37
  }

  put(key,val){
    this.table[HashTable.key2Hash(key)] = val
  }
  get(key){
    return this.table[HashTable.key2Hash(key)]
  }
  remove(key){
    this.table[HashTable.key2Hash(key)] = undefined
  }
}
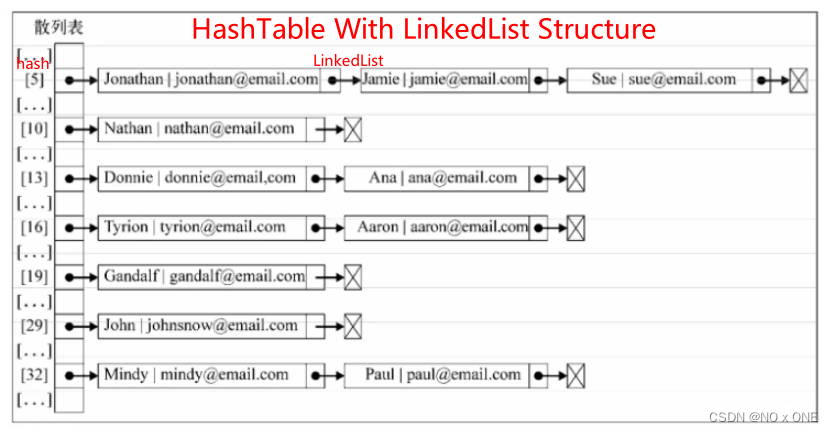
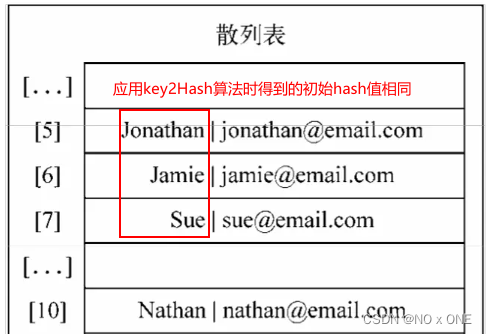
6.1 哈希值重复的冲突解决
使用哈希表有一个潜在的问题,那就是使用hash值代替key值时,有时候可能不同的key值会得到相同的hash值,例如'az'和'by',这里介绍三种解决方法
6.1.1 链地址法
核心思想:链表+哈希表,哈希表项以链表结构存储,
class HashTable{
  constructor(){
    this.table = []
  }
  static key2Hash(key){
    let hash = 0
    for(let code of key) hash += code.charCodeAt()
    return hash%37
  }
  put(key,val){
    const hash = HashTable.key2Hash(key)
    if(this.table[hash]===undefined) this.table[hash] = new LinkedList()
    this.table[hash].append({key,val})
  }
  get(key){
    const hash = HashTable.key2Hash(key)
    let linkList = this.table[hash]

 	return linkList===undefined? undefined :linkList.selectNode(node=>Object.is(node.key,key))
    // function getNodeVal(node){
    //   if(!node||!node.el) return undefined // 到末位
    //   if(Object.is(node.el.key,key)) return node.el.value
    //   return getNodeVal(node.next)
    // }
    // return getNodeVal(linkList.head)
  }

  remove(key){
    const hash = HashTable.key2Hash(key)
    let linkList =this.table[hash]

    if(linkList===undefined) return undefined
    const node = linkList.selectNode(node=>Object.is(node.key,key))
    return linkList.remove(node)

    // function removeNodeVal(node) {
    //   if(!node||!node.el) return false // 到末位
    //   if(Object.is(node.el.key,key)){
    //     linkList.remove(node.el)
    //     if(linkList.isEmpty) this.table[hash] = undefined // 由于指针的原因,这里要使用this.table[hash]
    //     return true
    //   }
    //   return removeNodeVal(node)
    // }
    // return removeNodeVal(linkList.head)
  }
}
6.1.2 线性探查
核心思想:若存在重复的hash值,则hash++,直到没有重复
class HashTable{
  constructor(){
    this.table = []
  }
  static key2Hash(key){
    let hash = 0
    for(let code of key) hash += code.charCodeAt()
    return hash%37
  }
  put(key,value){
    const hash = HashTable.key2Hash(key)
    while (this.table[hash]!==undefined){
      if(Object.is(this.table[hash].key,key)) return // 唯一key
    }
    this.table[hash] = {key,value}
  }
  get(key){
    const hash = HashTable.key2Hash(key)
    while(this.table[hash]){
      if(Object.is(this.table[hash].key,key)) return this.table[hash].value
      hash++
    }
    return undefined
  }
  remove(key){
    const hash = HashTable.key2Hash(key)
    while(this.table[hash]){
      if(Object.is(this.table[hash].key,key)){
        this.table[hash] =undefined
        return true
      }
      hash++
    }
    return false
  }
}
6.1.3 优化key2Hash算法
降低hash值重复率
 static key2Hash(key){
   let hash = 0
   for(let code of key) hash += code.charCodeAt()
   return hash%37
 }
// 改进,hash重复率更低,也可以插入时间戳
 static key2Hash2(key) {
   let hash = 5381
   for (let code of key) hash = hash * 33 + code.charCodeAt()
   return hash % 1013
 }
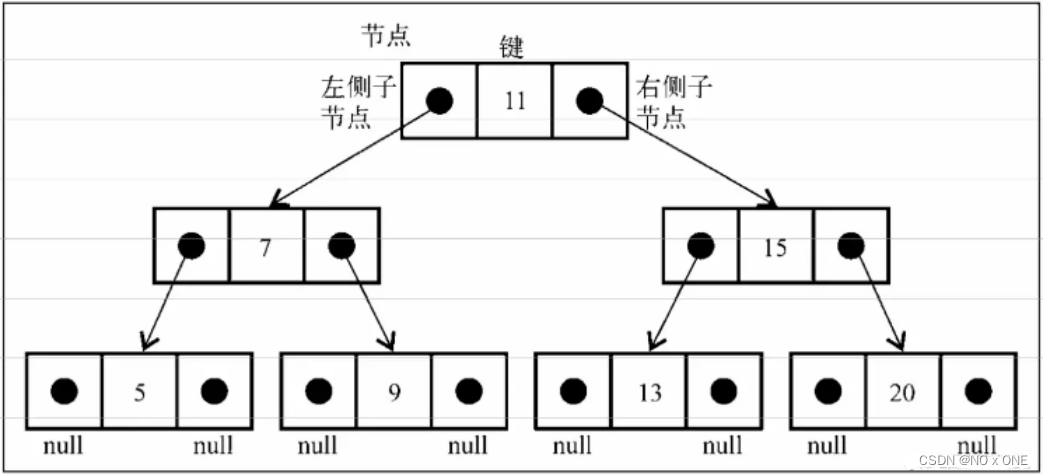
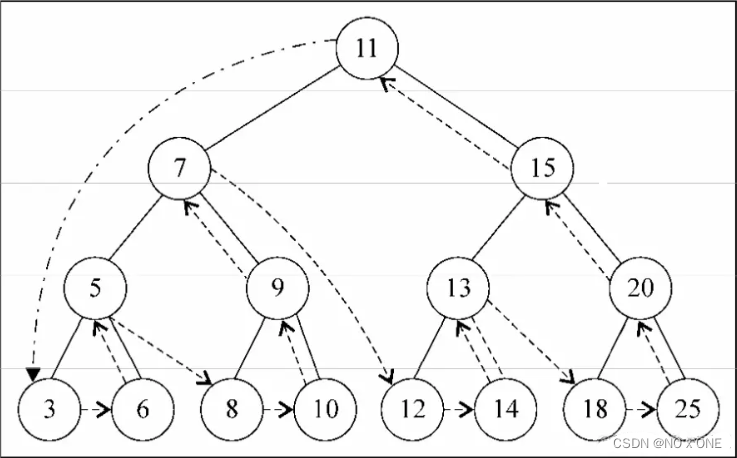
7.树
二叉搜索树
二叉树中的节点最多只能有两个子节点:一个是左侧子节点,另一个是右侧子节点
二叉搜索树(BST,Binary Search Tree)是二叉树的一种,在左侧节点存储(比父节点)小的值, 在右侧节点存储(比父节点)大(或者等于)的值,结构如下图所示
class BinarySearchTree{
  constructor(){
    this.root = null
  }
  static getNode(key){
    const node = Object.create(null)
    node.key = key
    node.left = null
    node.right = null
    return node
  }
  insert(key){
    const newNode = BinarySearchTree.getNode(key)
    if(!this.root) return this.root = newNode
    function insetNode(node,newNode) {
      if(newNode.key<node.key){ // left
        if(node.left === null)  return node.left = newNode
        else insetNode(node.left,newNode)
      }
      else{ // right
        if(node.right === null) return node.right = newNode
        else insetNode(node.right,newNode)
      }
    }
    insetNode(this.root,newNode)

	//** 用while循环代替递归函数
    let curNode = this.root
    let direction = newNode.key<curNode.key?'left':'right'
    while(curNode[direction]){
      curNode=curNode[direction]
      direction = newNode.key<curNode.key?'left':'right'
    }
    curNode[direction] = newNode
   	//**
  }
}
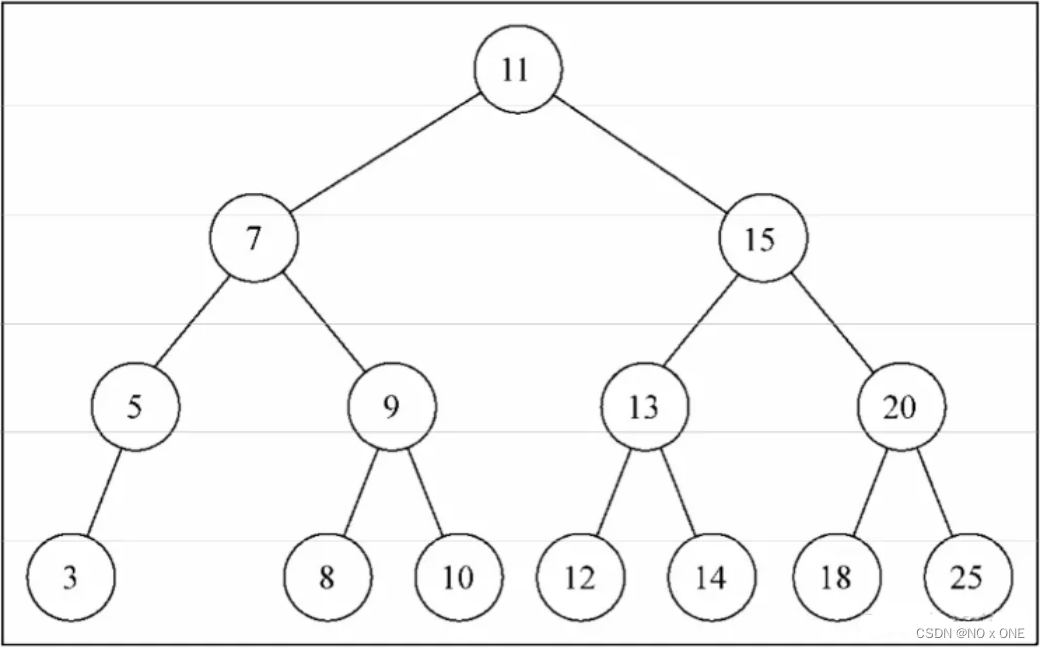
创建二叉树
const tree = new BinarySearchTree()
tree.insert(11)
tree.insert(7)
tree.insert(5)
tree.insert(3)
tree.insert(9)
tree.insert(8)
tree.insert(10)
tree.insert(13)
tree.insert(12)
tree.insert(14)
tree.insert(20)
tree.insert(18)
tree.insert(25)
结构如下,自己看
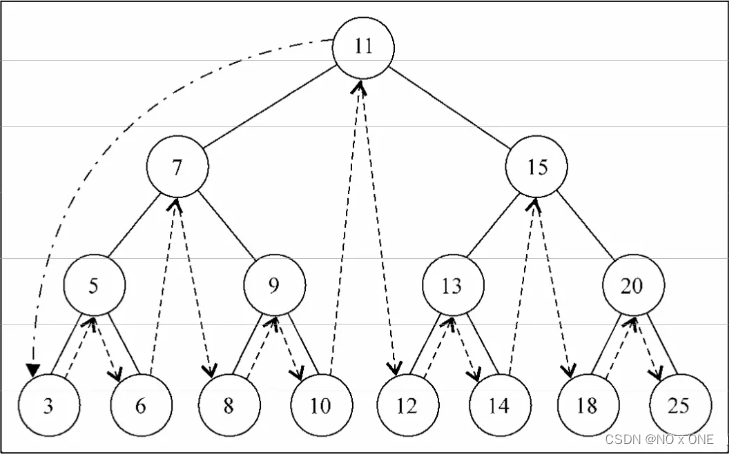
7.1 树的遍历
遍历一颗树是指访问树的每个节点并对它们进行某种操作(这里的操作这个词翻译成编程术语就是cb回调)的过程,有三种方式:中序、先序、后序
7.1.1 中序
中序遍历是一种以上行(即最小到最大)的顺序访问BST所有节点的遍历方式
class BinarySearchTree{
  // ...
  inOrderTranverse(cb){
    function tranverse(node,cb){
      if(node!==null){
        tranverse(node.left,cb) // 以最小节点为起点
        cb(node.key) // 回调
        tranverse(node.right,cb)
      }
    }
    tranverse(this.root,cb)
  }
}

// 中序遍历可以用于排序
let arr = []
tree.inOrderTranverse(node=>arr.push(node))
console.log(arr) // [3, 5, 6, 7, 8, 9, 10, 11, 12, 13, 14, 15, 18, 20, 25]
过程如下
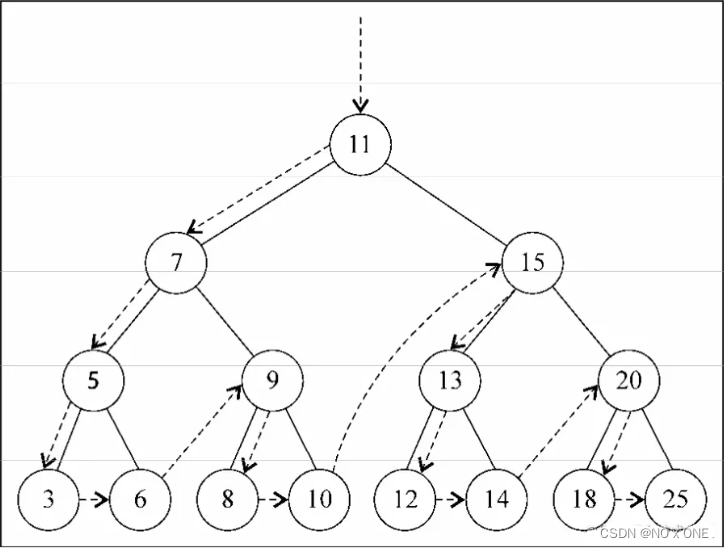
7.1.2 先序
先序遍历是以优先于后代节点的顺序访问每个节点
class BinarySearchTree{
  // ...
  preOrderTraverse(cb){
    function tranverse(node,cb) {
      if(node!==null){
        cb(node)
        tranverse(node.left,cb)
        tranverse(node.right,cb)
      }
    }
    tranverse(this.root,cb)
  }
}
过程如下
7.1.3 后序
后序遍历则是先访问节点的后代节点,再访问节点本身,与先序正好相反
class BinarySearchTree{
  // ...
  postOrderTraverse(cb){
    function tranverse(node,cb) {
      if(node!==null){
        tranverse(node.left,cb)
        tranverse(node.right,cb)
        cb(node)
      }
    }
    tranverse(this.root,cb)
  }
}
过程如下,自己看
7.2 节点操作
7.2.1 搜索最大值和最小值
前面说过了二叉搜索树的特点就是小的放左边,大的放右边
min(node=this.root){ // 默认为根节点
  while(node&&node.left) node = node.left
  return node

  //**
  function getMin(node){
	if(!node) return node
	if(node.left) return getMin(node.left)
	else return node
  }
  getMin(node)
  //**
}

max(node=this.root){
  while(node.right) node = node.right
  return node
}
7.2.2 搜索特定节点
search(key){
  let curNode = this.root
  while(curNode&&curNode.key!==key){
    if(key<curNode.key) curNode = curNode.left
    else curNode = curNode.right
  }
  return curNode?curNode:false

  //**
  function searchNode(node,key) {
    if(!node) return false
    if(node.key===key) return node
    if(key<node.key) return searchNode(node.left,key)
    else return searchNode(node.right,key)
  }
  searchNode(this.root,key)
  //**
}
7.2.3 移除特定节点(todo)
AVL树,RB树(todo)
8.图
class Graph{
  constructor(vertices=[]){
    if(Object.prototype.toString.call(vertices)!=='[object Array]') throw new Error(`只能传数组噢`)
    this.vertices=vertices
    this.adjList = new Dictionary() // 邻接表
    if(this.vertices.length) this.vertices.forEach(v=>this.adjList.set(v,[]))
  }
  addVertex(v){
    this.vertices.push(v)
    this.adjList.set(v,[])
  }
  addEdge(v,w){
    this.adjList.get(v).push(w)
    this.adjList.get(w).push(v)
  }
  toString(){
    return this.vertices.reduce((pre,cur)=>{
      return this.adjList.get(cur).reduce((pre,cur)=>{
        return  `${pre} ${cur}`
      },`${pre}\n${cur}:`)
    },'')

    //** 以下可以增加代码维护难度 (若你老板对你不好,可以这样写)
    return this.vertices.reduce((pre,cur)=>this.adjList.get(cur).reduce((pre,cur)=>`${pre} ${cur}`,`${pre}\n${cur}`),'')
    //**
  }
创建树
const graph = new Graph(['A', 'B', 'C', 'D', 'E', 'F', 'G', 'H', 'I'])
graph.addEdge('A', 'B')
graph.addEdge('A', 'C')
graph.addEdge('A', 'D')
graph.addEdge('C', 'D')
graph.addEdge('C', 'G')
graph.addEdge('D', 'G')
graph.addEdge('D', 'H')
graph.addEdge('B', 'E')
graph.addEdge('B', 'F')
graph.addEdge('E', 'I')
console.log(''+graph)
/**
 *  A: B C D
 *  B: A E F
 *  C: A D G
 *  D: A C G H
 *  E: B I
 *  F: B
 *  G: C D
 *  H: D
 *  I: E
 */
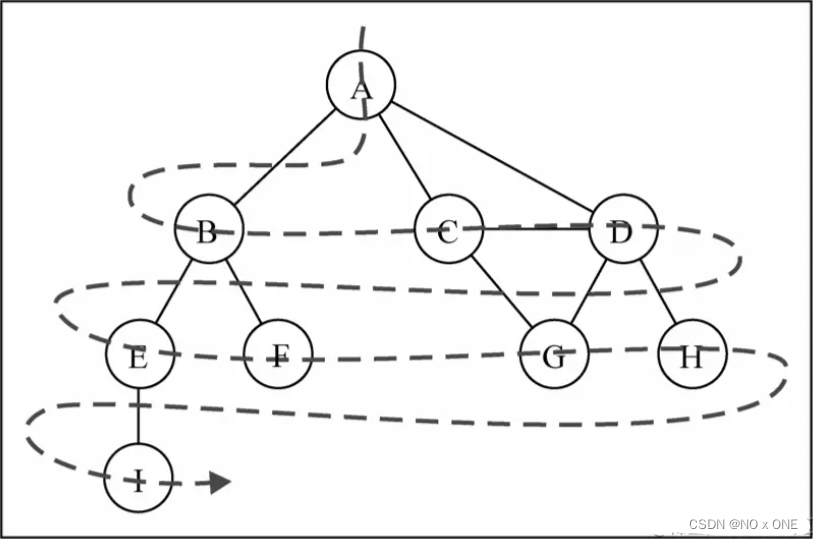
8.1 图遍历
图遍历算法的思想是:先指定第一次被访问的节点,并且追踪其下还有哪些节点还没有被完全探索
有两种遍历算法:广度优先搜索(Breadth-First Search,BFS)、深度优先搜索(Depth-First Search,DFS)
8.1.1 广度优先搜索
广度优先搜索(Breadth-First Search,BFS)是先宽后深地访问节点,实现思想:维护两个队列,分别用于存储已读和待读节点,两者具有互斥性,不断递归访问相邻的节点和同时标为已读
class Graph{
  // ...
  bfs(v,cb){
    const readList = [] // 已读队列
    const adjList = this.adjList
    let pending = [v||this.vertices[0]] // 待读队列
    while (pending.length) {
      let key = pending.shift()
      readList.push(key)
      cb&&cb(key)
      adjList.get(key).forEach(v=>{
        if(!readList.includes(v)&&!pending.includes(v)){ // 互斥,保证只读一遍
          pending.push(v)
        }
      })
    }
    //** 下面是另一种方法(我个人还是喜欢用while循环来代替递归,递归会浪费函数作用域内存,而且不优雅)
    ;(function read(vertices) {
      vertices.forEach(key=>{
        readList.push(pending.shift())
        cb&&cb(key)
        adjList.get(key).forEach(v=>{
          if(!pending.includes(v)&&!readList.includes(v)){ // 互斥,保证只读一遍
            pending.push(v)
          }
        })
        pending.length&&read(pending)
      })
    })(pending)
    //**
    }
  }
}
遍历看看
/**
 *  graph邻接表
 *  A: B C D
 *  B: A E F
 *  C: A D G
 *  D: A C G H
 *  E: B I
 *  F: B
 *  G: C D
 *  H: D
 *  I: E
 */

graph.bfs(null,v=>console.log(v)) // A B C D E F G H I
使用广度搜索计算到各节点到顶点的最短路径
class Graph{
  // ...
  bfs(v,cb){
    const readList = []
    const distances = []
    const predecessors = []
    const adjList = this.adjList
    let pending = [v||this.vertices[0]]
    while (pending.length) {
      let key = pending.shift()
      cb&&cb(key)
      readList.push(key)
      distances[key] = distances[key] || 0
      predecessors[key] = predecessors[key]||null
      adjList.get(key).forEach(v=>{
        if(!readList.includes(v)&&!pending.includes(v)){
          pending.push(v)
          distances[v] = distances[key]+1
          predecessors[v] = key
        }
      })
    }
    return {distances,predecessors}
  }
  getAllPath(fromV) {
    let res = Object.create(null)
    fromV = fromV || this.vertices[0]
    const vertices = this.vertices
    const { distances,predecessors } = this.bfs(fromV)
    vertices.forEach(toV=>{
      if(!!distances[toV]){
        let preV = predecessors[toV]
        let curPath = `${toV}`
        while (fromV!==preV) {
          curPath =`${preV} => ${curPath}`
          preV = predecessors[preV]
        }
        curPath = `${fromV} => ${curPath}`
        res[toV] = curPath
      }
    })
    return res
  }
}

/**
 *  graph邻接表
 *  A: B C D
 *  B: A E F
 *  C: A D G
 *  D: A C G H
 *  E: B I
 *  F: B
 *  G: C D
 *  H: D
 *  I: E
 */

console.log(graph.bfs())
// distances: [A: 0, B: 1, C: 1, D: 1, E: 2, F: 2, G: 2, H: 2 , I: 3]
// predecessors: [A: null, B: "A", C: "A", D: "A", E: "B", F: " B", G: " C", H: "D", I: "E"]
console.log(graph.getAllPath())
/**
 * B: "A => B"
 * C: "A => C"
 * D: "A => D"
 * E: "A => B => E"
 * F: "A => B => F"
 * G: "A => C => G"
 * H: "A => D => H"
 * I: "A => B => E => I"
 *
 */
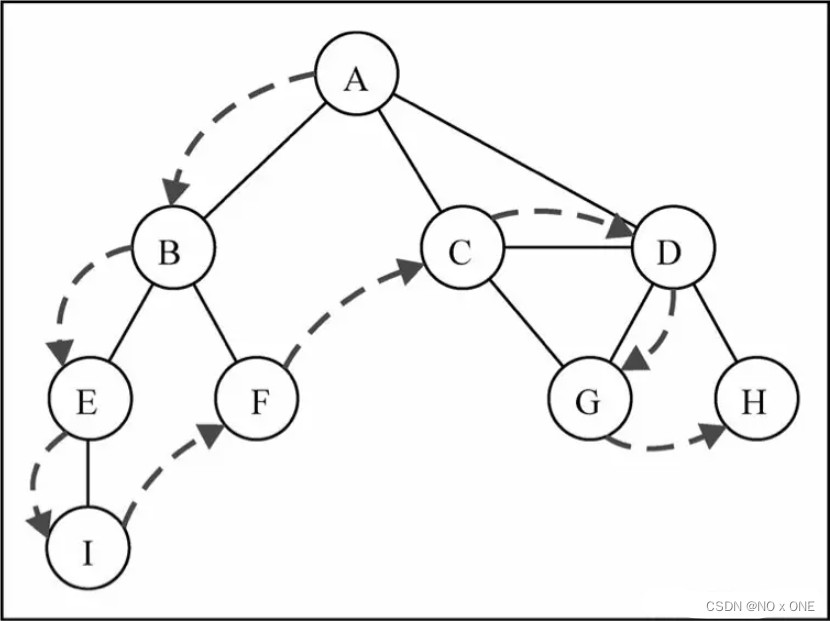
8.1.2 深度优先搜索
深度优先搜索(Depth-First Search,DFS)是先深后宽,实现思想:从第一个指定的顶点开始遍历图,沿着路径直到这条路径最后一个顶 点被访问了,接着原路回退并探索下一条路径,维护一个已读队列即可
class Graph{
  // ...
  dfs(cb){
    const readList = []
    const adjList =this.adjList
    const len = this.vertices.length
    function read(vertices){
      vertices.forEach(key=>{
        if(readList.includes(key)) return
        readList.push(key)
        cb&&cb(key)
        if(readList.length!==len) read(adjList.get(key))
      })
    }
    read(this.vertices)
  }
}
/**
 *  graph邻接表
 *  A: B C D
 *  B: A E F
 *  C: A D G
 *  D: A C G H
 *  E: B I
 *  F: B
 *  G: C D
 *  H: D
 *  I: E
 */
graph.dfs(val=>console.log(val)) // A B E I F C D G H
优化,加入前导节点标记predecessors 、遍历节点开始时所在轮次readTimes和遍历完所有子节点所在轮次finishedTimes
class Graph{
  dfs(cb){
    const readList = []
    const adjList =this.adjList
    const len = this.vertices.length

    let readT = 0
    const finishedTimes = Object.create(null)
    const readTimes = Object.create(null)
    const predecessors = Object.create(null)
    function read(vertices,predecessor){
      vertices.forEach(key=>{
        readT++
        if(adjList.get(key).every(v=>readList.includes(v))&&!finishedTimes[key]){
          finishedTimes[key] = readT // 完成遍历某节点的所有邻接点
        }
        if(readList.includes(key)) return
        readTimes[key] = readT
        readList.push(key)
        cb&&cb(key)
        predecessors[key] = predecessors[key] || predecessor || null
        if(readList.length!==len) read(adjList.get(key),key)
      })
    }
    read(this.vertices)
    return { readTimes, finishedTimes, predecessors }
  }
}
/**
 *  graph邻接表
 *  A: B C D
 *  B: A E F
 *  C: A D G
 *  D: A C G H
 *  E: B I
 *  F: B
 *  G: C D
 *  H: D
 *  I: E
 */
console.log(graph.dfs())
// readTimes: {A: 1, B: 2, C: 10, D: 12, E: 4, F: 8, G: 15, H: 18, I: 6 }   第2轮开始遍历到B节点
// finishedTimes: {A: 13, B: 9, C: 16, D: 20, E: 7, F: 8, G: 15, H: 18, I: 6 } 第9轮 "确认" 遍历完B节点下的所有子节点(这里的确认即这轮不再遍历下去,而是跳过)
// predecessors: {A: null, B: 'A', C: 'A', D: 'C', E: 'B', F: 'B', G: 'D', H: ''D', I: 'E'}


 4106
4106


 被折叠的 条评论
为什么被折叠?
被折叠的 条评论
为什么被折叠?
 到【灌水乐园】发言


