


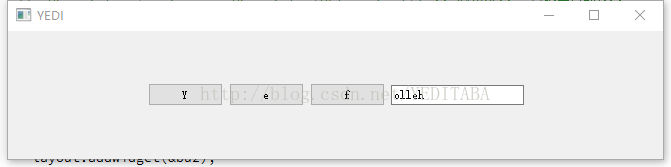
QT水平布局:头文件<QHBoxLayout>
#include <QApplication>
#include <QWidget>
#include <QPushButton>
#include <QLineEdit>
#include <QHBoxLayout>
#include <QWidget>
#include <QPushButton>
#include <QLineEdit>
#include <QHBoxLayout>
int main(int argc, char *argv[])
{
QApplication app(argc,argv);
{
QApplication app(argc,argv);
QWidget w;
w.setWindowTitle("YEDI");
w.setWindowTitle("YEDI");
QPushButton bu("Y");
QPushButton bu1("e");
QPushButton bu2("f");
QLineEdit lineit("olleh"); //设置默认字符
lineit.setEchoMode(QLineEdit::Normal);
lineit.setPlaceholderText("hello world"); //设置默认字符(提示)
QPushButton bu1("e");
QPushButton bu2("f");
QLineEdit lineit("olleh"); //设置默认字符
lineit.setEchoMode(QLineEdit::Normal);
lineit.setPlaceholderText("hello world"); //设置默认字符(提示)
QHBoxLayout layout; //设置水平布局
layout.addStretch(1); //添加弹簧
layout.addWidget(&bu); //添加按钮部件
layout.addWidget(&bu1);
layout.addWidget(&bu2);
layout.addWidget(&lineit);
layout.addStretch(1); //添加弹簧
layout.addStretch(1); //添加弹簧
layout.addWidget(&bu); //添加按钮部件
layout.addWidget(&bu1);
layout.addWidget(&bu2);
layout.addWidget(&lineit);
layout.addStretch(1); //添加弹簧
w.setLayout(&layout);
w.show();
return app.exec();
}
w.show();
return app.exec();
}
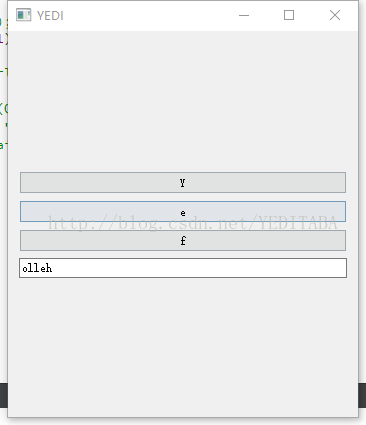
QT垂直布局:头文件<QVBoxLayout>
#include <QApplication>
#include <QWidget>
#include <QPushButton>
#include <QLineEdit>
#include <QVBoxLayout>
#include <QWidget>
#include <QPushButton>
#include <QLineEdit>
#include <QVBoxLayout>
int main(int argc, char *argv[])
{
QApplication app(argc,argv);
{
QApplication app(argc,argv);
QWidget w;
w.setWindowTitle("YEDI");
w.setWindowTitle("YEDI");
QPushButton bu("Y");
QPushButton bu1("e");
QPushButton bu2("f");
QLineEdit lineit("olleh"); //设置默认字符
lineit.setEchoMode(QLineEdit::Normal);
lineit.setPlaceholderText("hello world"); //设置默认字符(提示)
QPushButton bu1("e");
QPushButton bu2("f");
QLineEdit lineit("olleh"); //设置默认字符
lineit.setEchoMode(QLineEdit::Normal);
lineit.setPlaceholderText("hello world"); //设置默认字符(提示)
QVBoxLayout layout; //设置垂直布局
layout.addStretch(1); //添加弹簧
layout.addWidget(&bu); //添加按钮部件
layout.addWidget(&bu1);
layout.addWidget(&bu2);
layout.addWidget(&lineit);
layout.addStretch(1); //添加弹簧
layout.addStretch(1); //添加弹簧
layout.addWidget(&bu); //添加按钮部件
layout.addWidget(&bu1);
layout.addWidget(&bu2);
layout.addWidget(&lineit);
layout.addStretch(1); //添加弹簧
w.setLayout(&layout);
w.show();
return app.exec();
}
w.show();
return app.exec();
}
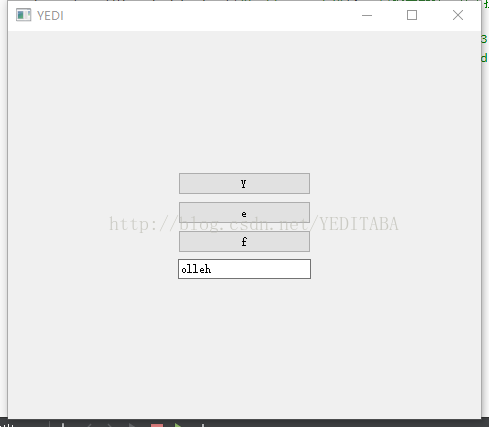
这两种的布局的缺点在于弹簧不能在上下左右都添加
改进:水平布局和垂直布局相结合
改进:水平布局和垂直布局相结合
#include <QApplication>
#include <QWidget>
#include <QPushButton>
#include <QLineEdit>
#include <QVBoxLayout>
#include <QHBoxLayout>
#include <QWidget>
#include <QPushButton>
#include <QLineEdit>
#include <QVBoxLayout>
#include <QHBoxLayout>
int main(int argc, char *argv[])
{
QApplication app(argc,argv);
{
QApplication app(argc,argv);
QWidget w;
w.setWindowTitle("YEDI");
w.setWindowTitle("YEDI");
QPushButton bu("Y");
QPushButton bu1("e");
QPushButton bu2("f");
QLineEdit lineit("olleh"); //设置默认字符
lineit.setEchoMode(QLineEdit::Normal);
lineit.setPlaceholderText("hello world"); //设置默认字符(提示)
QPushButton bu1("e");
QPushButton bu2("f");
QLineEdit lineit("olleh"); //设置默认字符
lineit.setEchoMode(QLineEdit::Normal);
lineit.setPlaceholderText("hello world"); //设置默认字符(提示)
QVBoxLayout layout;
layout.addStretch(1);
layout.addWidget(&bu);
layout.addWidget(&bu1);
layout.addWidget(&bu2);
layout.addWidget(&lineit);
layout.addStretch(1);
layout.addStretch(1);
layout.addWidget(&bu);
layout.addWidget(&bu1);
layout.addWidget(&bu2);
layout.addWidget(&lineit);
layout.addStretch(1);
QHBoxLayout lay;
lay.addStretch(1);
lay.addLayout(&layout);
lay.addStretch(1);
w.setLayout(&lay);
lay.addStretch(1);
lay.addLayout(&layout);
lay.addStretch(1);
w.setLayout(&lay);
w.show();
return app.exec();
}
}
网格布局:
#include <QApplication>
#include <QWidget>
#include <QLineEdit>
#include <QPushButton>
#include <QVBoxLayout>
#include <QHBoxLayout>
#include <QGridLayout>
#include <QLabel>
#include <QTextBrowser>
int main(int argc, char *argv[])
{
QApplication app(argc,argv);
QWidget w;
QLineEdit lineEdit;
QPushButton button("Button");
QPushButton button1("Button1");
QPushButton button2("Button2");
QPushButton button("Button");
QPushButton button1("Button1");
QPushButton button2("Button2");
QLabel label("label");
label.setParent(&w);
label.setParent(&w);
QGridLayout glayout; //设置网格布局
glayout.addWidget(&button, 1, 1); //表示把button按钮放在表格中(1,1)位置
glayout.addWidget(&button1, 1, 2);
glayout.addWidget(&button2, 2, 1);
glayout.addWidget(&label, 2, 2);
glayout.addWidget(&lineEdit, 3, 1, 1, 2);//表示把lineEdit文本框放在表格中(3,1)位置,大小占一行两列
glayout.addWidget(&button, 1, 1); //表示把button按钮放在表格中(1,1)位置
glayout.addWidget(&button1, 1, 2);
glayout.addWidget(&button2, 2, 1);
glayout.addWidget(&label, 2, 2);
glayout.addWidget(&lineEdit, 3, 1, 1, 2);//表示把lineEdit文本框放在表格中(3,1)位置,大小占一行两列
glayout.setColumnStretch(0, 1); //在第0列添加一个弹簧
glayout.setColumnStretch(3, 1); //在第3列添加一个弹簧
glayout.setRowStretch(0, 1); //在第0行添加一个弹簧
glayout.setRowStretch(4, 1); //在第4行添加一个弹簧
w.setLayout(&glayout);
w.show();
glayout.setColumnStretch(3, 1); //在第3列添加一个弹簧
glayout.setRowStretch(0, 1); //在第0行添加一个弹簧
glayout.setRowStretch(4, 1); //在第4行添加一个弹簧
w.setLayout(&glayout);
w.show();
return app.exec();
}
}


 307
307

 被折叠的 条评论
为什么被折叠?
被折叠的 条评论
为什么被折叠?
 到【灌水乐园】发言


