


一、SSO介绍
1、定义
-
单点登录(Single Sign - On,简称 SSO)是一种身份验证机制,它允许用户使用单一的凭据(如用户名和密码)访问多个相互信任的应用系统。在这种模式下,用户只需登录一次,就可以在不同的应用之间无缝切换,而无需为每个应用单独进行登录操作。
2、优势
-
用户体验提升:用户无需记住多个账号和密码,减少了登录操作的繁琐性,提高了用户体验。
-
管理效率提高:对于企业来说,管理用户账号和权限变得更加简单,只需要在单点登录系统中进行统一的用户管理和认证授权。
-
安全性增强:可以集中进行安全策略的实施,如密码强度要求、多因素认证等,并且单点登录系统可以更好地监控和审计用户的登录行为。
3、什么是 SSO?
SSO 英文全称 Single Sign On,单点登录。SSO 是在多个应用系统中,用户只需要登录一次就可以访问所有相互信任的应用系统。
二、SSO 设计与实现
本篇文章也主要是为了探讨如何设计&实现一个 SSO 系统
以下为需要实现的核心功能:
-
单点登录
-
单点登出
-
支持跨域单点登录
-
支持跨域单点登出
1、核心应用与依赖
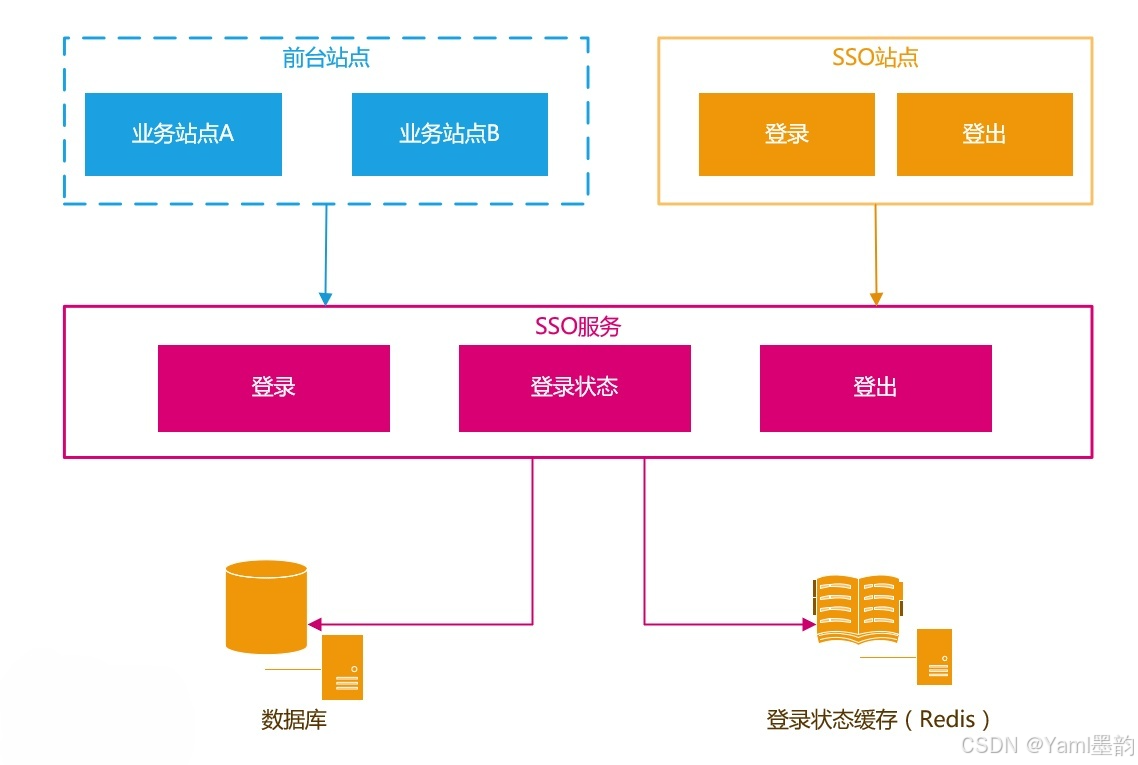
| 应用/模块/对象 | 说明 |
|---|---|
| 前台站点 | 需要登录的站点 |
| SSO站点-登录 | 提供登录的页面 |
| SSO站点-登出 | 提供注销登录的入口 |
| SSO服务-登录 | 提供登录服务 |
| SSO服务-登录状态 | 提供登录状态校验/登录信息查询的服务 |
| SSO服务-登出 | 提供用户注销登录的服务 |
| 数据库 | 存储用户账户信息 |
| 缓存 | 存储用户的登录信息,通常使用Redis |
2、用户登录状态的存储与校验
常见的Web框架对于Session的实现都是生成一个SessionId存储在浏览器Cookie中。然后将Session内容存储在服务器端内存中
用户登录成功之后,生成AuthToken交给客户端保存。如果是浏览器,就保存在Cookie中。如果是手机App就保存在App本地缓存中。本篇主要探讨基于Web站点的SSO。
用户在浏览需要登录的页面时,客户端将AuthToken提交给SSO服务校验登录状态/获取用户登录信息
对于登录信息的存储,建议采用Redis,使用Redis集群来存储登录信息,既可以保证高可用,又可以线性扩充。同时也可以让SSO服务满足负载均衡/可伸缩的需求。
| 对象 | 说明 |
|---|---|
| AuthToken | 直接使用UUID/GUID即可,如果有验证AuthToken合法性需求,可以将UserName+时间戳加密生成,服务端解密之后验证合法性 |
| 登录信息 | 通常是将UserId,UserName缓存起来 |
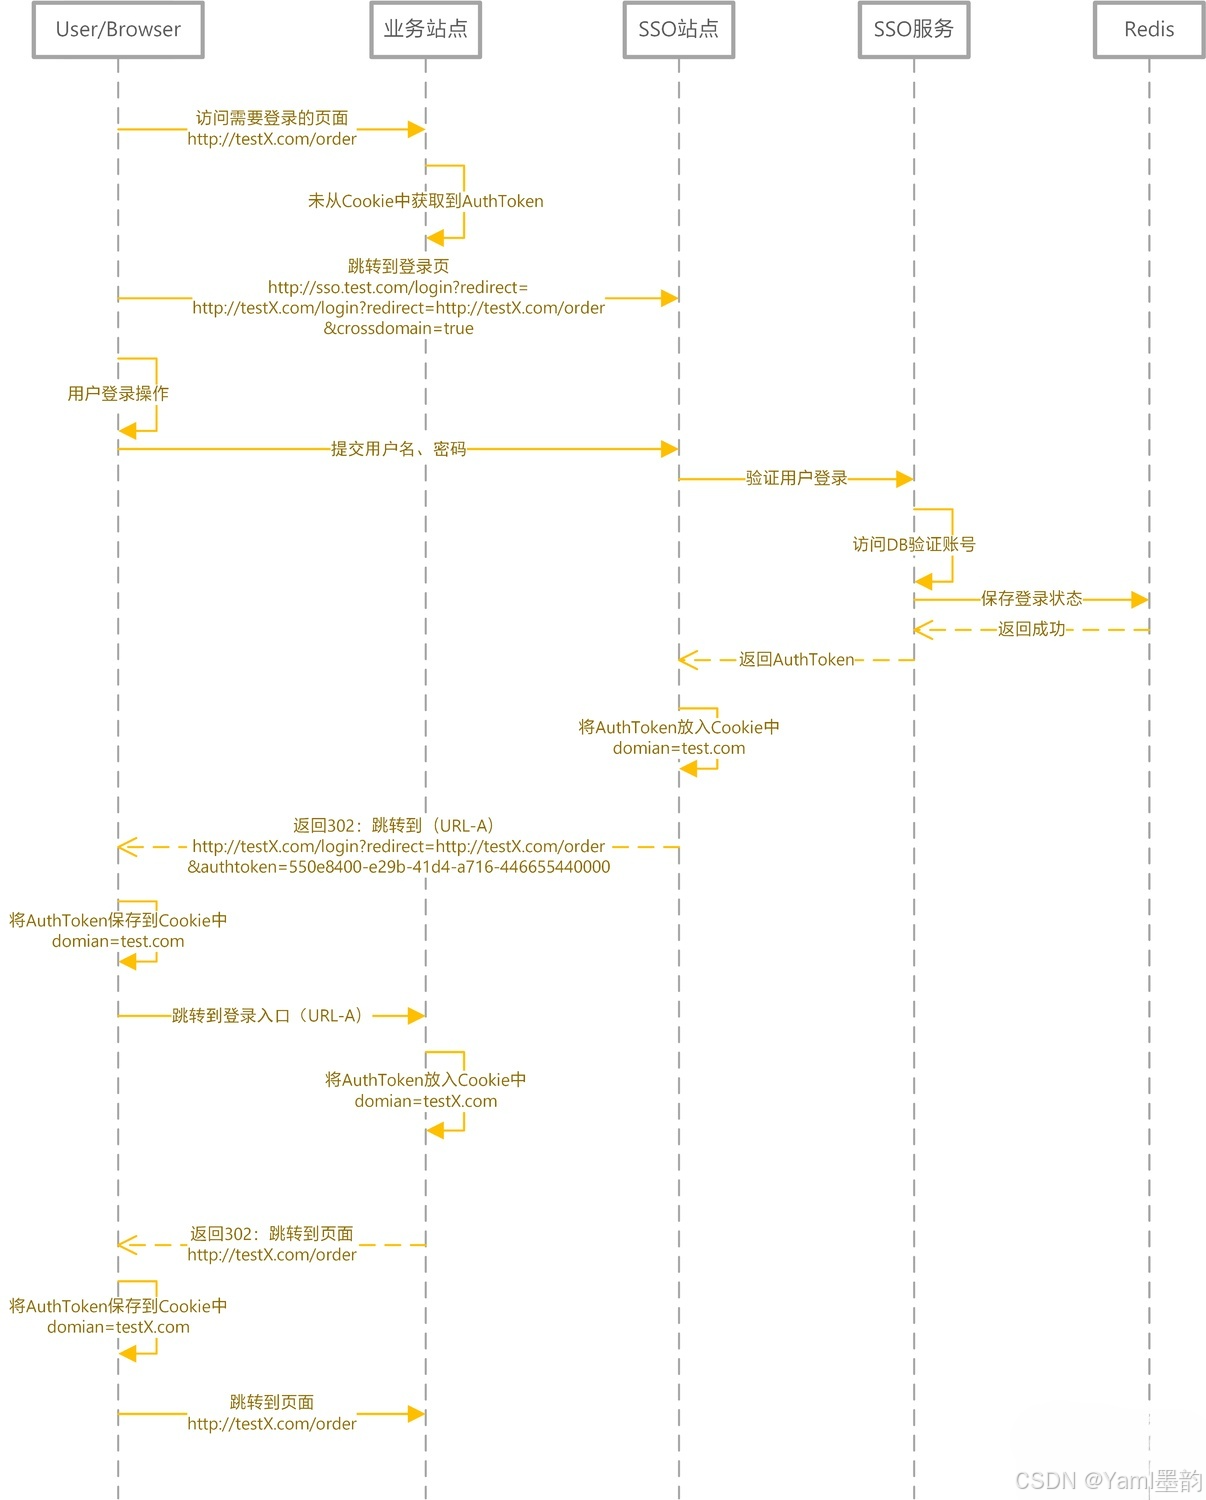
3、用户登录/登录校验
-
登录时序图
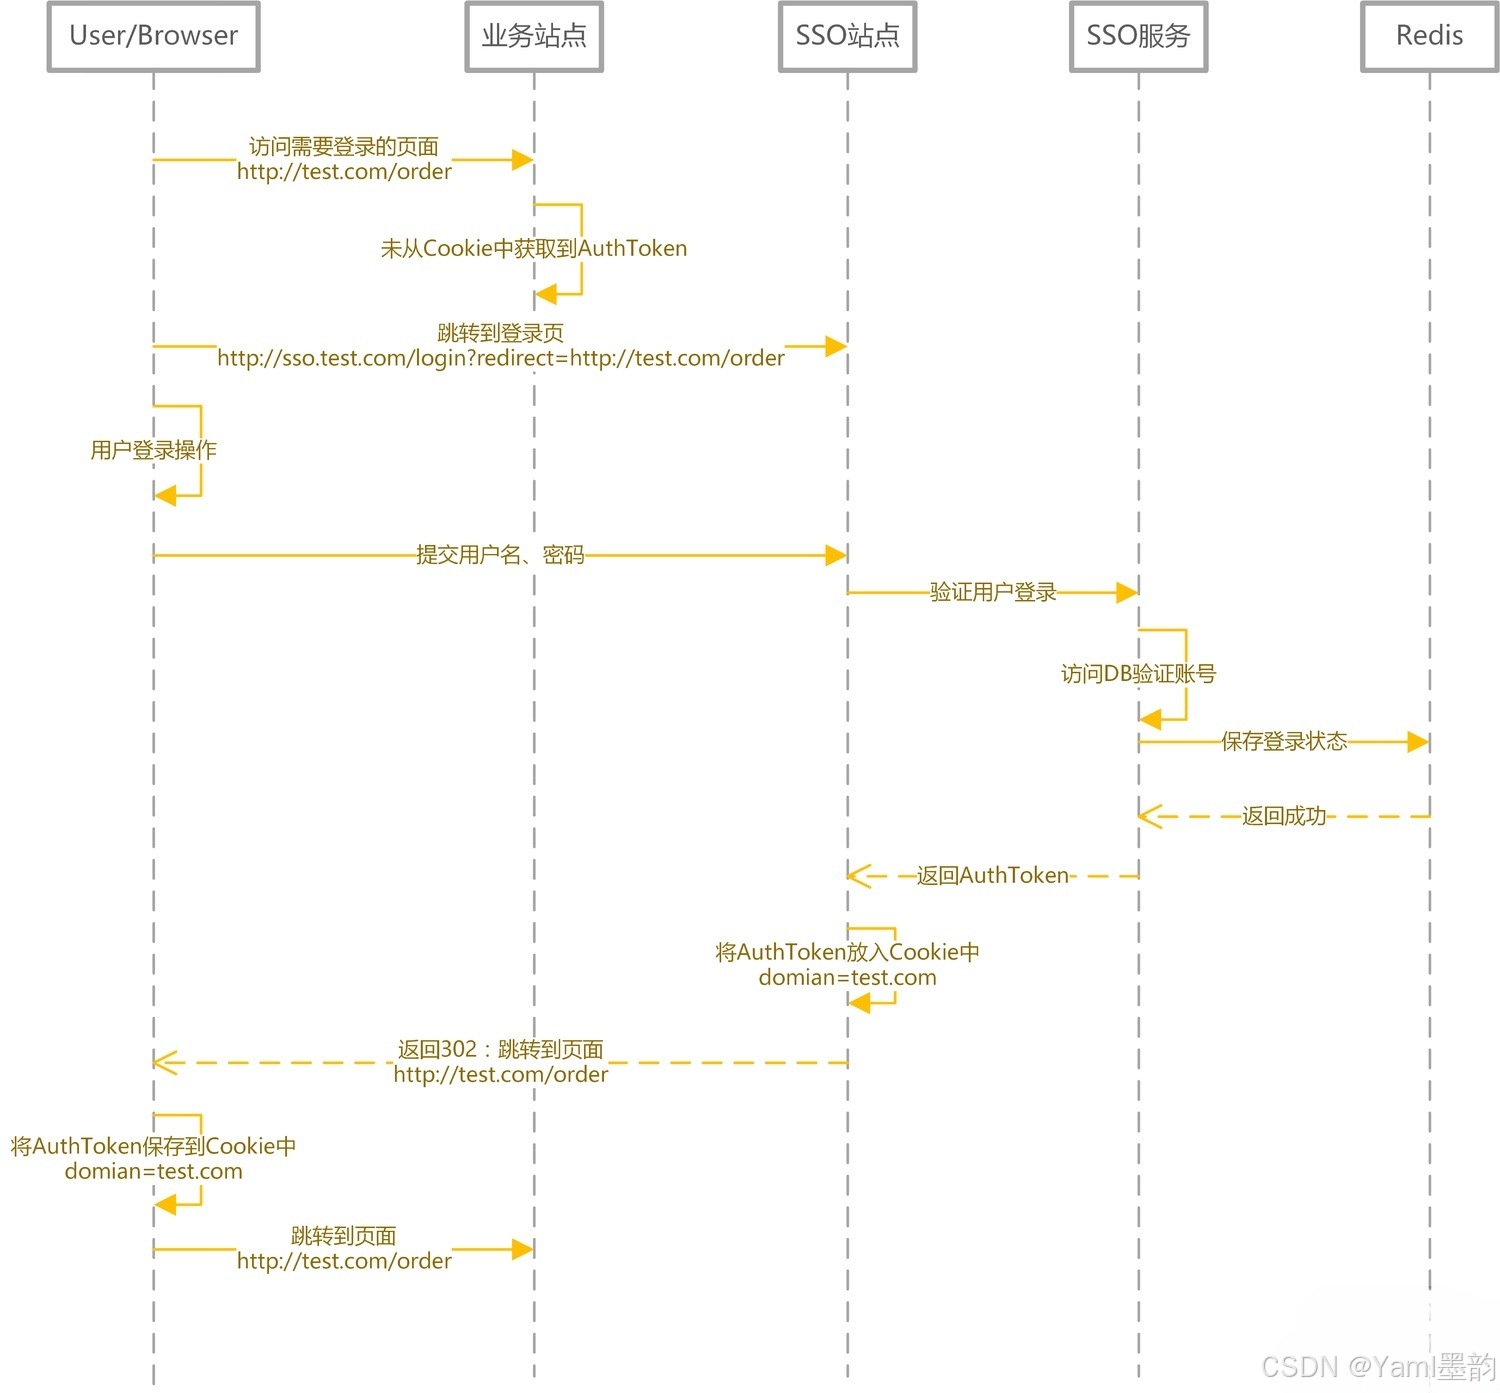
按照上图,用户登录后Authtoken保存在Cookie中。 domian= test. com
浏览器会将domain设置成 .test.com,
这样访问所有*.test.com的web站点,都会将Authtoken携带到服务器端。
然后通过SSO服务,完成对用户状态的校验/用户登录信息的获取
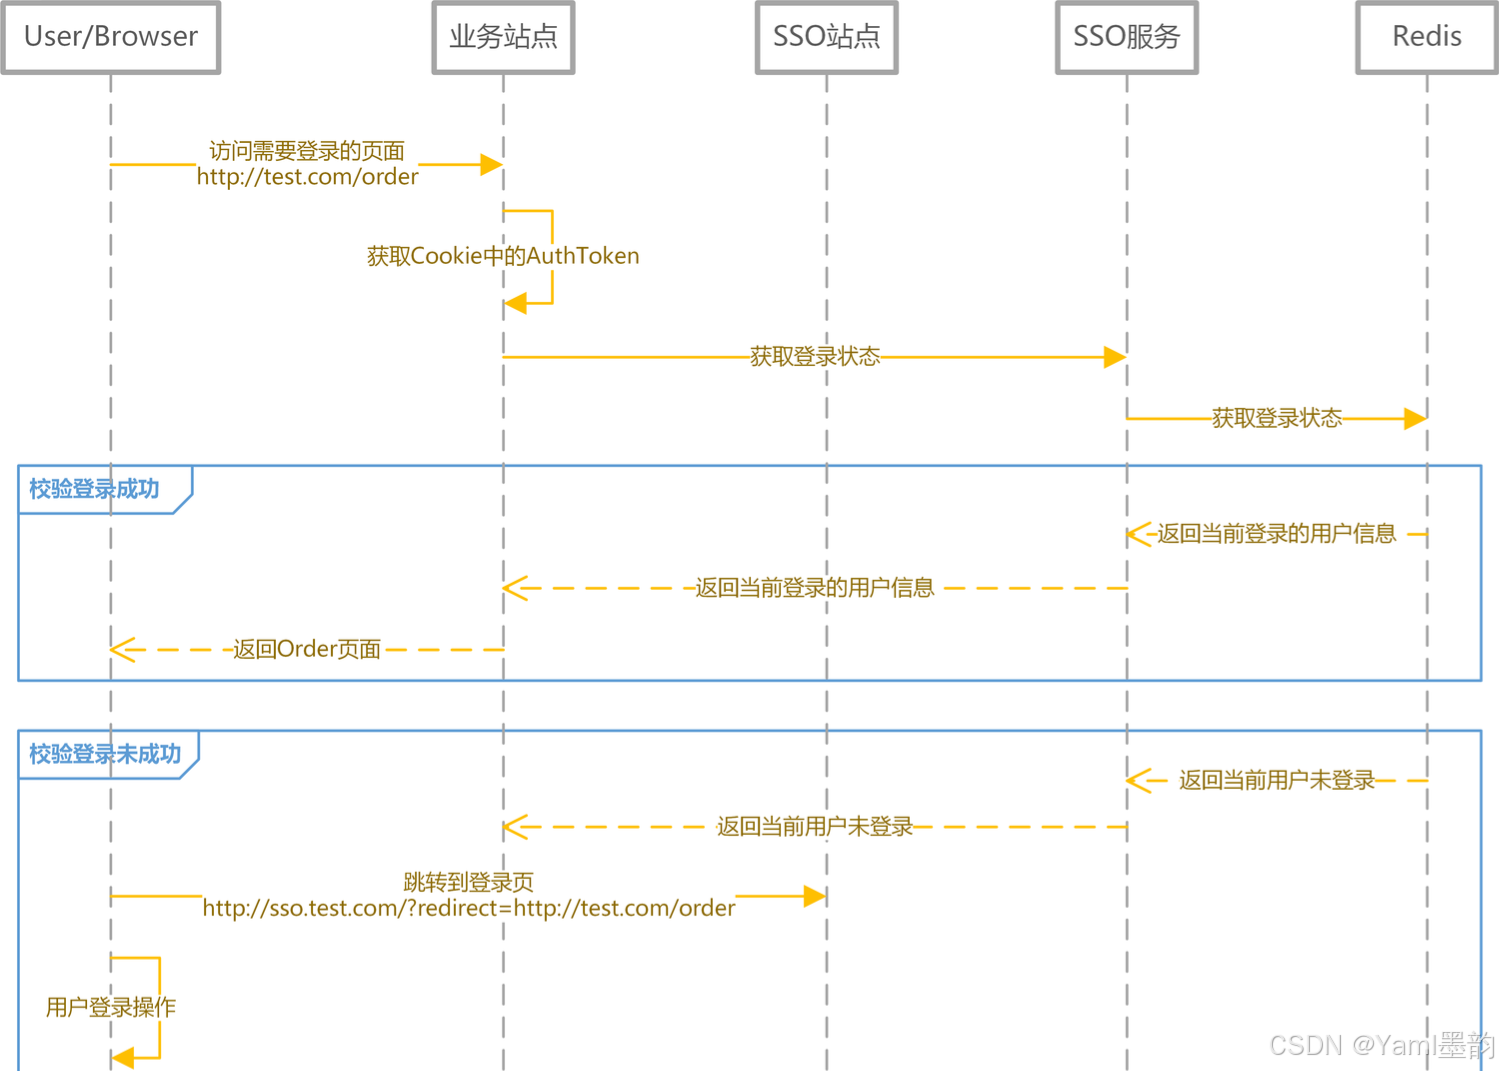
-
登录信息获取/登录状态校验
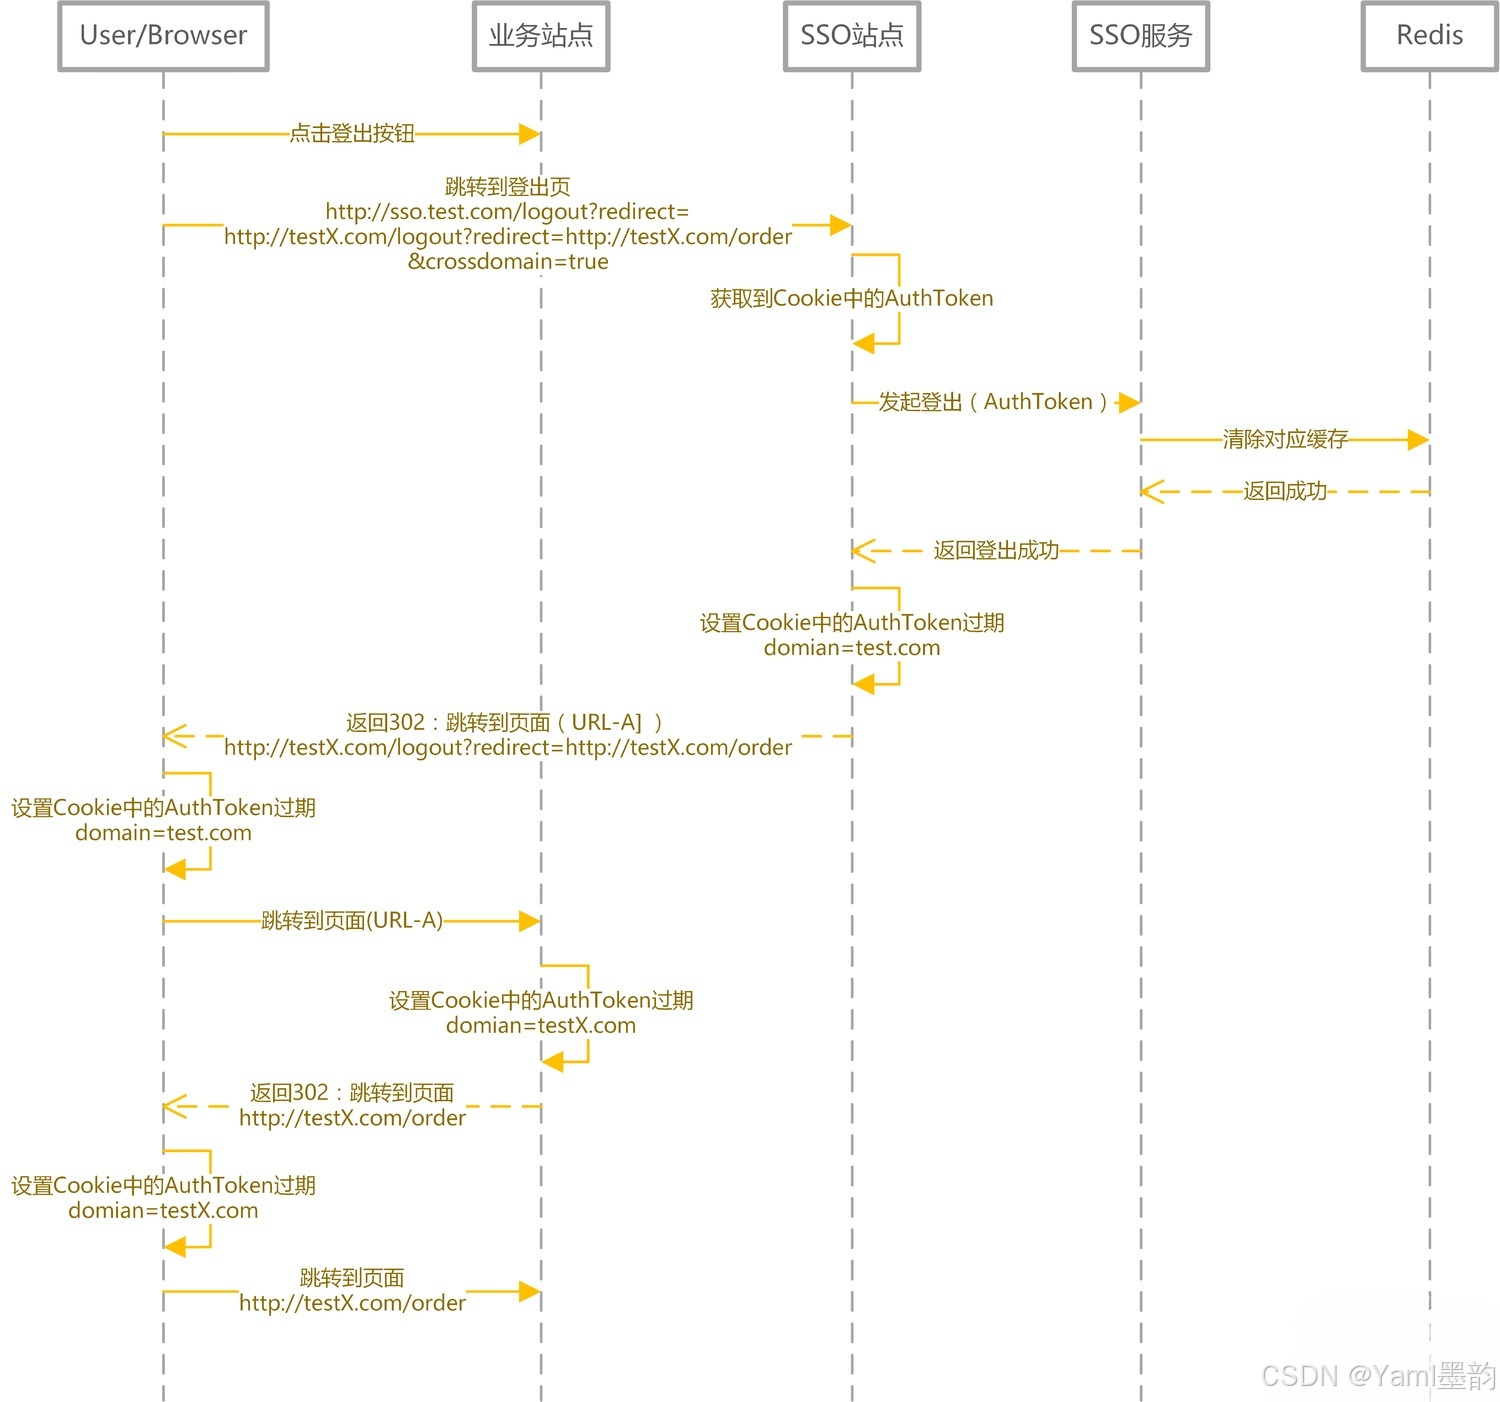
4、用户登出
用户登出时要做的事情很简单:
-
服务端清除缓存(Redis)中的登录状态
-
客户端清除存储的AuthToken
-
登出时序图
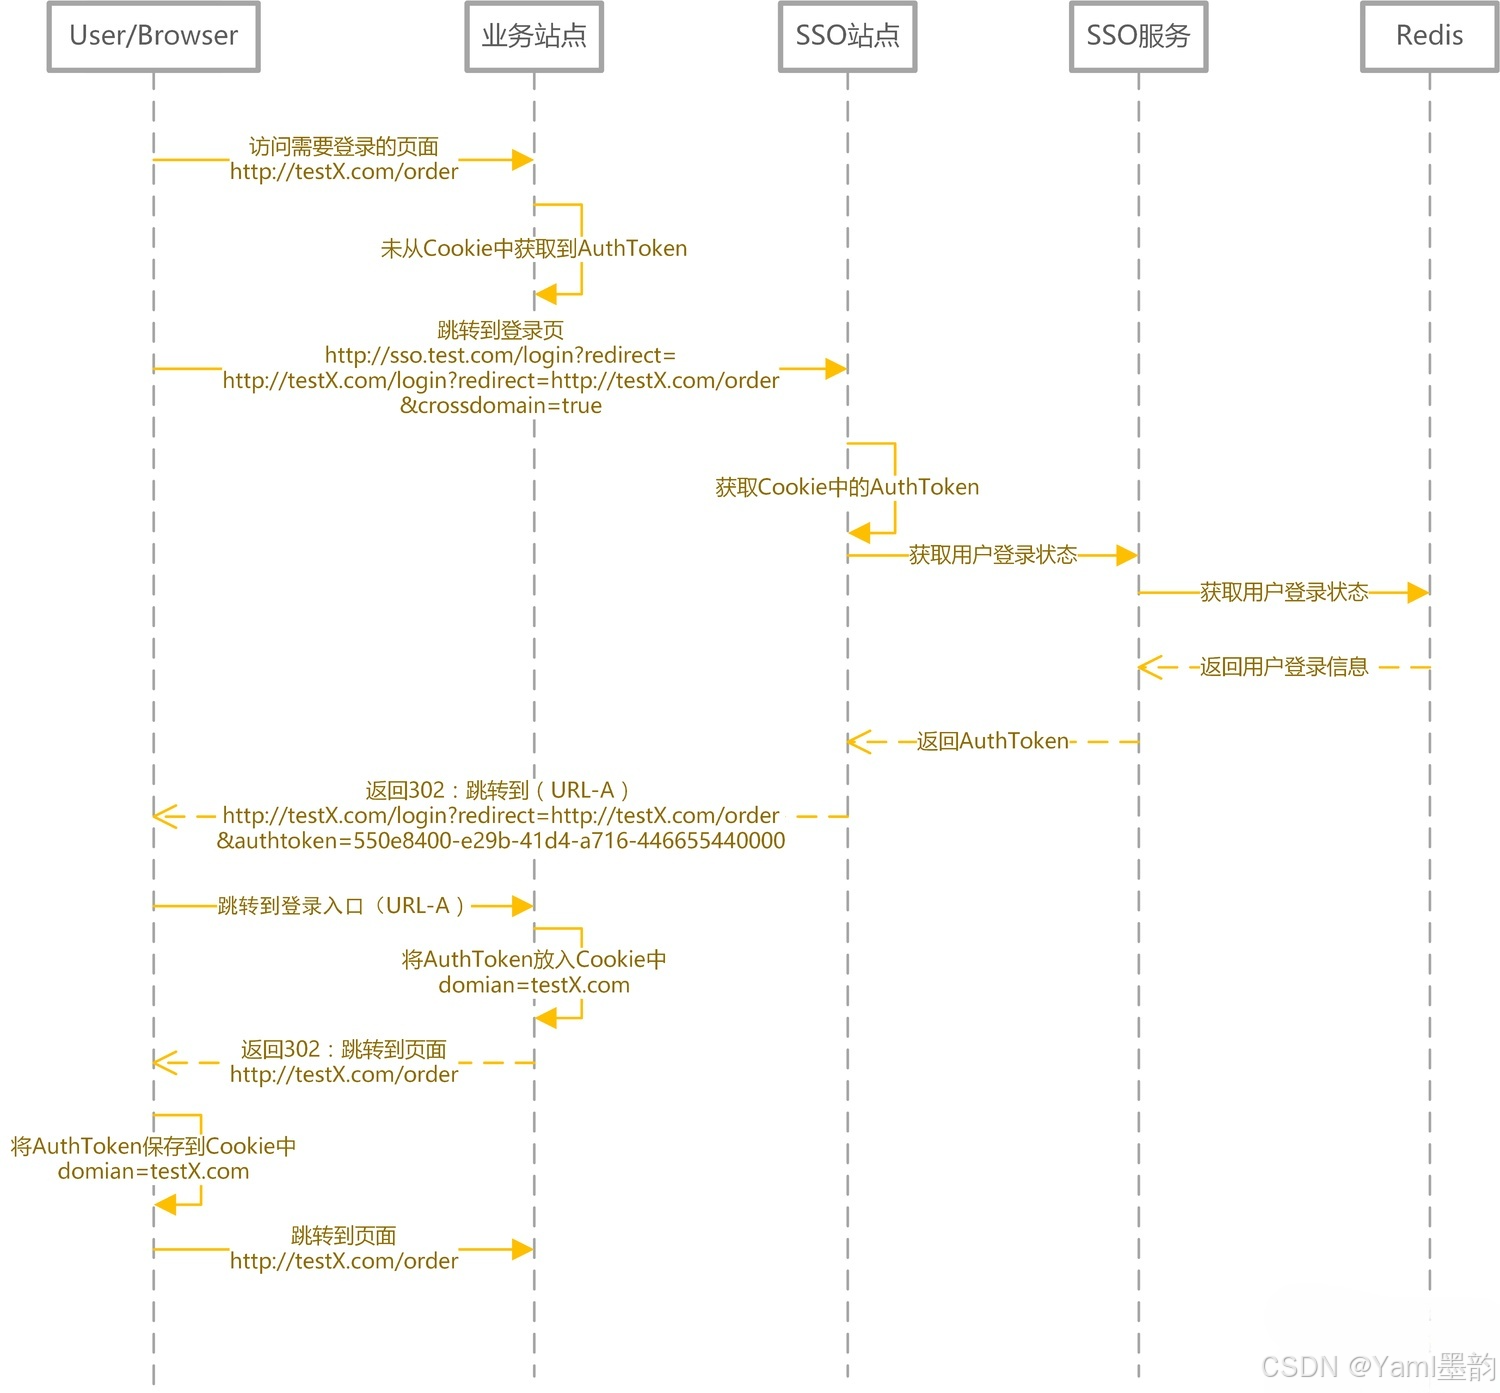
5、跨域登录、登出
前面提到过,核心思路是客户端存储AuthToken,服务器端通过Redis存储登录信息。由于客户端是将AuthToken存储在Cookie中的。所以跨域要解决的问题,就是如何解决Cookie的跨域读写问题。
解决跨域的核心思路就是:
-
登录完成之后通过回调的方式,将AuthToken传递给主域名之外的站点,该站点自行将AuthToken保存在当前域下的Cookie中。
-
登出完成之后通过回调的方式,调用非主域名站点的登出页面,完成设置Cookie中的AuthToken过期的操作。
-
跨域登录(主域名已登录)

-
跨域登录(主域名未登录)
-
跨域登出
三、案例
1、OAuth2
1、OAuth2 简介
-
OAuth2 是一种授权框架,它不是专门用于单点登录的协议,但可以很好地支持 SSO 场景。它主要定义了资源所有者(用户)、客户端(应用)和授权服务器之间的交互方式,用于授权第三方应用访问用户的受保护资源。
2、核心组件和流程
-
授权服务器(Authorization Server):负责颁发访问令牌(Access Token)。用户首先向授权服务器进行身份验证,授权服务器验证通过后,会向客户端颁发访问令牌。例如,在一个企业内部,可能有专门的身份认证服务器作为授权服务器。
-
资源服务器(Resource Server):保护用户的资源,如用户的个人信息、业务数据等。客户端需要使用访问令牌向资源服务器请求访问资源,资源服务器会验证令牌的有效性,只有有效令牌才能访问相应的资源。
-
客户端(Client):代表需要访问用户资源的应用。客户端需要在授权服务器上进行注册,获取客户端 ID 和客户端密钥,用于与授权服务器进行交互。
-
流程示例(以密码模式为例):
-
用户在客户端应用中输入用户名和密码,客户端将这些信息发送给授权服务器。
-
授权服务器验证用户身份,如果验证通过,颁发访问令牌给客户端。
-
客户端使用访问令牌向资源服务器请求资源,资源服务器验证令牌后,返回用户请求的资源。
-
3、Spring Boot 中的实现
-
依赖添加:在 Spring Boot 项目中,需要添加
spring - security - oauth2 - auto - configuration等相关依赖,用于支持 OAuth2 的功能。
<dependencies>
    <!-- Spring Boot Starter Security -->
    <dependency>
        <groupId>org.springframework.boot</groupId>
        <artifactId>spring-boot-starter-security</artifactId>
    </dependency>
    <!-- Spring Security OAuth2 -->
    <dependency>
        <groupId>org.springframework.security.oauth.boot</groupId>
        <artifactId>spring-security-oauth2-autoconfigure</artifactId>
    </dependency>
    <!-- JWT Support -->
    <dependency>
        <groupId>io.jsonwebtoken</groupId>
        <artifactId>jjwt</artifactId>
        <version>0.9.1</version>
    </dependency>
    <!-- Spring Boot Starter Web -->
    <dependency>
        <groupId>org.springframework.boot</groupId>
        <artifactId>spring-boot-starter-web</artifactId>
    </dependency>
    <!-- Other dependencies... -->
</dependencies>- 配置Spring Security和OAuth2:
在application.yml或application.properties中配置OAuth2客户端和IdP信息:
spring:
  security:
    oauth2:
      client:
        registration:
          sso-client:
            client-id: your-client-id
            client-secret: your-client-secret
            scope: read,write
            authorization-grant-type: authorization_code
            redirect-uri: "{baseUrl}/login/oauth2/code/{registrationId}"
        provider:
          sso-provider:
            authorization-uri: https://your-idp.com/oauth/authorize
            token-uri: https://your-idp.com/oauth/token
            user-info-uri: https://your-idp.com/userinfo
user-name-attribute: name-
创建SSO配置类
import org.springframework.context.annotation.Bean;
import org.springframework.context.annotation.Configuration;
import org.springframework.security.config.annotation.web.builders.HttpSecurity;
import org.springframework.security.config.annotation.web.configuration.EnableWebSecurity;
import org.springframework.security.config.annotation.web.configuration.WebSecurityConfigurerAdapter;
import org.springframework.security.oauth2.client.oidc.userinfo.OidcUserService;
import org.springframework.security.oauth2.client.registration.ClientRegistrationRepository;
import org.springframework.security.oauth2.client.web.OAuth2AuthorizationRequestRedirectFilter;
import org.springframework.security.oauth2.client.web.OAuth2LoginAuthenticationFilter;
import org.springframework.security.oauth2.core.endpoint.OidcParameterNames;
import org.springframework.security.web.SecurityFilterChain;

@Configuration
@EnableWebSecurity
public class SecurityConfig extends WebSecurityConfigurerAdapter {

    private final ClientRegistrationRepository clientRegistrationRepository;

    public SecurityConfig(ClientRegistrationRepository clientRegistrationRepository) {
        this.clientRegistrationRepository = clientRegistrationRepository;
    }

    @Override
    protected void configure(HttpSecurity http) throws Exception {
        http
            .authorizeRequests(authorizeRequests ->
                authorizeRequests
                    .antMatchers("/login**", "/oauth2/**").permitAll()
                    .anyRequest().authenticated()
            )
            .oauth2Login(oauth2Login ->
                oauth2Login
                    .loginPage("/oauth2/authorization/sso-client")
                    .defaultSuccessUrl("/home", true)
                    .userInfoEndpoint(userInfoEndpoint ->
                        userInfoEndpoint.oidcUserService(this.oidcUserService())
                    )
            )
            .exceptionHandling().authenticationEntryPoint(new LoginUrlAuthenticationEntryPoint("/oauth2/authorization/sso-client"))
            .and()
            .csrf().disable();
    }

    @Bean
    public OidcUserService oidcUserService() {
        return new OidcUserService();
    }

    @Bean
    public SecurityFilterChain filterChain(HttpSecurity http) throws Exception {
        http
            .addFilterBefore(oauth2AuthorizationRequestRedirectFilter(), OAuth2LoginAuthenticationFilter.class)
            .oauth2Login(withDefaults());
        return http.build();
    }

    private OAuth2AuthorizationRequestRedirectFilter oauth2AuthorizationRequestRedirectFilter() {
        OAuth2AuthorizationRequestRedirectFilter filter = new OAuth2AuthorizationRequestRedirectFilter(
                this.clientRegistrationRepository,
                this.authorizationRequestRepository()
        );
        filter.setAuthorizationRequestRepository(new HttpSessionOAuth2AuthorizationRequestRepository());
        filter.setRedirectUriTemplate("{baseUrl}/login/oauth2/code/{registrationId}");
        return filter;
    }

    // Other beans and configurations...
}- 处理用户信息:
你可以创建一个服务来处理从IdP返回的用户信息,并将其转换为你的应用程序所需的用户对象。
import org.springframework.security.core.userdetails.UserDetails;
import org.springframework.security.core.userdetails.UserDetailsService;
import org.springframework.security.core.userdetails.UsernameNotFoundException;
import org.springframework.security.oauth2.client.userinfo.DefaultOAuth2UserService;
import org.springframework.security.oauth2.client.userinfo.OAuth2UserRequest;
import org.springframework.security.oauth2.client.userinfo.OAuth2UserService;
import org.springframework.security.oauth2.core.OAuth2AuthenticationException;
import org.springframework.security.oauth2.core.user.DefaultOAuth2User;
import org.springframework.security.oauth2.core.user.OAuth2User;
import org.springframework.stereotype.Service;

import java.util.Collections;
import java.util.Map;

@Service
public class CustomOAuth2UserService implements OAuth2UserService<OAuth2UserRequest, UserDetails> {

    private final DefaultOAuth2UserService delegate = new DefaultOAuth2UserService();

    @Override
    public UserDetails loadUser(OAuth2UserRequest userRequest) throws OAuth2AuthenticationException {
        OAuth2User oAuth2User = delegate.loadUser(userRequest);

        // Extract user information from oAuth2User and create a custom UserDetails object
        String username = oAuth2User.getAttribute(OidcParameterNames.SUB); // or use another attribute as the username
        Map<String, Object> attributes = oAuth2User.getAttributes();

        // Create and return a custom UserDetails object
        return new org.springframework.security.core.userdetails.User(username, "", Collections.emptyList());
    }
}注意:在上面的示例中,CustomOAuth2UserService类负责从OAuth2用户请求中提取用户信息,并创建一个自定义的UserDetails对象。你需要根据自己的需求来定制这个类。
2、CAS
1、CAS 简介
-
CAS 是一种开源的单点登录协议,它提供了一种集中式的身份验证服务。用户通过 CAS 服务器进行身份验证,然后 CAS 服务器会为用户颁发一个票据(Ticket),客户端应用使用这个票据来验证用户身份,从而实现单点登录。
2、核心组件和流程
-
CAS 服务器(CAS Server):负责用户的身份验证。用户在访问应用时,会被重定向到 CAS 服务器进行登录。CAS 服务器验证用户身份后,会生成一个服务票据(Service Ticket,简称 ST)并返回给客户端应用。
-
客户端应用(CAS Client):集成了 CAS 客户端库的应用。客户端应用在收到服务票据后,会将其发送给 CAS 服务器进行验证。如果验证通过,用户就可以访问该应用。
-
流程示例:
-
用户访问应用 A,应用 A 发现用户未登录,将用户重定向到 CAS 服务器的登录页面。
-
用户在 CAS 服务器上输入用户名和密码进行登录,CAS 服务器验证通过后,生成服务票据 ST 并返回给应用 A。
-
应用 A 将 ST 发送给 CAS 服务器进行验证,CAS 服务器验证 ST 有效后,通知应用 A 用户已通过验证,用户可以访问应用 A。当用户访问应用 B 时,同样的流程会再次发生,但是由于用户已经在 CAS 服务器登录过,所以用户无需再次输入用户名和密码。
-
3、Spring Boot 中的实现
-
添加 CAS 客户端依赖:在 Spring Boot 项目中添加
spring - boot - starter - cas - client等相关依赖。 -
配置 CAS 客户端:在
application.properties或application.yml中配置 CAS 服务器的地址、应用的服务名称等信息。例如:
cas.server-url-prefix=http://localhost:8080/cas
cas.server-login-url=http://localhost:8080/cas/login
cas.client-host-url=http://localhost:8081-
安全配置:通过
WebSecurityConfigurerAdapter来配置安全相关设置,包括 CAS 认证相关的内容。例如:
import org.jasig.cas.client.session.SingleSignOutFilter;
import org.jasig.cas.client.validation.Cas20ServiceTicketValidator;
import org.springframework.beans.factory.annotation.Autowired;
import org.springframework.context.annotation.Bean;
import org.springframework.context.annotation.Configuration;
import org.springframework.security.crypto.bcrypt.BCryptPasswordEncoder;
import org.springframework.security.crypto.password.PasswordEncoder;
import org.springframework.security.web.authentication.logout.LogoutFilter;
import org.springframework.security.web.authentication.logout.SecurityContextLogoutHandler;
import org.springframework.security.web.authentication.logout.SimpleUrlLogoutSuccessHandler;
import org.springframework.security.web.csrf.CsrfFilter;
import org.springframework.security.web.csrf.CsrfTokenRepository;
import org.springframework.security.web.csrf.HttpSessionCsrfTokenRepository;
import java.util.Arrays;

@Configuration
public class SecurityConfig {
    @Autowired
    private CasAuthenticationProvider casAuthenticationProvider;

    @Bean
    public PasswordEncoder passwordEncoder() {
        return new BCryptPasswordEncoder();
    }

    @Bean
    public Cas20ServiceTicketValidator cas20ServiceTicketValidator() {
        return new Cas20ServiceTicketValidator("http://localhost:8080/cas");
    }

    @Bean
    public SingleSignOutFilter singleSignOutFilter() {
        SingleSignOutFilter singleSignOutFilter = new SingleSignOutFilter();
        singleSignOutFilter.setCasServerUrlPrefix("http://localhost:8080/cas");
        return singleSignOutFilter;
    }

    @Bean
    public LogoutFilter logoutFilter() {
        LogoutFilter logoutFilter = new LogoutFilter("http://localhost:8080/cas/logout", new SecurityContextLogoutHandler());
        logoutFilter.setFilterProcessesUrl("/logout");
        return logoutFilter;
    }

    @Bean
    public CsrfTokenRepository csrfTokenRepository() {
        return new HttpSessionCsrfTokenRepository();
    }
}


 3580
3580

 被折叠的 条评论
为什么被折叠?
被折叠的 条评论
为什么被折叠?
 到【灌水乐园】发言


