


1.Quartz 2D(Core Graphics)
苹果公司使用C语言编写的一套绘图引擎(一组能够实现绘图API),即可以在iOS中使用,也可以在Mac OS X上使用
step1:自定义一个类,继承自UIView
step2:重写 类中的 drawRect 方法
- (void)drawRect:(CGRect)rect
{
    //获取已经存在的绘图上下文对象
    //系统最终会将绘图上下文中记录的数据编程图像
    //为了影响最终绘制出来的结果,所以,就需要修改
    //唯一的绘图上下文对象中记录的数据
    CGContextRef context = UIGraphicsGetCurrentContext();
    CGContextMoveToPoint(context, 40, 40);
    CGContextAddLineToPoint(context, 40, 140);
    CGContextAddLineToPoint(context, 140, 40);
    CGContextAddLineToPoint(context, 40, 40);
    //设置描边的颜色
    CGContextSetStrokeColorWithColor(context,[[UIColor redColor] CGColor]);
    CGContextSetFillColorWithColor(context, [[UIColor greenColor]CGColor]);
    //按照context中记录的设置和路径
    //真的来绘制了
    //CGContextStrokePath(context);
    //CGContextFillPath(context);
    CGContextDrawPath(context, kCGPathFillStroke);
}
drawRect方法的特点:
1>创建视图实例时,该方法会被系统自动调用一次
2>一定不能自己调用此方法
3>如果视图中的数据发生了更改,需要重新绘制视图界面时,也不能自己调用drawRect方法来实现画图,而是需要调用 视图的 setNeedsDisplay的方法,来通知系统需要重绘,然后由系统负责整合资源,生成新的界面
2. 贝塞尔曲线(UIBezierPath)
1.绘制曲线
最终的绘图动作一定要写在drawRect方法中
因为,系统只允许在这个方法中获取到 当前绘图上下文对象
绘图的本质,就是依赖系统的这个上下文对象CGContextRef
所以,只能把绘制动作放在这个方法中
使用UIKit层面中的 UIBezierPath类来实现绘制线条
UIBezierPath只是对Core Graphics中一部分操作进行了封装,不是能完全替代Core Graphics
基本图形的绘制使用UIBezierPath就可以实现
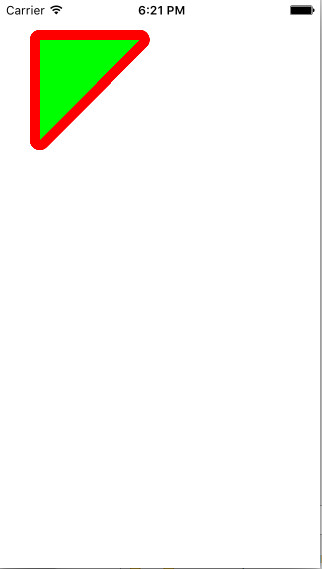
- (void)drawRect:(CGRect)rect
{
    // 1. 创建UIBezierPath实例
    UIBezierPath *path = [UIBezierPath bezierPath];
    // 2. 勾勒图形
    [path moveToPoint:CGPointMake(40, 40)];
    [path addLineToPoint:CGPointMake(40, 140)];
    [path addLineToPoint:CGPointMake(140, 40)];
    [path addLineToPoint:CGPointMake(40, 40)];

    //[path closePath];
    // 3. 设置描边或填充的颜色
    [[UIColor redColor] setStroke];
    [[UIColor greenColor] setFill];
    // 4.path的其他设置
    // 设置线宽
    path.lineWidth = 20;
    // 设置线头的样式
    path.lineCapStyle = kCGLineCapRound;
    // 设置线的连接处的样式
    path.lineJoinStyle = kCGLineJoinBevel;
    // 5. 真的绘制(可以描边 可以填充)
    [path stroke];
    [path fill];
}
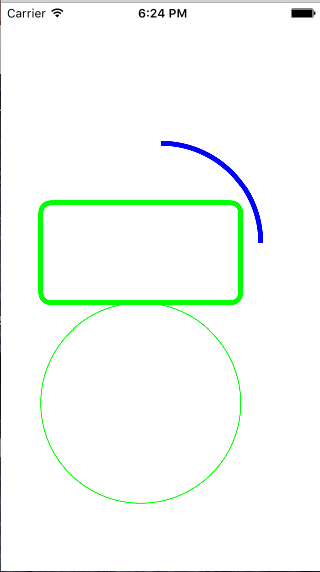
2.绘制圆弧
- (void)drawRect:(CGRect)rect
{
    // 创建UIBezierPath实例
    UIBezierPath *path = [UIBezierPath bezierPath];
    // 勾勒路径
    [path addArcWithCenter:CGPointMake(160, 240) radius:100 startAngle:M_PI_2*3 endAngle:M_PI*2 clockwise:YES];
    // 设置描边的颜色
    [[UIColor blueColor] setStroke];
    path.lineWidth = 5;
    [path stroke];
    //绘制圆角矩形
    UIBezierPath *path2 = [UIBezierPath bezierPathWithRoundedRect:CGRectMake(40, 200, 200, 100) cornerRadius:10];
    [[UIColor greenColor] setStroke];
    path2.lineWidth = 5;
    [path2 stroke];
    //绘制椭圆
    UIBezierPath *path3 = [UIBezierPath bezierPathWithOvalInRect:CGRectMake(40, 300, 200, 200)];
    [path3 stroke];

}
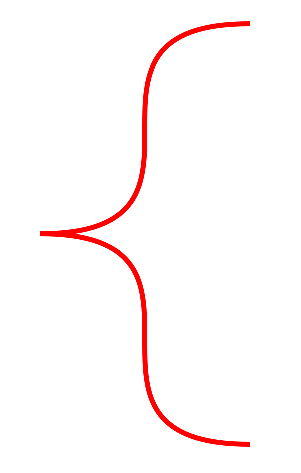
3.绘制不规则曲线
- (void)drawRect:(CGRect)rect
{
    UIBezierPath *path = [UIBezierPath bezierPath];
    [path moveToPoint:CGPointMake(250, 40)];
    [path addCurveToPoint:CGPointMake(40, 250) controlPoint1:CGPointMake(40, 40) controlPoint2:CGPointMake(250, 250)];
    [path addCurveToPoint:CGPointMake(250, 460) controlPoint1:CGPointMake(250, 250) controlPoint2:CGPointMake(40, 460)];
    [[UIColor redColor] setStroke];
    path.lineWidth = 5;
    [path stroke];
}


 4788
4788


 被折叠的 条评论
为什么被折叠?
被折叠的 条评论
为什么被折叠?
 到【灌水乐园】发言


