


一、初始化项目
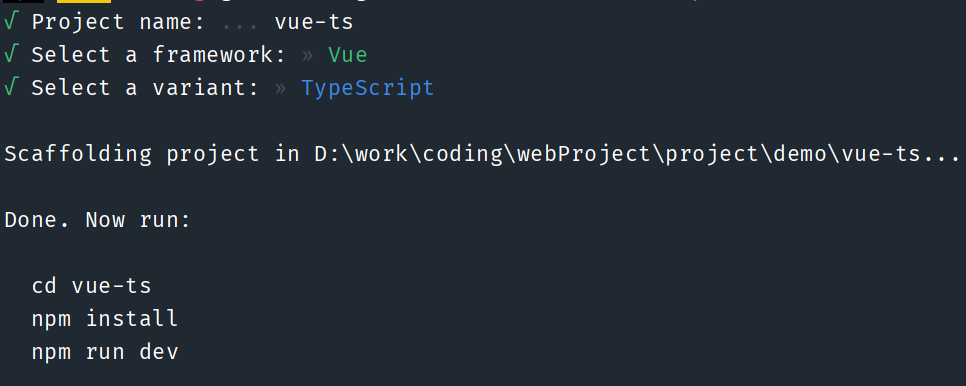
1、先手动初始化一个vue3 + ts 项目。打开终端。执行以下步骤:
使用npm创建vue3+ts项目
npm create vite@latest指定vite版本
npm create vite@3.2.0执行后输入项目名称
vue-ts选择
Vue选择
TypeScript如下图
2、安装初始化依赖
npm install二、添加Vue+ts基础配置
1、添加tsconfig.json内容
这边对tsconfig.json进行了一些扩展,默认的内容太少。
{
  "compilerOptions": {
    "target": "ESNext", // 编译后的版本
    "useDefineForClassFields": true, // 为class的属性提供基于ES6定义器的行为
    "lib": ["DOM", "DOM.Iterable", "ESNext"], // 指定要包含在编译中的library
    "allowJs": true, // 允许ts编译器编译js文件
    "skipLibCheck": true, // 跳过类型声明文件的类型检查
    "esModuleInterop": false, // es 模块 互操作,屏蔽ESModule和CommonJS之间的差异
    "allowSyntheticDefaultImports": true, // 允许通过 import x from 'y' 即使模块没有显式指定 default 导出
    "strict": true, // 开启严格模式
    "forceConsistentCasingInFileNames": true, // 对文件名称强制区分大小写
    "module": "ESNext", // 生成代码的模块化标准
    "moduleResolution": "Node", // 模块解析(查找)策略
    "resolveJsonModule": true, // 允许导入扩展名为.json的模块
    "isolatedModules": true, // 将每个文件作为单独的模块
    "noEmit": true, // 不生成输出文件 (只进行类型检查)
    "baseUrl": "./", // 解析非相对模块名称的基准目录
    "paths": {
      "@": ["src"], // 别名
      "@/*": ["src/*"] // 别名
    }
  },
  "include": ["src/**/*.ts", "src/**/*.d.ts", "src/**/*.tsx", "src/**/*.vue", "vite.config.ts"], // 包含的文件
  "exclude": ["node_modules", "dist", "**/*.js"] // 排除的文件
}
2、配置环境变量
配置开发、测试和生产环境,在创建根目录下创建.env.development、.env.test、.env.production三个文件。代码示例如下:
## 开发环境

# 变量必须以 VITE_ 为前缀才能暴露给外部读取
NODE_ENV='development'

VITE_APP_BASE = '/dev/'
VITE_BASE_URL = ''

## 测试环境

# 变量必须以 VITE_ 为前缀才能暴露给外部读取
NODE_ENV='test'

VITE_APP_BASE = '/test/'
VITE_BASE_URL = ''

## 生产环境

# 变量必须以 VITE_ 为前缀才能暴露给外部读取
NODE_ENV='production'

VITE_APP_BASE = '/prod/'
VITE_BASE_URL = ''修改package.json的scripts脚本字段,删除原先的dev和build,改为
"start:dev": "vite --mode development",
"start:test": "vite --mode test",
"start:prod": "vite --mode production",
"build:dev": "vue-tsc --noEmit && vite build --mode development",
"build:test": "vue-tsc --noEmit && vite build --mode test",
"build:prod": "vue-tsc --noEmit && vite build --mode production",
vue-tsc --noEmit 用于运行 vue-tsc(Vue 的 TypeScript 类型检查工具)并使用 --noEmit 选项。这个选项告诉 vue-tsc 只进行类型检查,而不生成输出文件,如果我们的代码无错,会直接退出,否则报错。
安装@types/node
npm i --save-dev @types/node安装完成后,在vite.config.ts中添加配置代码。配置如下:
import { defineConfig, loadEnv, ConfigEnv, UserConfig } from 'vite'

export default defineConfig(({ mode }: ConfigEnv): UserConfig  => {
  const env = loadEnv(mode, process.cwd())
  console.log('VITE_APP_BASE', env.VITE_APP_BASE)
  return {}
})
3、vite配置相对路径
如果无法提前确定基础路径,为了更方便部署到不同的现场,可以设置相对基础路径base: "./"。这将使所有生成的 URL 相对于每个文件。如果明确基础路径,这里也可以使用环境变量中定义的VITE_APP_BASE 。在vite.config.ts中添加如下代码:
import { defineConfig, loadEnv, ConfigEnv, UserConfig } from 'vite'

export default defineConfig(({ mode }: ConfigEnv): UserConfig  => {
  const env = loadEnv(mode, process.cwd())
  return {
    base: "./",
    // base: env.VITE_APP_BASE,
  }
})
4、配置别名路径
在vite.config.ts中添加如下代码:
import { defineConfig, loadEnv, ConfigEnv, UserConfig } from 'vite'
import { resolve } from "path";

export default defineConfig(({ mode }: ConfigEnv): UserConfig  => {
  return {
    resolve: {
      alias: {
        "@": resolve(__dirname, "./src"),
      }
    },
  }
})
5、配置开发服务器选项(开启跨域、自动打开浏览器、热更新、跨域代理等)
在vite.config.ts中添加如下代码:
import { defineConfig, loadEnv, ConfigEnv, UserConfig } from 'vite'

export default defineConfig(({ mode }: ConfigEnv): UserConfig  => {
  return {
    server: {
      port: 3000, // 服务端口号
      host: "0.0.0.0", // 指定服务器IP地址
      open: true, // 启动时自动打开浏览器
      cors: true, // 开启跨域
      hmr: true, // 开启热更新
      // 跨域代理配置
      proxy: {
        "/api": {
          target: "http://jsonplaceholder.typicode.com",
          changeOrigin: true,
          rewrite: path => path.replace(/^\/api/, "")
        }
      }
    },
  }
})
6、指定输出目录
在vite.config.ts中添加如下代码:
import { defineConfig, loadEnv, ConfigEnv, UserConfig } from 'vite'

export default defineConfig(({ mode }: ConfigEnv): UserConfig  => {
  return {
    build: {
      outDir: "vueTs",
    }
  }
})
三、扩展配置
1、安装scss或less
Vite 提供了对 .scss,.sass,.less,.styl 和 .stylus 文件的内置支持。没有必要为它们安装特定的 Vite 插件,但必须安装相应的预处理器依赖:
# .scss 和 .sass
npm add -D sass # 或 sass-embedded

# .less
npm add -D less

# .styl 和 .stylus
npm add -D stylus
2、全局引入css、less、scss变量样式文件
在assets下新建一个styles文件夹,在styles中新建一个common.scss文件。写一些公共的变量和样式代码。在vite.config.ts中添加如下代码:
import { defineConfig, loadEnv, ConfigEnv, UserConfig } from 'vite'

export default defineConfig(({ mode }: ConfigEnv): UserConfig  => {
  retrun {
    css: {
      preprocessorOptions: {
        scss: {
          // vite处理 控制台输出 Deprecation Warning: The legacy JS API is deprecated and will be removed in Dart Sass 2.0.0.
          api: 'modern-compiler',
          silenceDeprecations: ['legacy-js-api'],
          // sass1.80 议席版本使用
          additionalData: `@import "@/assets/styles/common.scss";`
          // sass 1.80 不再支持 @import 需要使用 `@use’; as * 手动导出全局变量和 mixin
          additionalData: `@use "@/assets/styles/common.scss" as *;`
        }
      }
    },
  }
})
3、组件名称可以写在 script 标签上
安装vite-plugin-vue-setup-extend-plus
npm add vite-plugin-vue-setup-extend-plus -D安装完成后,在vite.config.ts中添加如下代码:
import { defineConfig, loadEnv, ConfigEnv, UserConfig } from 'vite'
import vueSetupExtend from "vite-plugin-vue-setup-extend-plus"

export default defineConfig(({ mode }: ConfigEnv): UserConfig  => {
  retrun {
    plugins: [
      vueSetupExtend(), // 组件名称可以写在 script 标签上
    ]
  }
})然后在src下新建pages文件夹,再在pages中随便新建一个demo.vue文件。代码如下:
<template>
  <div>
    姓名:张三
    年龄:18
    性别:男
  </div>
</template>

<script lang="ts" setup name="userInfo">
  console.log('userInfo')
</script>

<style lang="scss" scoped></style>
<script setup lang="ts">
import Demo from "@/pages/demo.vue";
</script>
<template>
<div class="box">
<div>
vue-ts
</div>
<div>
<Demo />
</div>
</div>
</template>
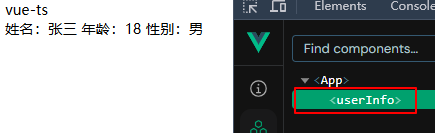
<style lang="scss" scoped></style>在vue-devtools中显示结果:
4、项目中使用 svg 图标
安装vite-plugin-svg-icons
npm add vite-plugin-svg-icons -D安装完成后,在vite.config.ts中添加如下代码:
import { defineConfig, loadEnv, ConfigEnv, UserConfig } from 'vite'
import { resolve } from "path"
import { createSvgIconsPlugin } from "vite-plugin-svg-icons";

export default defineConfig(({ mode }: ConfigEnv): UserConfig  => {
  retrun {
    plugins: [
      createSvgIconsPlugin({
        iconDirs: [resolve(process.cwd(), "src/assets/icons")],
        symbolId: "icon-[dir]-[name]"
      }), // 使用 svg 图标
    ]
  }
})在assets下新建icons文件夹,下载一个.svg文件,接着在components中添加SvgIcon/index.vue组件。
<template>
  <svg :style="iconStyle" aria-hidden="true">
    <use :xlink:href="symbolId" :fill="fill" />
  </svg>
</template>

<script lang="ts" setup name="SvgIcon">
import { computed, CSSProperties } from "vue";
interface SvgProps {
  name: string;
  prefix?: string;
  fill: string;
  iconStyle?: CSSProperties;
}
const props = withDefaults(defineProps<SvgProps>(), {
  prefix: "icon",
  iconStyle: () => ({ width: "14px", height: "14px" })
})

const symbolId = computed(() => `#${props.prefix}-${props.name}`)
</script>
在 src/main.ts内引入注册脚本,全局注册SvgIcon组件。
import { createApp } from 'vue'
import App from './App.vue'
import "virtual:svg-icons-register"; // svg图标
import SvgIcon from "@/components/SvgIcon/index.vue"; // svg公共组件

const app = createApp(App)
app.component('SvgIcon', SvgIcon)
app.mount('#app')
使用svg图标:
<SvgIcon name="index" :iconStyle="{ width: '50px', height: '50px' }" :fill="'red'" />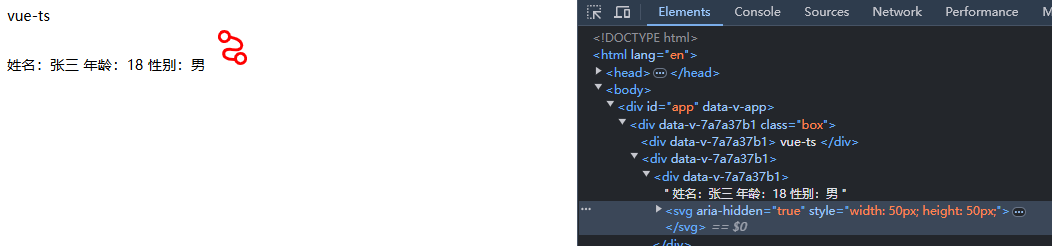
如果运行报错Cannot find module 'fast-glob',需要安装一下fast-glob依赖。
npm add fast-glob -D5、处理css3前缀兼容问题(如无硬性需求可不配置)
安装autoprefixer
npm add autoprefixer -D安装完成后,在vite.config.ts中添加如下代码:
import { defineConfig, loadEnv, ConfigEnv, UserConfig } from 'vite'
import autoprefixer from "autoprefixer";

export default defineConfig(({ mode }: ConfigEnv): UserConfig  => {
  retrun {
    postcss: {
      plugins: [
        // 自动添加前缀
        autoprefixer({
          overrideBrowserslist: [
            'Android 4.1',
            'iOS 7.1',
            'Chrome > 31',
            'ff > 31',
            'ie >= 8',
          ],
          grid: true,
        }),
      ]
    }
  }
})
6、vite解决低版本浏览器兼容性问题(如无硬性需求可不配置)
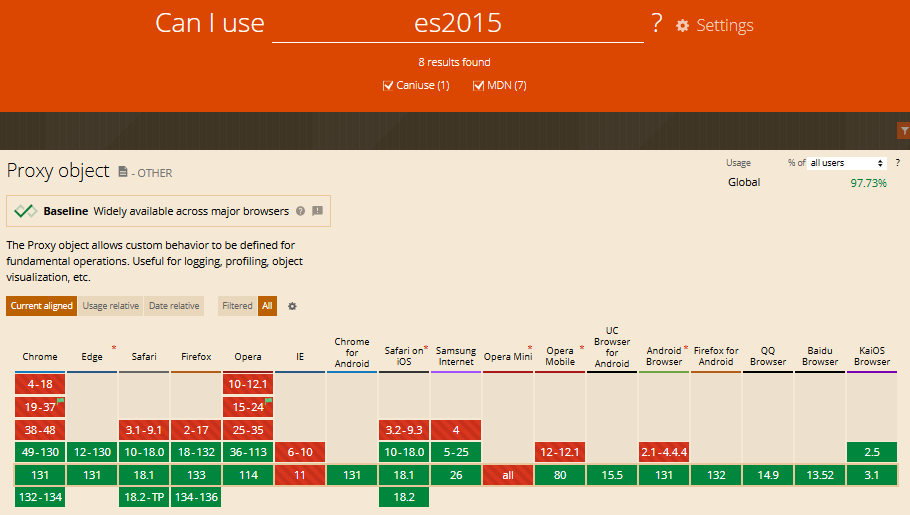
Vite 的目标是能够支持原生 ESM script 标签、支持原生 ESM 动态导入 和import.meta的浏览器。但可以通过修改vite.config.ts中的build.target配置项 指定构建目标,最低支持 es2015。代码如下:
import { defineConfig, loadEnv, ConfigEnv, UserConfig } from 'vite'

export default defineConfig(({ mode }: ConfigEnv): UserConfig  => {
  retrun {
    build: {
      target: "es2015",
    }
  }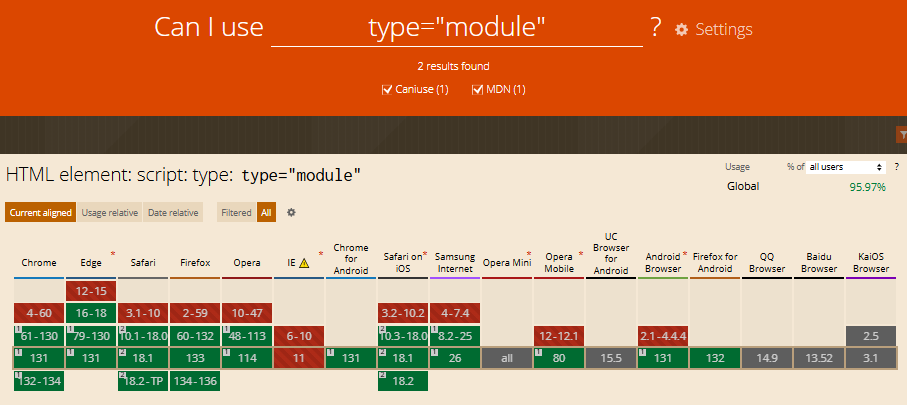
})但对于不支持ESM的浏览器还是无法兼容,如下图:
如果要兼容不支持ESM的浏览器。这边vite官方推荐使用@vitejs/plugin-legacy。先安装@vitejs/plugin-legacy。代码如下:
npm add @vitejs/plugin-legacy -D官方文档中说使用@vitejs/plugin-legacy需要安装terser。但我这边试了可以不用安装也能打包。代码如下:(如果可以打包,就可以不安装此依赖)
npm add terser -D在vite.config.ts中添加如下代码:
import { defineConfig, loadEnv, ConfigEnv, UserConfig } from 'vite'
import legacy from "@vitejs/plugin-legacy"

export default defineConfig(({ mode }: ConfigEnv): UserConfig  => {
  const isBuild = mode === 'production'
  retrun {
    plugins: [
      isBuild && legacy({
        targets: [
          'Chrome >= 49',
          'Edge >= 12',
          'Safari >= 10',
          'Firefox >= 18',
          'not IE <= 11',
          'iOS >= 10',
          'Android >= 5',
        ],
      })
    ],
    build: {
      target: "es2015",
    }
  }
})
四、优化打包构建
1、设置构建方式
在vite.config.ts中添加如下代码:
import { defineConfig, loadEnv, ConfigEnv, UserConfig } from 'vite'

export default defineConfig(({ mode }: ConfigEnv): UserConfig  => {
  retrun {
    build: {
      minify: "esbuild" // 使用 esbuild 进行代码压缩
      // esbuild 打包更快,但是不能去除 console.log,terser打包慢,但能去除console.log
      // minify: "terser",
      // terserOptions: {
      // 	compress: {
      // 		drop_console: viteEnv.VITE_DROP_CONSOLE,
      // 		drop_debugger: true
      // 	}
      // },
    }
  }
})
2、打包去除 console.log、debugger
在minify值为esbuild时,打包去除console.log debugger的方法。在vite.config.ts中添加如下代码:
import { defineConfig, loadEnv, ConfigEnv, UserConfig } from 'vite'
const isBuild = mode === 'production'

export default defineConfig(({ mode }: ConfigEnv): UserConfig  => {
  retrun {
    esbuild: {
      drop: isBuild ? ["console", "debugger"] : [] // 打包去除 console.log 和 debugger
    },
  }
})
3、超大静态资源拆分
在vite.config.ts中添加如下代码:
import { defineConfig, loadEnv, ConfigEnv, UserConfig } from 'vite'

export default defineConfig(({ mode }: ConfigEnv): UserConfig  => {
const isBuild = mode === 'production'

  retrun {
    build: {
      chunkSizeWarningLimit: 1500, // 指定代码块大小警告的限制
      rollupOptions: {
        output: {
          // 最小化拆分包
          manualChunks(id: string)  {
            if (isBuild && id.includes('node_modules')) {
              return id.toString().split('node_modules/')[1].split('/')[0].toString();
            }
          },
        }
      }
    }
  }
})
4、静态资源按类分包
在vite.config.ts中添加如下代码:
import { defineConfig, loadEnv, ConfigEnv, UserConfig } from 'vite'

export default defineConfig(({ mode }: ConfigEnv): UserConfig  => {
  retrun {
    esbuild: {
      rollupOptions: {
        output: { // 静态资源按类分包
          chunkFileNames: "assets/js/[name]-[hash].js",
          entryFileNames: "assets/js/[name]-[hash].js",
          assetFileNames: "assets/[ext]/[name]-[hash].[ext]"
        }
      }
    },
  }
})
5、构建视图分析依赖文件
安装rollup-plugin-visualizer代码如下:
npm add rollup-plugin-visualizer -D在vite.config.ts中添加如下代码:
import { defineConfig, loadEnv, ConfigEnv, UserConfig } from 'vite'
import { visualizer } from "rollup-plugin-visualizer"

export default defineConfig(({ mode }: ConfigEnv): UserConfig  => {
  const isBuild = mode === 'production'
  retrun {
    plugins: [
      isBuild && visualizer({
        open: true, // 构建完成后自动打开分析报告
        filename: "stats.html", // 生成的分析报告文件名
        gzipSize: true, // 收集 gzip 大小并显示
        brotliSize: true // 收集 brotli 大小并显示
      }), // 打包分析
    ],
  }
})
6、开启gzip 压缩
安装vite-plugin-compression代码如下:
npm add vite-plugin-compression -D在vite.config.ts中添加如下代码:
import { defineConfig, loadEnv, ConfigEnv, UserConfig } from 'vite'
import viteCompression from "vite-plugin-compression";

export default defineConfig(({ mode }: ConfigEnv): UserConfig  => {
  const isBuild = mode === 'production'
  retrun {
    plugins: [
      isBuild && viteCompression({
        verbose: true,
        disable: false,
        threshold: 10240,
        algorithm: "gzip",
        ext: ".gz"
      }), // 开启gzip压缩
    ],
  }
})
五、项目规范
1、设置editorconfig
在项目的根目录新建.editorconfig文件
# 表示是最顶层的配置文件,发现设为true时,才会停止查找.editorconfig文件
root = true
[*]                              # 表示所有文件适用
charset = utf-8                  # 设置文件字符集为 utf-8
end_of_line = lf                 # 设置换行符,可选 lf|cr|crlf
indent_size = 2                  # 缩进大小,可选设置 2 或 4
indent_style = tab             	 # 缩进风格,可选 space|tab
insert_final_newline = true      # 文件最后自动添加一个新行
trim_trailing_whitespace = true  # 去除行尾的空格
[*.md]                           # 表示仅对.md文件适用以下规则
trim_trailing_whitespace = false # 去除行尾的空格上述配置规饭会覆盖编辑器的配置,来达到不同编辑器中代码默认行为一致的作用。如果使用vscode需要安装EditorConfig 插件。安装完成打开.vscode/extensions.json添加配置:
{
  "recommendations": ["editorconfig.editorconfig"]
}
2、安装 ESLint
先安装 ESLint 依赖,然后初始化 ESLint 。 这里使用旧版本,去初始化 ESLint ,创建 .eslintrc 文件。代码如下:
// 安装eslint
npm add eslint -D

// 初始化eslint
npm init @eslint/config@0.4.3
运行 npm init @eslint/config@0.4.3 如下进行选择:
// 您想如何使用ESLint?
How would you like to use ESLint?
  // 仅检查语法
  To check syntax only
  // 检查语法并发现问题
  To check syntax and find problems
  // 检查语法、发现问题并强制执行代码风格
  To check syntax, find problems, and enforce code style  √

// 您的项目使用什么类型的模块?
What type of modules does your project use?
  JavaScript modules (import/export)  √
  CommonJS (require/exports)
  None of these

// 你的项目使用哪个框架?
Which framework does your project use?
  React
  Vue.js  √
  None of these

// 您的项目是否使用TypeScript?
Does your project use TypeScript?
   No
   Yes  √

// 您的代码在哪里运行?(按<space>选择,<a>切换所有,<i>反转选择)
Where does your code run?
  Browser  √
  Node  √

// 您希望如何为您的项目定义样式?
How would you like to define a style for your project?
  // 使用流行的风格指南
  Use a popular style guide
  // 回答问题确认你的风格
  Answer questions about your style  √

// 您希望配置文件采用什么格式?
What format do you want your config file to be in?
  JavaScript  √
  YAML
  JSON

// 您使用什么样式的缩进?
What style of indentation do you use?
  Tabs  √
  Spaces

// 字符串用什么引号?(都可以,这边选择双引号)
What quotes do you use for strings?
  Double
  Single  √

// 你用什么行结尾?
What line endings do you use?
  Unix  √
  Windows

// 您需要分号吗?(都可以,这边选择yes)
Do you require semicolons?
  No  √
  Yes

// 您选择的配置需要以下依赖项:
The config that you've selected requires the following dependencies:
eslint-plugin-vue@latest  // 扩展ESLint的功能,使其支持Vue
@typescript-eslint/eslint-plugin@latest // 扩展ESLint的功能,使其支持TypeScript
@typescript-eslint/parser@latest // 解析TypeScript代码
// 您想现在安装它们吗?(也可以选择No,然后手动安装以上组件)
Would you like to install them now?
  No
  Yes  √

// 您要使用哪个包管理器?(都可以,我这边使用的是npm)
Which package manager do you want to use?
  npm  √
  yarn
pnpm在根目录下添加.eslintignore 文件,忽略一些不需要 eslint 格式化的文件。如下:
node_modules
.vscode
.idea
vueTs
/public
.eslintrc.js
.gitignore
README.md
.editorconfig
.env.*
*.svg接下来我们在package.json中添加eslint命令,如下:
"lint:eslint": "eslint --fix --ext .js,.ts,.vue ./src"3、安装 Prettier
Prettier是一个代码格式化工具,它可以帮助你自动格式化你的代码,使其更易于阅读和理解。 在协同化合作开发中保持代码风格一致就显得尤为重要,可以提高代码的可阅读性,因为使用了清晰、一致的格式。这可以帮助你更快地找到代码中的错误,并更容易理解代码的逻辑。
安装prettier代码如下:
npm add prettier -D在根目录下添加文件.prettierrc.js 添加我们统一的代码风格。规则如下:
module.exports = {
	tabWidth: 2, // tab缩进大小
	useTabs: true, // 使用tab缩进
	printWidth: 130, // 一行的字符数,如果超过会进行换行
	semi: false, // 行尾是否加分号
	singleQuote: true, // 使用单引号代替双引号
	trailingComma: "none", // 在对象或数组最后一个元素后面是否加逗号(在ES5中加尾逗号)
	jsxSingleQuote: true, // 在jsx里是否使用单引号
	bracketSpacing: true, // 对象大括号直接是否有空格,默认为true,效果:{ foo: bar }
	arrowParens: "avoid", // 箭头函数如果只有一个参数则省略括号
};在项目目录添加.prettierignore 将需要忽略不需要格式化的内容添加到文件:
node_modules
.vscode
.idea
vueTs
/public
.eslintrc.js
.gitignore
README.md
.editorconfig
.env.*
*.svg然后在package.json中添加prettier命令,如下:
"lint:prettier": "prettier -C --write \"src/**/*\""4、解决ESLint和Prettier的冲突
要解决ESLint和Prettier的冲突,需要安装eslint-config-prettier和eslint-plugin-prettier依赖。命令如下:
npm add eslint-config-prettier eslint-plugin-prettier -D安装eslint-config-prettier 的作用是为了关闭所有不必要的或可能与Prettier冲突的ESLint 规则。
安装eslint-plugin-prettier 的作用是为了将Prettier的规则设置为ESLint规则。
安装完成后修改.eslintrc 文件
module.exports = {
	root: true,
	env: {
		browser: true,
		es2021: true,
		node: true
	},
	parser: 'vue-eslint-parser', // 指定如何解析语法
	parserOptions: {
		// 优先级低于parser的解析器配置
		parser: '@typescript-eslint/parser', // 指定如何解析语法
		ecmaVersion: 'latest', // 指定ECMAScript版本
		sourceType: 'module' // 指定模块类型
	},
	plugins: ['vue', '@typescript-eslint', 'prettier'],
	extends: [
		'eslint:recommended',
		'plugin:vue/vue3-essential',
		'plugin:@typescript-eslint/recommended',
		'plugin:prettier/recommended'
	],
	/**
	 * "off" 或 0    ==>  关闭规则
	 * "warn" 或 1   ==>  打开的规则作为警告(不影响执行)
	 * "error" 或 2  ==>  规则作为一个错误(代码不能执行,报错)
	 */
	rules: {
		// eslint (http://eslint.cn/docs/rules)
		'no-var': 'error', // 禁用var,用let和const代替
		'no-multiple-empty-lines': ['error', { max: 1 }], // 禁止出现多行空行
		'no-use-before-define': 'off', // 禁止在变量定义之前使用它们
		'prefer-const': 'off', // 定义的变量后续没有重新赋值 首选const
		'no-irregular-whitespace': 'off', // 禁止不规则的空白
		// typeScript (https://typescript-eslint.io/rules)
		'@typescript-eslint/no-unused-vars': 'off', // 禁止出现未使用的变量
		'@typescript-eslint/no-inferrable-types': 'off', // 允许类型推断
		'@typescript-eslint/no-namespace': 'off', // 禁止使用自定义命名空间
		'@typescript-eslint/no-explicit-any': 'off', // 禁止使用 any 类型
		'@typescript-eslint/ban-ts-ignore': 'off', // 允许使用 @ts-ignore
		'@typescript-eslint/ban-types': 'off', // 禁止使用特定类型
		'@typescript-eslint/explicit-function-return-type': 'off', // 不允许对初始化为数字、字符串或布尔值的变量或参数进行显式类型声明
		'@typescript-eslint/no-var-requires': 'off', // 禁止在import语句中使用require
		'@typescript-eslint/no-empty-function': 'off', // 禁止空函数
		'@typescript-eslint/no-use-before-define': 'off', // 禁止在变量定义之前使用它们
		'@typescript-eslint/ban-ts-comment': 'off', // 禁止 @ts-<directive> 使用注释或要求在指令后进行描述
		'@typescript-eslint/no-non-null-assertion': 'off', // 不允许使用后缀运算符的非空断言(!)
		'@typescript-eslint/explicit-module-boundary-types': 'off', // 不允许在函数和类方法的参数上缺少显式类型声明
		// vue (https://eslint.vuejs.org/rules)
		'vue/no-v-html': 'off', // 禁止使用 v-html 指令
		'vue/script-setup-uses-vars': 'error', // 在 <script setup> 中使用变量或导入的组件时,需要先声明
		'vue/v-slot-style': 'error', // 强制v-slot指令的使用样式
		'vue/no-mutating-props': 'off', // 禁止更改 prop 值
		'vue/custom-event-name-casing': 'off', // 强制自定义事件名称的命名样式
		'vue/attributes-order': 'off', // 强制执行属性顺序
		'vue/one-component-per-file': 'off', // 每个文件一个组件
		'vue/html-closing-bracket-newline': 'off', // 在标签的右括号之前要求或禁止换行
		'vue/max-attributes-per-line': 'off', // 强制每行属性的最大数量
		'vue/multiline-html-element-content-newline': 'off', // 在多行元素的内容之前和之后需要换行符
		'vue/singleline-html-element-content-newline': 'off', // 在单行元素的内容之前和之后需要换行符
		'vue/attribute-hyphenation': 'off', // 强制使用连字符属性命名
		'vue/require-default-prop': 'off', // 要求为每个 prop 提供默认值
		'vue/html-self-closing': [
			'error',
			{
				html: {
					void: 'always',
					normal: 'never',
					component: 'always'
				},
				svg: 'always',
				math: 'always'
			}
		], // 强制执行自闭合标签的特定风格
		'vue/multi-word-component-names': 'off' // 禁止使用单个单词的组件名
	}
}
5、安装 Stylelint
stylelint检测css、scss、sass、less的风格统一,检测样式是否符合规范。(如果不想要的话,可以不进行安装。)
安装stylelint代码如下:
npm add stylelint -D // 检测样式风格统一
npm add stylelint-config-standard -D // 作为Stylelint的配置基础,提供一套标准的CSS代码规范
npm add postcss -D // 扩展Stylelint使其能够支持更多的 CSS 语法和特性
npm add postcss-html -D // 扩展Stylelint使用postcss-html来处理HTML文件中的CSS
npm add stylelint-config-html -D // 为Stylelint提供HTML文件的CSS代码规范
npm add stylelint-config-recommended-scss -D // 为Stylelint提供推荐的SCSS代码规范
npm add stylelint-config-recommended-vue -D // 为Stylelint提供推荐的Vue代码规范安装stylelint-prettier的作用是为了将Prettier的规则设置为stylelint规则。但我们需要解决stylelint与Prettier的冲突,需要安装stylelint-config-prettier来解决两者之间的冲突,但在stylelint在15版本后关闭了与Prettier之间的规则冲突,如果你安装的是15版以上的版本那么就无需安装stylelint-config-prettier。我这边安装的是15版以上的版本所以我们这边只要安装stylelint-prettier就行,代码如下:
npm add stylelint-prettier -D然后在根目录下添加文件.stylelintrc.js 。内容如下:
module.exports = {
	extends: [
		'stylelint-config-html/vue', // 配置针对vue文件的规则
		'stylelint-config-recommended-vue/scss', // 配置针对vue文件的scss规则
		'stylelint-config-standard', // 继承stylelint-config-standard的规则配置
		'stylelint-prettier/recommended' // 使用prettier的规则配置
	],
	customSyntax: 'postcss-scss', // 使用postcss-scss解析scss文件
	overrides: [
		{
			files: ['**/*.{vue,html}'], // 匹配vue和html文件
			customSyntax: 'postcss-html' // 使用postcss-html解析html文件
		}
	],
	/**
	 * null 表示关闭规则
	 */
	rules: {
		'value-keyword-case': null, // 指定关键字的大小写
		'no-descending-specificity': null, // 禁止在具有较高优先级的选择器中使用较低优先级的选择器
		'function-url-quotes': 'always', // 要求或禁止 URL 的引号
		'color-hex-length': 'long', // 指定十六进制颜色的简写形式
		'rule-empty-line-before': 'never', // 要求或不允许在规则之前有空行
		'block-opening-brace-space-before': null, // 要求或禁止在块的开大括号之前有一个空格
		'property-no-unknown': null, // 禁止使用未知属性
		'no-empty-source': null, // 禁止空源码
		'declaration-block-trailing-semicolon': null, // 要求或不允许在声明块之后有一个尾随分号
		'selector-class-pattern': null, // 指定类选择器的模式
		'value-no-vendor-prefix': null, // 关闭 vendor-prefix(为了解决多行省略 -webkit-box)
		'at-rule-no-unknown': null, // 允许使用未知规则
		'selector-pseudo-class-no-unknown': [
			true,
			{
				ignorePseudoClasses: ['global', 'v-deep', 'deep'] // 忽略全局选择器
			}
		] // 允许使用未知的选择器
	}
}在项目目录添加.stylelintignore 需要忽略的文件:
node_modules
.vscode
.idea
vueTs
/public
.eslintrc.js
.gitignore
README.md
.editorconfig
.env.*
*.svg然后在package.json中添加stylelint命令,如下:
"lint:stylelint": "stylelint \"**/*.{css,html,vue,scss,sass,less}\""6、设置编辑器
在这里我们已经完成项目规范配置,如果是webstorm需要保存时自动执行Prettier格式化文件,我们需要简单配置一下,打开设置搜索prettier。配置如下图:
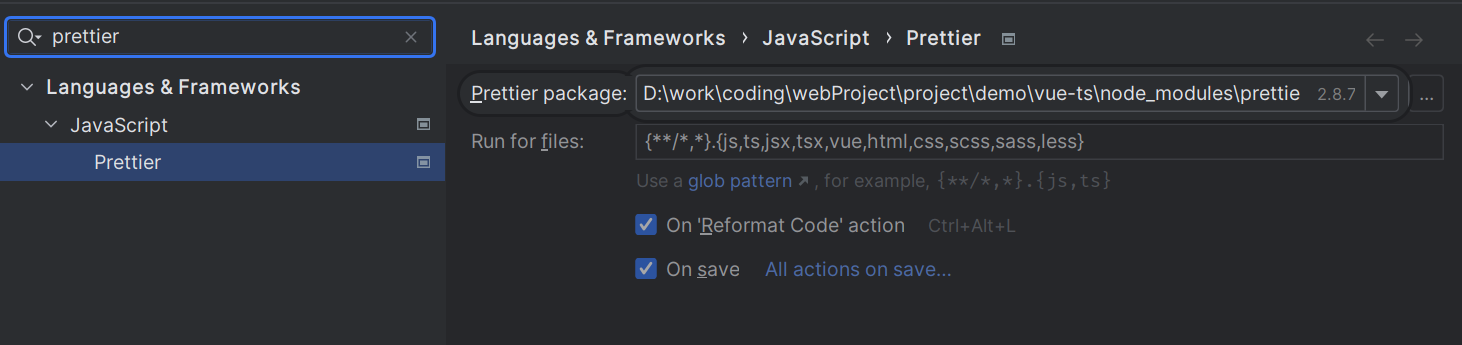
配置内容:
{**/*,*}.{js,ts,jsx,tsx,vue,html,css,scss,sass,less,json}如果是vscode需要保存时自动执行Prettier格式化文件,先安装Prettier - Code formatter插件,然后在.vscode/settings.json中添加规则。如下:
{
  "editor.formatOnSave": true, // 保存自动格式化
  "editor.defaultFormatter": "esbenp.prettier-vscode" // 默认格式化工具prettier
}
六、最后
文章在这里就结束了,有任何不准确的地方请多多指正,希望各位大佬勿喷。感谢你的阅读,愿你在技术探索的路上不断前行,一起加油!


 5873
5873

 被折叠的 条评论
为什么被折叠?
被折叠的 条评论
为什么被折叠?
 到【灌水乐园】发言


