


1、Springboot入门
SpringBoot是什么?
Spring Boot它本身并不提供Spring框架的核心特性以及扩展功能,只是用于快速、敏捷地开发新一代基于Spring框架的应用程序。也就是说,它并不是用来替代Spring的解决方案,而是和Spring框架紧密结合用于提升Spring开发者体验的工具。
同时它集成了大量常用的第三方库配置(例如Jackson, JDBC, Mongo, Redis, Mail等等),Spring Boot应用中这些第三方库几乎可以零配置的开箱即用(out-of-the-box),大部分的Spring Boot应用都只需要非常少量的配置代码,开发者能够更加专注于业务逻辑
注1:敏捷式开发
注2:spring boot其实不是什么新的框架,它默认配置了很多框架的使用方式,
就像maven整合了所有的jar包,spring boot整合了所有的框架
使用Idea配置SpringBoot项目
创建springboot项目

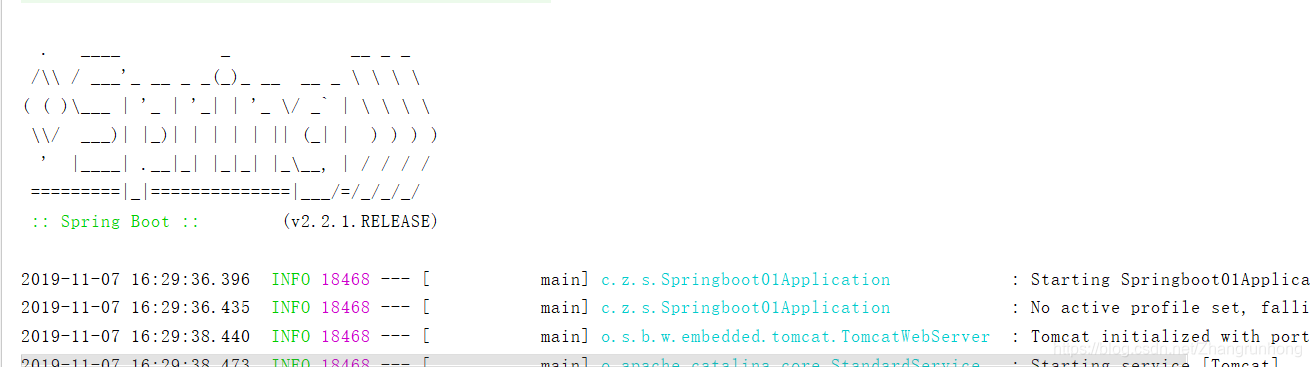
来看下启动项目,这里我们没有配置任何的tomcat,出现以下图说明配置成功,非常方便好用
案例
pom依赖
<?xml version="1.0" encoding="UTF-8"?>
<project xmlns="http://maven.apache.org/POM/4.0.0" xmlns:xsi="http://www.w3.org/2001/XMLSchema-instance"
         xsi:schemaLocation="http://maven.apache.org/POM/4.0.0 https://maven.apache.org/xsd/maven-4.0.0.xsd">
    <modelVersion>4.0.0</modelVersion>
    <parent>
        <groupId>org.springframework.boot</groupId>
        <artifactId>spring-boot-starter-parent</artifactId>
        <version>2.2.1.RELEASE</version>
        <relativePath/> <!-- lookup parent from repository -->
    </parent>
    <groupId>com.zrh</groupId>
    <artifactId>springboot01</artifactId>
    <version>0.0.1-SNAPSHOT</version>
    <name>springboot01</name>
    <description>Demo project for Spring Boot</description>

    <properties>
        <java.version>1.8</java.version>
    </properties>

    <dependencies>
        <dependency>
            <groupId>org.springframework.boot</groupId>
            <artifactId>spring-boot-starter-web</artifactId>
        </dependency>

        <dependency>
            <groupId>org.projectlombok</groupId>
            <artifactId>lombok</artifactId>
            <optional>true</optional>
        </dependency>
        <dependency>
            <groupId>org.springframework.boot</groupId>
            <artifactId>spring-boot-starter-test</artifactId>
            <scope>test</scope>
            <exclusions>
                <exclusion>
                    <groupId>org.junit.vintage</groupId>
                    <artifactId>junit-vintage-engine</artifactId>
                </exclusion>
            </exclusions>
        </dependency>
    </dependencies>

    <build>
        <plugins>
            <plugin>
                <groupId>org.springframework.boot</groupId>
                <artifactId>spring-boot-maven-plugin</artifactId>
            </plugin>
        </plugins>
    </build>

</project>
Springboot01Application.java
package com.zrh.springboot01;

import org.springframework.boot.SpringApplication;
import org.springframework.boot.autoconfigure.SpringBootApplication;

@SpringBootApplication
public class Springboot01Application {

    public static void main(String[] args) {
        SpringApplication.run(Springboot01Application.class, args);
    }

}
HelloControlle.java
测试类
package com.zrh.springboot01.controller;
import org.springframework.web.bind.annotation.RequestMapping;
import org.springframework.web.bind.annotation.RestController;
import java.util.HashMap;
import java.util.Map;
/**
* @author zrh
* @site IDEA项目
* @company
* @create 2019-11-0716:36
*/
@RestController
public class HelloControlle {
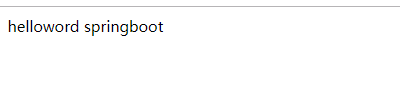
@RequestMapping("/hello1")
public String hello1(){
return "helloword springboot ";
}
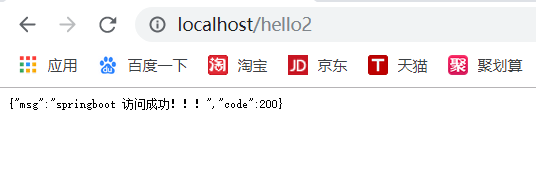
@RequestMapping("/hello2")
public Map hello2(){
Map map = new HashMap();
map.put("code",200);
map.put("msg","springboot 访问成功!!!");
return map;
}
}
测试结果:

2、Springboot配置文件介绍
内置属性

自定义属性
application.yml
注意uname和pwd 后面记得空一格不然会报错
server:
  port: 80
  servlet:
    context-path: /

user:
  uname: zs
  pwd: 123
HelloControlle.java
package com.zrh.springboot01.controller;
import org.springframework.beans.factory.annotation.Value;
import org.springframework.web.bind.annotation.RequestMapping;
import org.springframework.web.bind.annotation.RestController;
import java.util.HashMap;
import java.util.Map;
/**
* @author zrh
* @site IDEA项目
* @company
* @create 2019-11-0716:36
*/
@RestController
public class HelloControlle {
@Value("${user.uname}")
private String uname;
@Value("${user.pwd}")
private String pwd;
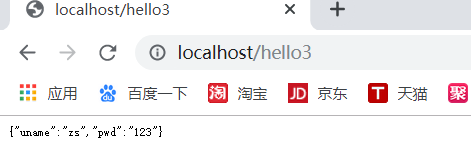
@RequestMapping("/hello3")
public Map hello3(){
Map map = new HashMap();
map.put("uname",uname);
map.put("pwd",pwd);
return map;
}
}
属性封装类
定义属性封装类
user.java
package com.zrh.springboot01.entity;

import lombok.Data;
import lombok.ToString;
import org.springframework.boot.context.properties.ConfigurationProperties;
import org.springframework.stereotype.Component;

/**
 * @author zrh
 * @site IDEA项目
 * @company
 * @create 2019-11-0717:17
 */
@ToString
@Component
@ConfigurationProperties(
        prefix = "user"
)

@Data
public class user {
    private String uname;
    private String pwd;
    private String age;


}
这里我们需要添加依赖
<dependency>
	<groupId>org.springframework.boot</groupId>
	<artifactId>spring-boot-configuration-processor</artifactId>
	<optional>true</optional>
</dependency>
测试代码
HelloControlle.java
package com.zrh.springboot01.controller;
import com.zrh.springboot01.entity.user;
import org.springframework.beans.factory.annotation.Autowired;
import org.springframework.beans.factory.annotation.Value;
import org.springframework.web.bind.annotation.RequestMapping;
import org.springframework.web.bind.annotation.RestController;
/**
* @author zrh
* @site IDEA项目
* @company
* @create 2019-11-0716:36
*/
@RestController
public class HelloControlle {
@Value("${user.uname}")
private String uname;
@Value("${user.pwd}")
private String pwd;
@Autowired
private user user;
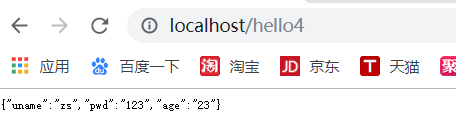
@RequestMapping("/hello4")
public user hello4(){
return user;
}
}
测试打印结果为:


 1万+
1万+


 被折叠的 条评论
为什么被折叠?
被折叠的 条评论
为什么被折叠?
 到【灌水乐园】发言


