


1 宏包含的特殊符号
分为几种:
# , ## , \1.1 字符串化操作(#)
在一个宏中的参数前面使用一个#,预处理器会把这个参数转换为一个字符数组,换言之就是:#是“字符串化”的意思,出现在宏定义中的#是把跟在后面的参数转换成一个字符串。
注意:其只能用于有传入参数的宏定义中,且必须置于宏定义体中的参数名前
#include <sys/types.h>
#include <stdlib.h>
#include <unistd.h>
#include <stdio.h>
#include <sys/wait.h>
#include <signal.h>
#include <fcntl.h>
#include <string.h>
#include <iostream>
#include <string>
using namespace std;
#define exp(s) printf("test s is : %s\n", s);
#define exp1(s) printf("test s is : %s\n", #s);
#define exp2(s) #s
int main(int argc, char** argv) {
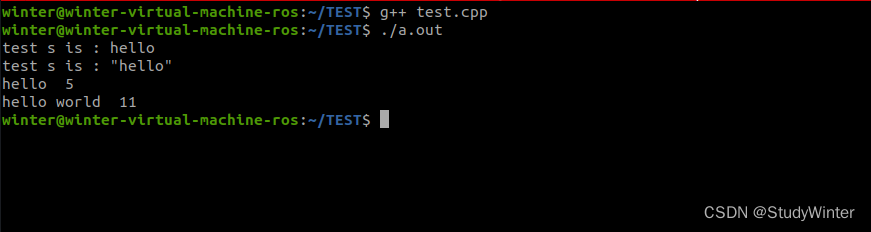
exp("hello");
exp1("hello"); // #是字符串化的意思
string str1 = exp2( hello ); // 忽略传入参数名前面和后面的空格
cout <<str1 << " " << str1.size() << endl;
// 当传入参数名间存在空格时,编译器将会自动连接各个子字符串,
// 用每个子字符串之间以一个空格连接,忽略剩余空格
string str2 = exp2( hello world );
cout <<str2 << " " << str2.size() << endl;
return 0;
}编译
1.2 符号连接操作符(##)
“##”是一种分隔连接方式,它的作用是先分隔,然后进行强制连接。将宏定义的多个形参转换成一个实际参数名。
注意事项:
(1)当用##连接形参时,##前后的空格可有可无。
(2)连接后的实际参数名,必须为实际存在的参数名或是编译器已知的宏定义。
(3)如果##后的参数本身也是一个宏的话,##会阻止这个宏的展开。
#include <sys/types.h>
#include <stdlib.h>
#include <unistd.h>
#include <stdio.h>
#include <sys/wait.h>
#include <signal.h>
#include <fcntl.h>
#include <string.h>
#include <iostream>
#include <string>

using namespace std;

#define expA(s) printf("前缀加上后的字符串为:%s\n",gc_##s) // gc_s必须存在
// 注意事项2
#define expB(s) printf("前缀加上后的字符串为:%s\n",gc_ ## s) // gc_s必须存在
// 注意事项1
#define gc_hello1 "I am gc_hello1"


int main() {
    // 注意事项1
    const char * gc_hello = "I am gc_hello";
    expA(hello); // 前缀加上后的字符串为:I am gc_hello
    expB(hello1); // 前缀加上后的字符串为:I am gc_hello1

    return 0;
}
编译

1.3 续行操作符(\)
当定义的宏不能用一行表达完整时,可以用”\”表示下一行继续此宏的定义。
注意 \ 前留空格。
#include <sys/types.h>
#include <stdlib.h>
#include <unistd.h>
#include <stdio.h>
#include <sys/wait.h>
#include <signal.h>
#include <fcntl.h>
#include <string.h>
#include <iostream>
#include <string>
using namespace std;
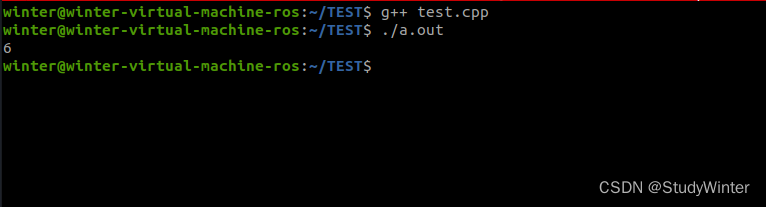
#define MAX(a,b) ((a)>(b) ? (a) \
:(b))
int main() {
int max_val = MAX(3,6);
cout<<max_val<<endl;
return 0;
}编译
2 do{...}while(0)的使用
2.1 避免语义曲解
例如:
#define fun() f1();f2();
if(a>0)
    fun()
这个宏被展开后就是:
if(a>0)
    f1();
    f2();
本意是a>0执行f1 f2,而实际是f2每次都会执行,所以就错误了。
为了解决这种问题,在写代码的时候,通常可以采用 {} 块。
#define fun() {f1();f2();}
if(a>0)
    fun();

// 宏展开
if(a>0)
{
    f1();
    f2();
};
但是会发现上述宏展开后多了一个分号,实际语法不太对。(虽然编译运行没问题,正常没分号)。
2.2 避免使用goto控制流
在一些函数中,我们可能需要在return语句之前做一些清理工作,比如释放在函数开始处由malloc申请的内存空间,使用goto总是一种简单的方法
int f() {
    int *p = (int *)malloc(sizeof(int));
    *p = 10;
    cout<<*p<<endl;
#ifndef DEBUG
    int error=1;
#endif
if(error)
    goto END;
    // dosomething
END:
    cout<<"free"<<endl;
    free(p);
    return 0;
}
但由于goto不符合软件工程的结构化,而且有可能使得代码难懂,所以很多人都不倡导使用,这个时候我们可以使用do{...}while(0)来做同样的事情:
int ff() {
    int *p = (int *)malloc(sizeof(int));
    *p = 10;
    cout<<*p<<endl;
    do{
#ifndef DEBUG
    int error=1;
#endif
    if(error)
        break;
    //dosomething
    }while(0);
    cout<<"free"<<endl;
    free(p);
    return 0;
}
这里将函数主体部分使用do{...}while(0)包含起来,使用break来代替goto,后续的清理工作在while之后,现在既能达到同样的效果,而且代码的可读性、可维护性都要比上面的goto代码好的多了。
2.3 避免由宏引起的警告
内核中由于不同架构的限制,很多时候会用到空宏。在编译的时候,这些空宏会给出warning,为了避免这样的warning,我们可以使用do{...}while(0)来定义空宏:
#define EMPTYMICRO do{}while(0)
2.4 定义单一的函数块来完成复杂的操作
如果你有一个复杂的函数,变量很多,而且你不想要增加新的函数,可以使用do{...}while(0),将你的代码写在里面,里面可以定义变量而不用考虑变量名会同函数之前或者之后的重复。 这种情况应该是指一个变量多处使用(但每处的意义还不同),我们可以在每个do-while中缩小作用域,比如:
int fc()
{
    int k1 = 10;
    cout<<k1<<endl;
    do{
        int k1 = 100;
        cout<<k1<<endl;
    }while(0);
    cout<<k1<<endl;
}


 2196
2196


 被折叠的 条评论
为什么被折叠?
被折叠的 条评论
为什么被折叠?
 到【灌水乐园】发言


