


前言
自定义控件之视图篇(一)—— 测量与布局
有这样一个需求,你需要设计一个Container,实现内部控件自动换行。即里面的控件能够根据长度来判断当前行是否容得下它,进而决定是否转到下一行显示。效果图如下
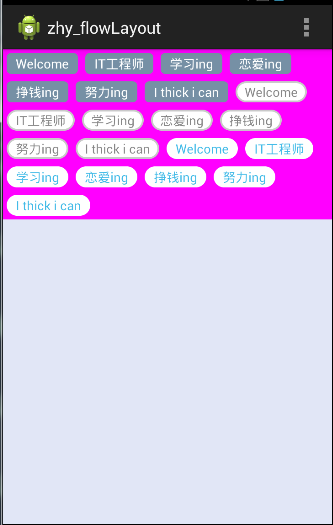
在上图中,所有的紫色部分是FlowLayout(自定义)控件,明显可以看出,内部的每个TextView控件可以根据大小自动排列。 效果图就是这样子了,第一篇先讲下预备知识。
ViewGroup绘制流程
View及ViewGroup基本相同,只是在ViewGroup中不仅要绘制自己而且还要绘制其中的子控件,而View则只需要绘制自己就可以了,所以我们这里就以ViewGroup为例来讲述整个绘制流程。
绘制流程分为三步:onMeasure()(测量)、onLayout()(布局)、onDraw()(绘制 ),其作用分别如下:
onMeasure():测量自己的大小,为正式布局提供建议(只是建议,至于用不用,要看onLayout())
onLayout():使用
layout(int, int, int, int)函数对所有子控件布局onDraw():根据布局的位置绘图
onMeasure与MeasureSpec
布局绘画涉及两个过程:onMeasure()(测量)过程和onLayout()(布局)过程。测量过程通过onMeasure()实现,是View树自顶向下的遍历,每个View在循环过程中将尺寸细节往下传递,当测量过程完成之后,所有的View都存储了自己的尺寸。第二个过程则是通过onLayout()来实现的,也是自顶向下的。在这个过程中,每个父View负责通过计算好的尺寸放置它的子View。
前面讲过,onMeasure()是用来测量当前控件大小的,给onLayout()提供数值参考,需要特别注意的是:测量完成以后通过setMeasuredDimension(int,int)设置给系统。
onMeasure
首先,看一下onMeasure()的声明:
protected void onMeasure(int widthMeasureSpec, int heightMeasureSpec)这里我们主要关注传进来的两个参数:int widthMeasureSpec和int heightMeasureSpec 。
与这两个参数有关的是两个问题:意义和组成。即它们是怎么来的,表示什么意思;还有,它们是组成方式是怎样的。
我们先说它们的意义: 它们是父类传递过来给当前View的一个建议值,即想把当前View的尺寸设置为宽widthMeasureSpec和高heightMeasureSpec 。
有关它们的组成,我们就直接转到MeasureSpec部分。
MeasureSpec
虽然表面上看起来它们是int类型的数字,其实他们是由 mode + size 两部分组成的。
widthMeasureSpec和heightMeasureSpec转化成二进制数字表示,它们都是32位的。前两位代表测量模式(简称模式,即mode),后面30位才是它们的实际数值(简称数值,即size)。
模式分类
它有三种模式:
UNSPECIFIED(未指定):父元素不对子元素施加任何束缚,子元素可以得到任意想要的大小
EXACTLY(完全):父元素决定子元素的确切大小,子元素将被限定在给定的边界里而忽略它本身大小
AT_MOST(至多):子元素至多达到指定大小的值
它们对应的二进制值分别是:
UNSPECIFIED = 00000000000000000000000000000000
EXACTLY = 01000000000000000000000000000000
AT_MOST =10000000000000000000000000000000
由于最前面两位代表mode,所以它们分别对应十进制的0,1,2。
模式提取
现在我们知道了widthMeasureSpec和heightMeasureSpec是由模式(mode)和数值(size)组成的,而且二进制的前两位代表模式,后30位代表数值。
我们先想想,如果我们自己来提取widthMeasureSpec和heightMeasureSpec中的模式和数值是怎么提取呢?
首先想到的肯定是通过MASK和与运算去掉不需要的部分而得到对应的模式或数值。
说到这大家可能会迷茫,我们写段代码来提取模式部分吧:
//对应11000000000000000000000000000000;总共32位,前两位是1
int MODE_MASK  = 0xc0000000;

//提取模式
public static int getMode(int measureSpec) {
    return (measureSpec & MODE_MASK);
}
//提取数值
public static int getSize(int measureSpec) {
    return (measureSpec & ~MODE_MASK);
}
相信大家看了代码就应该清楚模式和数值提取的方法了吧。
MeasureSpec
上面我们自已实现了模式和数值的提取。但在强大的andorid面前,肯定有提供提取模式和数值的类。这个类就是MeasureSpec 。下面两个函数就可以实现这个功能:
MeasureSpec.getMode(int spec) //获取MODE
MeasureSpec.getSize(int spec) //获取数值
另外模式的取值为:
MeasureSpec.AT_MOST
MeasureSpec.EXACTLY
MeasureSpec.UNSPECIFIED 通过下面的代码就可以分别获取widthMeasureSpec和heightMeasureSpec的模式值
int measureWidth = MeasureSpec.getSize(widthMeasureSpec);
int measureHeight = MeasureSpec.getSize(heightMeasureSpec);
int measureWidthMode = MeasureSpec.getMode(widthMeasureSpec);
int measureHeightMode = MeasureSpec.getMode(heightMeasureSpec);
测量模式有什么用呢
我们知道这里有三个模式:EXACTLY、AT_MOST、UNSPECIFIED 。
需要注意的是widthMeasureSpec和heightMeasureSpec各自都有它对应的模式,模式的由来分别来自于XML定义。
简单来说,XML布局和模式有如下对应关系:
wrap_content -> MeasureSpec.AT_MOST
match_parent -> MeasureSpec.EXACTLY
具体值 -> MeasureSpec.EXACTLY
例如,下面这个XML
<com.example.harvic.myapplication.FlowLayout
     android:layout_width="match_parent"
     android:layout_height="wrap_content">

</com.example.harvic.myapplication.FlowLayout> 那FlowLayout在onMeasure()中传值时widthMeasureSpec的模式就是MeasureSpec.EXACTLY,即父窗口宽度值。heightMeasureSpec的模式就是MeasureSpec.AT_MOST,即不确定的。
一定要注意是,当模式是MeasureSpec.EXACTLY时,我们就不必要设定我们计算的大小了,因为这个大小是用户指定的,我们不应更改。但当模式是MeasureSpec.AT_MOST时,也就是说用户将布局设置成了wrap_content,我们就需要将大小设定为我们计算的数值,因为用户根本没有设置具体值是多少,需要我们自己计算。
即,假如width和height是我们经过计算的控件所占的宽度和高度。那在onMeasure()中使用setMeasuredDimension(int, int)最后设置时,代码应该是这样的:
protected void onMeasure(int widthMeasureSpec, int heightMeasureSpec) {
        super.onMeasure(widthMeasureSpec, heightMeasureSpec);
    int measureWidth = MeasureSpec.getSize(widthMeasureSpec);
    int measureHeight = MeasureSpec.getSize(heightMeasureSpec);
    int measureWidthMode = MeasureSpec.getMode(widthMeasureSpec);
    int measureHeightMode = MeasureSpec.getMode(heightMeasureSpec);

    //经过计算,控件所占的宽和高分别对应width和height
    //计算过程,我们会在下篇细讲
    …………

    setMeasuredDimension((measureWidthMode == MeasureSpec.EXACTLY) ? measureWidth: width, (measureHeightMode == MeasureSpec.EXACTLY) ? measureHeight: height);
}
onLayout()
概述
上面说了,onLayout()是实现所有子控件布局的函数。注意,是所有子控件!!!那它自己的布局怎么办?后面我们再讲,先讲讲在onLayout()中我们应该做什么。
我们先看看ViewGroup的onLayout()函数的默认行为是什么 。
在ViewGroup.java中
@Override
protected abstract void onLayout(boolean changed, int l, int t, int r, int b); 是一个抽象方法,说明凡是派生自ViewGroup的类都必须自己去实现这个方法。像LinearLayout、RelativeLayout等布局,都是重写了这个方法,然后在内部按照各自的规则对子视图进行布局的。
实例
下面我们就举个例子来看一下有关onMeasure()和onLayout()的具体使用,下面是效果图:
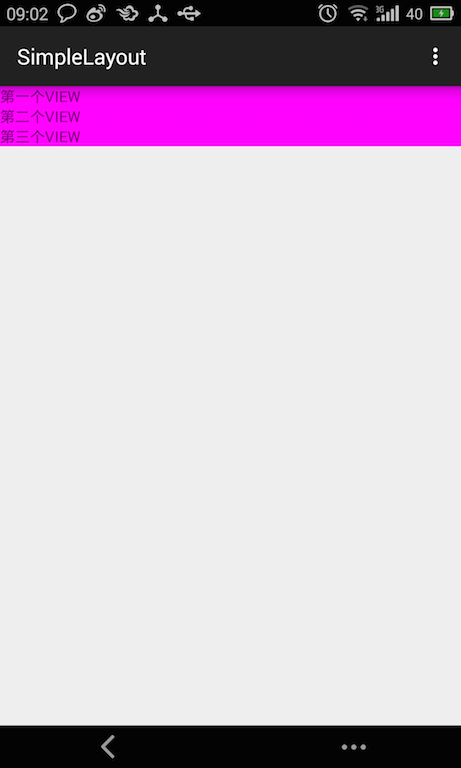
这个效果图主要有两点:
三个TextView竖直排列
背景的Layout宽度是match_parent,高度是wrap_content
下面我们就看一下,代码上如何实现:
XML布局
首先我们看一下XML布局:(activity_main.xml)
<com.harvic.simplelayout.MyLinLayout
    xmlns:android="http://schemas.android.com/apk/res/android"
    xmlns:tools="http://schemas.android.com/tools"
    android:layout_width="match_parent"
    android:layout_height="wrap_content"
    android:background="#ff00ff"
    tools:context=".MainActivity">

    <TextView android:text="第一个VIEW"
        android:layout_width="wrap_content"
        android:layout_height="wrap_content" />

    <TextView android:text="第二个VIEW"
        android:layout_width="wrap_content"
        android:layout_height="wrap_content" />

    <TextView android:text="第三个VIEW"
        android:layout_width="wrap_content"
        android:layout_height="wrap_content" />

</com.harvic.simplelayout.MyLinLayout> 可见里面有三个TextView,然后自定义的MyLinLayout布局,宽度设为了match_parent,高度设为了wrap_content。
重写onMeasure()函数
我们前面讲过,onMeasure()的作用就是根据Container内部的子控件计算自己的宽和高,最后通过setMeasuredDimension(int width, int height)设置进去。
下面看看onMeasure()的完整代码,然后再逐步讲解:
@Override
protected void onMeasure(int widthMeasureSpec, int heightMeasureSpec) {
    super.onMeasure(widthMeasureSpec, heightMeasureSpec);
    int measureWidth = MeasureSpec.getSize(widthMeasureSpec);
    int measureHeight = MeasureSpec.getSize(heightMeasureSpec);
    int measureWidthMode = MeasureSpec.getMode(widthMeasureSpec);
    int measureHeightMode = MeasureSpec.getMode(heightMeasureSpec);

    int height = 0;
    int width = 0;
    int count = getChildCount();
    for (int i=0;i<count;i++) {
        //测量子控件
        View child = getChildAt(i);
        measureChild(child, widthMeasureSpec, heightMeasureSpec);
        //获得子控件的高度和宽度
        int childHeight = child.getMeasuredHeight();
        int childWidth = child.getMeasuredWidth();
        //得到最大宽度,并且累加高度
        height += childHeight;
        width = Math.max(childWidth, width);
    }

    setMeasuredDimension((measureWidthMode == MeasureSpec.EXACTLY) ? measureWidth: width, (measureHeightMode == MeasureSpec.EXACTLY) ? measureHeight: height);
} 首先,是从父类传过来的建议宽度和高度值:widthMeasureSpec和heightMeasureSpec,从它们里面利用MeasureSpec提取宽高值和对应的模式:
int measureWidth = MeasureSpec.getSize(widthMeasureSpec);
int measureHeight = MeasureSpec.getSize(heightMeasureSpec);
int measureWidthMode = MeasureSpec.getMode(widthMeasureSpec);
int measureHeightMode = MeasureSpec.getMode(heightMeasureSpec);
接下来就是通过测量它所有的子控件来决定它所占位置的大小:
int height = 0;
int width = 0;
int count = getChildCount();
for (int i=0;i<count;i++) {
    //测量子控件
    View child = getChildAt(i);
    measureChild(child, widthMeasureSpec, heightMeasureSpec);
    //获得子控件的高度和宽度
    int childHeight = child.getMeasuredHeight();
    int childWidth = child.getMeasuredWidth();
    //得到最大宽度,并且累加高度
    height += childHeight;
    width = Math.max(childWidth, width);
} 我们这里要计算的是整个View当被设置成layout_width="wrap_content"和layout_height="wrap_content"所占用的大小,因为我们是垂直排列其内部所有的View,所以Container所占宽度应该是各个TextVIew中的最大宽度,所占高度应该是所有控件的高度和。
最后,根据当前用户的设置来判断是否将计算出来的值设置进onMeasure()中,用它来计算当前Container所在位置。
setMeasuredDimension((measureWidthMode == MeasureSpec.EXACTLY) ? measureWidth: width, (measureHeightMode == MeasureSpec.EXACTLY) ? measureHeight: height); 前面我们讲过,模式与XML布局的对应关系:
wrap_content -> MeasureSpec.AT_MOST
match_parent -> MeasureSpec.EXACTLY
具体值 -> MeasureSpec.EXACTLY
再看我们前面XML中针对MyLinLayout的设置:
<com.harvic.simplelayout.MyLinLayout
    xmlns:android="http://schemas.android.com/apk/res/android"
    xmlns:tools="http://schemas.android.com/tools"
    android:layout_width="match_parent"
    android:layout_height="wrap_content"
    android:background="#ff00ff"
tools:context=".MainActivity"> 所以这里的measureWidthMode应该是MeasureSpec.EXACTLY,measureHeightMode应该是MeasureSpec.AT_MOST;所以在最后利用setMeasuredDimension(width, height)来最终设置时,width使用的是从父类传过来的measureWidth,而高度则是我们自己计算的height,即实际的运算结果是这样的:
setMeasuredDimension(measureWidth,height); 总体来讲,onMeasure()中计算出的width和height,就是当XML布局设置为layout_width="wrap_content"和layout_height="wrap_content"时所占的宽和高,即整个Container所占的最小矩形。
重写onLayout()函数
在这部分,就是根据自己的意愿把内部的各个控件排列起来。我们要完成的是将所有的控件垂直排列,
先看完整的代码,然后再细讲:
protected void onLayout(boolean changed, int l, int t, int r, int b) {
    int top = 0;
    int count = getChildCount();
    for (int i=0;i<count;i++) {

        View child = getChildAt(i);

        int childHeight = child.getMeasuredHeight();
        int childWidth = child.getMeasuredWidth();

        child.layout(0, top, childWidth, top + childHeight);
        top += childHeight;
    }
} 最核心的代码,就是调用layout(int, int, int, int)函数设置子控件所在的位置:
int childHeight = child.getMeasuredHeight();
int childWidth = child.getMeasuredWidth();

child.layout(0, top, childWidth, top + childHeight);
top += childHeight; 在这里top指的是控件的顶点,那bottom的坐标就是top+childHeight,我们从最左边开始布局,那么right的坐标就肯定是子控件的宽度值了childWidth。
到这里,这个例子就讲完了,下面来讲一个非常容易混淆的问题。
getMeasuredWidth()与getWidth()
趁热打铁,就这个例子,我们讲一个很容易出错的问题:getMeasuredWidth()与getWidth()的区别。它们的值大部分时间都是相同的,但意义确是根本不一样的,我们就来简单分析一下。
区别主要体现在下面几点:
首先
getMeasureWidth()方法在measure()过程结束后就可以获取到了,而getWidth()方法要在layout()过程结束后才能获取到getMeasureWidth()方法中的值是通过setMeasuredDimension(int, int)来进行设置的,而getWidth()方法中的值则是通过layout(left, top, right, bottom)设置的
还记得吗,我们前面讲过,setMeasuredDimension(int, int)提供的测量结果只是为布局提供建议,最终的取用与否要看layout(int, int, int, int)函数。大家再看看我们上面重写的MyLinLayout,是不是我们自己使用child.layout(left, top, right, bottom)来定义了各个子控件所应在的位置:
int childHeight = child.getMeasuredHeight();
int childWidth = child.getMeasuredWidth();

child.layout(0, top, childWidth, top + childHeight); 从代码中可以看到,我们使用child.layout(0, top, childWidth, top + childHeight);来布局控件的位置,其中getWidth()的取值就是这里的右坐标减去左坐标的宽度。因为我们这里的宽度是直接使用的child.getMeasuredWidth()的值,当然会导致getMeasuredWidth()与getWidth()的值是一样的。如果我们在调用layout(int, int, int, int)的时候传进去的宽度值不与getMeasuredWidth()相同,那必然getMeasuredWidth()与getWidth()的值就不再一样了。
getMeasureWidth()方法在measure()过程结束后就可以获取到了,而getWidth()方法要在layout(int, int, int, int)过程结束后才能获取到。
Container自己什么时候被布局
前面我们说了,在派生自ViewGroup的Container中,比如我们上面的MyLinLayout,在onLayout()中布局它所有的子控件。那它自己什么时候被布局呢?
它当然也有父控件,它的布局也是在父控件中由它的父控件完成的,就这样一层一层地向上由各自的父控件完成对自己的布局。真到所有控件的最顶层结点,在所有的控件的最顶部有一个ViewRoot,它才是所有控件的最终祖先结点。那让我们来看看它是怎么来做的吧。
在它布局里,会调用它自己的一个layout(int, int, int, int)函数(不能被重载,代码位于android.view.View.java):
/* final 标识符 , 不能被重载 , 参数为每个视图位于父视图的坐标轴
 * @param l Left position, relative to parent
 * @param t Top position, relative to parent
 * @param r Right position, relative to parent
 * @param b Bottom position, relative to parent
 */
public final void layout(int l, int t, int r, int b) {
    boolean changed = setFrame(l, t, r, b); //设置每个视图位于父视图的坐标轴
    if (changed || (mPrivateFlags & LAYOUT_REQUIRED) == LAYOUT_REQUIRED) {
        if (ViewDebug.TRACE_HIERARCHY) {
            ViewDebug.trace(this, ViewDebug.HierarchyTraceType.ON_LAYOUT);
        }

        onLayout(changed, l, t, r, b);//回调onLayout函数 ,设置每个子视图的布局
        mPrivateFlags &= ~LAYOUT_REQUIRED;
    }
mPrivateFlags &= ~FORCE_LAYOUT; 在setFrame(l, t, r, b)就是设置自己的位置,设置结束以后才会调用onLayout(changed, l, t, r, b)来设置内部所有子控件的位置。
到这里,有关onMeasure()和onLayout()的内容就讲完啦,想必大家应该也对整个布局流程有了一个清楚的认识了,下面我们再看一个紧要的问题:如何得到自定义控件的左右间距margin值。
获取子控件Margin的方法
获取方法及示例
在这部分,大家先不必纠结这个例子为什么要这么写,我会先简单粗暴的教大家怎么先获取到margin值,然后再细讲为什么这样写,他们的原理是怎样的。
如果要自定义ViewGroup支持子控件的layout_margin参数,则自定义的ViewGroup类必须重载generateLayoutParams()函数,并且在该函数中返回一个ViewGroup.MarginLayoutParams派生类对象,这样才能使用margin参数。
我们在上面MyLinLayout例子的基础上,添加上layout_margin参数。
在XML中添加layout_margin
<com.harvic.simplelayout.MyLinLayout
    xmlns:android="http://schemas.android.com/apk/res/android"
    xmlns:tools="http://schemas.android.com/tools"
    android:layout_width="match_parent"
    android:layout_height="wrap_content"
    android:background="#ff00ff"
    tools:context=".MainActivity">

    <TextView android:text="第一个VIEW"
        android:layout_width="wrap_content"
        android:layout_height="wrap_content"
        android:layout_marginTop="10dp"
        android:background="#ff0000"/>

    <TextView android:text="第二个VIEW"
        android:layout_width="wrap_content"
        android:layout_height="wrap_content"
        android:layout_marginTop="20dp"
        android:background="#00ff00"/>

    <TextView android:text="第三个VIEW"
        android:layout_width="wrap_content"
        android:layout_height="wrap_content"
        android:layout_marginTop="30dp"
        android:background="#0000ff"/>

</com.harvic.simplelayout.MyLinLayout> 我们在每个TextView中都添加了layout_marginTop参数,而且值分别是10dp、20dp、30dp,背景也都分别改为了红、绿、蓝,现在我们运行一下,看看效果:
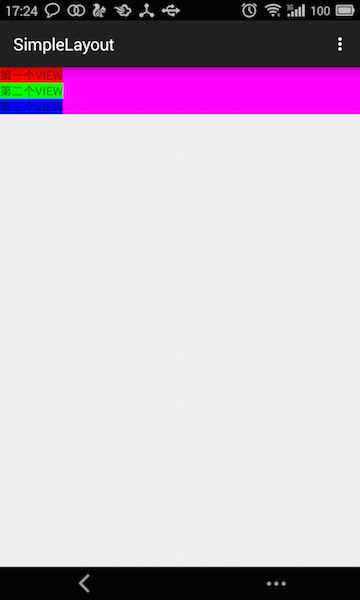
从图中可以看到,根本没作用!!!这是为什么呢?因为测量和布局都是我们自己实现的,我们在onLayout()中没有根据margin来布局,当然不会出现有关margin的效果啦。需要特别注意的是,如果我们在onLayout()中根据margin来布局的话,那么我们在onMeasure()中计算Container的大小时,也要加上margin,不然会导致Container太小,而控件显示不全的问题。
重写generateLayoutParams()函数
重写代码如下:
@Override
protected LayoutParams generateLayoutParams(LayoutParams p) {
    return new MarginLayoutParams(p);
}

@Override
public LayoutParams generateLayoutParams(AttributeSet attrs) {
    return new MarginLayoutParams(getContext(), attrs);
}

@Override
protected LayoutParams generateDefaultLayoutParams() {
    return new MarginLayoutParams(LayoutParams.MATCH_PARENT,
            LayoutParams.MATCH_PARENT);
} 在这里,我们重写了两个函数,一个是generateLayoutParams()函数,一个是generateDefaultLayoutParams()函数,直接返回对应的MarginLayoutParams的实例。至于为什么要这么写,我们后面再讲,这里先把margin信息获取到再说。
重写onMeasure()
让我们先看一下重写好的onMeasure()函数代码:
@Override
protected void onMeasure(int widthMeasureSpec, int heightMeasureSpec) {
    super.onMeasure(widthMeasureSpec, heightMeasureSpec);
    int measureWidth = MeasureSpec.getSize(widthMeasureSpec);
    int measureHeight = MeasureSpec.getSize(heightMeasureSpec);
    int measureWidthMode = MeasureSpec.getMode(widthMeasureSpec);
    int measureHeightMode = MeasureSpec.getMode(heightMeasureSpec);

    int height = 0;
    int width = 0;
    int count = getChildCount();
    for (int i=0;i<count;i++) {

        View child = getChildAt(i);
        measureChild(child, widthMeasureSpec, heightMeasureSpec);

        MarginLayoutParams lp = (MarginLayoutParams) child.getLayoutParams();
        int childHeight = child.getMeasuredHeight()+lp.topMargin+lp.bottomMargin;
        int childWidth = child.getMeasuredWidth()+lp.leftMargin+lp.rightMargin;

        height += childHeight;
        width = Math.max(childWidth, width);
    }

    setMeasuredDimension((measureWidthMode == MeasureSpec.EXACTLY) ? measureWidth: width, (measureHeightMode == MeasureSpec.EXACTLY) ? measureHeight: height);
}
最关键的地方是改了这句:
MarginLayoutParams lp = (MarginLayoutParams) child.getLayoutParams();
int childHeight = child.getMeasuredHeight()+lp.topMargin+lp.bottomMargin;
int childWidth = child.getMeasuredWidth()+lp.leftMargin+lp.rightMargin; 通过child.getLayoutParams()获取child对应的LayoutParams实例,将其强转成MarginLayoutParams,
然后在计算childHeight时添加上顶部间距和底部间距,计算childWidth时添加上左边间距和右边间距。
也就是说,我们在计算宽度和高度时不仅考虑到子控件的本身的大小还要考虑到子控件间的间距问题。
重写onLayout()函数
同样,我们在布局时仍然将间距加到控件里就好了,完整代码如下:
@Override
protected void onLayout(boolean changed, int l, int t, int r, int b) {
    int top = 0;
    int count = getChildCount();
    for (int i=0;i<count;i++) {

        View child = getChildAt(i);

        MarginLayoutParams lp = (MarginLayoutParams) child.getLayoutParams();
        int childHeight = child.getMeasuredHeight()+lp.topMargin+lp.bottomMargin;
        int childWidth = child.getMeasuredWidth()+lp.leftMargin+lp.rightMargin;

        child.layout(0, top, childWidth, top + childHeight);
        top += childHeight;
    }
}
在这里,同样在布局子控件时,添加上了子控件间的间距,具体就不讲了,很容易理解,最终的效果图如下:
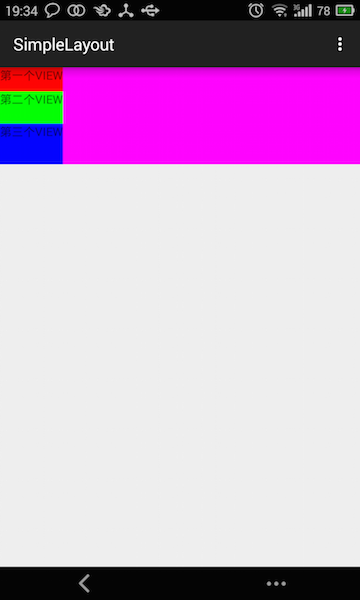
从效果图中可以明显的看到每个item都添加上间距了。
原理
上面我们看了要重写generateDefaultLayoutParams()函数才能获取控件的margin间距。那为什么要重写呢?下面这句为什么非要强转呢?
MarginLayoutParams lp = (MarginLayoutParams) child.getLayoutParams(); 下面我们来看看这么做的原因。
首先,Container在初始化子控件时,会调用LayoutParams的generateLayoutParams(LayoutParams p)来为子控件生成对应的布局属性,但默认只是生成layout_width和layout_height,所以对应的布局参数,即在正常情况下的generateLayoutParams()函数生成的LayoutParams实例是不能够取到margin值的。
/**
*从指定的XML中获取对应的layout_width和layout_height值
*/
public LayoutParams generateLayoutParams(AttributeSet attrs) {
    return new LayoutParams(getContext(), attrs);
}
/*
*如果要使用默认的构造方法,就生成layout_width="wrap_content"、layout_height="wrap_content"对应的参数
*/
protected LayoutParams generateDefaultLayoutParams() {
     return new LayoutParams(LayoutParams.WRAP_CONTENT, LayoutParams.WRAP_CONTENT);
} 所以,如果我们还需要margin相关的参数就只能重写generateLayoutParams()函数了:
public LayoutParams generateLayoutParams(AttributeSet attrs) {
    return new MarginLayoutParams(getContext(), attrs);
} 由于generateLayoutParams()的返回值是LayoutParams实例,而MarginLayoutParams是派生自LayoutParam的,所以根据类的多态特性,可以直接将此时的LayoutParams实例直接强转成MarginLayoutParams实例。所以下面这句在这里是不会报错的:
MarginLayoutParams lp = (MarginLayoutParams) child.getLayoutParams();大家也可以为了安全起见利用instance of来做下判断,如下:
MarginLayoutParams lp = null
if (child.getLayoutParams() instanceof  MarginLayoutParams) {
    lp = (MarginLayoutParams) child.getLayoutParams();
    …………
} 所以整体来讲,就是利用了类的多态特性!下面来看看MarginLayoutParams和generateLayoutParams()都做了什么。
MarginLayoutParams与generateLayoutParams()的实现
generateLayoutParams()实现
首先,我们看看generateLayoutPararms()都做了什么吧,它是怎么得到布局值的:
//位于ViewGrop.java中
public LayoutParams generateLayoutParams(AttributeSet attrs) {
    return new LayoutParams(getContext(), attrs);
}
public LayoutParams(Context c, AttributeSet attrs) {
    TypedArray a = c.obtainStyledAttributes(attrs, R.styleable.ViewGroup_Layout);
    setBaseAttributes(a,
            R.styleable.ViewGroup_Layout_layout_width,
            R.styleable.ViewGroup_Layout_layout_height);
    a.recycle();
}
protected void setBaseAttributes(TypedArray a, int widthAttr, int heightAttr) {
    width = a.getLayoutDimension(widthAttr, "layout_width");
    height = a.getLayoutDimension(heightAttr, "layout_height");
} 从上面的代码中明显可以看出,generateLayoutParams()调用LayoutParams()产生布局信息,而LayoutParams()最终调用setBaseAttributes(TypedArray, int, int)来获得对应的宽,高属性。
这里是通过TypedArray对自定义的XML进行值提取的过程,难度不大,不再细讲。从这里也可以看到,generateLayoutParams()生成的LayoutParams属性只有layout_width和layout_height的属性值。
MarginLayoutParams实现
下面再来看看MarginLayoutParams的具体实现,其实通过上面的过程,大家也应该想到,它也是通过TypeArray来解析自定义属性来获得用户的定义值的(大家看到长代码不要害怕,先列出完整代码,下面会分段讲):
public MarginLayoutParams(Context c, AttributeSet attrs) {
    super();

    TypedArray a = c.obtainStyledAttributes(attrs, R.styleable.ViewGroup_MarginLayout);
    int margin = a.getDimensionPixelSize(
            com.android.internal.R.styleable.ViewGroup_MarginLayout_layout_margin, -1);
    if (margin >= 0) {
        leftMargin = margin;
        topMargin = margin;
        rightMargin= margin;
        bottomMargin = margin;
    } else {
       leftMargin = a.getDimensionPixelSize(
               R.styleable.ViewGroup_MarginLayout_layout_marginLeft,
               UNDEFINED_MARGIN);
       rightMargin = a.getDimensionPixelSize(
               R.styleable.ViewGroup_MarginLayout_layout_marginRight,
               UNDEFINED_MARGIN);

       topMargin = a.getDimensionPixelSize(
               R.styleable.ViewGroup_MarginLayout_layout_marginTop,
               DEFAULT_MARGIN_RESOLVED);

       startMargin = a.getDimensionPixelSize(
               R.styleable.ViewGroup_MarginLayout_layout_marginStart,
               DEFAULT_MARGIN_RELATIVE);
       endMargin = a.getDimensionPixelSize(
               R.styleable.ViewGroup_MarginLayout_layout_marginEnd,
               DEFAULT_MARGIN_RELATIVE);
    }
    a.recycle();
}
这段代码分为两部分:
- 提取layout_margin的值并设置
TypedArray a = c.obtainStyledAttributes(attrs, R.styleable.ViewGroup_MarginLayout);
int margin = a.getDimensionPixelSize(
        com.android.internal.R.styleable.ViewGroup_MarginLayout_layout_margin, -1);
if (margin >= 0) {
    leftMargin = margin;
    topMargin = margin;
    rightMargin= margin;
    bottomMargin = margin;
} else {
  …………
} 在这段代码中就是通过提取layout_margin的值来设置上、下、左、右边距的。
- 如果用户没有设置layout_margin,而是单个设置的,那么就一个个提取,代码如下:
leftMargin = a.getDimensionPixelSize(
        R.styleable.ViewGroup_MarginLayout_layout_marginLeft,
        UNDEFINED_MARGIN);
rightMargin = a.getDimensionPixelSize(
        R.styleable.ViewGroup_MarginLayout_layout_marginRight,
        UNDEFINED_MARGIN);

topMargin = a.getDimensionPixelSize(
        R.styleable.ViewGroup_MarginLayout_layout_marginTop,
        DEFAULT_MARGIN_RESOLVED);

startMargin = a.getDimensionPixelSize(
        R.styleable.ViewGroup_MarginLayout_layout_marginStart,
        DEFAULT_MARGIN_RELATIVE);
endMargin = a.getDimensionPixelSize(
        R.styleable.ViewGroup_MarginLayout_layout_marginEnd,
DEFAULT_MARGIN_RELATIVE); 这里就是对layout_marginLeft、layout_marginRight、layout_marginTop、layout_marginBottom的值一个个提取的过程,难度不大,也没什么好讲的了。
从这里大家也可以看到,之所以非要重写generateLayoutParams()函数,是因为默认的generateLayoutParams()函数只会提取layout_width、layout_height的值,只有MarginLayoutParams才具有提取margin间距的功能!!!!
好啦,这篇就到这啦,下篇咱们就开始实现FlowLayout了。
原文链接:点击这里


 741
741

 被折叠的 条评论
为什么被折叠?
被折叠的 条评论
为什么被折叠?
 到【灌水乐园】发言


