


目录
4. 设置首页(index.html)的thymeleaf的渲染
7. 对象图导航语言(OGNL) th:text="${list[1].obj.name}"
8. 分支 (th:if、th:switch | th:case)
10. 代码片段 th:fragment th:insert
一、MVC概念
MVC全名是Model View Controller,是模型(model)-视图(view)-控制器(controller)的缩写
- Model(模型)表示应用程序核心(用来存储数据供视图层渲染)。
- View(视图)显示数据,而本篇使用的就是Thymeleaf作为视图。
- Controller(控制器)处理输入请求,将模型和视图分离。
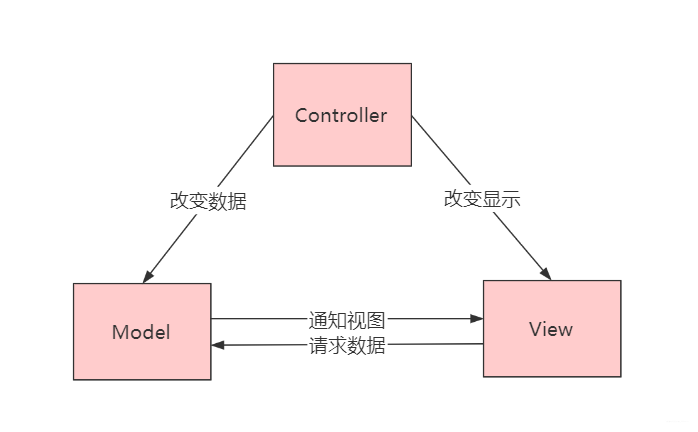
务必理解:三层架构。Thymeleaf 在表述层内,对视图层进行封装。目的是为了让各个组件可以单独维护,解耦合,动态的向网页传递数据。

二、Thymeleaf
Thymeleaf 3 ten-minute migration guide - Thymeleaf

作用:它的主要作用是在静态页面上渲染显示动态数据,简化视图层(MVC)操作。
1. HelloThymeleaf、逻辑视图
逻辑视图:
视图前缀 + 逻辑视图 + 视图后缀 ==> 物理视图
1、导入Jar包,建立依赖关系
2、创建视图基础类 (笔记复制即可)
重点关注前缀后缀设置,后期会使用框架替代该类。
//视图基础类 继承了HttpServlet, 本质还是一个Servlet
public class ViewBaseServlet extends HttpServlet {

    private TemplateEngine templateEngine;

    @Override//在初始化中 读取全局上下文参数
    public void init() throws ServletException {

        // 1.获取ServletContext对象
        ServletContext servletContext = this.getServletContext();

        // 2.创建Thymeleaf解析器对象
        ServletContextTemplateResolver templateResolver = new ServletContextTemplateResolver(servletContext);

        // 3.给解析器对象设置参数
        // ①HTML是默认模式,明确设置是为了代码更容易理解
        templateResolver.setTemplateMode(TemplateMode.HTML);

        // ②设置前缀 (重要)
        String viewPrefix = servletContext.getInitParameter("view-prefix");

        templateResolver.setPrefix(viewPrefix);

        // ③设置后缀 (重要)
        String viewSuffix = servletContext.getInitParameter("view-suffix");

        templateResolver.setSuffix(viewSuffix);

        // ④设置缓存过期时间(毫秒)
        templateResolver.setCacheTTLMs(60000L);

        // ⑤设置是否缓存
        templateResolver.setCacheable(true);

        // ⑥设置服务器端编码方式
        templateResolver.setCharacterEncoding("utf-8");

        // 4.创建模板引擎对象
        templateEngine = new TemplateEngine();

        // 5.给模板引擎对象设置模板解析器
        templateEngine.setTemplateResolver(templateResolver);

    }

    /**
     * 进行视图解析(渲染)的方法
     * @param templateName 逻辑视图
     * @param req 请求
     * @param resp 响应
     * @throws IOException
     */
    protected void processTemplate(String templateName, HttpServletRequest req, HttpServletResponse resp) throws IOException {
        // 1.设置响应体内容类型和字符集
        resp.setContentType("text/html;charset=UTF-8");

        // 2.创建WebContext对象
        WebContext webContext = new WebContext(req, resp, getServletContext());

        // 3.处理模板数据
        templateEngine.process(templateName, webContext, resp.getWriter());
    }
}
3、web.xml中通过全局初始化参数 ,配置视图前缀后缀
    <!--配置视图前缀、后缀-->
    <context-param>    <!--视图前缀-->
        <param-name>view-prefix</param-name> <!--name需要与ViewBaseServlet内保持一致-->
        <param-value>/pages/</param-value>
    </context-param>
    <context-param>     <!--视图后缀-->
        <param-name>view-suffix</param-name>
        <param-value>.html</param-value>
    </context-param>
4、创建HelloServlet 继承视图基础类,调用processTemplate()方法跳转访问的页面。
processTemplate("逻辑视图",请求对象,响应对象);
底层为请求转发 (连接不会发生改变,可以访问WEB-INF) getRequestDispatcher("路径").forward()
public class Thy01HelloServlet extends ViewBaseServlet {
    @Override
    protected void doGet(HttpServletRequest request, HttpServletResponse response) throws ServletException, IOException {
        System.out.println("------ Thy01HelloServlet ------");
        //1.解决乱码
        request.setCharacterEncoding("utf-8");
        //调用业务层方法...

        //请求域传递参数,修改msg所渲染的值
        request.setAttribute("msg","一行白鹭上青天");

        //2.processTemplate("逻辑视图",请求对象,响应对象),底层是请求转发
        processTemplate("hello",request,response);
}5、在对应的页面中 html 标签内引入命名空间,使用 thymeaf 将动态数据渲染到静态页面上。
hello.html
<!DOCTYPE html>
<!--1、html标签内加入 Thymeleaf 名称空间的声明-->
<html lang="en" xmlns:th="http://www.thymeleaf.org">
<head>
    <meta charset="UTF-8">
    <title>hello</title>
</head>
<body>
<h1>Hello</h1>

<!--2、在页面中使用 thymeaf 将动态数据渲染到静态页面上-->
<h1 th:text="${msg}">等待渲染</h1>  <br>

</body>
index首页
<body>
<a href="thy01">HelloThymeleaf</a> <br>
</body>

注:1.如果此处500报错,前缀 后缀没有问题,就是逻辑视图问题,请检查web.xml配置文件与视 图基础类对象中的参数名是否匹配,前后缀与processTemplate()传入的参数是否正确。
2.如果出现其他未知问题,可能是Toncat、Jar包、jdk版本兼容性问题。
2. th表达式基本语法 th:?="? {?}"
1、th名称空间:
- 不经过服务器解析,直接用浏览器打开HTML文件,看到的是『标签体原始值』
- 经过服务器解析, Thymeleaf引擎根据th:text属性指定的 标签体新值 去替换 标签体原始值

2、修改标签文本值:th:text="${key}"
<p th:text="${msg}">等待渲染</p>3、修改标签属性值:th:属性名="${key}"
<input type="text" th:value="${value}">4、解析url
4.1. 动态获取应用名:@{/}:
<span th:text="@{/}">应用名(上下文路径)</span>4.2. 附加参数发起请求:th:href= "${/资源名(参数名=参数值,.....)}"
<a th:href="@{/thy03(uname='张三',pwd='123456',hobby='swim',hobby='read')}">4.3. 携带动态数据作为参数发起请求: th:href="${/资源名(参数名=${key},.....)}"
<a th:href="@{/thy03(uname='张三',pwd='123456',message=${msg})}">3. 在Thymeleaf中操作域对象
在Servlet中将数据存储到域对象中,在Thymeleaf 前端页面中取出域对象中的数据并展示。
processTemplate 底层是请求转发。(连接不会发生改变,可以访问WEB-INF)
Servlet  (继承了视图基础类)
//请求域传递参数,修改msg所渲染的值
request.setAttribute("msg","一行白鹭上青天");

//processTemplate("逻辑视图",请求对象,响应对象),底层是请求转发
processTemplate("hello",request,response);
hello.html
<!--在页面中使用 thymeaf 将动态数据渲染到静态页面上-->
<h1 th:text="${msg}">等待渲染</h1> <br>域对象在Thymeleaf中的使用
域对象是在服务器中有一定作用域范围的对象,在这个范围内的所有动态资源都能够共享域对象中保存的数据。
① 请求域
在请求转发的场景下,我们可以借助HttpServletRequest对象内部给我们提供的存储空间,帮助我们携带数据,把数据发送给转发的目标资源 (request.setAttribute("msg","一行白鹭上青天"))。
② 会话域(后面学)
会话域的范围是一次会话

③ 应用域(后面学)
可用于统计在线人数
4. 设置首页(index.html)的thymeleaf的渲染
访问首页时,需要展示项目数据,而数据一般是存在于数据库的。因此在访问前要先执行Servlet 获取数据,再将数据渲染到首页上。
<servlet>
    <servlet-name>IndexServlet</servlet-name>
    <servlet-class>com.atguigu.servlet.IndexServlet</servlet-class>
</servlet>
<servlet-mapping>
    <servlet-name>IndexServlet</servlet-name>
    服务器启动会自动加载 当前项目下index.html 然后直接访问 IndexServlet
    <url-pattern>/index.html</url-pattern>
</servlet-mapping>
5. 获取请求参数 ${param.参数名}
根据参数名 获取对应参数值 (ker -> value)
getParameter.thml
<!--获取请求参数-->
<!--获取从Index传来的参数-->
<p><span>获取请求参数1</span> <span th:text="${param.uname}"></span></p>
<p><span>获取请求参数2</span> <span th:text="${param.pwd}"></span></p>

<!--获取当前名字的所有参数,-->
<p><span>获取请求参数3</span> <span th:text="${param.hobby}"></span></p>

<!--获取当前名字参数的第[0]位,-->
<p><span>获取请求参数4</span> <span th:text="${param.hobby[0]}"></span></p>

url:
http://localhost:8080/day09Thymeleaf/thy05?uname=zs&pwd=123&hobby=swim&hobby=read&hobby=run
index.html
<!--转发并传入参数,发送到hty05,再跳转到getParameter-->
<a th:href="@{/thy05(uname='zs',pwd=123,hobby='swim',hobby='read',hobby='run')}">访问Thy05</a> <br>public class Thy05ParameterServlet extends ViewBaseServlet {
@Override
protected void doGet(HttpServletRequest request, HttpServletResponse response) throws ServletException, IOException {
System.out.println("------ Thy05 ------");
//注意此处,hello02为逻辑视图, 视图前缀 + 逻辑视图 + 视图后缀 ==> 物理视图
// 转发到getParameter.thml
processTemplate("getParameter", request, response);
}6. 内置对象 th:?="${#?.?}"
内置对象:在Thymeleaf的表达式中可以直接使用的对象
基本内置对象:
<!--当前地区-->
<p><span>内置对象1:</span> <span th:text="${#locale.country}"></span></p>
<!--获取请求域数据1-->
<p><span>内置对象2:</span> <span th:text="${msg}"></span></p>
<!--获取请求域数据2-->
<p><span>内置对象3:</span> <span th:text="${#request.getAttribute('msg')}"></span></p>
<!--获取上下文对象1-->
<p><span>内置对象3:</span> <span th:text="${#request.getServletContext()}"></span></p>
<!--获取上下文对象2-->
<p><span>内置对象4:</span> <span th:text="${#servletContext}"></span></p>
 <!--获取上下文路径(应用名)-->
<p><span>内置对象3:</span> <span th:text="${#request.getContextPath()}"></span></p>
<!-- request等同于HttpServletRequest ,它有什么方法就可以用什么方法-->
公共内置对象:
request:<span th:text="${#request.getAttribute('msg')}"></span>
lists: <span th:text="${#lists.size(list1)}"></span>
strings:<span th:text="${#strings.indexOf(msg,'e')}"></span>
<p><span>公共的内置对象list1 </span> <span th:text="${#lists.isEmpty(list1)}"></span></p>
<p><span>公共的内置对象list2 </span> <span th:text="${#lists.isEmpty(list2)}"></span></p>  <!--可以调用List方法-->
<p><span>公共的内置对象list2 </span> <span th:text="${#lists.size(list1)}"></span></p>
<p><span>公共的内置对象string </span> <span th:text="${#strings.indexOf(msg,'黄')}"></span></p> <!--同理-->
7. 对象图导航语言(OGNL) th:text="${list[1].obj.name}"
OGNL:Object-Graph Navigation Language对象-图 导航语言
从根对象触发,通过特定的语法,逐层访问对象的各种属性。 快速访问对象属性值。
底层调用了对象的 get()方法
${对象名.属性名}
${listkey[下标].属性名}
${map.key.属性名}
${map[map集合的key].属性名}
<body>
    <h1>简单对象</h1>
    <p><span>获取对象的属性值:</span> <span th:text="${p.name}"></span></p>
    <p><span>获取对象的属性值:</span> <span th:text="${p.sex}"></span></p>
    <p><span>获取对象的属性值:</span> <span th:text="${p.a}"></span></p>
    <hr>
    <h1>复杂对象</h1>
    <p>复杂对象 <span th:text="${p2}"></span></p>
    <p>复杂对象 <span th:text="${p2.name}"></span></p>
    <p>复杂对象 <span th:text="${p2.computer}"></span></p>
    <p>复杂对象 <span th:text="${p2.computer.cname}"></span></p>

    <hr>
    <h1>集合对象</h1>
    <p>集合对象 <span th:text="${list}"></span></p>
    <p>集合对象 <span th:text="${list[0]}"></span></p>
    <p>集合对象 <span th:text="${list[1].name}"></span></p>
    <p>集合对象 <span th:text="${list[1].computer}"></span></p>
    <p>集合对象 <span th:text="${list[1].computer.cprice}"></span></p>

    <p>集合对象?? <span th:text="${list[0]}"></span></p>

    <hr>
    <h1>Map</h1>
    <p>Map <span th:text="${map}"></span></p>
    <p>Map <span th:text="${map.p1}"></span></p>
    <p>Map <span th:text="${map['p-2']}"></span></p>


    <!--如果key是特殊字符则需要使用 中括号包裹-->
    <p>Map <span th:text="${map['p-2'].sex}"></span></p>
    <p>Map <span th:text="${map.p-2}"></span></p>

</body>
public class Thy06ObjectServlet extends ViewBaseServlet {
@Override
protected void doGet(HttpServletRequest request, HttpServletResponse response) throws ServletException, IOException {
System.out.println("------ Thy06Object ------");
//1.解决乱码
request.setCharacterEncoding("utf-8");
response.setContentType("text/html;charset=utf-8");
//创建Person 对象
Person p1 = new Person("李白", 20, "男");
request.setAttribute("p", p1);
//复杂对象
Computer c1 = new Computer("联想", 6666.6, "黑色");
Person p2 = new Person("安琪拉", 20, "女", c1);
request.setAttribute("p2", p2);
//复杂对象2 List
ArrayList<Person> list = new ArrayList<>();
Computer c3 = new Computer("华硕", 9999.9, "金色");
Person p3 = new Person("伊娃", 200, "女", c3);
list.add(p2);
list.add(p3);
request.setAttribute("list", list);
//复杂对象3 Map
Map<String,Person> map = new HashMap<>();
Computer c4 = new Computer("华硕", 9999.9, "金色");
Person p4 = new Person("妲己", 300, "女", c3);
map.put("p1", p3);//"伊娃",
map.put("p-2", p4);//"妲己",
request.setAttribute("map", map);
processTemplate("object",request,response);
}8. 分支 (th:if、th:switch | th:case)
① if 和 unless 、not
if配合not关键词和unless配合原表达式效果是一样的,看自己的喜好。
<body>
<!-- if true可进 -->
<div th:if="${#lists.isEmpty(list1)}">
    无数据 th:if
</div>
<!-- unless false可进 -->
<div th:unless="${#lists.isEmpty(list1)}">
    有数据 th:unless
</div>
<!-- not 对后续结果取反 -->
<div th:if="${not #lists.isEmpty(list1)}">
    有数据 th:if="${not
</div>

<span th:if="${1==2}">th:if="${1==2}"</span> <br>   <!--不显示-->
<span th:if="${1!=2}">th:if="${1!=2}"</span> <br>   <!--显示-->
<span th:if="${not(1==2)}">th:if="${not 1==2}"</span> <br>  <!--显示-->
<span th:unless="${1==2}">th:unless="${1==2}"</span> <br>   <!--显示-->
② switch
<div th:switch="${list1[0].cname}">
    <span th:case="联想">联想666</span>
    <span th:case="华硕">华硕666</span>
    <span th:case="宏碁">宏碁666</span>
</div>
9. 迭代 th:each="e : ${ list }"
<tr th:each="e :${list1}"> e:集合中的元素
<tr th:each="e,status :${list1}"> status:在进行遍历时的状态信息
<h3>list集合遍历</h3>
<table width="400px" border="1">
    <tr>
        <td>品牌</td>
        <td>价格</td>
        <td>颜色</td>
    </tr>
    <tr th:each="e : ${list1}">   <!--each迭代-->
        <td th:text="${e.cname}"></td>
        <td th:text="${e.cprice}"></td>
        <td th:text="${e.color}"></td>
    </tr>
</table>
<h3>迭代状态 status</h3>
<table width="1000px" border="1">
    <tr>
        <td>品牌</td>
        <td>价格</td>
        <td>颜色</td>
        <td>下标</td>
        <td>第几个元素</td>
        <td>总数量</td>
        <td>当前元素</td>
        <td>奇数</td>
        <td>偶数</td>
        <td>是不是第一个</td>
        <td>是不是最后一个</td>
    </tr>
    <tr th:each="e,status : ${list1}">   <!--each迭代,status状态-->
        <td th:text="${e.cname}"></td>
        <td th:text="${e.cprice}"></td>
        <td th:text="${e.color}"></td>
        <td th:text="${status.index}"></td>
        <td th:text="${status.count}"></td>
        <td th:text="${status.current}"></td>
        <td th:text="${status.size}"></td>
        <td th:text="${status.odd}"></td>
        <td th:text="${status.even}"></td>
        <td th:text="${status.first}"></td>
        <td th:text="${status.last}"></td>
    </tr>
</table>

10. 代码片段 th:fragment th:insert
th:fragment="片段名" th:insert="逻辑视图::片段名"
作用:抽取各个页面的公共部分,解耦合。
例如:![]()
① 创建页面的公共代码片段
使用th:fragment来给这个片段命名:
<div th:fragment="header">
    <p>被抽取出来的头部内容</p>
</div>
② 在需要的页面中进行包含
| 语法 | 效果 | 特点 |
|---|---|---|
| th:insert | 把目标的代码片段整个插入到当前标签内部 | 它会保留页面自身的标签 |
| th:replace | 用目标的代码替换当前标签 | 它不会保留页面自身的标签 |
| th:include | 把目标的代码片段去除最外层标签,然后再插入到当前标签内部(只替换内容) | 它会去掉片段外层标记,同时保留页面自身标记 |
代码:
创建页面的公共代码片段
<div th:fragment="header1" id="baseDiv1">
    <p>头部样式1</p>
</div>

<div th:fragment="header2" id="baseDiv2">
    <p>头部样式2</p>
</div>
使用: th:操作="代码片段的逻辑视图::代码片段的名字"
使用公共代码片段
<div th:include="temp/BaseHtml::header1" id="div1">
    <p>标题头</p>
</div>
11. 在Vue中使用 Thymeleaf
"data":{
"key" :"[ [ ${thymeleaf} ] ]"
}
    "el":"#content",
    "data":{
      //服务器端渲染 vue 渲染  vue 覆盖 服务器端渲染的值
      "errorMsg": "[[${msg==null?'请输入用户名密码':msg}]]", //数据回显,获取请求域内异常信息
      "username": "[[${param.uname}]]",   //注册失败获取页面参数: 之前填入的数据
      "password": "[[${param.upwd}]]"
    },


 1010
1010


 被折叠的 条评论
为什么被折叠?
被折叠的 条评论
为什么被折叠?
 到【灌水乐园】发言


