


uniapp:使用DCloud的uni-push推送消息通知(在线模式)java实现
1.背景
今天开发app的时候遇到一个需求:
业务在出发特定条件的时候向对应的客户端推送消息通知。
为什么选择在线模式,因为我们使用的是德邦类似的手持终端,如果是在线模式需要配置厂商信息,OPPO或者小米,华为那些,额。
2.实现途径
我这里的技术栈
前端:前端uniapp
后端:java
查阅了晚上很多的文档使用的是uniapp自带的uni-push
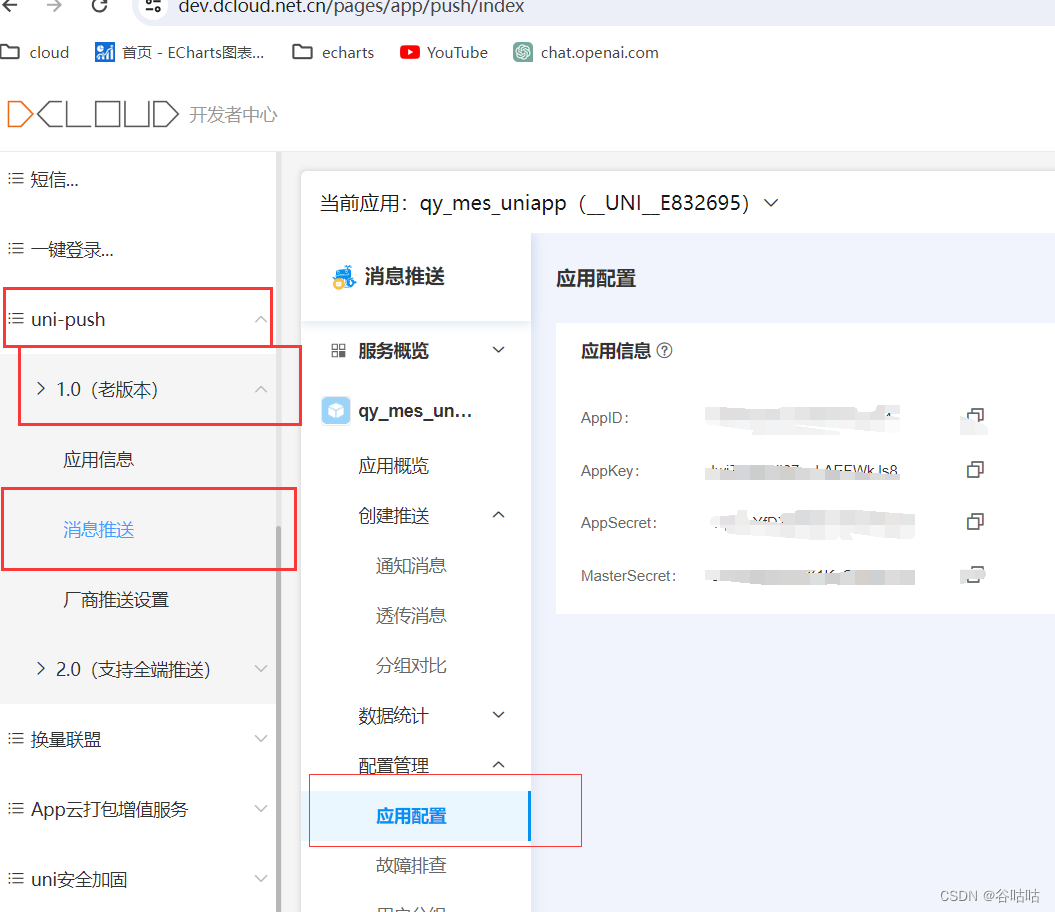
这里我使用的是下面截图的1.0老版本的。
额!其实全程不需要登录个推的官网创建应用。
因为:其实uniapp的push调用的就是个推的接口。所以我们在代码用到的所以的appid和appKey,masterSecret还有appid在uniapp的DCloud中就可以获得。
3.代码实现(后端java)
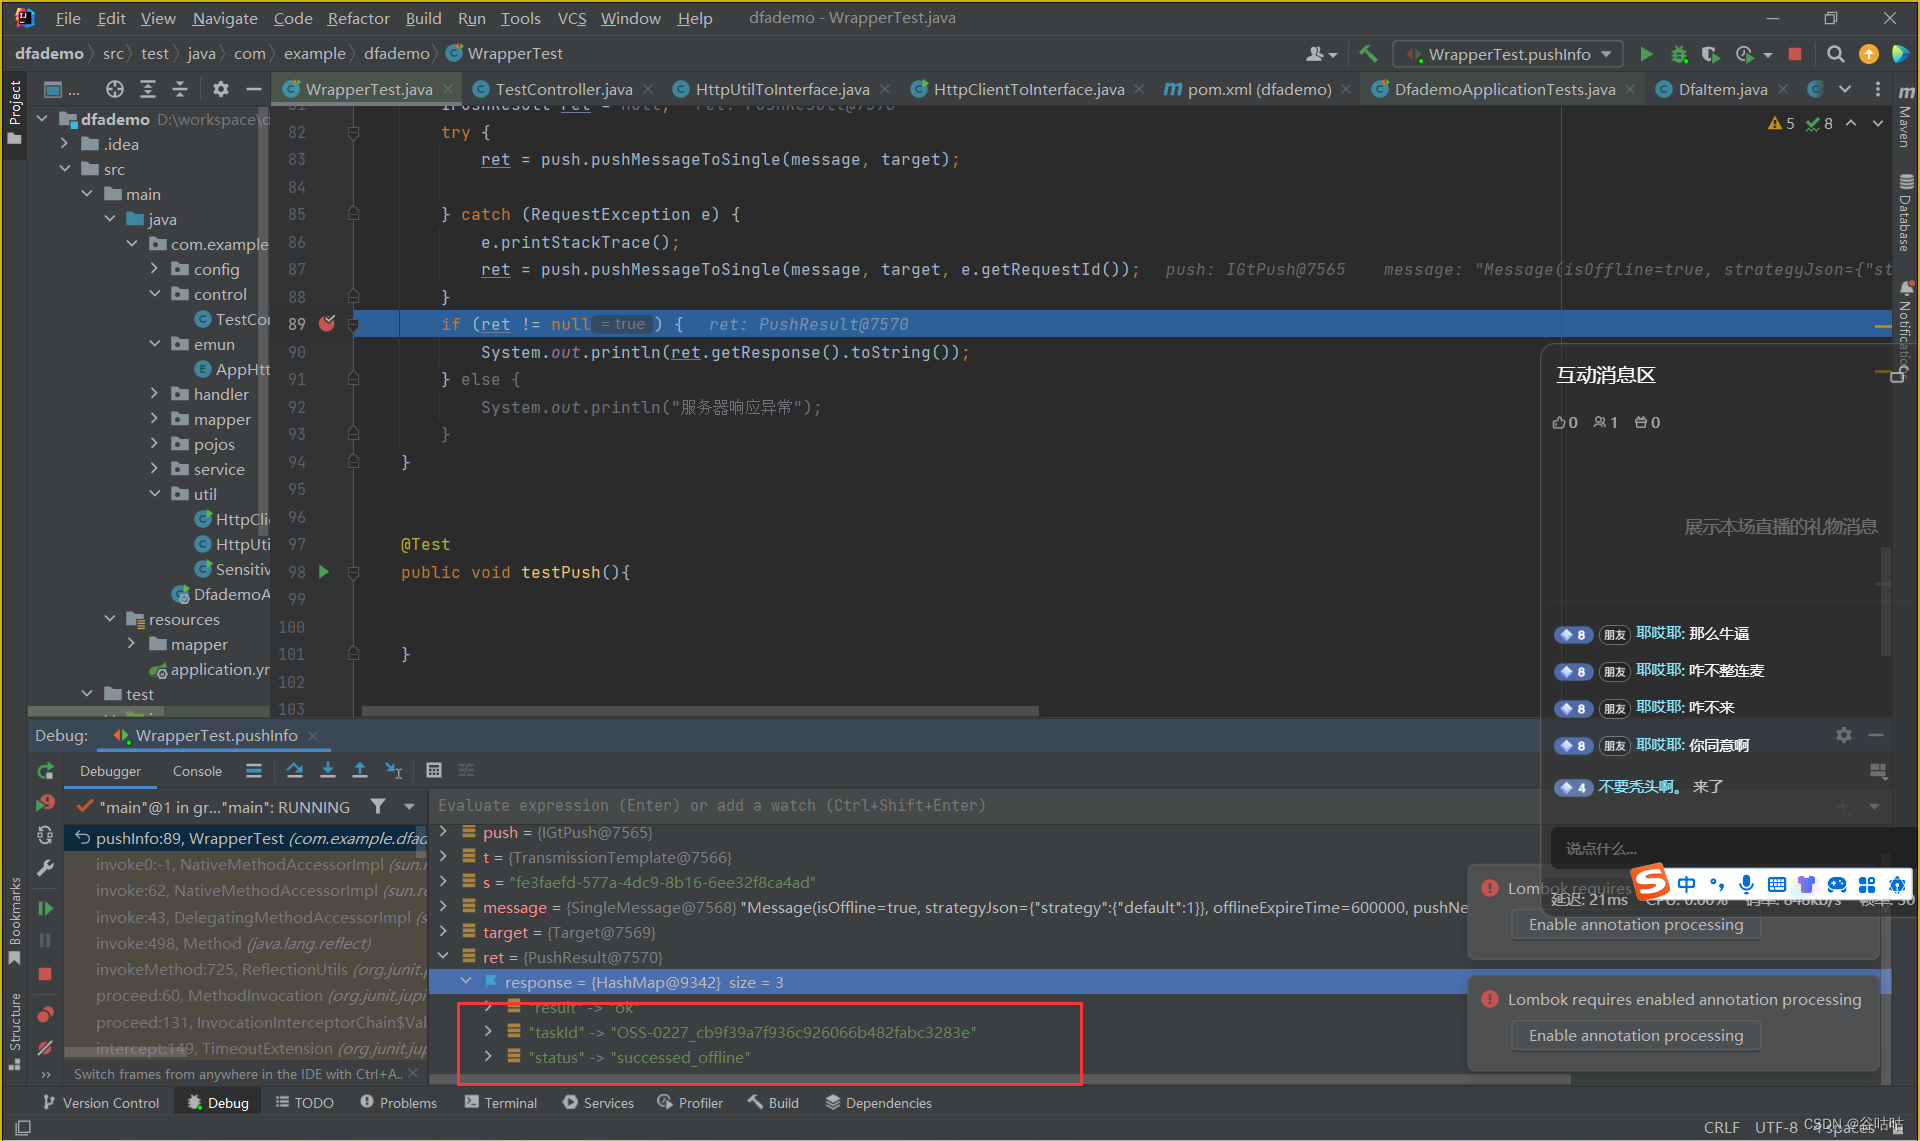
这里谷咕咕写了一个junit测试类,这里的代码是可以直接复制粘贴就可以用的
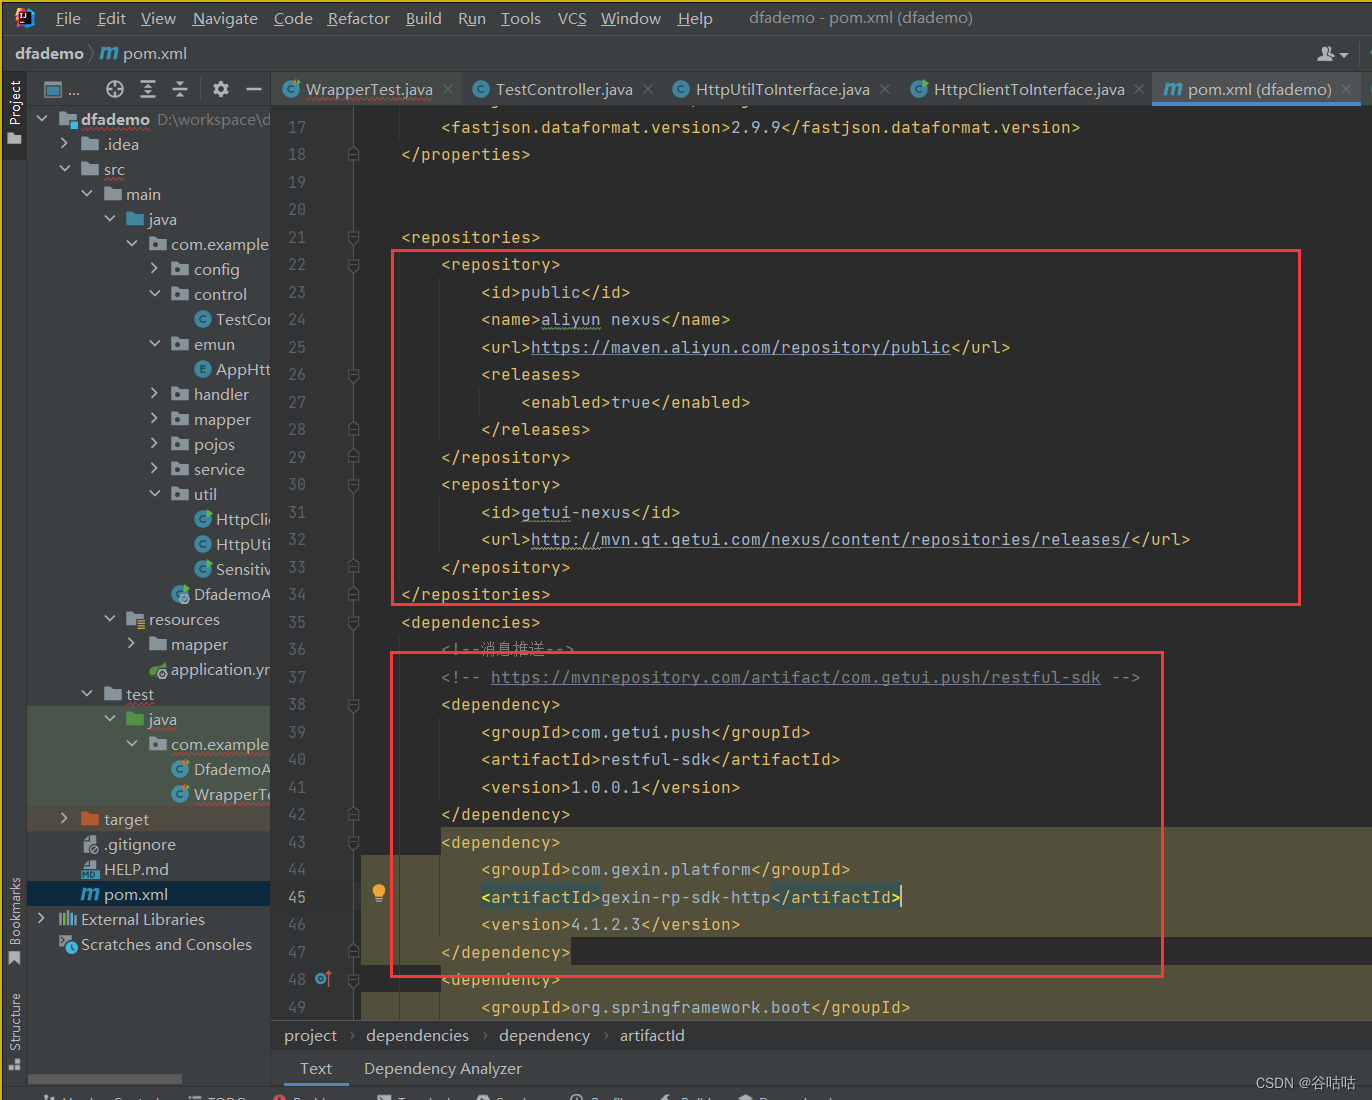
当然在此之前要导入个推的相关依赖。
有些依赖会下载失败,所以要导入一个资源地址
注意的是:https不然会报错,额也有可能只是我报错了
这里所有的信息填完之后,你会发现少一个setClientId()
这个其实就是用户安装完app后的一个标识,唯一标识当前用户app(获取看下面的前端代码)
<repositories>
        <repository>
            <id>public</id>
            <name>aliyun nexus</name>
            <url>https://maven.aliyun.com/repository/public</url>
            <releases>
                <enabled>true</enabled>
            </releases>
        </repository>
        <repository>
            <id>getui-nexus</id>
            <url>http://mvn.gt.getui.com/nexus/content/repositories/releases/</url>
        </repository>
    </repositories>


<!--消息推送-->
        <!-- https://mvnrepository.com/artifact/com.getui.push/restful-sdk -->
       <dependencies>
        <dependency>
            <groupId>com.getui.push</groupId>
            <artifactId>restful-sdk</artifactId>
            <version>1.0.0.1</version>
        </dependency>
        <dependency>
            <groupId>com.gexin.platform</groupId>
            <artifactId>gexin-rp-sdk-http</artifactId>
            <version>4.1.2.3</version>
        </dependency>
       </dependencies>
/**
     * 测试uniapp 发送在线消息通知
     */
    @Test
    public void pushInfo(){
        // host     appKey   masterSecret
        IGtPush push  = new IGtPush("https://sdk.open.api.igexin.com/apiex.htm","appKey", "masterSecret");
        TransmissionTemplate t = new TransmissionTemplate();
        t.setAppId("appId");
        t.setAppkey("appKey");

        String s = UUID.randomUUID().toString();
        //推送格式
        t.setTransmissionContent("{title:\"通知标题\",content:\"您有一条新通知,点击查看\",payload:\""+s+"\"}");

        //1:强制应用启动 2:等待应用启动
        t.setTransmissionType(1);
        SingleMessage message = new SingleMessage();
        // 把透传消息设置到消息模板中
        message.setData(t);
        // 设置优先级
        message.setPriority(1);
        // 是否进行离线发送
        message.setOffline(true);
        // 离线有效时间,单位为毫秒
        message.setOfflineExpireTime(1000 * 600);
        // 可选,1为wifi,0为不限制网络环境。根据手机处于的网络情况,决定是否下发
        message.setPushNetWorkType(0);
        //按照用户的cid推送
        Target target = new Target();
        target.setAppId("appId");
        target.setClientId("f00a7f3a9a11b5b7ab71e32a696a7370");      // 在此填写设备cid
        IPushResult ret = null;
        try {
            ret = push.pushMessageToSingle(message, target);

        } catch (RequestException e) {
            e.printStackTrace();
            ret = push.pushMessageToSingle(message, target, e.getRequestId());
        }
        if (ret != null) {
            System.out.println(ret.getResponse().toString());
        } else {
            System.out.println("服务器响应异常");
        }
    }
4.代码实现(前端)
前端app.vue
这个文件就是用于在onLaunch生命周期函数中接受到到消息通知的推送。
其中一段代码就是解决获得cid的用户唯一标识的
这里谷咕咕只是为了直接拿到用了弹窗,大家开发的时候可以首次打开app的时候可以存储到数据库中
setTimeout(function(){
	var pinf = plus.push.getClientInfo();
	console.log(pinf +'============')
	var cid = pinf && pinf.clientid || '';
	console.log(cid +'============')
	setTimeout(() => {
		uni.showModal({
			title: '发现cid ' + cid,
			content: '请到App store进行升级',
			showCancel: false
		})
	}, 5000);
},2000)
上面这段代码为什么用延时setTimeout?因为有可能plus没有加载出来,那样拿到的cid就是null
其他的就是监听个推的addEventListener
完整代码:
<script>
	import {
		URLPaBu
	} from './store/mutation-types';

	function requestToJavaBackend() {
		uni.request({
			url: 'http://' + URLPaBu + '/app/getNewestVersion', // 替换成你的后端 Java 服务的API地址
			method: 'GET', // 或 'POST',根据你的需求选择请求方法
			success: (res) => {
				if (true) {
					var pinf = plus.push.getClientInfo();
					var cid = pinf && pinf.clientid || '';
					setTimeout(() => {
						uni.showModal({
							title: '发现cid ' + cid,
							content: '请到App store进行升级',
							showCancel: false
						})
					}, 1000);
				}
			},
			fail: (err) => {
				uni.showModal({
					title: '版本校验错误',
					content: '版本校验错误,联系管理员',
					showCancel: false
				})
				// 在这里处理请求失败后的逻辑
			},
		});
	}
	export default {
		onLaunch() {
			uni.onPushMessage((res) => {
						console.log("收到推送消息:",res) //监听推送消息
					})
			setTimeout(function(){
							var pinf = plus.push.getClientInfo();
							console.log(pinf +'============')
							var cid = pinf && pinf.clientid || '';
							console.log(cid +'============')
							setTimeout(() => {
								uni.showModal({
									title: '发现cid ' + cid,
									content: '请到App store进行升级',
									showCancel: false
								})
							}, 5000);
						},2000)
			// 加载系统信息
			this.$store.dispatch('SystemInfo');
			// 在应用启动时执行一次任务
			// 每隔一段时间执行一次任务
			// requestToJavaBackend()
			// setInterval(() => {
			// 	requestToJavaBackend()
			// }, 5000); // 30秒
			let timer = false;
			plus.push.addEventListener("click", (msg) => {
				console.log("+-------------------+++");
				clearTimeout(timer);
				timer = setTimeout(() => {
					console.log(1111, msg);
					if (msg.payload) {
						uni.navigateTo({
							url: msg.payload
						})
					}
				}, 1500)
			}, false)
			plus.push.addEventListener("receive", (msg) => {
				console.log("++++++++++++++++++++++++");
				console.log(msg);
				if ("LocalMSG" == msg.payload) {} else {
					if (msg.type == 'receive') {
						var options = {
							cover: false,
							title: msg.title
						};
						plus.push.createMessage(msg.content, msg.payload, options);
					}
				}
			}, false)
		},

		onShow() {
		},
		onHide() {},
		methods: {

		},

	}
</script>

<style lang="scss">
	@import "@/uni_modules/uview-ui/index.scss";
	@import "@/static/style.scss";
</style>
整体的代码就是这样,我们跑一下junit代码就这么实现了
5.HBuilder配置
需要在mainfest中打开push的配置
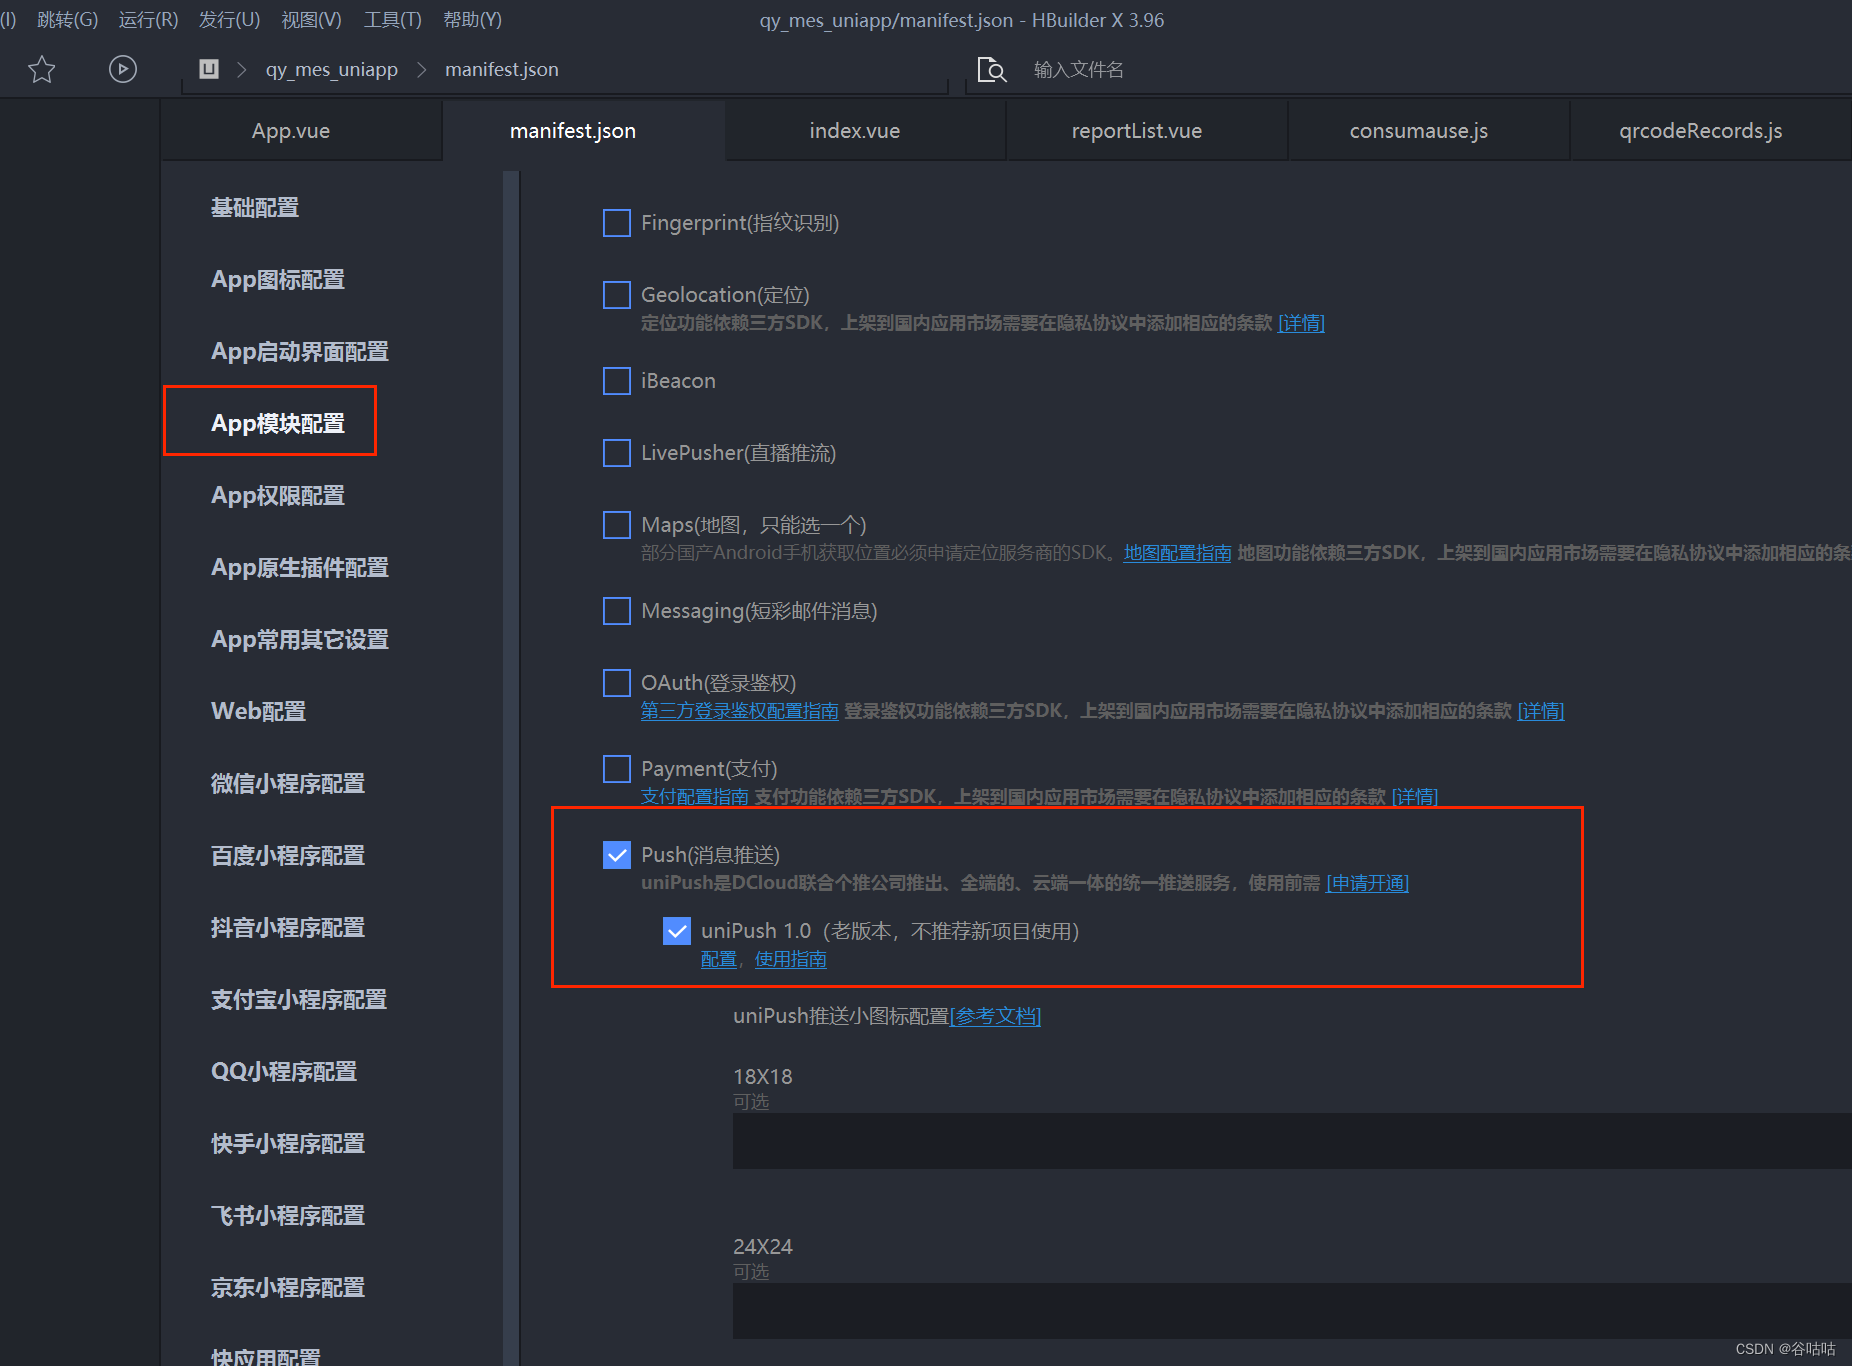
然后按照指示的步骤开通,注意app包名的对应
6.注意:需要注意的是
1.java代码中的链接需要https
2.使用的是DCloud中的app信息
3.还有就是必须打包成apk后在手机上安装后才能获取cid,在hbuilder中在基座上运行你会发现也可以获取cid,但是那个cid用了之后会特使AppError


 1957
1957


 被折叠的 条评论
为什么被折叠?
被折叠的 条评论
为什么被折叠?
 到【灌水乐园】发言


