


上一篇文章我们已经介绍了Spring是如何将包路径下的类信息都扫描封装到BeanFactory中了,所以接下来我们着重看一下spring是如何通过BeanFactory创建Bean的实例。

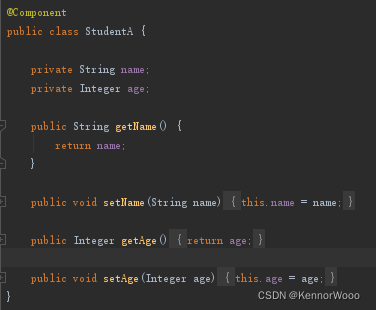
以我们示例代码中的StudentA为例,看看他的实例化过程是如何的
@Override
public void preInstantiateSingletons() throws BeansException {
// Iterate over a copy to allow for init methods which in turn register new bean definitions.
// While this may not be part of the regular factory bootstrap, it does otherwise work fine.
// 获取注册到BeanFactory的BeanName
List<String> beanNames = new ArrayList<>(this.beanDefinitionNames);
// Trigger initialization of all non-lazy singleton beans...
for (String beanName : beanNames) {
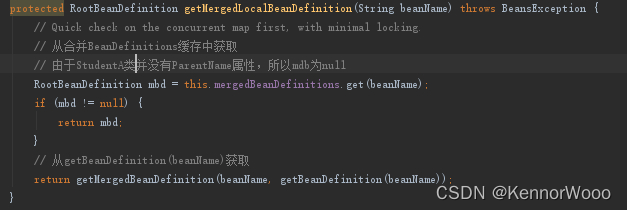
// 如果当前类有设置ParentName属性时合并BeanDefinition,
RootBeanDefinition bd = getMergedLocalBeanDefinition(beanName);
if (!bd.isAbstract() && bd.isSingleton() && !bd.isLazyInit()) {
// 注释1. 判断是否实现了FactoryBean接口
if (isFactoryBean(beanName)) {
// String FACTORY_BEAN_PREFIX = "&";
// 获取FactoryBean真正的实例需要在beanName前拼接&字符
Object bean = getBean(FACTORY_BEAN_PREFIX + beanName);
if (bean instanceof FactoryBean) {
FactoryBean<?> factory = (FactoryBean<?>) bean;
boolean isEagerInit;
if (System.getSecurityManager() != null && factory instanceof SmartFactoryBean) {
isEagerInit = AccessController.doPrivileged(
(PrivilegedAction<Boolean>) ((SmartFactoryBean<?>) factory)::isEagerInit,
getAccessControlContext());
}
else {
isEagerInit = (factory instanceof SmartFactoryBean &&
((SmartFactoryBean<?>) factory).isEagerInit());
}
if (isEagerInit) {
getBean(beanName);
}
}
}
else {
// 注释2. 大部分Bean走此方法
getBean(beanName);
}
}
}
// Trigger post-initialization callback for all applicable beans...
// 注释3.如果类实现了SmartInitializingSingleton接口,则在实例化完成后调用afterSingletonsInstantiated方法。
for (String beanName : beanNames) {
Object singletonInstance = getSingleton(beanName);
if (singletonInstance instanceof SmartInitializingSingleton) {
SmartInitializingSingleton smartSingleton = (SmartInitializingSingleton) singletonInstance;
if (System.getSecurityManager() != null) {
AccessController.doPrivileged((PrivilegedAction<Object>) () -> {
smartSingleton.afterSingletonsInstantiated();
return null;
}, getAccessControlContext());
}
else {
smartSingleton.afterSingletonsInstantiated();
}
}
}
}
首先我们看一下注释3,这里Spring提供了一个SmartInitializingSingleton接口为我们在Bean实例完成后做一些自定义处理。
注释1是针对实现了FactoryBean的类的实例化处理,这个我们后续再说明。
这里着重看一下注释2的getBean(beanName)方法,因为正常项目里绝大部分类都是走此方法实例化。

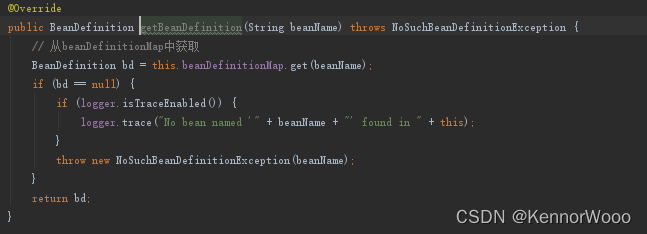
可以看到getBean方法会继续调用到doGetBean方法。
这里我们要记住doGetBean方法是spring创建实例对象的入口,此方法最终会返回实例化完成的对象。
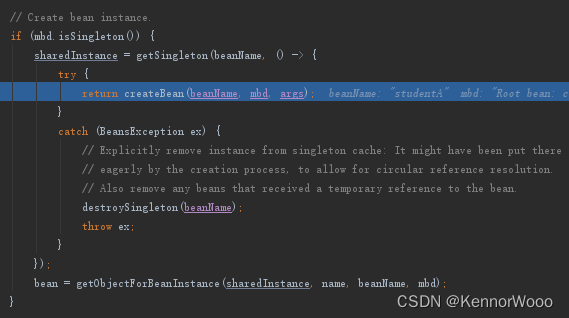
protected <T> T doGetBean(
      String name, @Nullable Class<T> requiredType, @Nullable Object[] args, boolean typeCheckOnly)
      throws BeansException {

   String beanName = transformedBeanName(name);
   Object bean;

   // Eagerly check singleton cache for manually registered singletons.
   // 注释1 从缓存中获取实例对象
   Object sharedInstance = getSingleton(beanName);
   if (sharedInstance != null && args == null) {
      bean = getObjectForBeanInstance(sharedInstance, name, beanName, null);
   }

   else {
         // 注释2 获取BeanDefinition对象
         RootBeanDefinition mbd = getMergedLocalBeanDefinition(beanName);
         checkMergedBeanDefinition(mbd, beanName, args);
        ... ...
         // Create bean instance.
         if (mbd.isSingleton()) {
            sharedInstance = getSingleton(beanName, () -> {
               try {
                  // 注释3:创建实例
                  return createBean(beanName, mbd, args);
               }
               ... ...
            });
            bean = getObjectForBeanInstance(sharedInstance, name, beanName, mbd);
         }

         else if (mbd.isPrototype()) {
            // It's a prototype -> create a new instance.
            Object prototypeInstance = null;
            try {
               beforePrototypeCreation(beanName);
               prototypeInstance = createBean(beanName, mbd, args);
            }
            finally {
               afterPrototypeCreation(beanName);
            }
            bean = getObjectForBeanInstance(prototypeInstance, name, beanName, mbd);
         }

         else {
            String scopeName = mbd.getScope();
            if (!StringUtils.hasLength(scopeName)) {
               throw new IllegalStateException("No scope name defined for bean ´" + beanName + "'");
            }
            Scope scope = this.scopes.get(scopeName);
            if (scope == null) {
               throw new IllegalStateException("No Scope registered for scope name '" + scopeName + "'");
            }
            try {
               Object scopedInstance = scope.get(beanName, () -> {
                  beforePrototypeCreation(beanName);
                  try {
                     return createBean(beanName, mbd, args);
                  }
                  finally {
                     afterPrototypeCreation(beanName);
                  }
               });
               bean = getObjectForBeanInstance(scopedInstance, name, beanName, mbd);
            }
         }
      }
   }
   ... ...
   return (T) bean;
}
首先注释1 Object sharedInstance = getSingleton(beanName)从缓存中获取实例对象,具体代码如下:
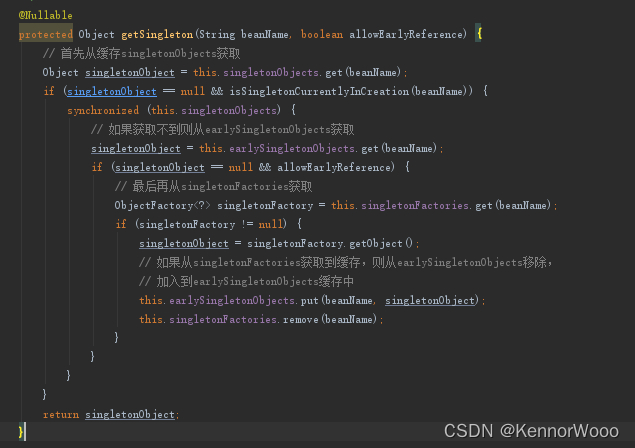
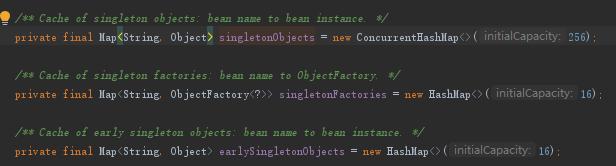
这里我们先记住缓存有三个集合,分别为singletonObjects、earlySingletonObjects和singletonFactories。
缓存优先级为一级缓存singletonObjects,二级缓存earlySingletonObjects,三级缓存singletonFactories。
如果没有获取到缓存,则先从注释2处获取我们之前已经扫描注册到BeanFactory里的BeanDefinition,在上一篇文章中我们找到所有的BeanDefinition都会保存在BeanFactory的beanDefinitionMap中,所以注释2的方法最终会从beanDefinitionMap获取,具体源码如下:
获取到BeanDefinition后继续走到注释3创建实例 createBean(beanName, mbd, args),由于我们现在是在ApplicationContext初始化阶段,此时缓存中并没有相应的实例,所以会走到注释3这里。
 sharedInstance = getSingleton(beanName, () -> {
               try {
                  // 注释3:创建实例
                  return createBean(beanName, mbd, args);
               }
               ... ...
            });
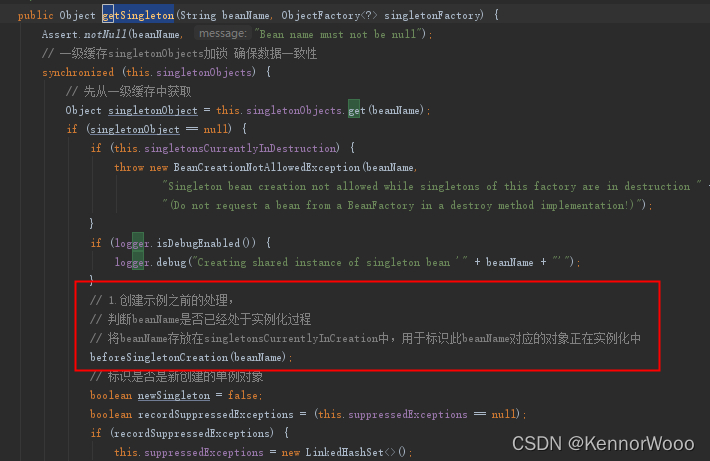
getSingleton的具体代码如下:
public Object getSingleton(String beanName, ObjectFactory<?> singletonFactory) {
   Assert.notNull(beanName, "Bean name must not be null");
   // 一级缓存singletonObjects加锁 确保数据一致性
   synchronized (this.singletonObjects) {
      // 先从一级缓存中获取
      Object singletonObject = this.singletonObjects.get(beanName);
      if (singletonObject == null) {
          ... ...
         // 1.创建示例之前的处理,
         // 通过singletonsCurrentlyInCreation是否有beanName判断beanName是否已经处于实例化过程
         // 如果没有则将beanName存放在singletonsCurrentlyInCreation中,用于标识此beanName对应的对象正在实例化中
         beforeSingletonCreation(beanName);
         // 标识是否是新创建的单例对象
         boolean newSingleton = false;
         boolean recordSuppressedExceptions = (this.suppressedExceptions == null);
         if (recordSuppressedExceptions) {
            this.suppressedExceptions = new LinkedHashSet<>();
         }
         try {
            // 2.调用createBean方法
            singletonObject = singletonFactory.getObject()
            // 标识为新创建的单例对象
            newSingleton = true;
         }
         ... ...
         finally {
            if (recordSuppressedExceptions) {
               this.suppressedExceptions = null;
            }
            // 3.创建示例完成后的处理,将beanName从singletonsCurrentlyInCreation中移除
            afterSingletonCreation(beanName);
         }
         if (newSingleton) {
            // 4.将实例化对象加入缓存
            addSingleton(beanName, singletonObject);
         }
      }
      return singletonObject;
   }
}
这里可以先看一下注释第1点和注释第3点看看实例化开始之前和结束之后的具体处理代码

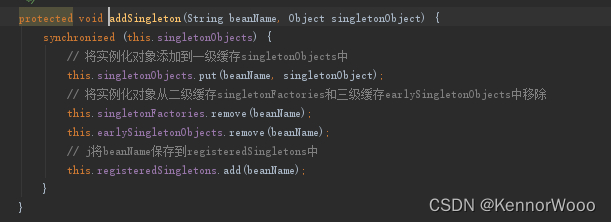
接着我们看到注释第4点,看看addSingleton的具体代码
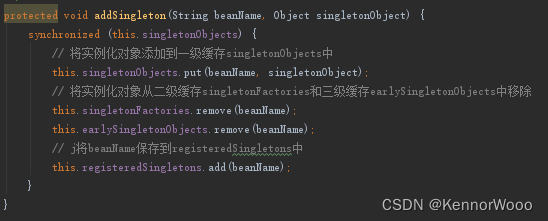
从上面的代码中可以看到,一个对象在实例化完成后只会缓存在一级缓存中。
接着我们看回注释第2点

这里会返回到上一层方法中调用到createBean方法
sharedInstance = getSingleton(beanName, () -> {
               try {
                  // 注释3:创建实例
                  return createBean(beanName, mbd, args);
               }
               ... ...
            });
所以我们接下来看一下注释3 createBean方法
@Override
protected Object createBean(String beanName, RootBeanDefinition mbd, @Nullable Object[] args)
      throws BeanCreationException {
   ... ...
   RootBeanDefinition mbdToUse = mbd;
   ... ...
   try {
      // 创建实例
      Object beanInstance = doCreateBean(beanName, mbdToUse, args);
      if (logger.isTraceEnabled()) {
         logger.trace("Finished creating instance of bean '" + beanName + "'");
      }
      return beanInstance;
   }
   ... ...
}
接着我们看一下doCreateBean方法
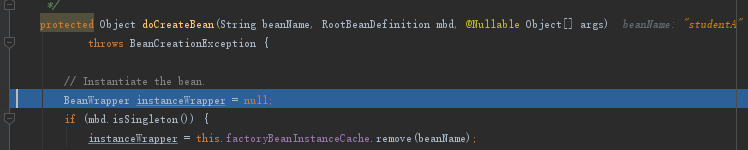
protected Object doCreateBean(String beanName, RootBeanDefinition mbd, @Nullable Object[] args)
throws BeanCreationException {
// Instantiate the bean.
BeanWrapper instanceWrapper = null;
if (mbd.isSingleton()) {
instanceWrapper = this.factoryBeanInstanceCache.remove(beanName);
}
if (instanceWrapper == null) {
// 1.创建实例
instanceWrapper = createBeanInstance(beanName, mbd, args);
}
Object bean = instanceWrapper.getWrappedInstance();
Class<?> beanType = instanceWrapper.getWrappedClass();
if (beanType != NullBean.class) {
mbd.resolvedTargetType = beanType;
}
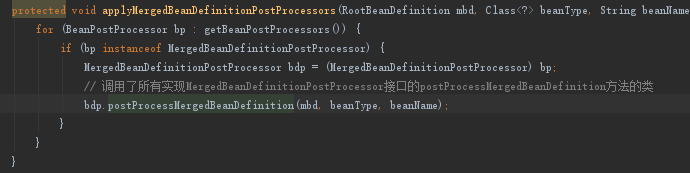
// Allow post-processors to modify the merged bean definition.
// 2.调用实现了BeanPostProcessor接口类的postProcessMergedBeanDefinition方法,
// 例如AutowiredAnnotationBeanPostProcessor和CommonAnnotationBeanPostProcessor
// 用于处理封装 @Autowired,@Value,@PostConstruct,@PreDestroy,@Resource注解
synchronized (mbd.postProcessingLock) {
if (!mbd.postProcessed) {
try {
applyMergedBeanDefinitionPostProcessors(mbd, beanType, beanName);
}
catch (Throwable ex) {
throw new BeanCreationException(mbd.getResourceDescription(), beanName,
"Post-processing of merged bean definition failed", ex);
}
mbd.postProcessed = true;
}
}
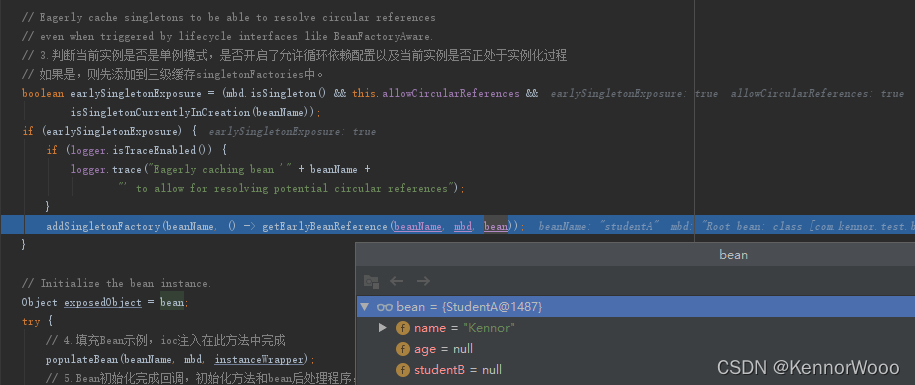
// Eagerly cache singletons to be able to resolve circular references
// even when triggered by lifecycle interfaces like BeanFactoryAware.
// 3.判断当前实例是否是单例模式,是否开启了允许循环依赖配置以及当前实例是否正处于实例化过程
// 如果是,则先添加到三级缓存singletonFactories中。
boolean earlySingletonExposure = (mbd.isSingleton() && this.allowCircularReferences &&
isSingletonCurrentlyInCreation(beanName));
if (earlySingletonExposure) {
if (logger.isTraceEnabled()) {
logger.trace("Eagerly caching bean '" + beanName +
"' to allow for resolving potential circular references");
}
addSingletonFactory(beanName, () -> getEarlyBeanReference(beanName, mbd, bean));
}
// Initialize the bean instance.
Object exposedObject = bean;
try {
// 4.填充Bean示例,ioc注入在此方法中完成
populateBean(beanName, mbd, instanceWrapper);
// 5.Bean初始化完成回调,初始化方法和bean后处理程序,如生成代理对象等。
exposedObject = initializeBean(beanName, exposedObject, mbd);
}
catch (Throwable ex) {
if (ex instanceof BeanCreationException && beanName.equals(((BeanCreationException) ex).getBeanName())) {
throw (BeanCreationException) ex;
}
else {
throw new BeanCreationException(
mbd.getResourceDescription(), beanName, "Initialization of bean failed", ex);
}
}
... ...
return exposedObject;
}
可以看到doCreateBean是个核心方法,做了很多操作,我们先看注释第1点创建示例的方法createBeanInstance
protected BeanWrapper createBeanInstance(String beanName, RootBeanDefinition mbd, @Nullable Object[] args) {
   // Make sure bean class is actually resolved at this point.
   // 获取class对象
   Class<?> beanClass = resolveBeanClass(mbd, beanName);
   ... ...
   // Candidate constructors for autowiring?
   // 判断是否有@AutoWrite的构造方法
   Constructor<?>[] ctors = determineConstructorsFromBeanPostProcessors(beanClass, beanName);
   if (ctors != null || mbd.getResolvedAutowireMode() == AUTOWIRE_CONSTRUCTOR ||
         mbd.hasConstructorArgumentValues() || !ObjectUtils.isEmpty(args)) {
      return autowireConstructor(beanName, mbd, ctors, args);
   }

   // Preferred constructors for default construction?
   // 判断是否有默认构造方法
   ctors = mbd.getPreferredConstructors();
   if (ctors != null) {
      return autowireConstructor(beanName, mbd, ctors, null);
   }

   // No special handling: simply use no-arg constructor.
   // 使用无参构造方法进行实例化
   return instantiateBean(beanName, mbd);
}
由于我们示例代码StudentA没有编写构造方法,所以最后会调用无参构造方法进行实例化,所以我们接着看instantiateBean

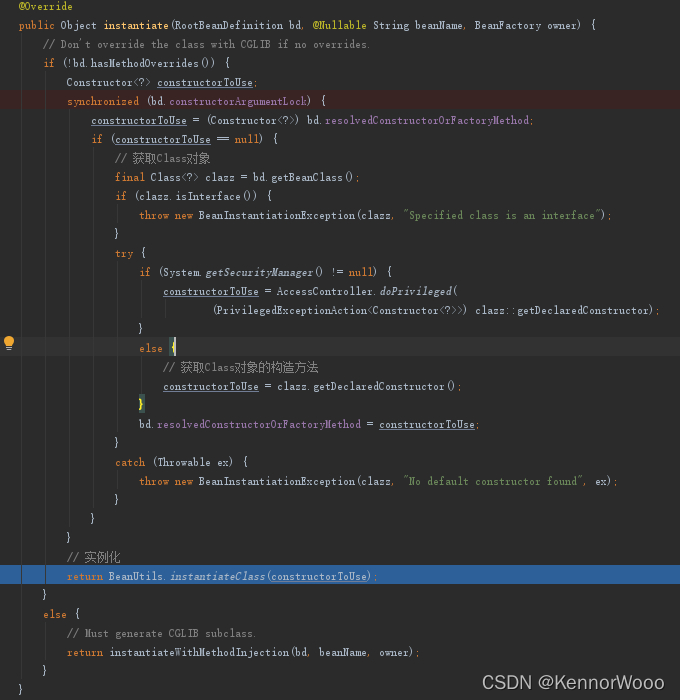
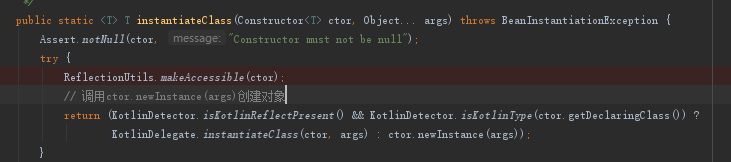
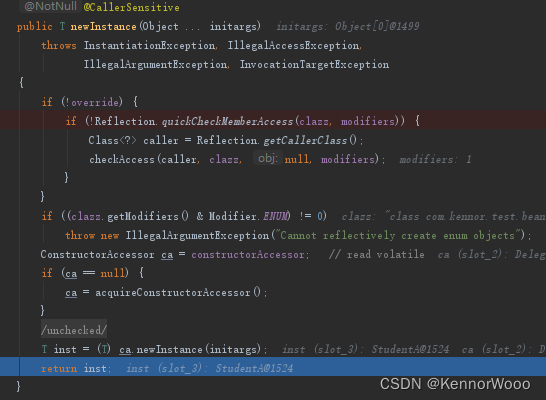
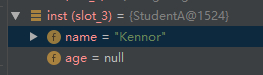
这里我们就完成了StudentA的实例化,接着我们返回到doCreateBean方法中。
因为StudentA此时没有设置其他功能注解,所以doCreateBean最后就直接返回出去了,继续执行getSingleton方法后续的代码。
最后实例化完成的单例对象都会保存到一级缓存singletonObjects中。
接着我们看一下@AutoWried注入的流程
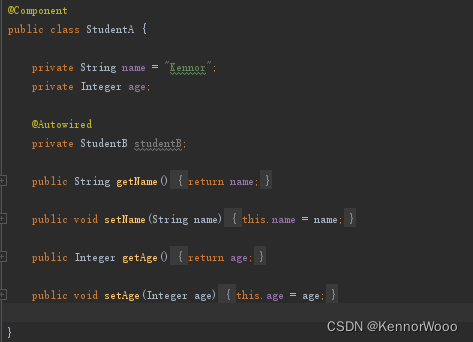
首先调整一下我们的StudentA的代码,在StudentA中注入StudentB,代码如下:
我们现在直接看到doCreateBean方法中的第2点注释
// Allow post-processors to modify the merged bean definition.
// 2.调用实现了BeanPostProcessor接口类的postProcessMergedBeanDefinition方法,
// 例如AutowiredAnnotationBeanPostProcessor和CommonAnnotationBeanPostProcessor
// 用于处理封装 @Autowired,@Value,@PostConstruct,@PreDestroy,@Resource注解信息
synchronized (mbd.postProcessingLock) {
   if (!mbd.postProcessed) {
      try {
         applyMergedBeanDefinitionPostProcessors(mbd, beanType, beanName);
      }
      catch (Throwable ex) {
         throw new BeanCreationException(mbd.getResourceDescription(), beanName,
               "Post-processing of merged bean definition failed", ex);
      }
      mbd.postProcessed = true;
   }
}
这里调用了applyMergedBeanDefinitionPostProcessors方法,我们看一下底层具体的代码
在上一篇文章中在ApplicationContext构造方法中我们已经知道创建添加了AutowiredAnnotationBeanPostProcessor类用于处理@AutoWrited注解,所以我们直接看一下AutowiredAnnotationBeanPostProcessor的postProcessMergedBeanDefinition方法。

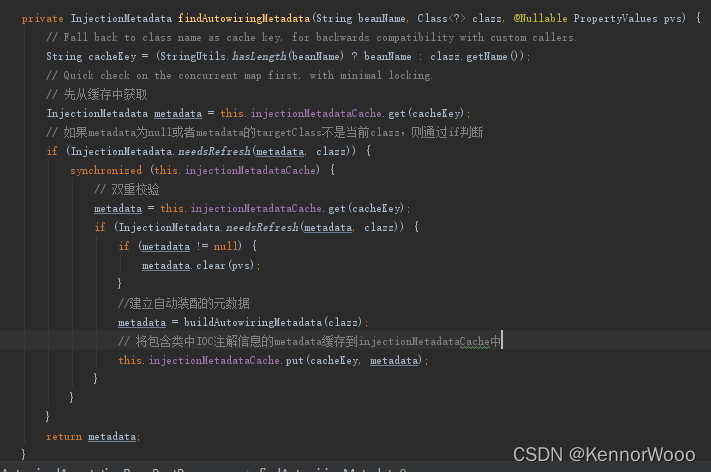
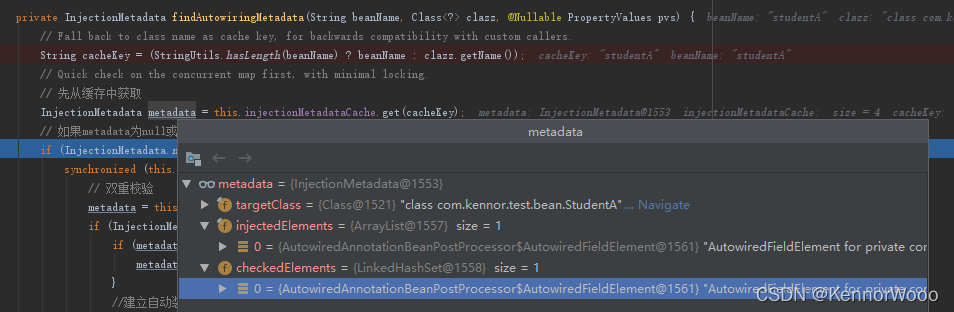
可以看到解析出来的数据最后会缓存到injectionMetadataCache中。
接着我们看一下buildAutowiringMetadata方法。
private InjectionMetadata buildAutowiringMetadata(final Class<?> clazz) {
   List<InjectionMetadata.InjectedElement> elements = new ArrayList<>();
   Class<?> targetClass = clazz;

   do {
      final List<InjectionMetadata.InjectedElement> currElements = new ArrayList<>();
      // 处理类的所有属性
      ReflectionUtils.doWithLocalFields(targetClass, field -> {
         // 1.查找有注入注解的属性
         AnnotationAttributes ann = findAutowiredAnnotation(field);
         if (ann != null) {
            if (Modifier.isStatic(field.getModifiers())) {
               if (logger.isInfoEnabled()) {
                  logger.info("Autowired annotation is not supported on static fields: " + field);
               }
               return;
            }
            // required默认为true 如果找不到注解属性对应的Bean时会直接报错
            boolean required = determineRequiredStatus(ann);
            currElements.add(new AutowiredFieldElement(field, required));
         }
      });
      // 处理类的所有方法
      ReflectionUtils.doWithLocalMethods(targetClass, method -> {
         //  查找有注入注解的方法
         Method bridgedMethod = BridgeMethodResolver.findBridgedMethod(method);
         if (!BridgeMethodResolver.isVisibilityBridgeMethodPair(method, bridgedMethod)) {
            return;
         }
         AnnotationAttributes ann = findAutowiredAnnotation(bridgedMethod);
         if (ann != null && method.equals(ClassUtils.getMostSpecificMethod(method, clazz))) {
            if (Modifier.isStatic(method.getModifiers())) {
               if (logger.isInfoEnabled()) {
                  logger.info("Autowired annotation is not supported on static methods: " + method);
               }
               return;
            }
            if (method.getParameterCount() == 0) {
               if (logger.isInfoEnabled()) {
                  logger.info("Autowired annotation should only be used on methods with parameters: " +
                        method);
               }
            }
            boolean required = determineRequiredStatus(ann);
            PropertyDescriptor pd = BeanUtils.findPropertyForMethod(bridgedMethod, clazz);
            currElements.add(new AutowiredMethodElement(method, required, pd));
         }
      });

      elements.addAll(0, currElements);
      targetClass = targetClass.getSuperclass();
   }
   while (targetClass != null && targetClass != Object.class);

   return new InjectionMetadata(clazz, elements);
}
可以看到buildAutowiringMetadata主要用户查找类中的IOC注解的属性和方法,然后将这些属性和方法相应封装到AutowiredFieldElement和AutowiredMethodElement后再进一步封装到InjectionMetadata中,因此InjectionMetadata封装了clazz类完整的IOC注解的信息。
接着我们重点看一下注释第1点 AnnotationAttributes ann = findAutowiredAnnotation(field);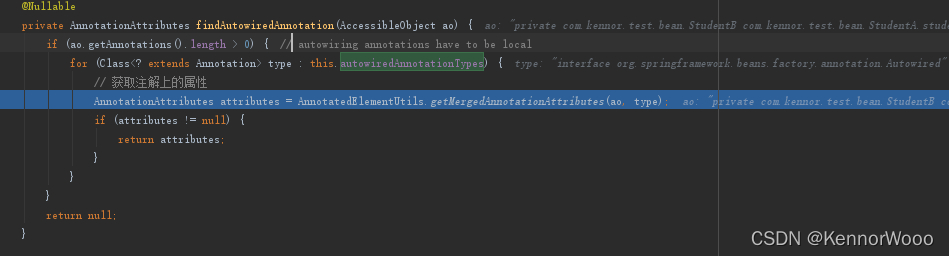
可以看到如果当前的属性如果有包含了autowiredAnnotationTypes中的注解,则会返回AnnotationAttributes。
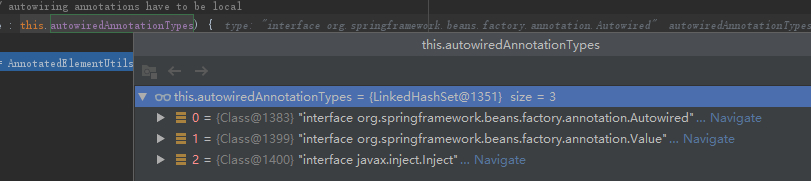
而autowiredAnnotationTypes中就有包含我们的目标注解@Autowired
这样就把StudentA上的@AutoWired注解已经对应是StudentB属性解析封装后缓存了起来。
接着我返回doCreateBean方法继续往下走,此时走到注释第3点
// Eagerly cache singletons to be able to resolve circular references
// even when triggered by lifecycle interfaces like BeanFactoryAware.
// 3.判断当前实例是否是单例模式,是否开启了允许循环依赖配置以及当前实例是否正处于实例化过程
// 如果是,则先添加到三级缓存singletonFactories中。
boolean earlySingletonExposure = (mbd.isSingleton() && this.allowCircularReferences &&
      isSingletonCurrentlyInCreation(beanName));
if (earlySingletonExposure) {
   if (logger.isTraceEnabled()) {
      logger.trace("Eagerly caching bean '" + beanName +
            "' to allow for resolving potential circular references");
   }
   addSingletonFactory(beanName, () -> getEarlyBeanReference(beanName, mbd, bean));
}
可以看到Bean未完全实例化之前就已经将当前实例的Factory添加添加到三级缓存singletonFactories中。
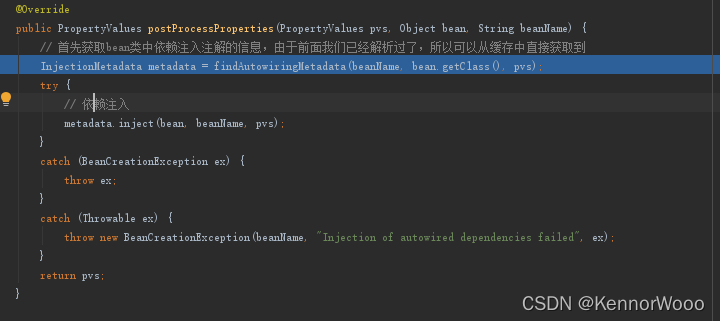
接着我们继续看到doCreateBean方法中的注释第4点,这里要记住@Autowried的依赖注入的实例化就是在populateBean方法中完成的。
Object exposedObject = bean;
try {
   // 4.填充Bean示例,ioc注入在此方法中完成
   populateBean(beanName, mbd, instanceWrapper);
   // 5.Bean初始化完成回调,初始化方法和bean后处理程序,如生成代理对象等。
   exposedObject = initializeBean(beanName, exposedObject, mbd);
}
@SuppressWarnings("deprecation")  // for postProcessPropertyValues
protected void populateBean(String beanName, RootBeanDefinition mbd, @Nullable BeanWrapper bw) {
   ... ...
   // Give any InstantiationAwareBeanPostProcessors the opportunity to modify the
   // state of the bean before properties are set. This can be used, for example,
   // to support styles of field injection.
   // 1. Spring在此方法一开始就提供InstantiationAwareBeanPostProcessor接口让开发者能够控制Bean是否支持依赖注入
   // 如果postProcessAfterInstantiation方法返回false,则方法直接返回
   if (!mbd.isSynthetic() && hasInstantiationAwareBeanPostProcessors()) {
      for (BeanPostProcessor bp : getBeanPostProcessors()) {
         if (bp instanceof InstantiationAwareBeanPostProcessor) {
            InstantiationAwareBeanPostProcessor ibp = (InstantiationAwareBeanPostProcessor) bp;
            if (!ibp.postProcessAfterInstantiation(bw.getWrappedInstance(), beanName)) {
               return;
            }
         }
      }
   }
   ... ...
   PropertyDescriptor[] filteredPds = null;
   if (hasInstAwareBpps) {
      if (pvs == null) {
         pvs = mbd.getPropertyValues();
      }
      // AutowiredAnnotationBeanPostProcessor将在这里处理@AutoWrited注解的属性或方法
      for (BeanPostProcessor bp : getBeanPostProcessors()) {
         if (bp instanceof InstantiationAwareBeanPostProcessor) {
            InstantiationAwareBeanPostProcessor ibp = (InstantiationAwareBeanPostProcessor) bp;
            // 2.依赖注入
            PropertyValues pvsToUse = ibp.postProcessProperties(pvs, bw.getWrappedInstance(), beanName);
            if (pvsToUse == null) {
               if (filteredPds == null) {
                  filteredPds = filterPropertyDescriptorsForDependencyCheck(bw, mbd.allowCaching);
               }
               pvsToUse = ibp.postProcessPropertyValues(pvs, filteredPds, bw.getWrappedInstance(), beanName);
               if (pvsToUse == null) {
                  return;
               }
            }
            pvs = pvsToUse;
         }
      }
   }
   ... ...
   if (pvs != null) {
      // 处理老版本xml配置中的property属性标签
      applyPropertyValues(beanName, mbd, bw, pvs);
   }
}
首先我们看到注释第1点,这里Spring让我们能够去控制Bean是否使用依赖注入功能。
举个简单的例子,我们修改StudentB的代码如下,为其name设置默认属性
接着我们从Spring容器中获取StudentA实例然后打印StudentB的名称
正常情况下StudentB能够成功注入到StudentA中,打印结果如下:
接着我们自定义一个类去继承InstantiationAwareBeanPostProcessor接口,然后控制StudentA无法使用依赖注入功能,如下
这样Student将无法正常获取到StudentB的实例,会报空指针错误

注释掉控制StudentA无法使用依赖注入功能的代码,接着返回populateBean方法我们继续看注释第二点
// AutowiredAnnotationBeanPostProcessor将在这里处理@AutoWrited注解的属性或方法
for (BeanPostProcessor bp : getBeanPostProcessors()) {
   if (bp instanceof InstantiationAwareBeanPostProcessor) {
      InstantiationAwareBeanPostProcessor ibp = (InstantiationAwareBeanPostProcessor) bp;
      // 2.依赖注入
      PropertyValues pvsToUse = ibp.postProcessProperties(pvs, bw.getWrappedInstance(), beanName);
      if (pvsToUse == null) {
         if (filteredPds == null) {
            filteredPds = filterPropertyDescriptorsForDependencyCheck(bw, mbd.allowCaching);
         }
         pvsToUse = ibp.postProcessPropertyValues(pvs, filteredPds, bw.getWrappedInstance(), beanName);
         if (pvsToUse == null) {
            return;
         }
      }
      pvs = pvsToUse;
   }
}
获取到InjectionMetadata后继续往下走metadata.inject(bean, beanName, pvs);
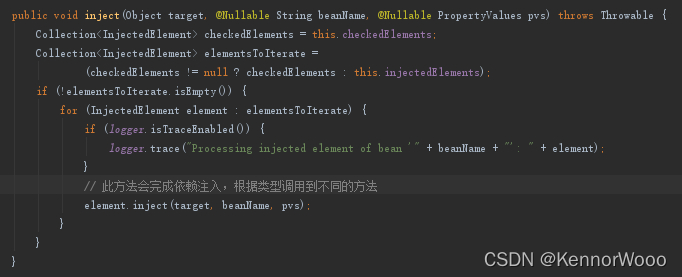

我们示例代码会调用到AutowiredFieldElement的inject方法
@Override
   protected void inject(Object bean, @Nullable String beanName, @Nullable PropertyValues pvs) throws Throwable {
      Field field = (Field) this.member;
      Object value;
      if (this.cached) {
         // 从缓存中获取
         value = resolvedCachedArgument(beanName, this.cachedFieldValue);
      }
      else {
         // 通过属性和required构造DependencyDescriptor对象
         // DependencyDescriptor包装Class、构造函数参数、方法参数或字段等信息。
         DependencyDescriptor desc = new DependencyDescriptor(field, this.required);
         desc.setContainingClass(bean.getClass());
         Set<String> autowiredBeanNames = new LinkedHashSet<>(1);
         Assert.state(beanFactory != null, "No BeanFactory available");
         // 获取类型转换器
         TypeConverter typeConverter = beanFactory.getTypeConverter();
         try {
            // 1.获取依赖注入的实例
            value = beanFactory.resolveDependency(desc, beanName, autowiredBeanNames, typeConverter);
         }
         catch (BeansException ex) {
            throw new UnsatisfiedDependencyException(null, beanName, new InjectionPoint(field), ex);
         }
         synchronized (this) {
            if (!this.cached) {
               if (value != null || this.required) {
                  this.cachedFieldValue = desc;
                  // 记录当前Bean和依赖注入的Bean之间的依赖关系,
                  // 用于当前Bean销毁之前先销毁依赖注入的Bean。
                  registerDependentBeans(beanName, autowiredBeanNames);
                  if (autowiredBeanNames.size() == 1) {
                     String autowiredBeanName = autowiredBeanNames.iterator().next();
                     if (beanFactory.containsBean(autowiredBeanName) &&
                           beanFactory.isTypeMatch(autowiredBeanName, field.getType())) {
                        // 做缓存操作
                        this.cachedFieldValue = new ShortcutDependencyDescriptor(
                              desc, autowiredBeanName, field.getType());
                     }
                  }
               }
               else {
                  this.cachedFieldValue = null;
               }
               this.cached = true;
            }
         }
      }
      if (value != null) {
         ReflectionUtils.makeAccessible(field);
         // 2.将value设置到Bean的属性中
         field.set(bean, value);
      }
   }
}
通过这个方法可以知道注释第1点的方法会返回实例化完成的对象(StudentB),然后最终在注释第2点处设置到Bean(StudentA)的属性(studentB)中。
所以我们着重看一下注释第1点的方法。
// 1.获取依赖注入的实例
value = beanFactory.resolveDependency(desc, beanName, autowiredBeanNames, typeConverter);
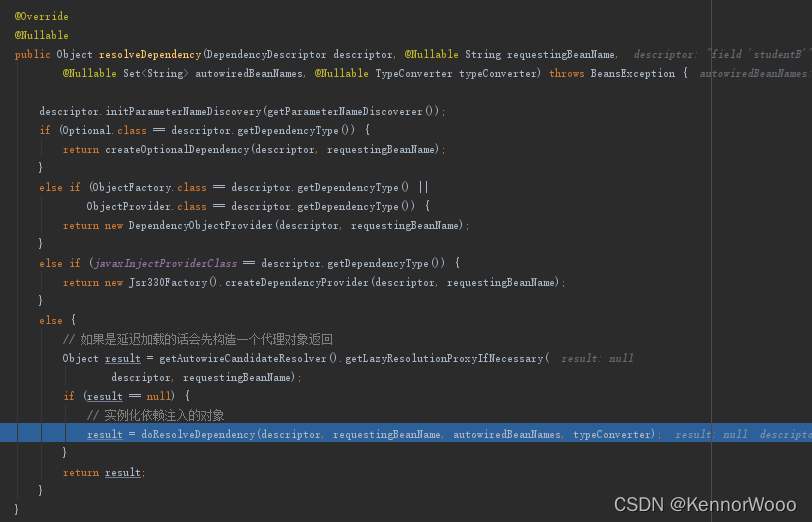
@Nullable
public Object doResolveDependency(DependencyDescriptor descriptor, @Nullable String beanName,
      @Nullable Set<String> autowiredBeanNames, @Nullable TypeConverter typeConverter) throws BeansException {

   InjectionPoint previousInjectionPoint = ConstructorResolver.setCurrentInjectionPoint(descriptor);
   try {
      Object shortcut = descriptor.resolveShortcut(this);
      if (shortcut != null) {
         return shortcut;
      }
      // 获取依赖注入对象的Class
      Class<?> type = descriptor.getDependencyType();
      Object value = getAutowireCandidateResolver().getSuggestedValue(descriptor);
      ... ...
      // 如果依赖注入的对象是集合,例如Array,Map等,则此方法会创建集合对象并返回
      Object multipleBeans = resolveMultipleBeans(descriptor, beanName, autowiredBeanNames, typeConverter);
      if (multipleBeans != null) {
         return multipleBeans;
      }
      // 获取要依赖注入的对象的BeanName和Class
      Map<String, Object> matchingBeans = findAutowireCandidates(beanName, type, descriptor);
      if (matchingBeans.isEmpty()) {
         if (isRequired(descriptor)) {
            raiseNoMatchingBeanFound(type, descriptor.getResolvableType(), descriptor);
         }
         return null;
      }

      String autowiredBeanName;
      Object instanceCandidate;
      ... ...
      if (autowiredBeanNames != null) {
         autowiredBeanNames.add(autowiredBeanName);
      }
      if (instanceCandidate instanceof Class) {
         // 1.依赖注入的对象的实例化
         instanceCandidate = descriptor.resolveCandidate(autowiredBeanName, type, this);
      }
      Object result = instanceCandidate;
      if (result instanceof NullBean) {
         if (isRequired(descriptor)) {
            raiseNoMatchingBeanFound(type, descriptor.getResolvableType(), descriptor);
         }
         result = null;
      }
      if (!ClassUtils.isAssignableValue(type, result)) {
         throw new BeanNotOfRequiredTypeException(autowiredBeanName, type, instanceCandidate.getClass());
      }
      return result;
   }
   finally {
      ConstructorResolver.setCurrentInjectionPoint(previousInjectionPoint);
   }
}
继续往注释第1点的方法里看

可以看到调用到了BeanFactory的getBean方法,而最后会调用到doGetBean方法
于是重走我们上面介绍的Bean实例化过程将StudentB实例化,最终获取到StudentB设置到StudentA的属性中,然后StudentA继续往下执行完成自身的实例化。
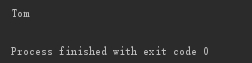
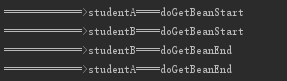
我们在doGetBean方法的开头和结尾处添加日志,可以清晰看到StudentA和StudentB的实例化顺序,如下
接着我们继续修改一下StudentB的代码,让StudentB也依赖注入StudentA。代码如下:
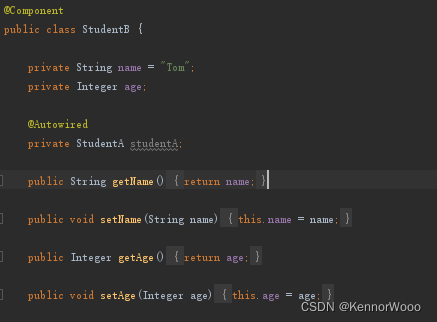
这样在StudentA中注入了StudentB,在StudentB也注入了StudentA,两者之间相互注入,看一下spring是如何处理这种情况。
由上面的流程介绍中我们已经知道StudentA会优先去依赖注入StudentB对象,触发doGetBean方法实例化StudentB,那么我们就着重看一下这种情况下StudentB是如何处理自己依赖注入的StudentA对象。
在上面的流程调用到BeanFactory的doGetBean方法去实例化StudentB的时候,由于StudentB是第一次实例化,最终会调用到doCreateBean方法,
而处理StudentB中依赖注入StudentA的流程则会走到doCreateBean方法中的第4点注释处的populateBean方法去获取StudentA的实例对象。
整个具体流程我下面通过打关键代码部分的断点进行说明。
首先程序一开始进入doGetBean方法实例化StudentA。
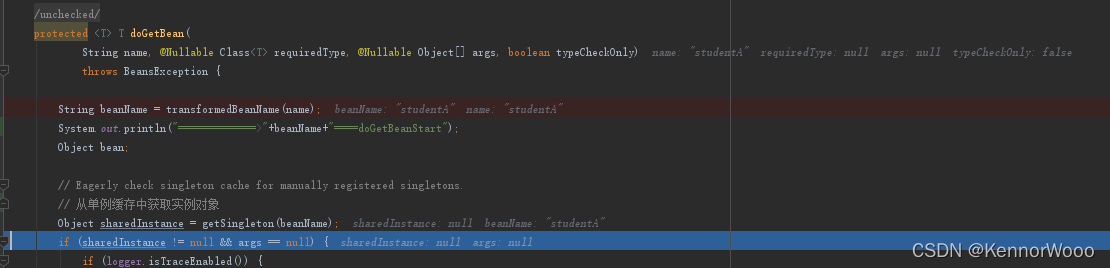
这里首先从三级缓存中获取不到StudentA对象,
所以往下走到getSingleton()方法,在getSingleton方法中调用了createBean方法
在调用createBean方法之前,getSingleton中在开始实例化对象之前会进行标识,此处用于校验是否出现循环依赖的情况,先记住这步操作,再下一篇文章中会介绍到。
然后进入到doCreateBean方法中
接着将StudentA的初始实例,然后添加到三级缓存中
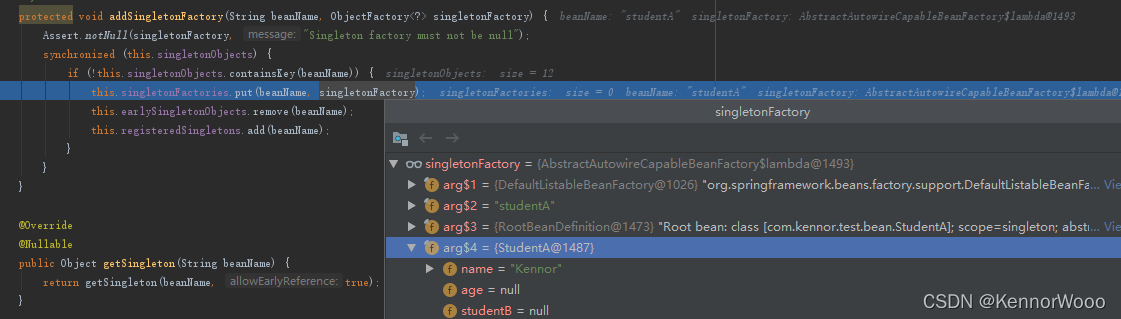
可以看到此时StudentA会被缓存到三级缓存singletonFactories中。
接着doCreateBean方法继续往下走到注释第4点处完成studentB属性的依赖注入功能

最后来到StudentB的实例化流程中


接着来到了doGetBean方法获取StudentB实例
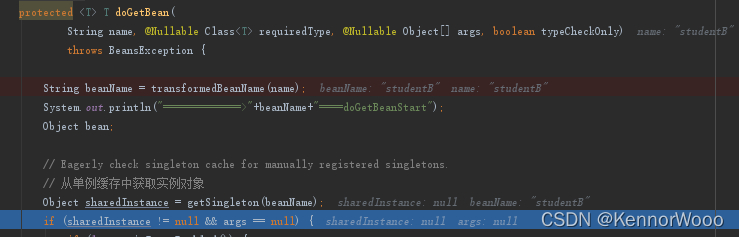
此时三级缓存中没有StudentB对象,所以直接走到createBean方法
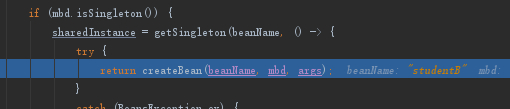
然后来到doCreateBean中,创建StudentB的初始示例,然后添加到三级缓存中
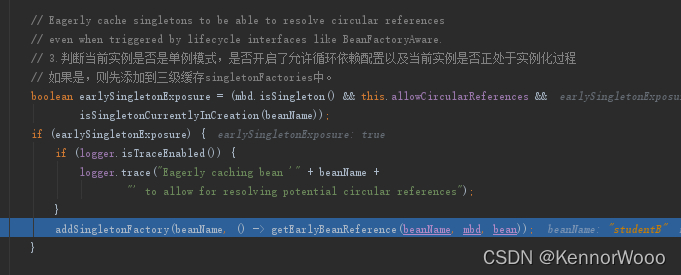
然后走到处理依赖注入的populateBean方法,此时会处理StudentB类中依赖注入的studentA属性。


接着就调用到了BeanFactory获取StudentA实例

继续走到doGetBean方法,此时从三级缓存中获取到StudentA的实例,并将StudentA从三级缓存升级保存到二级缓存中。


然后直接将StudentA的缓存实例返回出去,此时的Student的实例如下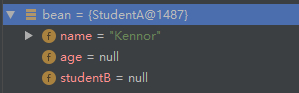
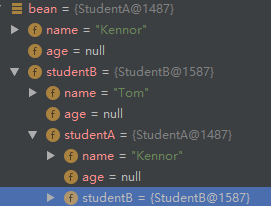
此时StudentB获取到StudentA的实例后继续走doCreateBean方法。
在执行完依赖注入的代码后,此时的StudentB的实例如下:
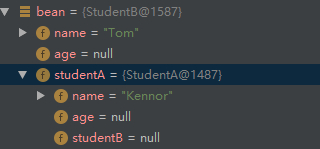
可以看到此时已经持有了StudentA的实例。
接着创建StudentB实例的doCreateBean方法继续往下走返回StudentB实例

然后走到getSingleton方法中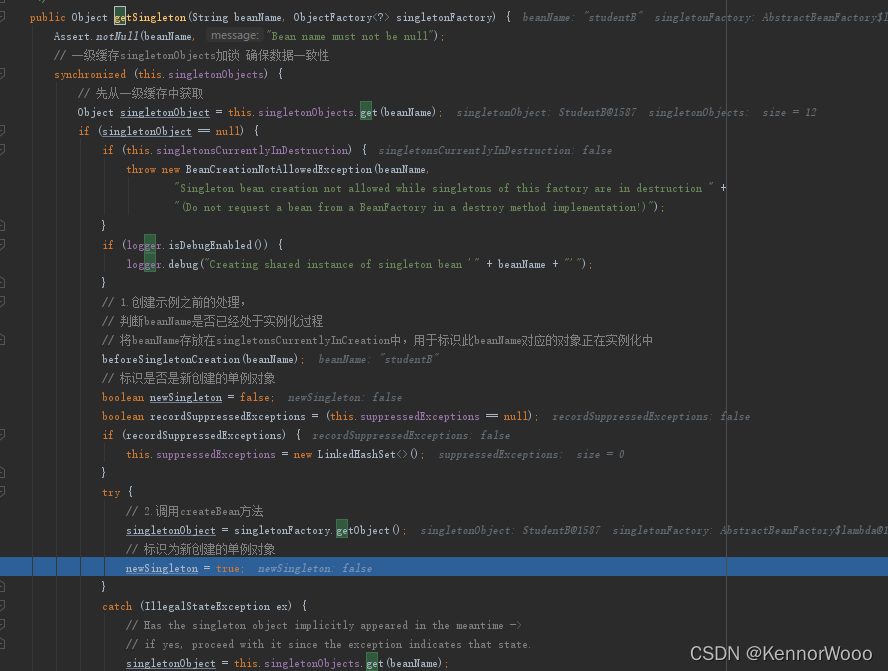
然后在getSingleton方法后面将StudentB实例加入缓存中

此时StudentB实例保存在一级缓存中。
接着继续走到StudentA的doCreateBean方法中,此时StudentA也将StudentB的实例对象注入到自己本身中,此时的StudentA实例如下:
最后doCreateBean方法返回StudentA实例,然后走到getSingleton方法,接着StudentA实例保存到一级缓存中,完成整个流程。


 1130
1130


 被折叠的 条评论
为什么被折叠?
被折叠的 条评论
为什么被折叠?
 到【灌水乐园】发言


