


OpenGL.Shader:志哥教你写一个滤镜直播客户端(可能是结束篇)
OpenGL.Shader基本的图像处理知识已经学习的7788了,所以这篇应该是滤镜直播客户端的最后一篇了,之后会出基于FFmpeg4.3的实战文章,可能还会穿插OpenCV系列的学习文章。
今天介绍几个抖音上比较流行的滤镜实现,网上可能已经存在很多相关的帖子,就是没有几个能提供demo,这不是耍流氓吗,所以还是自己动手来吧。不过u1s1,自己现在的实现效果可能也不太完美,因为之前写这框架没有考虑输入输出帧率的控制,很多好玩的滤镜其实需要掌握好帧率的控制,这是以前的我做得不足,有不足就要改进,所谓的框架迭代升级不就是这样吗?
0、动态帧率
在介绍滤镜实现之前,先说说如何识别现有框架下Android摄像头输出的动态帧率统计。有经验的同学都知道,Android系统的摄像头帧率输出一直都是动态变化着。在运行图像是静止的情况下,输出帧率可以稳定在25~30fps;但是一旦图像产生变化,及时帧内压缩有运动补偿,输出帧率就会降低至15~20fps。对于需要稳定获取Android摄像头输出帧的应用可说是“哑巴吃黄连——有口难言”,需要一种可靠的方法知道当前系统的输出帧率是多少,以便我们写的程序能在恰当的时机做出需要的调整。
实现思路很简单,视频帧率就是每秒内有多少帧图像显示的统计。我们只需要实现一个定时任务,每一秒回调一次次数统计并清空就可以了。具体代码如下:
头文件CELLTimer.h的接口定义
#ifndef CELLTIMER_H
#define CELLTIMER_H
#include <sys/types.h>

namespace CELL {

    class CELLTimerHandler {
    public:
        virtual void handlerCallback()=0;

        virtual ~CELLTimerHandler() {};
    };

    class CELLTimer {
    private:
        long m_second, m_microsecond;

        pthread_t thread_timer;

        static void *OnTimer_stub(void *p) {
            (static_cast<CELLTimer *>(p))->thread_proc();
            return NULL;
        }

        void thread_proc();

        CELLTimerHandler *m_handler;
        bool isStop;

    public:
        CELLTimer();

        CELLTimer(long second, long microsecond);

        virtual ~CELLTimer();

        void setTimer(long second, long microsecond, CELLTimerHandler *handler);

        void startTimer();

        void stopTimer();
    };
}
#endif // CELLTIMER_H
接口实现CELLTimer.cpp;实现的方法很简单,用POSIX标准的select函数实现。关于select和poll/epoll的多路复用内容是面试的常考知识点,大家还是要牢牢掌握好(这里推荐两篇收藏的好文,cpp角度https://www.cnblogs.com/aspirant/p/9166944.html,Java角度https://blog.csdn.net/qq_27529917/article/details/82945450)一些小巧妙(超时唤起当定时器)也可以略为了解。
namespace CELL {
//public methods//
    CELLTimer::CELLTimer() :
            m_second(0), m_microsecond(0) {
        thread_timer = -1;
    }

    CELLTimer::CELLTimer(long second, long microsecond) :
            m_second(second), m_microsecond(microsecond) {
        thread_timer = -1;
    }

    CELLTimer::~CELLTimer() {
    }

    void CELLTimer::setTimer(long second, long microsecond,
                             CELLTimerHandler *handler) {
        m_second = second;
        m_microsecond = microsecond;
        m_handler = handler;
    }

    void CELLTimer::startTimer() {
        if (thread_timer == -1)
            pthread_create(&thread_timer, NULL, OnTimer_stub, this);
    }

    void CELLTimer::stopTimer() {
        isStop = true;
        //pthread_join(thread_timer, NULL); //wait the thread stopped
        thread_timer = -1;
    }
//private methods//
    void CELLTimer::thread_proc() {
        while (!isStop) {
            if (m_handler != NULL)
                m_handler->handlerCallback();
            if (isStop) break;
            struct timeval tempval;
            tempval.tv_sec = m_second;
            tempval.tv_usec = m_microsecond;
            select(0, NULL, NULL, NULL, &tempval);
        }
        //LOGD("CELLTimer--thread_proc exit ... ");
    }

}
使用方法,在GpuFilterRender中定义一个CELL::CELLTimer mFpsTimer,并实现CELLTimer的回调接口CELLTimerHandler;一个静态变量mInputFps,一个私有变量mCurrentInputFps。在接收摄像头帧图输入的方法内统计计算mCurrentInputFps++,在CELLTimerHandler的回调就能及时统计出当前帧率。
// 头文件定义
int static      mInputFps;
int             mCurrentInputFps;
CELL::CELLTimer mFpsTimer;
// CELLTimer定时器Callback
virtual void handlerCallback()
{
    mInputFps = mCurrentInputFps;
    LOGI("InputFps : %d", mInputFps);
    mCurrentInputFps = 0;
}
// /
void GpuFilterRender::surfaceCreated(ANativeWindow *window)
{
    ... ...
    mFpsTimer.setTimer(1, 0, this);
    mFpsTimer.startTimer();
}
void GpuFilterRender::surfaceDestroyed()
{
    ... ...
    mFpsTimer.stopTimer();
}
void GpuFilterRender::feedVideoData(int8_t *data, int data_len, int previewWidth, int previewHeight)
{
    // 在帧图输入接口统计帧率
    mCurrentInputFps++;
}
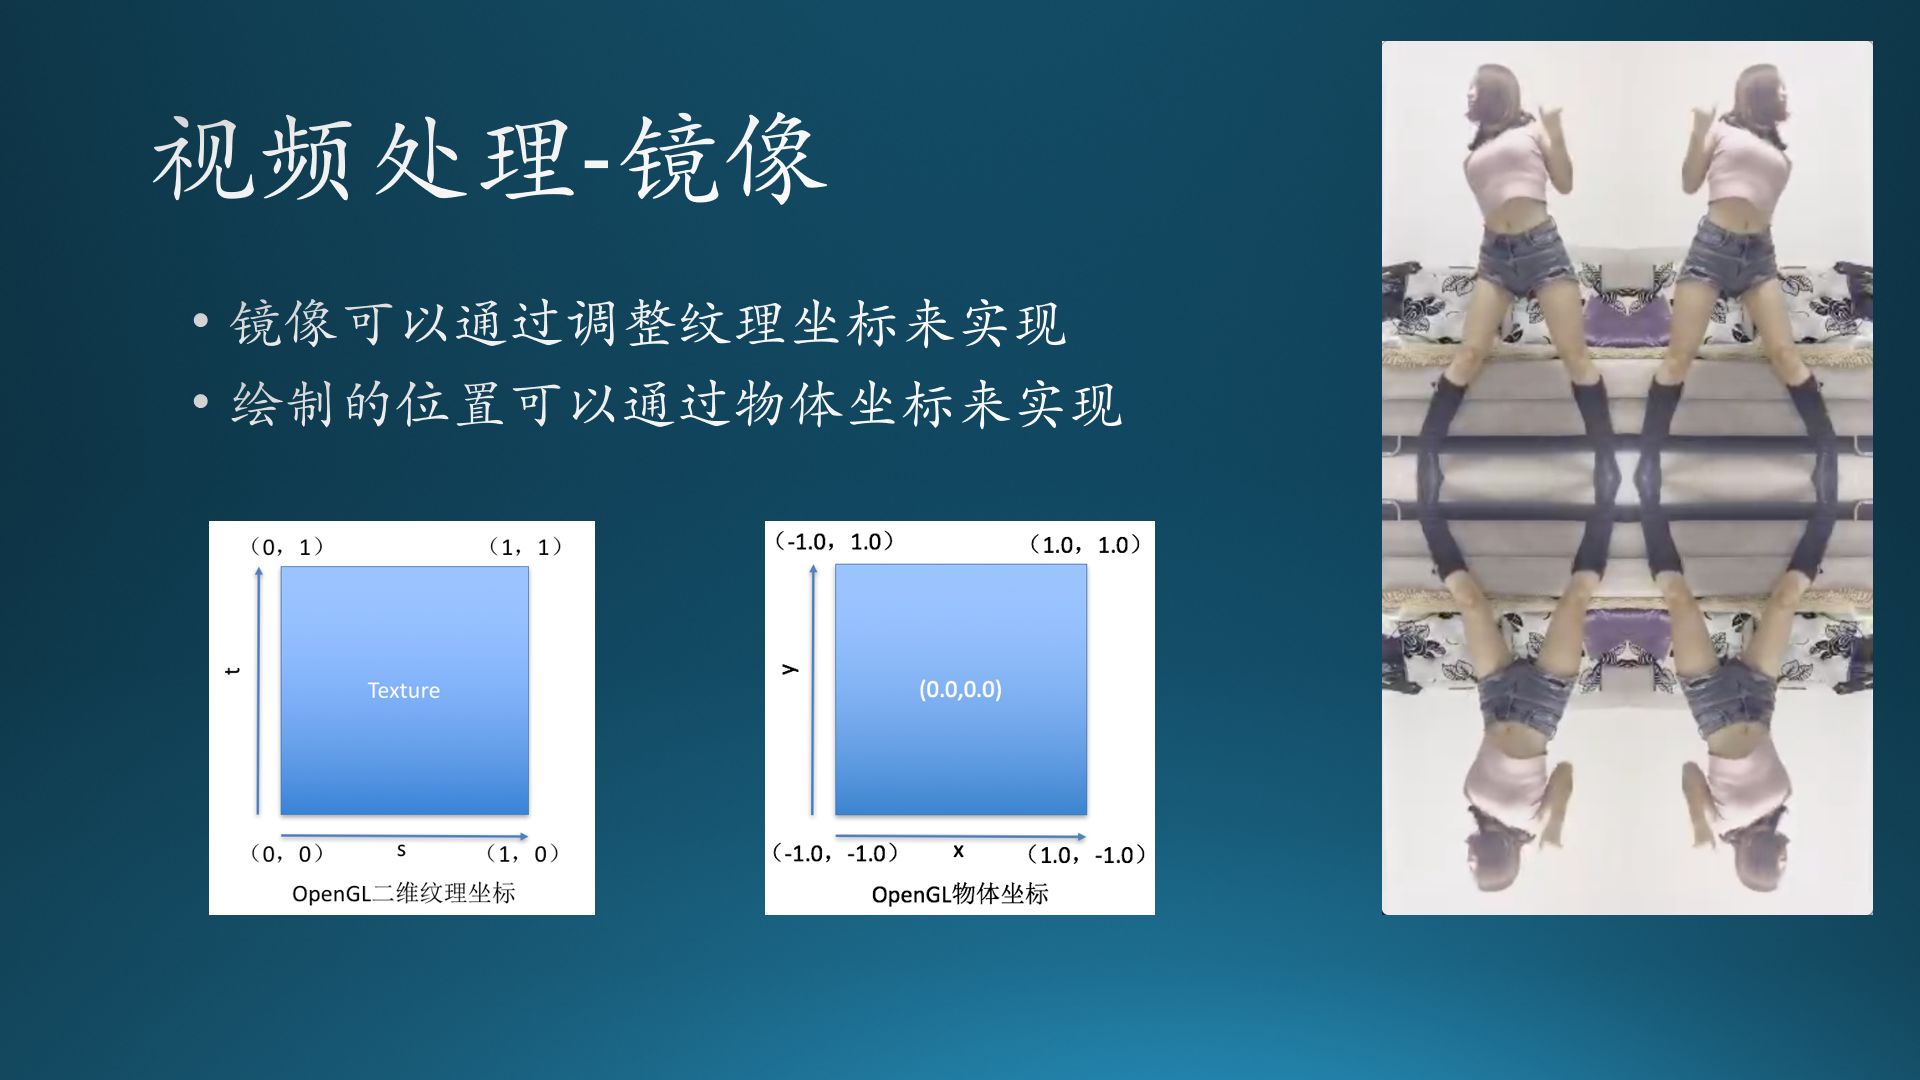
1、4镜像滤镜
动态帧率有了,接下来先来一个简单的滤镜效果——4镜像,将屏幕它分割为四部分,每部分画一个相同的视频帧,因为屏幕被分割为4部分,我们的物体坐标在渲染时就不能设定为全屏的。在OpenGL中物体坐标,左下角为(-1,-1),右上角为(1,1),这样我们就可以分别计算出4部分的物体坐标。
确认好物体坐标后,我们接下来就要确认画什么?也就是将视频帧以什么样的方式画在物体坐标上,这时就需要控制纹理坐标,先前已介绍过OpenGL定义的纹理坐标:从左下角(0,0)到右上角(1,1),但实际上,系统视频帧图是一张以左上角为(0,0)到右下角(1,1)倒立过的图像。而且要想高效实现4镜像的渲染,需要借助fbo离屏渲染视频帧图,然后把视频帧当作一张纹理(此时的纹理就是按照OpenGL定义的纹理坐标),根据不同位置进行图像处理后再渲染,这样就可以实现简单的镜像效果。
实现代码如下,详情请参考https://github.com/MrZhaozhirong/NativeCppApp /src/main/cpp/gpufilter/filter/DouYin4ImageFilter.hpp
#ifndef DOUYIN_4IMAGE_FILTER_HPP
#define DOUYIN_4IMAGE_FILTER_HPP
#include "GpuBaseFilter.hpp"
#include "../render/GpuFilterRender.h"

class DouYin4ImageFilter : public GpuBaseFilter {
public:
    int getTypeId() { return FILTER_TYPE_DOUYIN_4IMAGE; }

    DouYin4ImageFilter()
    {   // 不需要特殊的shader,沿用GpuBaseFilter就可以了。
        LOGI("---DouYin4ImageFilter构造, %p", this);
    }
    void init() {
        GpuBaseFilter::init(NO_FILTER_VERTEX_SHADER.c_str(), NO_FILTER_FRAGMENT_SHADER.c_str());
    }

    void onOutputSizeChanged(int width, int height) {
        GpuBaseFilter::onOutputSizeChanged(width, height);
        if (mFboTextureId != 9999) {
            glDeleteTextures(1, &mFboTextureId);
            mFboTextureId = 9999;
        }
        if (mFboId != 9999) {
            glDeleteFramebuffers(1, &mFboId);
            mFboId = 9999;
        }
        // 创建fbo,用于保存视频帧图作为纹理对象
        glGenFramebuffers(1, &mFboId);
        glGenTextures(1, &mFboTextureId);
        glBindTexture(GL_TEXTURE_2D, mFboTextureId);
        glTexParameteri(GL_TEXTURE_2D, GL_TEXTURE_MIN_FILTER, GL_LINEAR);
        glTexParameteri(GL_TEXTURE_2D, GL_TEXTURE_MAG_FILTER, GL_LINEAR);
        glTexParameteri(GL_TEXTURE_2D, GL_TEXTURE_WRAP_S, GL_CLAMP_TO_EDGE); // GL_REPEAT
        glTexParameteri(GL_TEXTURE_2D, GL_TEXTURE_WRAP_T, GL_CLAMP_TO_EDGE); // GL_REPEAT
        glTexImage2D(GL_TEXTURE_2D, 0, GL_RGBA16F, width, height, 0, GL_RGBA, GL_FLOAT, 0);

        glBindFramebuffer(GL_FRAMEBUFFER, mFboId);
        glFramebufferTexture2D(GL_FRAMEBUFFER, GL_COLOR_ATTACHMENT0, GL_TEXTURE_2D, mFboTextureId, 0);

        glBindTexture(GL_TEXTURE_2D, 0);
        glBindFramebuffer(GL_FRAMEBUFFER, 0);
    }
    void onDraw(GLuint SamplerY_texId, GLuint SamplerU_texId, GLuint SamplerV_texId,
                void* positionCords, void* textureCords)
    {
        glBindFramebuffer(GL_FRAMEBUFFER, mFboId);
        GpuBaseFilter::onDraw(SamplerY_texId, SamplerU_texId, SamplerV_texId, positionCords, textureCords );
        glBindFramebuffer(GL_FRAMEBUFFER, 0);
        // 把视频帧的纹理对象当做二次输入,根据不同位置的顶点坐标和纹理坐标实现4镜像
        GpuBaseFilter::onDrawRGB(mFboTextureId, positionCords_left_top, texCoordinates_left_top);
        GpuBaseFilter::onDrawRGB(mFboTextureId, positionCords_right_top, texCoordinates_right_top);
        GpuBaseFilter::onDrawRGB(mFboTextureId, positionCords_left_bottom, texCoordinates_left_bottom);
        GpuBaseFilter::onDrawRGB(mFboTextureId, positionCords_right_bottom, texCoordinates_right_bottom);
    }

private:
    GLuint mFboId = 9999;
    GLuint mFboTextureId = 9999;
    // fbo纹理,遵循opengl的正立原则
    float texCoordinates_left_top[8] = {
            0.0f, 0.0f,     //左下
            1.0f, 0.0f,     //右下
            0.0f, 1.0f,     //左上
            1.0f, 1.0f,     //右上
    };
    float texCoordinates_right_top[8] = {
            1.0f, 0.0f,     //左下
            0.0f, 0.0f,     //右下
            1.0f, 1.0f,     //左上
            0.0f, 1.0f,     //右上
    };
    float texCoordinates_left_bottom[8] = {
            0.0f, 1.0f,     //左下
            1.0f, 1.0f,     //右下
            0.0f, 0.0f,     //左上
            1.0f, 0.0f,     //右上
    };
    float texCoordinates_right_bottom[8] = {
            1.0f, 1.0f,     //左下
            0.0f, 1.0f,     //右下
            1.0f, 0.0f,     //左上
            0.0f, 0.0f,     //右上
    };
    // 顶点坐标
    float positionCords_left_top[8] = {
            //x, y          //position
            -1.0f, -0.0f,   //左下
            0.0f, -0.0f,    //右下
            -1.0f, 1.0f,    //左上
            0.0f, 1.0f,     //右上
    };
    float positionCords_right_top[8] = {
            //x, y          //position
            -0.0f, -0.0f,   //左下
            1.0f, -0.0f,    //右下
            -0.0f, 1.0f,    //左上
            1.0f, 1.0f,     //右上
    };
    float positionCords_left_bottom[8] = {
            //x, y          //position
            -1.0f, -1.0f,   //左下
            0.0f, -1.0f,    //右下
            -1.0f, 0.0f,    //左上
            0.0f, 0.0f,     //右上
    };
    float positionCords_right_bottom[8] = {
            //x, y          //position
            -0.0f, -1.0f,   //左下
            1.0f, -1.0f,    //右下
            -0.0f, 0.0f,    //左上
            1.0f, 0.0f,     //右上
    };
};
#endif // DOUYIN_4IMAGE_FILTER_HPP
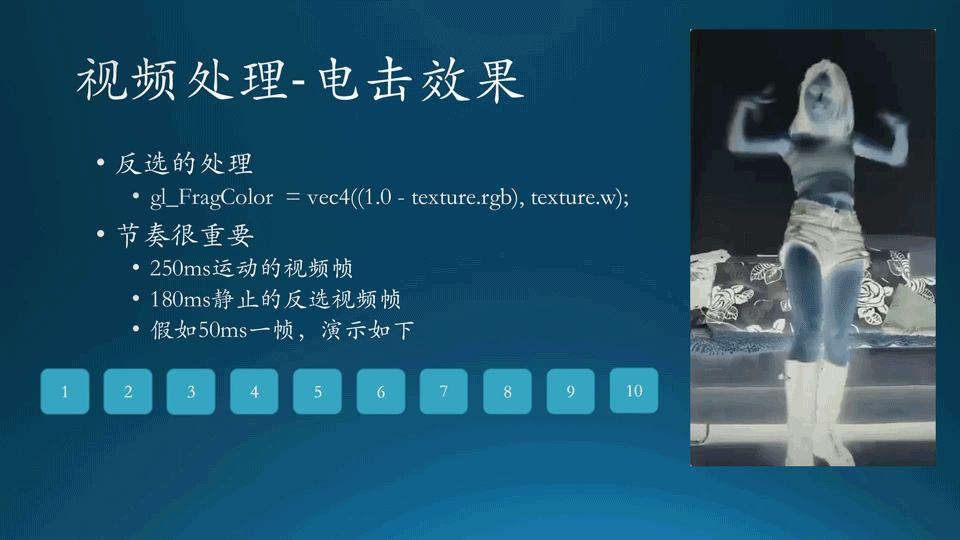
2、 电击效果
接下来一起来看看复杂一丢丢的特效实现方法,首先是电击效果,实际上它的实现就是反选的处理,只需要使用下面代码就可以:
gl_FragColor = vec4((1.0 - texture.rgb), texture.w);但想要达到一个很好的效果,其中还是有一些小技巧,也就是需要把握好节奏。假如我们现在有250ms运动的视频帧,再排上180ms静止的反选视频帧就可以实现了,如下方动图演示:假设50ms为一帧,那么对于10帧总时间为500ms的视频帧来说,前5帧都不变,依旧是正常的效果,从第6帧开始我们做反选并且保证画面是静止的,也就是说第7、8、9帧同样放第6帧,而第10帧时我们渲染正常的第10帧,这样周而复始就可以实现电击效果。这下就需要我们用到上方的动态帧率了,根据帧率我们要恰当的调整其电击效果的渲染。
原理实现的相关代码如下,详情请参考:https://github.com/MrZhaozhirong/NativeCppApp /src/main/cpp/gpufilter/filter/DouYinElectricShockFilter.hpp
#ifndef DOUYIN_ELECTRIC_SHOCK_FILTER_HPP
#define DOUYIN_ELECTRIC_SHOCK_FILTER_HPP
#include "GpuBaseFilter.hpp"

class DouYinElectricShockFilter : public GpuBaseFilter {
public:
    int getTypeId() { return FILTER_TYPE_DOUYIN_SHOCK; }

    DouYinElectricShockFilter()
    {
        SHOCK_FRAGMENT_SHADER     ="precision mediump float;\n\
                                    varying highp vec2 textureCoordinate;\n\
                                    uniform sampler2D SamplerRGB;\n\
                                    uniform sampler2D SamplerY;\n\
                                    uniform sampler2D SamplerU;\n\
                                    uniform sampler2D SamplerV;\n\
                                    mat3 colorConversionMatrix = mat3(\n\
                                                       1.0, 1.0, 1.0,\n\
                                                       0.0, -0.39465, 2.03211,\n\
                                                       1.13983, -0.58060, 0.0);\n\
                                    vec3 yuv2rgb(vec2 pos)\n\
                                    {\n\
                                       vec3 yuv;\n\
                                       yuv.x = texture2D(SamplerY, pos).r;\n\
                                       yuv.y = texture2D(SamplerU, pos).r - 0.5;\n\
                                       yuv.z = texture2D(SamplerV, pos).r - 0.5;\n\
                                       return colorConversionMatrix * yuv;\n\
                                    }\n\
                                    uniform int is_shock;\n\
                                    void main()\n\
                                    {\n\
                                        vec4 textureColor = vec4(yuv2rgb(textureCoordinate), 1.0);\n\
                                        if (is_shock==0) \n\
                                        {\n\
                                            gl_FragColor = textureColor;\n\
                                        }\n\
                                        else\n\
                                        {\n\
                                            gl_FragColor = vec4( (1.0-textureColor.rgb), textureColor.w);\n\
                                        }\n\
                                    }";
        mInputFps = 0;
        mCurrentFps = 0;
    }
    ~DouYinElectricShockFilter() {
        if(!SHOCK_FRAGMENT_SHADER.empty()) SHOCK_FRAGMENT_SHADER.clear();
    }
    void init() {
        GpuBaseFilter::init(NO_FILTER_VERTEX_SHADER.c_str(), SHOCK_FRAGMENT_SHADER.c_str());
        mShockLocation = glGetUniformLocation(mGLProgId, "is_shock");
    }
    // 接收统计的静态帧率  和  当前帧率
    void setShockFps(int inputFps, int currentFps) {
        mInputFps = inputFps;
        mCurrentFps = currentFps;
    }
    void onDraw(GLuint SamplerY_texId, GLuint SamplerU_texId, GLuint SamplerV_texId,
                void* positionCords, void* textureCords)
    {
        if (!mIsInitialized)
            return;
        glUseProgram(mGLProgId);
        glUniform1i(mDrawModeLocation, 0);

        glVertexAttribPointer(mGLAttribPosition, 2, GL_FLOAT, GL_FALSE, 0, positionCords);
        glEnableVertexAttribArray(mGLAttribPosition);
        glVertexAttribPointer(mGLAttribTextureCoordinate, 2, GL_FLOAT, GL_FALSE, 0, textureCords);
        glEnableVertexAttribArray(mGLAttribTextureCoordinate);
        // runPendingOnDrawTasks();
        if (mInputFps==0&&mCurrentFps==0) {
            mShock = 0;
        } else {
            int halfInputFps = mInputFps/2;
            if (mCurrentFps > halfInputFps)
            {
                mShock = 1;
            }
            else
            {
                mShock = 0;
            }
        }
        // 为了突出效果,我把一秒内的一半帧图都当作电击效果处理了。
        glUniform1i(mShockLocation, mShock);
        if (mShock==0) {
            glActiveTexture(GL_TEXTURE0);
            glBindTexture(GL_TEXTURE_2D, SamplerY_texId);
            glUniform1i(mGLUniformSampleY, 0);
            glActiveTexture(GL_TEXTURE1);
            glBindTexture(GL_TEXTURE_2D, SamplerU_texId);
            glUniform1i(mGLUniformSampleU, 1);
            glActiveTexture(GL_TEXTURE2);
            glBindTexture(GL_TEXTURE_2D, SamplerV_texId);
            glUniform1i(mGLUniformSampleV, 2);
        } else {
            //glActiveTexture(GL_TEXTURE0);
            //glActiveTexture(GL_TEXTURE1);
            //glActiveTexture(GL_TEXTURE2);
        }
        // onDrawArraysPre();
        glDrawArrays(GL_TRIANGLE_STRIP, 0, 4);
        glDisableVertexAttribArray(mGLAttribPosition);
        glDisableVertexAttribArray(mGLAttribTextureCoordinate);
        glBindTexture(GL_TEXTURE_2D, 0);
    }
private:
    std::string SHOCK_FRAGMENT_SHADER;
    GLint mShockLocation;
    int mShock;
    int mInputFps;
    int mCurrentFps;
};
#endif // DOUYIN_ELECTRIC_SHOCK_FILTER_HPP
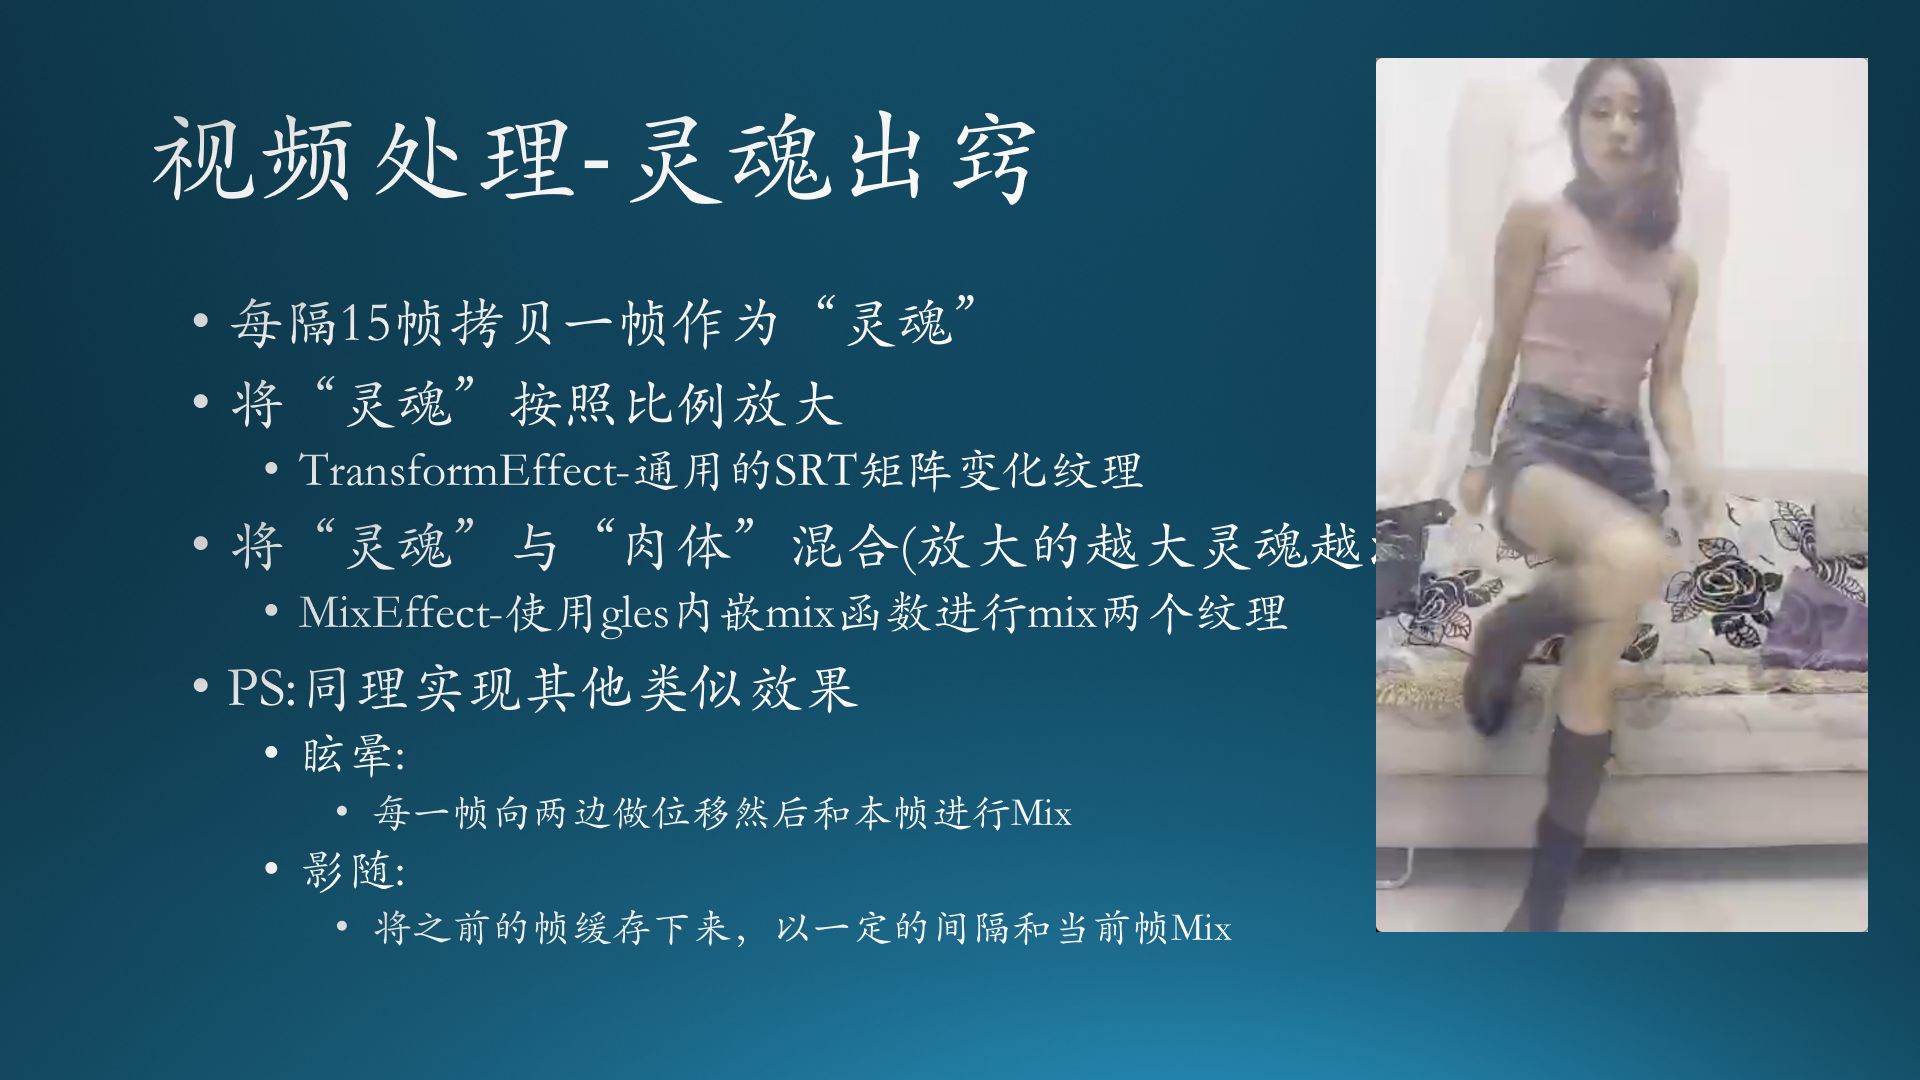
3、灵魂出窍
最后来个更好玩的滤镜效果——灵魂出窍。这个特效就是人影有一个向外扩散的效果,同样它的节奏也是非常重要的,尤其是能与音乐的配合才能达到一个完美的效果。在得到放大后的“灵魂”(拷贝帧),我们就需要考虑把“灵魂”和“肉体”(原本视频帧)混合起来,这里需要用到GLES的一个内嵌Mix函数将两个纹理进行mix即可。那么同理,我们还可以实现眩晕、影随的效果:眩晕是将每一帧向两侧做位移再与本帧进行mix,而影随则是将之前的帧缓存下来,以一定的间隔和当前帧做mix。
原理实现的相关代码如下,详情请参考:https://github.com/MrZhaozhirong/NativeCppApp /src/main/cpp/gpufilter/filter/DouYinSouloutFilter.hpp
我个人更喜欢影随这个效果,所以尝试实现影随的效果。因为从原理上看,影随比灵魂出窍处理效果要好啊。实现方式大同小异,利用fbo在合适的时机保存“灵魂图像”,然后利用纹理坐标的归一化特性实现“视频帧”与“灵魂帧”的差异变化,最后就是利用GLSL的内置函数mix实现两帧图的混合。
#ifndef DOUYIN_SOULOUT_FILTER_HPP
#define DOUYIN_SOULOUT_FILTER_HPP
#include "GpuBaseFilter.hpp"

class DouYinSouloutFilter : public GpuBaseFilter {
public:
    int getTypeId() { return FILTER_TYPE_DOUYIN_SOULOUT; }

    DouYinSouloutFilter()
    {
        SOULOUT_VERTEX_SHADER   = "attribute vec4 position;\n\
                                   attribute vec4 inputTextureCoordinate;\n\
                                   attribute vec4 soulTextureCoordinate;\n\
                                   varying vec2 textureCoordinate;\n\
                                   varying vec2 soulCoordinate;\n\
                                   void main()\n\
                                   {\n\
                                      textureCoordinate = inputTextureCoordinate.xy;\n\
                                      soulCoordinate = soulTextureCoordinate.xy;\n\
                                      gl_Position = position;\n\
                                   }";

        SOULOUT_FRAGMENT_SHADER = "precision mediump float;\n\
                                   varying vec2 textureCoordinate;\n\
                                   varying vec2 soulCoordinate;\n\
                                   uniform sampler2D SamplerY;\n\
                                   uniform sampler2D SamplerU;\n\
                                   uniform sampler2D SamplerV;\n\
                                   uniform int mixFlag;\n\
                                   uniform int drawMode;\n\
                                   uniform sampler2D textureSoul;\n\
                                   mat3 colorConversionMatrix = mat3(\n\
                                                      1.0, 1.0, 1.0,\n\
                                                      0.0, -0.39465, 2.03211,\n\
                                                      1.13983, -0.58060, 0.0);\n\
                                   vec3 yuv2rgb(vec2 pos)\n\
                                   {\n\
                                      vec3 yuv;\n\
                                      yuv.x = texture2D(SamplerY, pos).r;\n\
                                      yuv.y = texture2D(SamplerU, pos).r - 0.5;\n\
                                      yuv.z = texture2D(SamplerV, pos).r - 0.5;\n\
                                      return colorConversionMatrix * yuv;\n\
                                   }\n\
                                   void main()\n\
                                   {\n\
                                      if (mixFlag==1) \n\
                                      {\n\
                                          gl_FragColor = vec4(yuv2rgb(textureCoordinate), 1.0);\n\
                                      }\n\
                                      else\n\
                                      {\n\
                                          vec4 normalColor = vec4(yuv2rgb(textureCoordinate), 1.0);\n\
                                          vec4 soulColor = texture2D(textureSoul, soulCoordinate);\n\
                                          gl_FragColor = mix(normalColor, soulColor, 0.35);\n\
                                      }\n\
                                   }";
    }
    ~DouYinSouloutFilter()
    {
        if(!SOULOUT_VERTEX_SHADER.empty()) SOULOUT_VERTEX_SHADER.clear();
        if(!SOULOUT_FRAGMENT_SHADER.empty()) SOULOUT_FRAGMENT_SHADER.clear();
    }

    void onOutputSizeChanged(int width, int height) {
        GpuBaseFilter::onOutputSizeChanged(width, height);
        if (mSoulTextureId != 9999) {
            glDeleteTextures(1, &mSoulTextureId);
            mSoulTextureId = 9999;
        }
        if (mFboId != 9999) {
            glDeleteFramebuffers(1, &mFboId);
            mFboId = 9999;
        }
        glGenFramebuffers(1, &mFboId);
        glGenTextures(1, &mSoulTextureId);
        glBindTexture(GL_TEXTURE_2D, mSoulTextureId);
        glTexParameteri(GL_TEXTURE_2D, GL_TEXTURE_MIN_FILTER, GL_LINEAR);
        glTexParameteri(GL_TEXTURE_2D, GL_TEXTURE_MAG_FILTER, GL_LINEAR);
        glTexParameteri(GL_TEXTURE_2D, GL_TEXTURE_WRAP_S, GL_CLAMP_TO_EDGE); // GL_REPEAT
        glTexParameteri(GL_TEXTURE_2D, GL_TEXTURE_WRAP_T, GL_CLAMP_TO_EDGE); // GL_REPEAT
        glTexImage2D(GL_TEXTURE_2D, 0, GL_RGBA16F, width, height, 0, GL_RGBA, GL_FLOAT, 0);

        glBindFramebuffer(GL_FRAMEBUFFER, mFboId);
        glFramebufferTexture2D(GL_FRAMEBUFFER, GL_COLOR_ATTACHMENT0, GL_TEXTURE_2D, mSoulTextureId, 0);
        glBindFramebuffer(GL_FRAMEBUFFER, 0);
    }

    void init() {
        GpuBaseFilter::init(SOULOUT_VERTEX_SHADER.c_str(), SOULOUT_FRAGMENT_SHADER.c_str());
        mGLAttribSoulCoordinate = static_cast<GLuint>(glGetAttribLocation(mGLProgId, "soulTextureCoordinate"));
        mMixFlagLocation = static_cast<GLuint>(glGetUniformLocation(mGLProgId, "mixFlag"));
        mGLUniformSampleSoul = static_cast<GLuint>(glGetUniformLocation(mGLProgId, "textureSoul"));
    }

    void setInputFps(int fps) {
        mInputFps = fps;
    }
    void setCurrentFps(int fps) {
        mCurrentFps = fps;
    }

    void onDraw(GLuint SamplerY_texId, GLuint SamplerU_texId, GLuint SamplerV_texId,
                void* positionCords, void* textureCords)
    {
        if (mInputFps==0&&mCurrentFps==0) {
            mMixFlag = 0;
        } else {
            int halfInputFps = mInputFps/2;
            if (mCurrentFps>halfInputFps+0)
            //    || mCurrentFps==halfInputFps+1
            //    || mCurrentFps==halfInputFps+2
            //    || mCurrentFps==halfInputFps+3
            //    || mCurrentFps==halfInputFps+4
            //    || mCurrentFps==halfInputFps+5)
            {
                mMixFlag = 1;
            }
            else
            {
                mMixFlag = 0;
            }
        }
        if (mMixFlag == 1) //mMixFlag == 1
        { // 拷贝当前帧当灵魂
            glBindFramebuffer(GL_FRAMEBUFFER, mFboId);
            GpuBaseFilter::onDraw(SamplerY_texId, SamplerU_texId, SamplerV_texId, positionCords, textureCords );
            glBindFramebuffer(GL_FRAMEBUFFER, 0);
        }

        glUseProgram(mGLProgId);
        // 把相关参数传到shader当中。
        glVertexAttribPointer(mGLAttribPosition, 2, GL_FLOAT, GL_FALSE, 0, positionCords); // 当前帧顶点坐标
        glEnableVertexAttribArray(mGLAttribPosition);
        glVertexAttribPointer(mGLAttribTextureCoordinate, 2, GL_FLOAT, GL_FALSE, 0, textureCords);// 当前帧纹理坐标
        glEnableVertexAttribArray(mGLAttribTextureCoordinate);
        glVertexAttribPointer(mGLAttribSoulCoordinate, 2, GL_FLOAT, GL_FALSE, 0, soul_texCoordinates);// 灵魂帧纹理坐标
        glEnableVertexAttribArray(mGLAttribSoulCoordinate);

        glUniform1i(mMixFlagLocation, mMixFlag);

        glActiveTexture(GL_TEXTURE0);
        glBindTexture(GL_TEXTURE_2D, SamplerY_texId);
        glUniform1i(mGLUniformSampleY, 0);

        glActiveTexture(GL_TEXTURE1);
        glBindTexture(GL_TEXTURE_2D, SamplerU_texId);
        glUniform1i(mGLUniformSampleU, 1);

        glActiveTexture(GL_TEXTURE2);
        glBindTexture(GL_TEXTURE_2D, SamplerV_texId);
        glUniform1i(mGLUniformSampleV, 2);

        glActiveTexture(GL_TEXTURE3);
        glBindTexture(GL_TEXTURE_2D, mSoulTextureId);
        glUniform1i(mGLUniformSampleSoul, 3);
        // onDrawArraysPre();
        glDrawArrays(GL_TRIANGLE_STRIP, 0, 4);
        glDisableVertexAttribArray(mGLAttribPosition);
        glDisableVertexAttribArray(mGLAttribTextureCoordinate);
        glDisableVertexAttribArray(mGLAttribSoulCoordinate);
        glBindTexture(GL_TEXTURE_2D, 0);
    }
private:
    std::string SOULOUT_VERTEX_SHADER;
    std::string SOULOUT_FRAGMENT_SHADER;

    GLuint mFboId = 9999;
    GLuint mSoulTextureId = 9999;
    GLuint mMixFlagLocation;
    GLuint mGLAttribSoulCoordinate;
    GLuint mGLUniformSampleSoul;

    int mMixFlag;
    int mInputFps;
    int mCurrentFps;
    //灵魂顶点坐标,实现位置相对偏移。
    float soul_positionCords[8] = {
            //x, y          //position
            -1.0f, -1.0f,   //左下
            1.0f, -1.0f,    //右下
            -1.0f, 1.0f,    //左上
            1.0f, 1.0f,     //右上
    };
    //灵魂纹理坐标,相对原图取局内部分,然后填充到屏幕,实现相对放大。
    float soul_texCoordinates[8] = {
            0.1f, 0.1f,     //左下
            0.9f, 0.1f,     //右下
            0.1f, 0.9f,     //左上
            0.9f, 0.9f,     //右上
    };
};
#endif // DOUYIN_SOULOUT_FILTER_HPP
滤镜客户端系列文章到此告一段落。理论学习实质比较大,离实战商用还有一定的距离。正所谓人无完人,代码不可能完美没有bug。写博客的初衷就是为了温故而知新,谁不是笑看当年自己的代码?庆幸自己永远在学习总结的路上,也希望大家一直在路上。The end.


 被折叠的 条评论
为什么被折叠?
被折叠的 条评论
为什么被折叠?
 到【灌水乐园】发言


