


前言:
本篇主要讲述关于线程池的内容,简要介绍Executor框架的结构。重点讲述ThreadPoolExecutor,FutureTask等等。具体包括线程池的种类,工作机制,异常处理机制,等待队列,线程池的状态转换,拒绝服务策略等等。
概念
线程池:用于管理线程,避免每次使用线程都要创建线程,可以节省很多开销,并且也使得管理更加方便,功能更强大。在Java中,ThreadPoolExecutor就是最关键的线程池类。
线程池的状态:
①初始:Running
②调用shutdown方法后,Shutdown状态。此时不接受新的任务,但会等待所有任务执行完毕。
③调用shutdownNow方法,Stop状态。此时不接受新任务,而且尝试去终止所有活跃的进程。
④当线程池处于Shutdown / Stop状态,并且所有工作线程都已经销毁,任务等待队列也已经情况,那么线程池会设置为Terminate状态。
Executor框架
①Executor,顶级接口。
/**
 * An object that executes submitted {@link Runnable} tasks. This
 * interface provides a way of decoupling task submission from the
 * mechanics of how each task will be run, including details of thread
 * use, scheduling, etc.  An {@code Executor} is normally used
 * instead of explicitly creating threads. For example, rather than
 * invoking {@code new Thread(new(RunnableTask())).start()} for each
 * of a set of tasks, you might use:
 *
 * <pre>
 * Executor executor = <em>anExecutor</em>;
 * executor.execute(new RunnableTask1());
 * executor.execute(new RunnableTask2());
 * ...
 * </pre>
 **/
public interface Executor {
    /**
     * Executes the given command at some time in the future.  The command
     * may execute in a new thread, in a pooled thread, or in the calling
     * thread, at the discretion of the {@code Executor} implementation.
     *
     * @param command the runnable task
     * @throws RejectedExecutionException if this task cannot be
     * accepted for execution
     * @throws NullPointerException if command is null
     ......
     */
    void execute(Runnable command);
}
只有一个executor方法,作用是向线程池里提交一个Runnable任务并执行。(解耦,不必每个任务都单独run/start)
②ExecutorService,次级接口 (常用)
/**
 * An {@link Executor} that provides methods to manage termination and
 * methods that can produce a {@link Future} for tracking progress of
 * one or more asynchronous tasks.
 *
 * <p>An {@code ExecutorService} can be shut down, which will cause
 * it to reject new tasks.  Two different methods are provided for
 * shutting down an {@code ExecutorService}. The {@link #shutdown}
 * method will allow previously submitted tasks to execute before
 * terminating, while the {@link #shutdownNow} method prevents waiting
 * tasks from starting and attempts to stop currently executing tasks.
 * Upon termination, an executor has no tasks actively executing, no
 * tasks awaiting execution, and no new tasks can be submitted.  An
 * unused {@code ExecutorService} should be shut down to allow
 * reclamation of its resources.
 *
 ......
 **/
public interface ExecutorService extends Executor {
	void shutdown();
	List<Runnable> shutdownNow();
    boolean isShutdown();
    boolean isTerminated();
    boolean awaitTermination(long timeout, TimeUnit unit)
        throws InterruptedException;
    <T> Future<T> submit(Callable<T> task);
    <T> Future<T> submit(Runnable task, T result);
    Future<?> submit(Runnable task);
    // ......
}
提供了很多管理线程的方法,从该接口开始才像一个线程池。
③ThreadPoolExecutor
/**
 * An {@link ExecutorService} that executes each submitted task using
 * one of possibly several pooled threads, normally configured
 * using {@link Executors} factory methods.
 *
 * <p>Thread pools address two different problems: they usually
 * provide improved performance when executing large numbers of
 * asynchronous tasks, due to reduced per-task invocation overhead,
 * and they provide a means of bounding and managing the resources,
 * including threads, consumed when executing a collection of tasks.
 * Each {@code ThreadPoolExecutor} also maintains some basic
 * statistics, such as the number of completed tasks.
 *
 * <p>To be useful across a wide range of contexts, this class
 * provides many adjustable parameters and extensibility
 * hooks. However, programmers are urged to use the more convenient
 * {@link Executors} factory methods {@link
 * Executors#newCachedThreadPool} (unbounded thread pool, with
 * automatic thread reclamation), {@link Executors#newFixedThreadPool}
 * (fixed size thread pool) and {@link
 * Executors#newSingleThreadExecutor} (single background thread), that
 * preconfigure settings for the most common usage
 * scenarios. Otherwise, use the following guide when manually
 * configuring and tuning this class:
 ......
 **/
public class ThreadPoolExecutor extends AbstractExecutorService {
	// ......
}
AbstractExecutorService是ExecutorService接口的一个抽象类,提供了部分方法的实现,然后ThreadPoolExecutor继承了AbstractExecutorService。ThreadPoolExecutor是线程池功能中最关键的一个类。它的主要功能包括:创建线程池,给任务分配线程资源,执行任务,管理线程等等。简单情况下,可以使用Executors工具类创建线程池即可,但实际上逻辑仍然是调用ThreadPoolExecutor的构造方法。(Executors存在缺陷,工业上一般不适用它,直接用ThreadPoolExecutor)
ThreadPoolExecutor
4个构造方法
public class ThreadPoolExecutor extends AbstractExecutorService {
    // 1
    public ThreadPoolExecutor(int corePoolSize, int maximumPoolSize, long keepAliveTime,
                                  TimeUnit unit, BlockingQueue<Runnable> workQueue) {
            this(corePoolSize, maximumPoolSize, keepAliveTime, unit, workQueue,
                 Executors.defaultThreadFactory(), defaultHandler);
        }
    // 2
    public ThreadPoolExecutor(int corePoolSize, int maximumPoolSize, long keepAliveTime,
                              TimeUnit unit, BlockingQueue<Runnable> workQueue,
                              ThreadFactory threadFactory) {
        this(corePoolSize, maximumPoolSize, keepAliveTime, unit, workQueue,
             threadFactory, defaultHandler);
    }
    // 3
    public ThreadPoolExecutor(int corePoolSize, int maximumPoolSize, long keepAliveTime,
                              TimeUnit unit, BlockingQueue<Runnable> workQueue,
                              RejectedExecutionHandler handler) {
        this(corePoolSize, maximumPoolSize, keepAliveTime, unit, workQueue,
             Executors.defaultThreadFactory(), handler);
    }
    // 4
    public ThreadPoolExecutor(int corePoolSize, int maximumPoolSize,
                              long keepAliveTime, TimeUnit unit,
                              BlockingQueue<Runnable> workQueue, ThreadFactory threadFactory,
                              RejectedExecutionHandler handler) {
        if (corePoolSize < 0 || maximumPoolSize <= 0 || maximumPoolSize < corePoolSize ||
            keepAliveTime < 0)
            throw new IllegalArgumentException();
        if (workQueue == null || threadFactory == null || handler == null)
            throw new NullPointerException();
        this.corePoolSize = corePoolSize;
        this.maximumPoolSize = maximumPoolSize;
        this.workQueue = workQueue;
        this.keepAliveTime = unit.toNanos(keepAliveTime);
        this.threadFactory = threadFactory;
        this.handler = handler;
    }
}
很多构造参数,来看看JDK里文档对这些参数的注释:
/**
     * Creates a new {@code ThreadPoolExecutor} with the given initial
     * parameters.
     *
     * @param corePoolSize the number of threads to keep in the pool, even
     *        if they are idle, unless {@code allowCoreThreadTimeOut} is set
     * @param maximumPoolSize the maximum number of threads to allow in the
     *        pool
     * @param keepAliveTime when the number of threads is greater than
     *        the core, this is the maximum time that excess idle threads
     *        will wait for new tasks before terminating.
     * @param unit the time unit for the {@code keepAliveTime} argument
     * @param workQueue the queue to use for holding tasks before they are
     *        executed.  This queue will hold only the {@code Runnable}
     *        tasks submitted by the {@code execute} method.
     * @param threadFactory the factory to use when the executor
     *        creates a new thread
     * @param handler the handler to use when execution is blocked
     *        because the thread bounds and queue capacities are reached
     * @throws IllegalArgumentException if one of the following holds:<br>
     *         {@code corePoolSize < 0}<br>
     *         {@code keepAliveTime < 0}<br>
     *         {@code maximumPoolSize <= 0}<br>
     *         {@code maximumPoolSize < corePoolSize}
     * @throws NullPointerException if {@code workQueue}
     *         or {@code threadFactory} or {@code handler} is null
     */
corePoolSize:核心池的大小。the number of threads to keep in the pool
maximumPoolSize:线程池最大线程数。the maximum number of threads to allow in the pool
poolSize:线程池中当前的线程数。the current number of threads in the pool
这三者的关系:
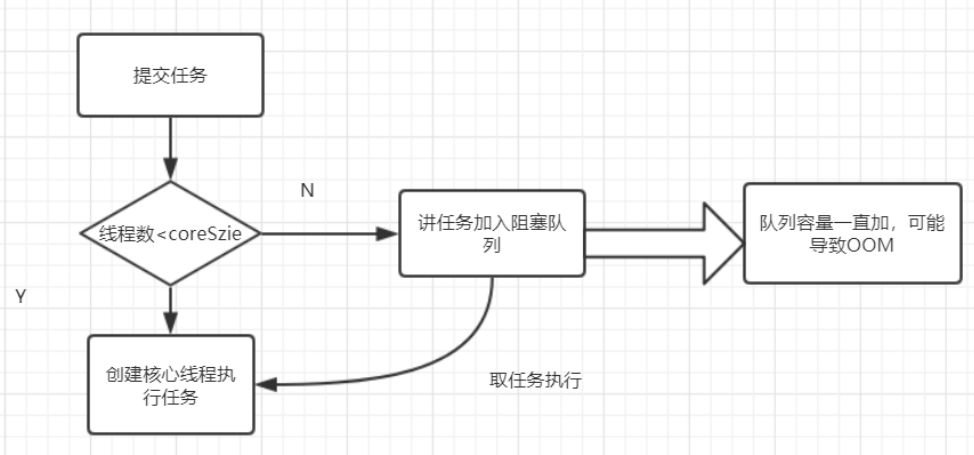
当提交一个新的任务等待处理,那么有几种情况:
①线程池中有可用的空闲idle线程,直接使用该线程进行任务。
②poolSize < corePoolSize,新增加一个线程去处理。
③poolSize == corePoolSize,新任务被放入阻塞队列中等待
④如果阻塞队列满了,如果此时poolSize < maximumPoolSize,新增加线程去处理。
⑤如果阻塞队列已满,且 poolSize == maximumPoolSize,此时线程池已经达到极限,会根据饱和策略RejectedExecutionHandler拒绝新的任务。
假设工作完成后,此时线程池会保留corePoolSize个线程(处于idle状态)。如果工作完成后,此时poolSize > corePoolSize,此时会终止一部分idle线程(只保留corePoolSize个线程),但并不是立刻,而是当线程进入idle时间超过keepAliveTime时,单位为unit,才会终止。
workQueue:阻塞队列,有5种。
①ArrayBlockQueue,有界队列,使用数组实现的FIFO队列
②LinkedBlockingQueue,可设置容量,如果不设置,那么会是无界队列,最大长度为Integer.MAX_VALUE。吞吐量比有界队列要高,但是可能引起OOM异常。
③DelayQueue,延迟队列,先按执行的时间长度进行排序(时间短的优先),再按照先后顺序进行排序。
④PriorityBlockingQueue,优先级队列
⑤SynchronousQueue,同步队列。不存储元素,只有在有空闲线程时才调用该空闲线程进行工作,否则就新建一个线程来处理。
threadFactory:线程工厂,定义创建线程的方法逻辑
handler:拒绝服务时的策略
①ThreadPoolExecutor.AbortPolicy,丢弃任务,抛出异常
②ThreadPoolExecutor.DiscardPolicy,丢弃任务,不抛异常
③ThreadPoolExecutor.DiscardOldestPolicy,丢弃队列最前面的任务,然后重新尝试执行任务
④ThreadPoolExecutor.CallerRunsPolicy,由调用线程本身处理该任务(不会进入线程池中执行)
execute方法
public void execute(Runnable command) {
        if (command == null)
            throw new NullPointerException();
    // ...
        int c = ctl.get();
	// ...
    }
ctl变量
最先出现的是一个ctl变量,ctl变量是一个AtomicInteger:
private final AtomicInteger ctl = new AtomicInteger(ctlOf(RUNNING, 0));
    private static final int COUNT_BITS = Integer.SIZE - 3;
    private static final int CAPACITY   = (1 << COUNT_BITS) - 1;

    // runState is stored in the high-order bits
    private static final int RUNNING    = -1 << COUNT_BITS;
    private static final int SHUTDOWN   =  0 << COUNT_BITS;
    private static final int STOP       =  1 << COUNT_BITS;
    private static final int TIDYING    =  2 << COUNT_BITS;
    private static final int TERMINATED =  3 << COUNT_BITS;

    // Packing and unpacking ctl
    private static int runStateOf(int c)     { return c & ~CAPACITY; }
    private static int workerCountOf(int c)  { return c & CAPACITY; }
    private static int ctlOf(int rs, int wc) { return rs | wc; }
AtomicInteger保证了对该Integer的操作都是原子的,而且此处的ctl用一个数字就表示了两种状态。
状态1:rs:runState,表示线程池的5种状态:Running,Shutdown,Stop,Tidying,Terminate
状态2:wc:workerCount,有效线程数。
rs要用3位来存储(最高位的3位,含符号位),因而代码规定线程个数最大为2 ^ 29 - 1
高3位表示的状态:101:Running,000:Shutdown,001:Stop,010:Tidying,011:Terminate
(排序:Running < Shutdown < Stop < Tidying < Terminated)
所以也就可以理解ctl那个诡异的构造方法 ctlOf 了,rs | wc。
execute
回到execute方法
public void execute(Runnable command) {
        if (command == null)
            throw new NullPointerException();
        /*
         * Proceed in 3 steps:
         *
         * 1. If fewer than corePoolSize threads are running, try to
         * start a new thread with the given command as its first
         * task.  The call to addWorker atomically checks runState and
         * workerCount, and so prevents false alarms that would add
         * threads when it shouldn't, by returning false.
         *
         * 2. If a task can be successfully queued, then we still need
         * to double-check whether we should have added a thread
         * (because existing ones died since last checking) or that
         * the pool shut down since entry into this method. So we
         * recheck state and if necessary roll back the enqueuing if
         * stopped, or start a new thread if there are none.
         *
         * 3. If we cannot queue task, then we try to add a new
         * thread.  If it fails, we know we are shut down or saturated
         * and so reject the task.
         */
        int c = ctl.get();
    // workerCountOf,获取当前有效线程数, 如果少于corePoolSize,新建线程进行操作.
        if (workerCountOf(c) < corePoolSize) {
            if (addWorker(command, true))	// 新建线程去工作
                return;
            c = ctl.get();	// 有可能创建失败的,因为中途可能线程池插入了其他线程,达到了corePoolSize阈值
            // 此时就要重新再获取一次ctl的值
        }
    // 此时有效线程数大于等于corePoolSize,并且线程池状态为Running,那么就要尝试把任务插入到等待队列
        if (isRunning(c) && workQueue.offer(command)) {
            int recheck = ctl.get();
    // recheck的原因:可能外层if的时候,线程池是Running的,但后续使用的时候该线程池已经不再是Running
    // 这也就是上面step2的注释:or that the pool shut down since entry into this method
            if (! isRunning(recheck) && remove(command))
                reject(command);		// 线程池不Running,不再添加任务,这种情况下就只能reject了
            else if (workerCountOf(recheck) == 0)
                addWorker(null, false);		// 如果有效线程为0,就添加一个Worker,但不会执行该任务.
        }
    // 执行到这里有两种情况:①线程池不为Running ②线程池Running,但等待队列已满
        else if (!addWorker(command, false))	// 尝试能否addWorker,有可能其他线程在中途被关闭
            reject(command);		// 新建线程失败,只能reject
    }
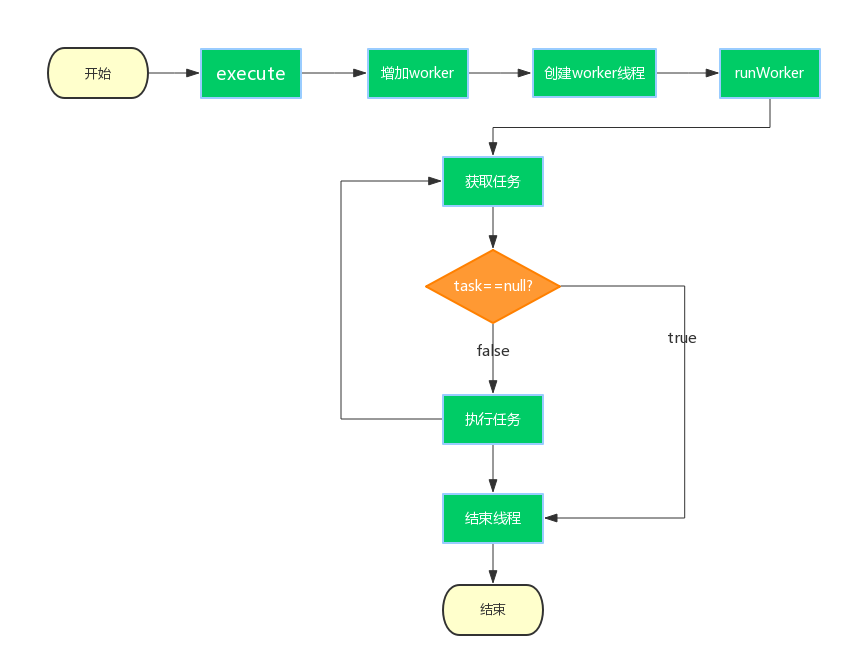
execute主要是对ctl的判断,根据线程池的状态和有效线程数量来进行新建线程还是添加任务到队列,还是拒绝。里面调用的其他方法主要是:addWorker方法。
addWorker
方法参数:firstTask:表明新线程要执行的第一个任务。如果直接传入command,那么就是该线程新建出来就直接执行该任务。如果传入null,表明只创建,不立即执行。
core:如果是true,表明边界是corePoolSize,false表明是maximumPoolSize。execute方法里的true/false参数也更好理解了。
private boolean addWorker(Runnable firstTask, boolean core) {
        retry:
        for (;;) {
            int c = ctl.get();
            int rs = runStateOf(c);			// 获取线程池的状态

            // 如果线程池为Running,继续执行
            // 如果状态为Tidying,Stop,Terminate,不再执行
            // 如果线程池为Shutdown,当传入的firstTask为null且等待队列不为空,才继续执行.否则不再执行
            // Check if queue empty only if necessary.
            if (rs >= SHUTDOWN &&
                ! (rs == SHUTDOWN &&
                   firstTask == null &&
                   ! workQueue.isEmpty()))
                return false;

            for (;;) {
                int wc = workerCountOf(c);		// 获取线程池的有效线程数
                if (wc >= CAPACITY ||
                    wc >= (core ? corePoolSize : maximumPoolSize))	// 超出限制数就return false
                    return false;
                if (compareAndIncrementWorkerCount(c))	// CAS自增成功,跳出两层循环
                    break retry;
                c = ctl.get();  // Re-read ctl
                if (runStateOf(c) != rs)
                    continue retry;				// 如果线程池状态发生了改变,从外层循环重新开始
                //执行到这里说明CAS自增失败(conflict),且线程池状态没有改变,直接从内层循环开始
                // else CAS failed due to workerCount change; retry inner loop
            }
        }
    // 到目前为止只是对ctl变量进行了原子性的自增操作,后续才是addWorker的逻辑.

        boolean workerStarted = false;
        boolean workerAdded = false;
        Worker w = null;
        try {
            w = new Worker(firstTask);	// 创建Worker,构造参数为firstTask
            final Thread t = w.thread;	// thread是Worker的属性,表示执行当前任务的线程
            if (t != null) {
                // mainLock是ThreadPoolExecutor的ReentrantLock类型变量
                final ReentrantLock mainLock = this.mainLock;
                mainLock.lock();
                try {
                    // Recheck while holding lock.
                    // Back out on ThreadFactory failure or if
                    // shut down before lock acquired.
                    int rs = runStateOf(ctl.get());

                    // 只有当线程池状态为Running,或者状态是Shutdown且firstTask为null才新建Worker
                    if (rs < SHUTDOWN ||
                        (rs == SHUTDOWN && firstTask == null)) {
                        // 线程此时还没有启动,如果Alive则说明并发出错,这里要退出逻辑
                        if (t.isAlive()) // precheck that t is startable
                            throw new IllegalThreadStateException();
                        workers.add(w);			// workers是一个HashSet
                        int s = workers.size();
                        if (s > largestPoolSize)
                            largestPoolSize = s;
                        workerAdded = true;		// 设置largestPoolSize, workerAdded标记量
                    }
                } finally {
                    mainLock.unlock();		// 创建完线程,释放mainLock
                }
                if (workerAdded) {	// 启动线程执行任务
                    t.start();
                    workerStarted = true;
                }
            }
        } finally {
            if (! workerStarted)	// 如果线程没有启动,那么这个Worker就相当于创建失败
                addWorkerFailed(w);			// 清理掉这个无用的Worker
        }
        return workerStarted;
    }
总体逻辑:
step1:获取 ctl 的线程池状态以及有效线程数,判断能否新增。如果可以,通过CAS进行原子性自增。
step2:创建 Worker,后续要添加到ThreadPoolExecutor里的一个HashSet集合里。该集合是线程不安全的,因而还需要一个独占锁ReentrantLock mainLock,加锁保证线程安全。
step3:加入到HashSet中并不是结束,还要启动线程,如果此时线程因为各种原因,没有成功启动,那么这个线程就失去了意义,此时要跳转到addWorkerFailed方法,把该线程清理掉。
Question:为什么要用ReentrantLock+HashSet,而不是直接使用同步集合SynchronizedSet?
Ans:根据JDK里的解释: Among the reasons is that this serializes interrupt Idle Workers, which avoids unnecessary interrupt storms, especially during shutdown. Otherwise exiting threads would concurrently interrupt those that have not yet interrupted. It also simplifies some of the associated statistics bookkeeping of largestPoolSize etc. 大概是可以避免中断某一个线程的时候,使用同步集合可能引起其他线程也发生中断。同时使用一个简单的集合类,还能简化一些属性的记录,比如largestPoolSize等。
Worker
Worker的逻辑:
private final class Worker extends AbstractQueuedSynchronizer implements Runnable {
    // ...
    protected boolean tryAcquire(int unused) {
        if (compareAndSetState(0, 1)) {
            setExclusiveOwnerThread(Thread.currentThread());
            return true;
        }
        return false;
    }

    public void run() {
        runWorker(this);
    }
}
Worker继承了AQS,因此它是使用AQS来实现独占锁的方式。
Question:为什么Worker要使用AQS,而不使用ReentrantLock来实现?
Ans:JDK解释:We implement a simple non-reentrant mutual exclusion lock rather than use ReentrantLock because we do not want worker tasks to be able to reacquire the lock when they invoke pool control methods like setCorePoolSize. 设计者不希望Worker线程能够重新获得其他关于线程池控制方法的锁。Worker线程应该用于执行它自己的任务,但它不应该具有调用线程池控制方法的功能,比如setCorePoolSize。如果直接使用ReentrantLock,那么Worker线程使用的是可重入锁,在执行自身任务的时候,还能进行setCorePoolSize,这就容易出错(一边执行线程,一边更改线程池的配置)。于是Worker选择自己继承AQS,重写tryAcquire,实现了非可重入锁。
而对于Worker,最后会调用它的run方法,实际上是调用ThreadPoolExecutor的runWork方法:
runWorker
final void runWorker(Worker w) {
        Thread wt = Thread.currentThread();
        Runnable task = w.firstTask;
        w.firstTask = null;
        w.unlock(); // allow interrupts
        boolean completedAbruptly = true;
        try {
            // 先执行Worker的firstTask,之后不断地尝试从任务队列中取出任务来执行
            while (task != null || (task = getTask()) != null) {
                // 执行任务前先上锁,避免同一个任务被多个线程执行
                w.lock();
                // 如果线程池正在停止,那么要保证当前线程是中断状态
                // 如果不是,那么要确保当前线程没有处于interrupted状态
                // If pool is stopping, ensure thread is interrupted;
                // if not, ensure thread is not interrupted.  This
                // requires a recheck in second case to deal with
                // shutdownNow race while clearing interrupt
                if ((runStateAtLeast(ctl.get(), STOP) ||
                     (Thread.interrupted() &&
                      runStateAtLeast(ctl.get(), STOP))) &&
                    !wt.isInterrupted())
                    wt.interrupt();
                try {
                    beforeExecute(wt, task);	// 空方法,可以自己拓展
                    Throwable thrown = null;
                    try {
                        task.run();		// 自定义的Runnable/Callable的run方法具体逻辑
                    } catch (RuntimeException x) {
                        thrown = x; throw x;
                    } catch (Error x) {
                        thrown = x; throw x;
                    } catch (Throwable x) {
                        thrown = x; throw new Error(x);
                    } finally {
                        afterExecute(task, thrown);		// 空方法,可以自己拓展
                    }
                } finally {
                    task = null;	// firstTask执行一次就可以置为null
                    w.completedTasks++;		// 计算已经执行的Task数量
                    w.unlock();
                }
            }
            completedAbruptly = false;	// 记录任务执行过程中是否出现了异常
        } finally {
            processWorkerExit(w, completedAbruptly);	// 结束
        }
    }
runWorker方法就是优先执行firstTask,然后不断执行等待队列中的任务(getTask方法),最后执行到task.run();就是任务的具体逻辑。同时还有一个completedAbruptly变量来记录是否出现异常。结束的时候调用processWorkerExit方法。执行到最后的情况有两种,一种是是出现异常,此时应该重新新建线程来执行任务。另一种情况是等待队列为空,线程进入idle状态,等待keepAliveTime之后就被删掉。
getTask
先看getTask方法的逻辑,从等待队列中获取任务:
private Runnable getTask() {
    // timeOut变量表示上一次从等待队列中获取任务是否超时
        boolean timedOut = false; // Did the last poll() time out?

        for (;;) {
            int c = ctl.get();
            int rs = runStateOf(c);

            // rs >= SHUTDOWN,说明不是Running状态
            // 接着再判断线程池状态是否为Stop/Tidying/Terminate,或者等待队列已经为空
            // 如果满足上述条件, 将workerCount减1(CAS减1操作),并返回null
            // Check if queue empty only if necessary.
            if (rs >= SHUTDOWN && (rs >= STOP || workQueue.isEmpty())) {
                // 如果是Shutdown状态,并不会直接return,而是把当下的任务继续执行完
                decrementWorkerCount();
                return null;
            }

            int wc = workerCountOf(c);

            // Are workers subject to culling?
            // timed变量用于判断是否需要进行超时控制
            // allowCoreThreadTimeOut默认是false,也就是核心线程默认不允许超时
            // 而当线程数量超过corePoolSize,那么就需要进行超时控制
            boolean timed = allowCoreThreadTimeOut || wc > corePoolSize;

            // wc > maximumPoolSize,说明是在任务执行阶段同时执行了setMaximumPoolSize方法
            // 既然都比maximumPoolSize大,那么肯定也超过了corePoolSize,因而需要进行超时控制
            // 如果 timed && timuedOut为true,说明需要超时控制,并且上次获取队列超时
            // 如果此时有效线程数大于1,或者等待队列为空,那么就尝试把workCount减1
            if ((wc > maximumPoolSize || (timed && timedOut))
                && (wc > 1 || workQueue.isEmpty())) {
                if (compareAndDecrementWorkerCount(c))
                    return null;
                continue;	// 减1失败,需要重试
            }

            try {
                // 如果需要超时控制,那么在keepAliveTime时间下,如果无法获取任务
                // 也就是idle时间超过keepAliveTime,那么就返回null
                Runnable r = timed ?
                    workQueue.poll(keepAliveTime, TimeUnit.NANOSECONDS) :
                    workQueue.take();
                // 如果执行take方法时队列为空,take方法会阻塞,直到队列不为空
                if (r != null)
                    return r;
                // 如果r为null,说明已经超时,timeOut设置为true
                timedOut = true;
            } catch (InterruptedException retry) {
                // 如果获取任务时,线程出现了中断,则重试
                timedOut = false;
            }
        }
    }
该方法的关键在于第二个if判断,目标是控制线程池的有效线程数量。当线程池的数量超过了corePoolSize,但后续等待队列已空,此时就可以销毁一部分的线程,保持线程数量为corePoolSize。至于什么时候销毁,则是执行完runWorker之后,等待Worker的run方法执行完,由JVM自动回收。当getTask方法返回null时,在runWorker会跳出循环,最后就是执行processWorkerExit方法。
processWorkerExit
processWorkerExit方法:
private void processWorkerExit(Worker w, boolean completedAbruptly) {
    // 如果线程执行时出现异常,需要将workerCount减1
    // 如果没有出现异常,那么在getTask方法中就已经对workerCount进行了减1操作
        if (completedAbruptly) // If abrupt, then workerCount wasn't adjusted
            decrementWorkerCount();

        final ReentrantLock mainLock = this.mainLock;
        mainLock.lock();	// addWork时要加锁, removeWork也要加锁.
        try {
            completedTaskCount += w.completedTasks;
            workers.remove(w);		// 统计完成的任务数,并从HashSet
        } finally {
            mainLock.unlock();
        }
		// 根据线程池的状态,进行判断是否要结束线程池
        tryTerminate();

        int c = ctl.get();
        if (runStateLessThan(c, STOP)) {	// 状态为Running或Shutdown
            if (!completedAbruptly) {		// 没有发生异常
                int min = allowCoreThreadTimeOut ? 0 : corePoolSize; // 是否进行超时控制
                if (min == 0 && ! workQueue.isEmpty())
                    min = 1;	// 等待队列有任务, 那么至少要保留一个worker
                if (workerCountOf(c) >= min)	// 如果不需要超时控制, workerCount不少于corePoolSize
                    return; // replacement not needed
            }
            addWorker(null, false);	// 发生了异常,直接addWorker重新去完成任务
        }
    }
至此,processWorkerExit执行完毕后,工作线程被销毁。但如果是因为发生异常而进入该方法逻辑,则会重新addWorker来处理原本的任务。
整个流程:
submit方法
submit方法,也是向线程池提交任务,实际上还是调用了execute方法。但它利用了一个Future接口,把Runnable任务改造成了RunnableFuture,从而可以获取任务执行结果。 而且execute方法只能处理Runnable任务,而submit可以处理Runnable任务,也可以处理Callable任务。
submit
submit方法,实际上在ThreadPoolExecutor里是没有进行重写的,所以submit的方法逻辑在AbstractExecutorService里:
public Future<?> submit(Runnable task) {
    if (task == null) throw new NullPointerException();
    RunnableFuture<Void> ftask = newTaskFor(task, null);
    execute(ftask);
    return ftask;
}

/**
     * @throws RejectedExecutionException {@inheritDoc}
     * @throws NullPointerException       {@inheritDoc}
     */
public <T> Future<T> submit(Runnable task, T result) {
    if (task == null) throw new NullPointerException();
    RunnableFuture<T> ftask = newTaskFor(task, result);
    execute(ftask);
    return ftask;
}

/**
     * @throws RejectedExecutionException {@inheritDoc}
     * @throws NullPointerException       {@inheritDoc}
     */
public <T> Future<T> submit(Callable<T> task) {
    if (task == null) throw new NullPointerException();
    RunnableFuture<T> ftask = newTaskFor(task);
    execute(ftask);
    return ftask;
}
可以看到,是先通过newTaskFor方法,把任务封装成RunnableFuture,再调用execute,最后把RunnableFuture作为Future类型返回。
RunnableFuture
RunnableFuture是一个接口,定义:
public interface RunnableFuture<V> extends Runnable, Future<V> {
    /**
     * Sets this Future to the result of its computation
     * unless it has been cancelled.
     */
    void run();
}
RunnableFuture继承了Runnable和Future,所以其实现类需要实现run方法,而且它也能作为Future类型返回。
Future也是一个接口,定义:
public interface Future<V> {

    boolean cancel(boolean mayInterruptIfRunning);

    boolean isCancelled();

    boolean isDone();

    V get() throws InterruptedException, ExecutionException;

    V get(long timeout, TimeUnit unit)
        throws InterruptedException, ExecutionException, TimeoutException;
}
可以看到Future的功能:判断是否完成任务,能否中断,获取执行结果。而RunnableFuture是一个次级接口。
newTaskFor
接着我们查看newTaskFor方法的逻辑:
protected <T> RunnableFuture<T> newTaskFor(Callable<T> callable) {
    return new FutureTask<T>(callable);
}
newTaskFor方法创建的是一个FutureTask对象,而FutureTask是实现了RunnableFuture接口的类。
FutureTask
public class FutureTask<V> implements RunnableFuture<V> {
    /**
     * The run state of this task, initially NEW.  The run state
     * transitions to a terminal state only in methods set,
     * setException, and cancel.  During completion, state may take on
     * transient values of COMPLETING (while outcome is being set) or
     * INTERRUPTING (only while interrupting the runner to satisfy a
     * cancel(true)). Transitions from these intermediate to final
     * states use cheaper ordered/lazy writes because values are unique
     * and cannot be further modified.
     *
     * Possible state transitions:
     * NEW -> COMPLETING -> NORMAL
     * NEW -> COMPLETING -> EXCEPTIONAL
     * NEW -> CANCELLED
     * NEW -> INTERRUPTING -> INTERRUPTED
     */
    private volatile int state;					// state是volatile变量
    private static final int NEW          = 0;
    private static final int COMPLETING   = 1;
    private static final int NORMAL       = 2;
    private static final int EXCEPTIONAL  = 3;
    private static final int CANCELLED    = 4;
    private static final int INTERRUPTING = 5;
    private static final int INTERRUPTED  = 6;

    /** The underlying callable; nulled out after running */
    private Callable<V> callable;

    // outcome没必要为volatile,因为其伴随着state进行读写,state是FutureTask的主导因素
    // outcome就是线程的执行结果(最后返回FutureTask本身,可以通过outcome获取执行结果)
    /** The result to return or exception to throw from get() */
    private Object outcome; // non-volatile, protected by state reads/writes
    /** The thread running the callable; CASed during run() */
    private volatile Thread runner;
    /** Treiber stack of waiting threads */
    private volatile WaitNode waiters;	// 并发stack数据,用于存放阻塞在该FutureTask#get方法的线程

	public FutureTask(Callable<V> callable) {
        if (callable == null)
            throw new NullPointerException();
        this.callable = callable;
        this.state = NEW;       // ensure visibility of callable
    }

    public FutureTask(Runnable runnable, V result) {
        this.callable = Executors.callable(runnable, result);	// Runnable转Callable
        this.state = NEW;       // ensure visibility of callable
    }
    // ...
}
可以看到,newTaskFor最终返回了一个FutureTask,并将其与Callable相连接。如果传入Callable参数,则直接赋值。如果传入的是Runnable,则先转换成Callable。
FutureTask是一个可取消的异步计算,实现了Future的基本方法,提供了start,cancel等操作,可以查询计算是否已经完成,并且可以获取计算的结果。使用get可以获取计算的结果,而且只能在计算完成之后才能获取,一旦还没有完成,调用时会阻塞,等待计算完成。FutureTask有两个很重要的属性,分别是state和runner。
state表示当前任务的状态:
NEW:初始化的时候设置,表示内部的callable成员已经成功赋值,该状态持续到run方法执行结束之前。
COMPLETING:线程在处理任务时设定的中间状态,表示线程正准备设置result
NORMAL:当设置result结果完成后,表示过程结果。这是正确完成任务时的最终状态
EXCEPTIONAL:任务执行过程出现异常,此时的最终结果就是EXCEPTIONAL
CANCELLED:任务还没有执行就被cancel的状态
INTERRUPTING:任务执行过程中被interrupt时的所设置的状态
INTERRUPTED:中断完毕的最终状态
state初始化为NEW,只有在set,setException,cancel方法中的state才可以转变为终态。在任务完成期间,state的值可能是COMPLETING或者INTERRUPTING。
state有4种可能的状态转换:
① NEW → COMPLETING → NORMAL
② NEW → COMPLETING → EXCEPTIONAL
③ NEW → CANCELLED
④ NEW → INTERRUPTING → INTERRUPTED
创建完FutureTask之后,调用的依然是ThreadPoolExecutor的execute方法。最后的逻辑就跟上面介绍execute的一样,最后执行到runWorker方法,在里面调用了run方法,在这里是FutureTask自定义的run方法。
FutureTask#run
public void run() {
    // 首先要判断任务的状态state,如果任务状态不是NEW,说明任务状态已经发生改变(已经走了上面4种可能中的一种)
        if (state != NEW ||
            !UNSAFE.compareAndSwapObject(this, runnerOffset,
                                         null, Thread.currentThread()))
            return;	// 如果为NEW,再判断runner,如果runner不为null,说明已经有线程在执行,返回.
        try {			// 执行到这里,说明刚刚就把当前执行的线程赋值给了runner
            Callable<V> c = callable;		// 开始执行任务
            if (c != null && state == NEW) {	// 任务不为空切状态为new,就执行
                V result;
                boolean ran;
                try {
                    result = c.call();	// 执行任务
                    ran = true;			// 执行成功
                } catch (Throwable ex) {
                    result = null;
                    ran = false;
                    setException(ex);
                }
                if (ran)
                    set(result);		// 设置最后的结果
            }
        } finally {
            // runner must be non-null until state is settled to
            // prevent concurrent calls to run()
            runner = null;		// 无论是否执行成功,都把runner设置为null
            // state must be re-read after nulling runner to prevent
            // leaked interrupts
            int s = state;
            if (s >= INTERRUPTING)
                handlePossibleCancellationInterrupt(s);
        }
    }
对于第一个判断状态的!UNSAFE.compareAndSwapObject(this, runnerOffset, null, Thread.currentThread()),相当于:
if (this.runner == null ) {
    this.runner = Thread.currentThread();
}
只是CAS使其具备了原子性。
FutureTask#set
而在线程正确执行完任务之后,会把result通过set方法设置给outcome成员变量:
protected void set(V v) {
    if (UNSAFE.compareAndSwapInt(this, stateOffset, NEW, COMPLETING)) {
        outcome = v;
        UNSAFE.putOrderedInt(this, stateOffset, NORMAL); // final state
        finishCompletion();
    }
}
可以看到,在set方法里,把执行结果赋值给了outcome,并且把线程的最终状态设置为NORMAL。最后又还要调用一个finishCompletion方法:
FutureTask#finishCompletion
/**
     * Removes and signals all waiting threads, invokes done(), and
     * nulls out callable.
     */
    private void finishCompletion() {
        // assert state > COMPLETING;
        for (WaitNode q; (q = waiters) != null;) {
            if (UNSAFE.compareAndSwapObject(this, waitersOffset, q, null)) {
                for (;;) {
                    Thread t = q.thread;
                    if (t != null) {
                        q.thread = null;
                        LockSupport.unpark(t);
                    }
                    WaitNode next = q.next;
                    if (next == null)
                        break;
                    q.next = null; // unlink to help gc
                    q = next;
                }
                break;
            }
        }

        done();

        callable = null;        // to reduce footprint
    }
这个方法主要做了3件事情:
①遍历waiters队列,调用LockSupport.unpark(t);唤醒等待返回结果的线程,释放资源。
②调用done方法。这是一个空方法,子类可以实现这个方法,做一些额外的操作。
③设置callable为null,callable变量是FutureTask封装的任务,任务执行完,释放资源。
上面的是正常执行完成的状态变化,如果出现异常,那么会调用setException方法。
FutureTask#setException
protected void setException(Throwable t) {
    if (UNSAFE.compareAndSwapInt(this, stateOffset, NEW, COMPLETING)) {
        outcome = t;
        UNSAFE.putOrderedInt(this, stateOffset, EXCEPTIONAL); // final state
        finishCompletion();
    }
}
直接把异常信息作为执行结果,然后把最终状态设置为EXCEPTIONAL。对于剩下的两种状态转移情况,其实都是cancel,只是任务是否在执行的时候被cancel而导致的两种情况。如果任务还没开始就被取消,那就叫cancel。如果任务进行中被取消,就叫interrupted。二者具体都是调用cancel方法。
FutureTask#cancel
public boolean cancel(boolean mayInterruptIfRunning) {
        if (!(state == NEW &&
              UNSAFE.compareAndSwapInt(this, stateOffset, NEW,
                  mayInterruptIfRunning ? INTERRUPTING : CANCELLED)))
            return false;
        try {    // in case call to interrupt throws exception
            if (mayInterruptIfRunning) {
                try {
                    Thread t = runner;
                    if (t != null)
                        t.interrupt();
                } finally { // final state
                    UNSAFE.putOrderedInt(this, stateOffset, INTERRUPTED);
                }
            }
        } finally {
            finishCompletion();
        }
        return true;
    }
传入的参数mayInterruptIfRunning就是区分取消的时候任务是否正在执行。如果为false,说明没有执行,此时Task的状态变化就是:NEW→CANCELLED。如果为true,说明任务正在执行,状态为:NEW→INTERRUPTING→INTERRUPTED
至此,submit方法已经执行完毕,先构造出Callable,然后调用execute方法,通过FutureTask获取执行结果。最后的执行结果就是存到了FutureTask的outcome变量里,而submit方法最后正是直接把FutureTask作为结果返回,只要有了这个FutureTask对象,那么就可以获取执行结果。而获取结果需要调用FutureTask的get方法。
FutureTask#get
public V get() throws InterruptedException, ExecutionException {
    int s = state;
    if (s <= COMPLETING)
        s = awaitDone(false, 0L);
    return report(s);
}
逻辑比较简单,先判断状态,如果还没执行完,就等待。如果执行完毕,就执行report。report方法:
private V report(int s) throws ExecutionException {
    Object x = outcome;
    if (s == NORMAL)	// 只有当执行状态为NORMAL才返回正确结果
        return (V)x;
    if (s >= CANCELLED)			// CANCELLED
        throw new CancellationException();
    throw new ExecutionException((Throwable)x);	// INTERRUPTTED
}
FutureTask#awaitDone
那么还没执行完,需要等待,查看awaitDone方法:
private int awaitDone(boolean timed, long nanos)
    throws InterruptedException {
    final long deadline = timed ? System.nanoTime() + nanos : 0L;	// 一直等
    WaitNode q = null;
    boolean queued = false;
    for (;;) {
        if (Thread.interrupted()) {	// 如果调用get的线程被中断了,就移除此等待节点,抛出异常
            removeWaiter(q);
            throw new InterruptedException();
        }

        int s = state;		// 读取状态
        if (s > COMPLETING) {	// 任务已经执行完成,或者发生异常结束,此时都无需阻塞,直接返回
            if (q != null)
                q.thread = null;
            return s;
        }
        else if (s == COMPLETING) // cannot time out yet // 任务执行结束(可能正常,也可能异常)
            Thread.yield();		// 但是结果还没有保存到outcome,先让出执行权,给其他线程先执行
        else if (q == null)
            q = new WaitNode();		// 如果等待节点为null,就创建一个等待节点
        else if (!queued)			// 如果该节点还没有加入到等待队列,加入到队列头
            queued = UNSAFE.compareAndSwapObject(this, waitersOffset,
                                                 q.next = waiters, q);
        else if (timed) {			// 如果设置了超时,那么时间到了就移除当前节点
            nanos = deadline - System.nanoTime();
            if (nanos <= 0L) {
                removeWaiter(q);
                return state;
            }
            LockSupport.parkNanos(this, nanos);	// 还没超时,任务还没结束,阻塞特定的时间
        }
        else
            LockSupport.park(this);		// 阻塞,等待唤醒
    }
}
awaitDone方法内部是一个无限循环,看似很多判断,实际上这个循环最多执行3次。
假设一个线程A执行了get方法,但其子任务还没有执行完,此时A没有中断,那么它会进行以下步骤:
①执行awaitDone,判断等待节点q为null,因此第一次循环就是先创建了一个等待节点q。
②第二次循环,该节点不为null,但没有加入到等待队列中,于是就加入到队列。
③第三次循环,这次是最后的等待逻辑了。先判断是否中断,如果中断了就移除节点,退出,抛异常。然后判断是否设置了超时时间,如果设置了超时时间,那么就阻塞特定的时间。其余的情况,都是一直阻塞,等待被其他线程唤醒。
FutureTask总结
虽然是分析ThreadPoolExecutor,但是submit方法里面大量调用了FutureTask的方法,所以感觉像是在分析FutureTask,不过也没差。核心思想主要是使用volatile + CAS的方法,代替锁操作,进行同步,而CAS主要就是通过Unsafe类实现,底层是native方法。其次还有LockSupport的park和unpark方法的使用:
①park(Object blocker):线程进入阻塞状态,告诉线程调度,当前线程不可用,直到线程再次获取permit;如果在调用park之前,线程已经获得了permit(比如已经调用了unpark),那么该方法会直接返回。
②unpark(Thread thread):使得传入的线程再次获得permit。这里的permit可以理解为一个信号量。
LockSupport在这里的作用类似于wait / notify / notifyAll。
FutureTask的其他用法
异步IO
FutureTask除了用于获取线程执行结果,还可以实现异步调用。因为get方法会使线程进入阻塞状态,因而在summit到get这个过程,中间主线程可以继续执行其他任务,等到主线程需要子线程的计算结果时,再异步获取子线程的执行结果。
例子:
public static void main(String[] args) {
    Random random = new Random();
    ExecutorService pool = Executors.newSingleThreadExecutor();
    List<Future<Integer>> futureList = new ArrayList<>();
    int res = 0;
    for (int i = 0; i < 10; i++) {
        Callable<Integer> callable = new Callable<Integer>() {
            @Override
            public Integer call() throws Exception {
                int res = 0;
                for (int i = 1; i <= 10; i++)
                    res += random.nextInt(10);
                try {
                    Thread.sleep(1000);
                } catch (InterruptedException e) {
                    e.printStackTrace();
                }
                return res;
            }
        };
        Future<Integer> future = pool.submit(callable);
        futureList.add(future);
    }
    //doSth();    // FutureTask线程submit时, 主线程执行其他操作
    for (Future<Integer> future : futureList) {
        try {
            System.out.println(future);
            System.out.println(future.get());   // 阻塞future线程
            System.out.println("----");
        } catch (InterruptedException e) {
            e.printStackTrace();
        } catch (Exception e) {
            e.printStackTrace();
        }
    }
    pool.shutdown();
}
线程里创建了10个Callable线程,submit,然后执行到get,由于get会阻塞futuer线程,此时main线程可以等待结果(同步IO),也可以进行其他任务,等到future线程结束,再去get它的结果(异步获取子线程结果)。
即:计算future线程时,main也能进行其他操作,而不是傻等future thread的执行。在这个例子中,各个future线程会顺序执行,因为它们在get方法会阻塞其他future线程。主线程在执行到这里的时候也会阻塞,此时可以进行doSth。然后doSth完毕之后,执行到get,此时future线程们都已经调用结束,就跟没有阻塞一样,异步地获取了结果。
确保任务只执行一次
get方法,由上面的分析可得,它的阻塞方式是CAS + volatile + 等待队列。因此future线程get时,会阻塞其他future线程,因而可以确保只调用了一个get方法,确保任务只执行一次。
举例:对于一些方法,比如要求一个key只创建一个Connection(Spring),最简单的方法是Lock,但效率低下。改用ConcurrentHashMap可以几乎避免加锁操作,但在高并发的情况下还是会创建多个Connection对象,只是putIfAbsent的原子性操作确保了线程安全。
private ConcurrentHashMap<String, FutureTask<Connection>> connectionPool = new ConcurrentHashMap<>();

public Connection getConnection(String key) throws Exception {
    FutureTask<Connection> connectionTask = connectionPool.get(key);
    if (connectionTask != null) {
        return connectionTask.get();
    } else {
        Callable<Connection> callable = new Callable<Connection>() {
            @Override
            public Connection call() throws Exception {
                // TODO Auto-generated method stub
                return createConnection();
            }
        };
        FutureTask<Connection> newTask = new FutureTask<>(callable);
        connectionTask = connectionPool.putIfAbsent(key, newTask);
        if (connectionTask == null) {
            connectionTask = newTask;
            connectionTask.run();
        }
        return connectionTask.get();
    }
}

//创建Connection
private Connection createConnection() {
    return null;
}
最后的return connectionTask.get方法,阻塞了其他的FutureTask线程,而且它们需要等到第一个FutureTask线程执行完毕(成功get,也就是submit也已经完成)。这时候高并发可能还是会创建多个FutureTask,但从pool里get的connectionTask已经不为null,因而避免了多次调用createConnection逻辑。
Executors
作用:Executors是Executor框架里的工具类,相当于Collections。除了使用ThreadPoolExecutor创建线程池,还可以使用Executors创建(封装好了一部分参数),有4种常见的线程池。实际上还是调用了ThreadPoolExecutor的构造方法,而且虽然JDK推荐使用Executors创建线程池,但最佳的方法实际上就是使用ThreadPoolExecutor直接创建。但这里还是要了解Executors提供了哪4种常见线程池,有哪些特别,为什么不推荐使用Executors。
PS:每种线程池都有两个构造方法,一个包含ThreadFactory参数,一个不包含。这里暂时不考虑ThreadFactory参数。
newFixedThreadPool
public static ExecutorService newFixedThreadPool(int nThreads) {
    return new ThreadPoolExecutor(nThreads, nThreads,
                                  0L, TimeUnit.MILLISECONDS,
                                  new LinkedBlockingQueue<Runnable>());
}
可以看到,确实就是调用ThreadPoolExecutor构造方法。前两个参数是corePoolSize和maximumPoolSize,二者大小都相同,都为自定义的nThreads,因此keepAliveTime为0(不存在有效线程数超过corePoolSize的情况,也就无须判断idle线程的存活时间然后销毁线程了)。等待队列使用了无界队列,因而可能OOM。
工作机制:
测试代码:(Executors返回的是ExecutorService类型)
public static void testNewFixedPool() {
    ExecutorService pool = Executors.newFixedThreadPool(10);
    for (int i = 0; i < Integer.MAX_VALUE; i++) {
        pool.execute(() -> {
            try {
                Thread.sleep(10000);
            } catch (InterruptedException e) {
                e.printStackTrace();
            }
        });
    }
}
修改一下JVM参数-Xmx8m -Xms8m,运行代码:(如果不修改JVM参数,那么会一直创建线程直到把电脑内存耗尽
Exception in thread "main" java.lang.OutOfMemoryError: GC overhead limit exceeded
    at java.util.concurrent.LinkedBlockingQueue.offer(LinkedBlockingQueue.java:416)
    at java.util.concurrent.ThreadPoolExecutor.execute(ThreadPoolExecutor.java:1361)
    at learnJava.multithread.testPool.TestExecutors.testNewFixedPool(TestExecutors.java:22)
    at learnJava.multithread.testPool.TestExecutors.main(TestExecutors.java:217)
设置了JVM中最大空间大小为8m,调用testNewFixedPool方法时会一直循环创建线程,当线程到达一定数量,会超出JVM的内存限制,就抛出OOM。
Question:使用无界队列的线程池会导致内存飙升吗?
Ans:会的。如果线程的执行时间较长,会导致队列的任务越来越多,导致机器内存使用不断增加,最后导致OOM。比如newFixedThreadPool。
适用场景:适用于CPU密集型任务。也就是长期执行的任务,但又不会分配过多的线程,导致效率降低或者OOM。
newCachedThreadPool
public static ExecutorService newCachedThreadPool() {
    return new ThreadPoolExecutor(0, Integer.MAX_VALUE,
                                  60L, TimeUnit.SECONDS,
                                  new SynchronousQueue<Runnable>());
}
corePoolSize为0,max为Integer.MAX_VALUE,keepAliveTime为60秒,使用SynchronousQueue作为等待队列。
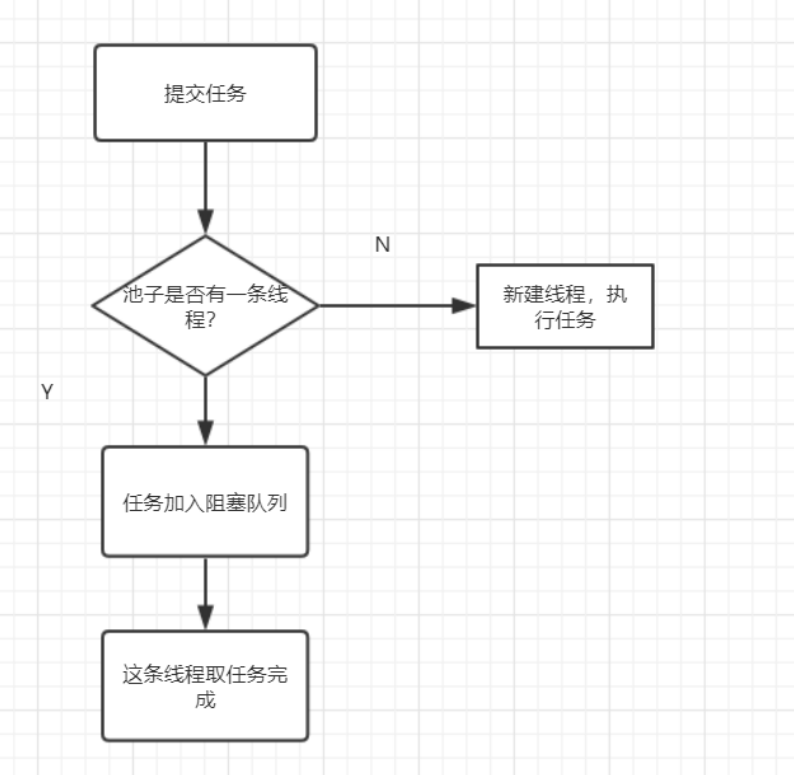
工作流程:
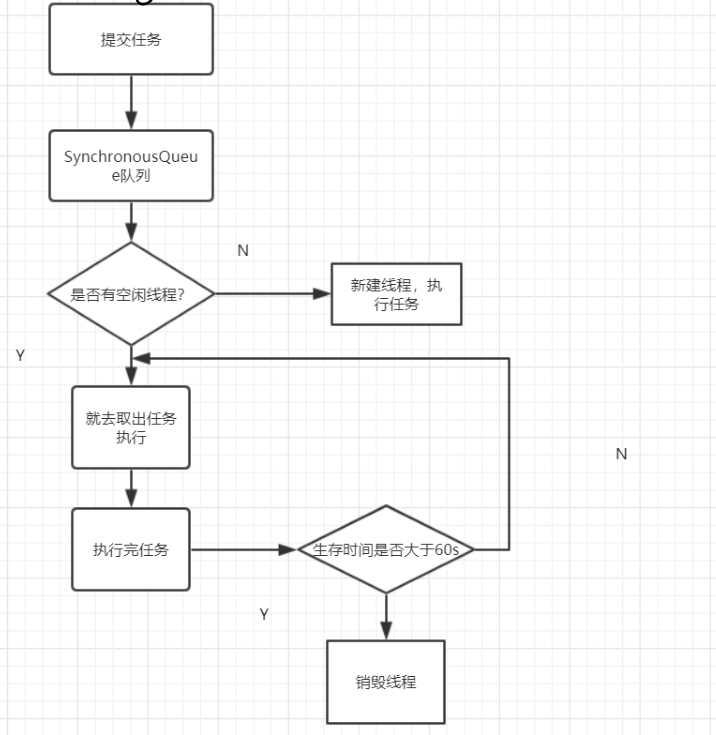
因为corePoolSize为0,所以没有核心线程,任务直接提交到等待队列。如果有空闲线程,那么就调用。如果没有则新建一个。执行完任务之后,线程继续去接下一个任务,或者进入idle状态,60秒后销毁。
测试代码:
public static void testNewCachedPool() {
    ExecutorService pool = Executors.newCachedThreadPool();
    for (int i = 0; i < 5; i++) {
        pool.execute(() -> {
            System.out.println(Thread.currentThread().getName() + " is running!");
        });
    }
}
运行结果:
pool-1-thread-1 is running!
pool-1-thread-4 is running!
pool-1-thread-3 is running!
pool-1-thread-2 is running!
pool-1-thread-5 is running!
适用场景:并发量较大的短期小任务
newSingleThreadExecutor
public static ExecutorService newSingleThreadExecutor() {
    return new FinalizableDelegatedExecutorService
        (new ThreadPoolExecutor(1, 1,
                                0L, TimeUnit.MILLISECONDS,
                                new LinkedBlockingQueue<Runnable>()));
}
corePoolSize和max都为1,使用无界队列,也就是线程池里一直只有1个线程。
工作流程:
只有1个线程。如果线程正在工作,则新来的任务添加到阻塞队列,逐个执行。
测试代码:
public static void testNewSinglePool() {
    ExecutorService pool = Executors.newSingleThreadExecutor();
    for (int i = 0; i < 5; i++)
        pool.execute(() -> {
            System.out.println(Thread.currentThread().getName() + " is running!");
        });
}
执行结果:
pool-1-thread-1 is running!
pool-1-thread-1 is running!
pool-1-thread-1 is running!
pool-1-thread-1 is running!
pool-1-thread-1 is running!
只有一个线程,串行地执行任务。
适用场景:串行执行任务,一个接一个地执行。
newScheduledThreadPool
public ScheduledThreadPoolExecutor(int corePoolSize) {
    super(corePoolSize, Integer.MAX_VALUE, 0, NANOSECONDS,
          new DelayedWorkQueue());
}
自行一corePoolSize,max为Integer.MAX_VALUE,使用DelayedWorkQueue队列,keepAliveTime为0,返回的是ScheduledExecutorService类型,可通过方法设置在某种速率下进行周期执行。
与其他线程直接execute不同,该线程池通过其他方法制订周期性任务:
public class ScheduledThreadPoolExecutor extends ThreadPoolExecutor
    implements ScheduledExecutorService {
    public ScheduledFuture<?> scheduleWithFixedDelay(Runnable command, long initialDelay,
                                                     long delay, TimeUnit unit) {
        if (command == null || unit == null)
            throw new NullPointerException();
        if (delay <= 0)
            throw new IllegalArgumentException();
        ScheduledFutureTask<Void> sft =
            new ScheduledFutureTask<Void>(command, null, triggerTime(initialDelay, unit),
                                          unit.toNanos(-delay));
        RunnableScheduledFuture<Void> t = decorateTask(command, sft);
        sft.outerTask = t;
        delayedExecute(t);
        return t;
    }

    public ScheduledFuture<?> scheduleAtFixedRate(Runnable command, long initialDelay,
                                                  long period, TimeUnit unit) {
        if (command == null || unit == null)
            throw new NullPointerException();
        if (period <= 0)
            throw new IllegalArgumentException();
        ScheduledFutureTask<Void> sft =
            new ScheduledFutureTask<Void>(command, null, triggerTime(initialDelay, unit),
                                          unit.toNanos(period));
        RunnableScheduledFuture<Void> t = decorateTask(command, sft);
        sft.outerTask = t;
        delayedExecute(t);
        return t;
    }
}
①scheduleWithFixedDelay(command, initialDelay, delay, unit);,初次在initialDelay时间后执行,随后每隔delay时间执行一次。
②scheduleAtFixedRate(command, initialDelay, period, unit);,初次在initialDelay时间后执行,后续每到 n * period时间就执行一次。 n为正整数。
二者区别举例:假设任务要100ms,间隔为3000ms。
对于①方法,会是执行完任务,等待间隔的时间再执行,即每个任务的开始执行时间为:
init,init + 3100, init + 6200 ……
对于②方法,则是: init,init + 3000, init + 6000。如果执行时间大于period,那么执行完立刻开始下一次。
综上:①方法的间隔稳定为delay,而②方法的间隔为: max {上一次任务执行时间, period}
测试代码:
public static void testNewSchedulePool() {
    ScheduledExecutorService pool = Executors.newScheduledThreadPool(1);
    //        pool.scheduleWithFixedDelay(new Runnable() {
    //            @Override
    //            public void run() {
    //                System.out.println("Current time: " + System.currentTimeMillis());
    //                System.out.println(Thread.currentThread().getName() + " is running");
    //            }
    //        }, 1, 3, TimeUnit.SECONDS);
    pool.scheduleAtFixedRate(() -> {
        System.out.println("Current time: " + System.currentTimeMillis());
        System.out.println(Thread.currentThread().getName() + " is running");
        try {
            Thread.sleep(5000);
        } catch (InterruptedException e) {
            e.printStackTrace();
        }
    }, 15, 2, TimeUnit.SECONDS);
}
执行结果:
Current time: 1587848985850
pool-1-thread-1 is running
Current time: 1587848990851
pool-1-thread-1 is running
Current time: 1587848995851
pool-1-thread-1 is running
Current time: 1587849000852
pool-1-thread-1 is running
Current time: 1587849005853
pool-1-thread-1 is running
Current time: 1587849010854
pool-1-thread-1 is running
程序在15秒后开始创建线程执行,之后两个线程之间的执行时间间隔大概为5000ms,即period虽然为2s,但线程执行时间为5s,所以最后的间隔是5s,上一个线程执行完,立刻就开始执行下一个线程。
适用场景:周期性任务
Question:为什么不推荐使用Executors创建线程池,而应该直接使用ThreadPoolExecutor来创建?
Ans:对于Executors创建的线程池,有的使用了无界队列LinkedBlockingQueue,当大量任务堆积时会导致OOM。有的设置了maximumPoolSize为Integer.MAX_VALUE,也可能因为创建大量线程而导致OOM。
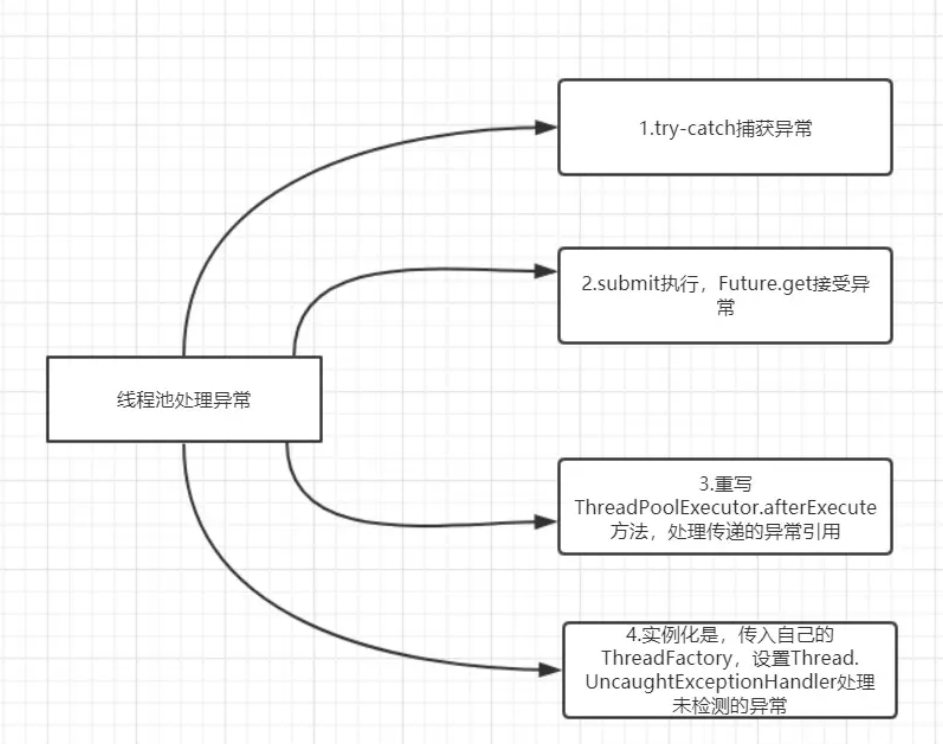
线程池异常机制
直接使用Thread类时,在出错时会抛出异常,但是在线程池中,默认是不处理的,需要显式去处理异常情况。
例子:
public static void testException() {
    ExecutorService pool = Executors.newFixedThreadPool(5);
    for (int i = 0; i < 5; i++) {
        pool.submit(new Callable<Object>() {
            public Object call() {
                System.out.println(Thread.currentThread().getName());
                Object obj = null;
                System.out.println("result##:" + obj.toString());
                return 1;
            }
        });
    }
}
执行结果:
pool-1-thread-2
pool-1-thread-4
pool-1-thread-5
pool-1-thread-3
pool-1-thread-1
可以看到,虽然代码有异常,但无论是Runnable还是Callable,都无法感知到异常。有几种方法可以处理异常。
①直接使用try-catch
public static void testException() {
    ExecutorService pool = Executors.newFixedThreadPool(5);
    for (int i = 0; i < 5; i++) {
        pool.submit(new Callable<Object>() {
            public Object call() {
                System.out.println(Thread.currentThread().getName());
                Object obj = null;
                try {
                    System.out.println("result##:" + obj.toString());
                } catch (Exception e) {
                    System.err.println(Thread.currentThread().getName() + " throws exception!");
                }

                return 1;
            }
        });
    }
}
执行结果:
pool-1-thread-2
pool-1-thread-5
pool-1-thread-4
pool-1-thread-3
pool-1-thread-1
pool-1-thread-2 throws exception!
pool-1-thread-4 throws exception!
pool-1-thread-3 throws exception!
pool-1-thread-1 throws exception!
pool-1-thread-5 throws exception!
②使用FutureTask
FutureTask可以捕获异常,在run方法出现异常时会调用setException方法,把Throwable对象设置给outcome变量,然后在需要get的时候就获得了异常。
public static void testException11() {
    ExecutorService pool = Executors.newFixedThreadPool(5);
    for (int i = 0; i < 5; i++) {
        Future future = pool.submit(() -> {
            System.out.println(Thread.currentThread().getName());
            Object obj = null;
            System.out.println("result##:" + obj.toString());
        });
        try {
            future.get();
        } catch (InterruptedException e) {
            System.err.println("Catch an interrupted exception!");
        } catch (ExecutionException e) {
            System.err.println("Catch an execution exception!");
        }
    }
}
执行结果:
pool-1-thread-1
pool-1-thread-2
pool-1-thread-3
pool-1-thread-4
pool-1-thread-5
Catch an execution exception!
Catch an execution exception!
Catch an execution exception!
Catch an execution exception!
Catch an execution exception!
③设置Handler
给工作线程设置UncaughtExceptionHandler,在unCaughtException方法里处理异常。
public static void testException2() {
    ExecutorService pool = Executors.newFixedThreadPool(1, r -> {
        Thread t = new Thread(r);
        t.setUncaughtExceptionHandler((t1, e) -> {
            System.out.println(t1.getName() + " is throwing exception: " + e);
        });
        return t;
    });
    pool.execute(() -> {
        Object object = null;
        System.out.println("result##:" + object.toString());
    });
}
执行结果:
Thread-0 is throwing exception: java.lang.NullPointerException
该方法需要与线程池连用,重写ThreadFactory的逻辑。在Factory创建线程后,对线程设置Handler。
④重写afterExecute方法
ThreadPoolExecutor里的runWorker方法中,有一个afterExecute的空方法,可以用于拓展。在这里,我们可以重写此方法,负责处理异常的情况。
这是JDK里的一个demo:
class ExtendedExecutor extends ThreadPoolExecutor {
    public ExtendedExecutor(int corePoolSize, int maximumPoolSize, long keepAliveTime,
                            TimeUnit unit, BlockingQueue<Runnable> workQueue) {
        super(corePoolSize, maximumPoolSize, keepAliveTime, unit, workQueue);
    }

    // ...
    protected void afterExecute(Runnable r, Throwable t) {
        super.afterExecute(r, t);
        if (t == null && r instanceof Future<?>) {
            try {
                Object result = ((Future<?>) r).get();
            } catch (CancellationException ce) {
                t = ce;
            } catch (ExecutionException ee) {
                t = ee.getCause();
            } catch (InterruptedException ie) {
                Thread.currentThread().interrupt(); // ignore/reset
            }
        }
        if (t != null)
            System.out.println(t);
    }
}
⑤异常处理总结图


 152
152


 被折叠的 条评论
为什么被折叠?
被折叠的 条评论
为什么被折叠?
 到【灌水乐园】发言


