


原始博客的地址:
https://lyldalek.notion.site/JVM-0x2-d51f2a9d315d4df7904a32474bb510c5
该项目的地址:
https://github.com/aprz512/write-your-own-jvm
认识class文件
上一篇我们通过搜索 classpath 下的文件,将一个 class 文件转换为了二进制数据。
这些二进制数据是有固定的格式的,具体可看官方文档,下面贴一个 java7 的 class 文件格式:
https://docs.oracle.com/javase/specs/jvms/se7/html/jvms-4.html
快速熟悉 class 文件也是有套路的,一般的这种文件格式的设计都会采用套娃的方式:
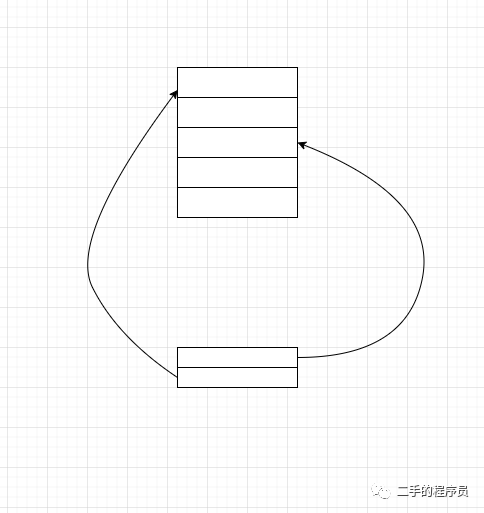
一段区域储存一些重复的数据,另一段区域只用储存数据对应的索引。当然还可以嵌套的更深。
我们先来看看官方是如何定义 class 文件的:
ClassFile {
    u4             magic;
    u2             minor_version;
    u2             major_version;
    u2             constant_pool_count;
    cp_info        constant_pool[constant_pool_count-1];
    u2             access_flags;
    u2             this_class;
    u2             super_class;
    u2             interfaces_count;
    u2             interfaces[interfaces_count];
    u2             fields_count;
    field_info     fields[fields_count];
    u2             methods_count;
    method_info    methods[methods_count];
    u2             attributes_count;
    attribute_info attributes[attributes_count];
}
这是伪代码,但是描述的还是非常清晰的,u4 就是4个bytes,把它当作无符号数。cp_info 等又是另外一个结构体。
总体来说,我们主要的工作是解析下面4个部分:
-
cp_info 常量池
-
field_info 类的字段信息
-
method_info 类的方法信息
-
attribute_info 类的属性信息(比如,源文件名等)
常量池介绍
常量池可以看成是一个表,但是有三点需要特别注意。
-
表头给出的常量池大小比实际大1。假设表头给出的值是n,那么常量池的实际大小是n–1。
-
有效的常量池索引是1~n–1。0是无效索引,表示不指向任何常量。
-
CONSTANT_Long_info和CONSTANT_Double_info各占两个位置。
表中的每一项的结构如下:
cp_info {
    u1 tag;
    u1 info[];
}
可以看出,每一项都包含一个 tag,一个 info 数组。info 数组里面的的具体内容与 tag 的值有关。
tag 的值分为以下几种:
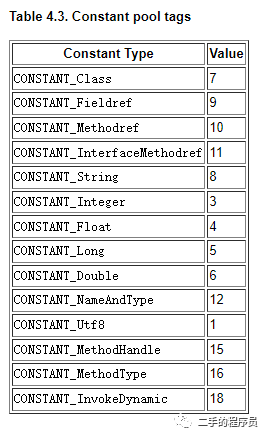
tag取值很多,就举一个例子,其他的都是类似的。如果 tag 的值为 7,那么 info 数组表示的意义如下:
CONSTANT_Class_info {
    u1 tag;
    u2 name_index;
}
name_index 是一个 u2 类型,就相当于info的长度为2。
name_index 的含义根据名称也能猜的出来,是类名,只不过储存的是常量池的索引,索引指向的位置是类名。该位置的常量类型一定是一个 CONSTANT_Utf8_info 类型。
说起来可能有点不太好懂,我们看一个具体的例子:
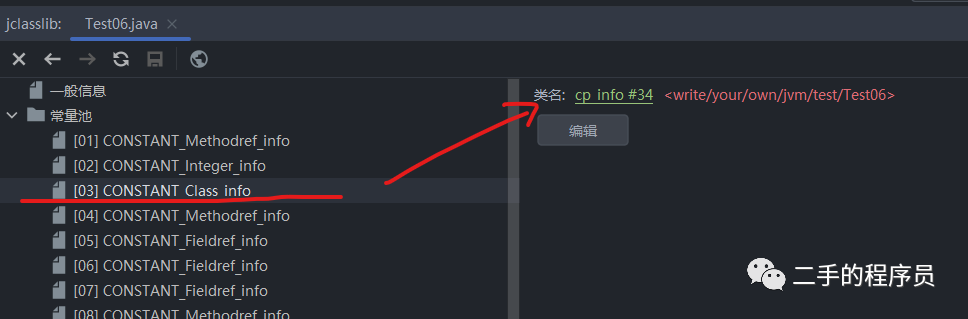
图中是一个 CONSTANT_Class_info ,它的 name_index 是 34,我们看看常量池的第34项是什么:
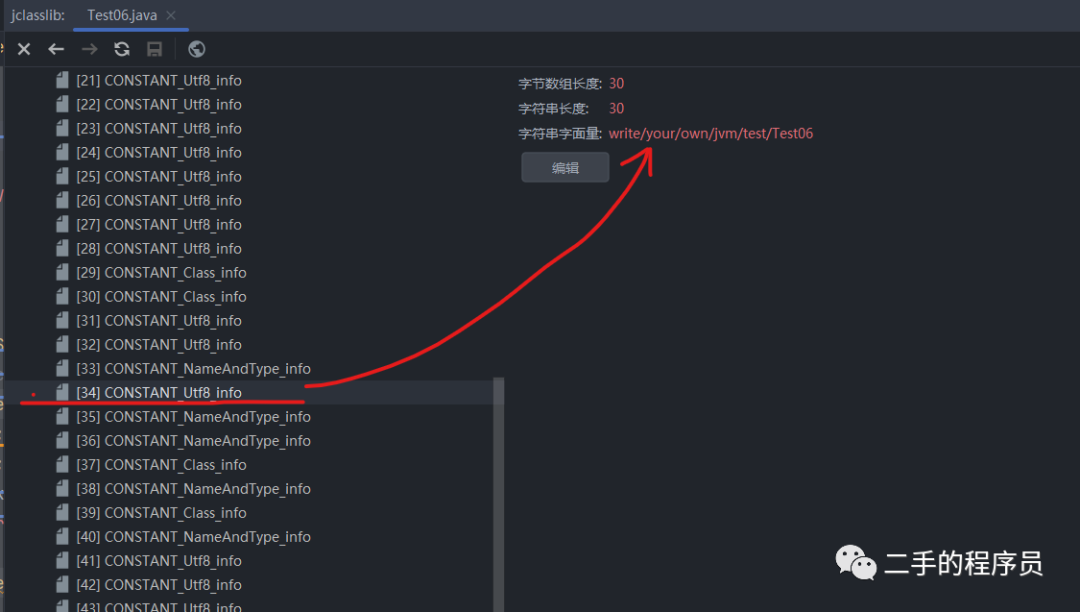
可以看到34处,它确实是一个 CONSTANT_Utf8_info 类型,其具体的值就是类的名字。
其他的tag类型也是类似的,具体可以看官方文档,就不详细介绍了,我们现在开始使用代码解析常量池。
字节处理
在描述 class 文件的结构体中我们看到了 u1 ,u2,u4 等类型,为了代码的简洁与易读性,我们封装一个类:
public class ClassReader {

    private final byte[] codes;
    private int pos;

    public ClassReader(byte[] aClassData) {
        this.codes = aClassData;
        this.pos = 0;
    }

    /**
     * read next one unsigned byte, convert to int
     */
    public int nextU1toInt() {
        return ByteUtil.byteToInt(new byte[]{codes[pos++]});
    }

    /**
     * read next two unsigned bytes, convert to int
     */
    public int nextU2ToInt() {
        return ByteUtil.byteToInt(new byte[]{codes[pos++], codes[pos++]});
    }

    /**
     * read next four unsigned bytes, convert to int
     */
    public int nextU4ToInt() {
        return ByteUtil.byteToInt(new byte[]{codes[pos++], codes[pos++], codes[pos++], codes[pos++]});
    }

    /**
     * read next four unsigned bytes, consider it float
     */
    public float nextU4ToFloat() {
        byte[] bytes = nextBytes(4);
        return ByteBuffer.wrap(bytes).order(ByteOrder.BIG_ENDIAN).getFloat();
    }

    /**
     * read next four unsigned bytes, convert to hex string.
     * for example: 7f123456
     */
    public String nextU4ToHexString() {
        return ByteUtil.byteToHexString((new byte[]{codes[pos++], codes[pos++], codes[pos++], codes[pos++]}));
    }

    /**
     * read next ${len} bytes
     */
    public byte[] nextBytes(int len) {
        if (pos + len > codes.length) {
            throw new ArrayIndexOutOfBoundsException("pos = " + pos + ", len = " + len + ", codes.length = " + codes.length);
        }
        byte[] data = Arrays.copyOfRange(codes, pos, pos + len);
        pos += len;
        return data;
    }

    /**
     * read next 8 unsigned bytes, consider it long
     */
    public long nextU8ToLong() {
        byte[] bytes = nextBytes(8);
        return ByteBuffer.wrap(bytes).order(ByteOrder.BIG_ENDIAN).getLong();
    }

    /**
     * read next 8 unsigned bytes, consider it double
     */
    public double nextU8ToDouble() {
        byte[] bytes = nextBytes(8);
        return ByteBuffer.wrap(bytes).order(ByteOrder.BIG_ENDIAN).getDouble();
    }

    /**
     * read u2 table
     * |- u2 count -|- u2 -|- u2 -| ... |
     *
     * @return 先读一个 u2 的值,为 x,再读 x 个 u2 的值
     */
    public int[] nextU2s() {
        int count = nextU2ToInt();
        int[] result = new int[count];
        for (int i = 0; i < count; i++) {
            result[i] = nextU2ToInt();
        }
        return result;
    }

    /**
     * back n bytes
     */
    public void back(int n) {
        this.pos -= n;
    }

}
有了这个类,我们读取 u1 的值时,只需要调用一下对应方法即可。
常量池解析
我们创建一个 ConstantPool 类,把它看作一个 table,那么就需要有一个数组字段,用来储存table的entry。
public class ConstantPool {

    private final int size;
    private final ConstantInfo[] constantInfos;

    public ConstantPool(ClassReader reader) {
        size = reader.nextU2ToInt();
        constantInfos = new ConstantInfo[size];
        // 0是无效索引,表示不指向任何常量。
        constantInfos[0] = new InvalidConstantInfo();
        for (int i = 1; i < size; i++) {
            int tag = reader.nextU1toInt();
            ConstantInfo constInfo = ConstantInfoFactory.createConstantInfo(tag, reader, this);
            constantInfos[i] = constInfo;
            // double and long 占2个位置
            if (tag == ConstantInfo.CONST_TAG_DOUBLE || tag == ConstantInfo.CONST_TAG_LONG) {
                i++;
            }
        }
    }
}
常量池的结构也是很清晰的:
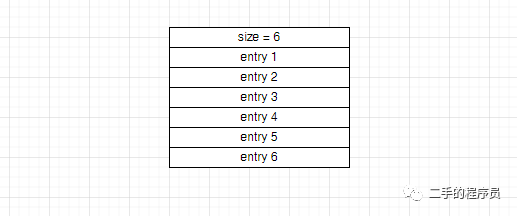
每一个entry具体需要读多少个字节,需要根据 tag 的值来分情况处理:
public class ConstantInfoFactory {

    // Factory method
    static ConstantInfo createConstantInfo(int tag, ClassReader reader, ConstantPool constPool) {
        switch (tag) {
            ...
            case CONST_TAG_CLASS:
                return new ConstantClassInfo(constPool, reader);
            ...
        }
    }
}
public class ConstantClassInfo implements ConstantInfo {

    private final ConstantPool constPool;
    // The constant_pool entry at that index must be a CONSTANT_Utf8_info (§4.4.7) structure
    // representing a valid binary class or interface name encoded in internal form
    private final int nameIndex;

    public ConstantClassInfo(ConstantPool constPool, ClassReader reader) {
        nameIndex = reader.nextU2ToInt();
        this.constPool = constPool;
    }
}
之前看过 CONSTANT_Class_info 的结构,由于 tag 已经被读取过了,所以它只需要再额外读取一个 name_index,也就是2个字节。
常量池的解析到这里就差不多了,下面我们看字段的解析。

字段介绍
类的字段的排列大致如下:

每个field的结构如下:
field_info {
    u2             access_flags;
    u2             name_index;
    u2             descriptor_index;
    u2             attributes_count;
    attribute_info attributes[attributes_count];
}
access_flags 是一些修饰符的 mask,比如该字段是不是 public 等,具体如下:
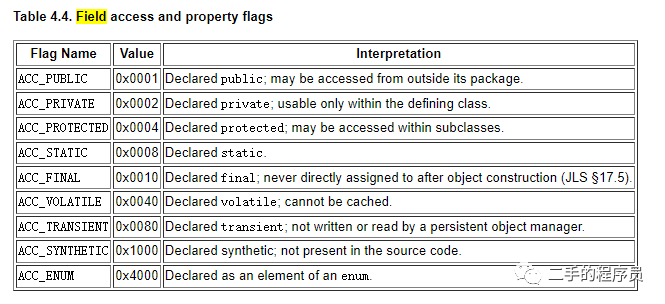
每个flag都是一个二进制位,最终组合成的值是 access_flags。
name_index 是字段名,常量池的索引。
descriptor_index 是字段的描述,常量池的索引。
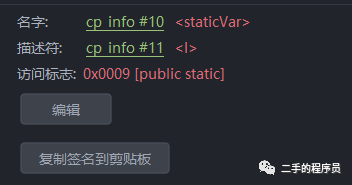
上图中,staticVar 是字段的名字,I 是字段描述符,表示字段是一个 int 类型。
attributes_count 是字段的属性个数。
attributes 是字段属性的具体描述。
字段,方法,类都有属性,这个我们放到后面再具体介绍。
字段解析
由于字段与方法的结构一样:
method_info {
    u2             access_flags;
    u2             name_index;
    u2             descriptor_index;
    u2             attributes_count;
    attribute_info attributes[attributes_count];
}
所以我们定义一个 MemberInfo来表示字段与方法,可以代码复用:
  public static MemberInfo[] readMembers(ConstantPool constantPool, ClassReader reader) {
        int memberCount = reader.nextU2ToInt();
        MemberInfo[] memberInfo = new MemberInfo[memberCount];

        for (int i = 0; i < memberCount; i++) {
            memberInfo[i] = new MemberInfo(constantPool, reader);
        }

        return memberInfo;
    }
首先,我们读取2个字节,它是 field/method 的个数,然后我们再根据个数来分别读取每个 field/method 的具体信息。
  public MemberInfo(ConstantPool constantPool, ClassReader reader) {
        this.constantPool = constantPool;
        accessFlags = reader.nextU2ToInt();
        nameIndex = reader.nextU2ToInt();
        descriptorIndex = reader.nextU2ToInt();
        attributesCount = reader.nextU2ToInt();
        attributes = AttributeInfo.readAttributes(reader, constantPool, attributesCount);
    }
属性介绍
在解析字段和方法的时候,细心的读者一定会发现,还有一些重要的信息没有出现,如方法的字节码等信息。
实际上是因为这些信息都储存在了方法的属性表中。属性有很多种:
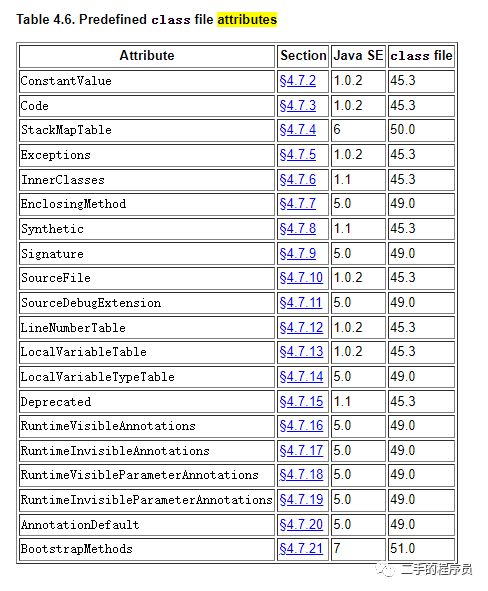
ConstantValue是定长属性,只会出现在field_info结构中,用于表示常量表达式的值。比如,我们定义一个字段:
public class Test06 {
    public static final int f = 100;
}
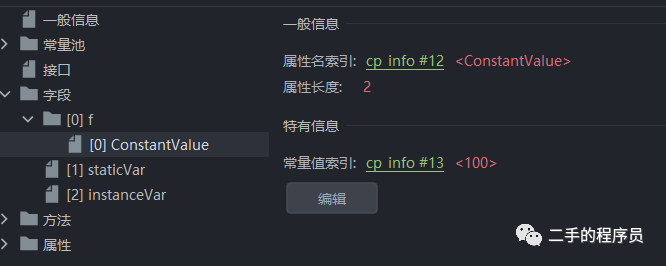
可以看到f字段有一个 ConstantValue 属性。ConstantValue 结构如下:
ConstantValue_attribute {
    u2 attribute_name_index;
    u4 attribute_length;
    u2 constantvalue_index;
}
attribute_name_index 是常量池的索引,表示该属性的名字(是ConstantValue)。
attribute_length 是属性长度,ConstantValue_attribute 结构的attribute_length值固定为2。
constantvalue_index 是常量池的索引,指向的常量池项通常是下面几种类型:
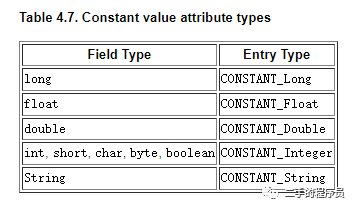
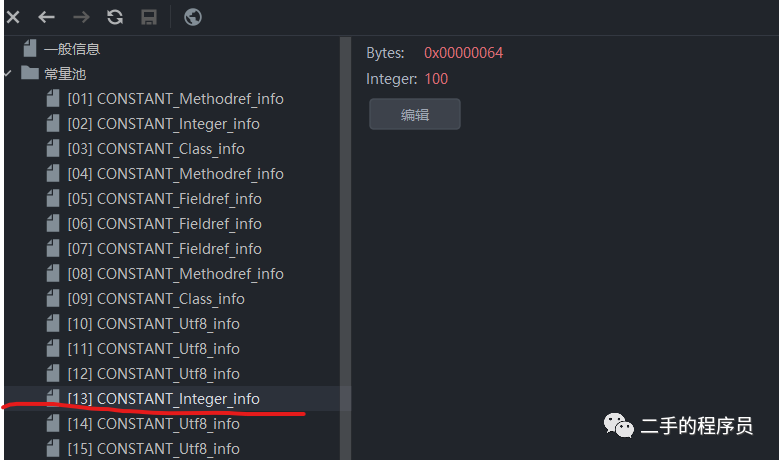
上面的例子中,f字段的值就是常量池的第13项,为100。
了解了ConstantValue_attribute 结构体,其他的属性也是差不多的,我们就不展开了。
解析属性
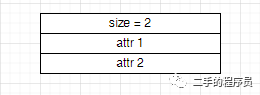
属性的排列格式与字段和常量池也是差不多的。
  public static AttributeInfo[] readAttributes(ClassReader reader, ConstantPool constantPool, int attributeCount) {
        AttributeInfo[] attributes = new AttributeInfo[attributeCount];
        for (int i = 0; i < attributeCount; i++) {
            attributes[i] = readAttribute(reader, constantPool);
        }
        return attributes;
    }

    static AttributeInfo readAttribute(ClassReader reader, ConstantPool constantPool) {
        int attrNameIndex = reader.nextU2ToInt();
        String attrName = constantPool.getUtf8(attrNameIndex);
        int attrLength = reader.nextU4ToInt();
        return newAttributeInfo(attrName, attrNameIndex, attrLength, reader, constantPool);
    }
先读取属性的个数,然后再分别去读具体的属性信息。
  static AttributeInfo newAttributeInfo(
            String attrName, int attrNameIndex, int attrLength, ClassReader reader, ConstantPool constantPool) {
        switch (attrName) {
            case "Code":
                return new CodeAttribute(attrNameIndex, attrLength, reader, constantPool);
            case "ConstantValue":
                return new ConstantValueAttribute(attrNameIndex, attrLength, reader, constantPool);
            case "Exceptions":
                return new ExceptionsAttribute(attrNameIndex, attrLength, reader);
            case "Synthetic":
                return new SyntheticAttribute(attrNameIndex, attrLength);
            case "SourceFile":
                return new SourceFileAttribute(attrNameIndex, attrLength, reader, constantPool);
            case "LineNumberTable":
                return new LineNumberTableAttribute(attrNameIndex, attrLength, reader);
            case "LocalVariableTable":
                return new LocalVariableTableAttribute(attrNameIndex, attrLength, reader);
            case "Deprecated":
                return new DeprecatedAttribute(attrNameIndex, attrLength);
            default:
                return new UnParsedAttribute(attrNameIndex, attrLength, reader);
        }
    }
这里,我们使用字符串来判断每一项是什么属性。
可以看到,我们没有实现所有的属性解析,这是因为有些属性过于复杂,嵌套层次能到5~6层,所以就只实现了常见的一些属性,有兴趣的可以自行实现。
我们看一下CodeAttribute :
 public CodeAttribute(int attributeNameIndex, int attributeLength, ClassReader reader, ConstantPool constantPool) {
        super(attributeNameIndex, attributeLength);
        this.maxStack = reader.nextU2ToInt();
        this.maxLocals = reader.nextU2ToInt();
        this.codeLength = reader.nextU4ToInt();
        this.code = reader.nextBytes(codeLength);
        this.exceptionTable = ExceptionTableEntry.readExceptionTable(reader);
        this.attributesCount = reader.nextU2ToInt();
        this.attributes = AttributeInfo.readAttributes(reader, constantPool, attributesCount);
    }
CodeAttribute 非常的神奇,它里面有异常表(后面的文章再说)。不仅如此,它除了自身是一个AttributeInfo,它还有一个自己的 attributes 结构,相当于套娃:
Code_attribute {
    u2 attribute_name_index;
    u4 attribute_length;
    u2 max_stack;
    u2 max_locals;
    u4 code_length;
    u1 code[code_length];
    u2 exception_table_length;
    {   u2 start_pc;
        u2 end_pc;
        u2 handler_pc;
        u2 catch_type;
    } exception_table[exception_table_length];
    u2 attributes_count;
    attribute_info attributes[attributes_count];
}
那么这些套娃的属性是干啥的呢?举个例子:
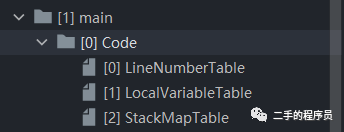
在main方法里面,有一个 Code 属性,Code属性又有 LineNumberTable 等属性。这样想一下,也很合理。
再看一下 UnParsedAttribute :
public class UnParsedAttribute extends AttributeInfo {
    public UnParsedAttribute(int attributeNameIndex, int attributeLength, ClassReader reader) {
        super(attributeNameIndex, attributeLength);
        // consume next attribute bytes
        reader.nextBytes(attributeLength);
//        System.out.println("UnParsedAttribute" + attributeLength);
    }
}
可以看到,attribute_length其实就是 attribute后续字节的长度。
总结
经过上面的一些解析后,我们将类中的字段,方法,以及它们附带的属性信息都解析出来了,这为我们后面实现运行时数据区打下了基础。
上面我们在解析字段,方法,属性的时候,基本都是遵循一个固定的模式:
-
读取 table 的size
-
读取每个具体 table entry 的信息
只要掌握了这个规律,解析起来非常的简单。


 1374
1374

 被折叠的 条评论
为什么被折叠?
被折叠的 条评论
为什么被折叠?
 到【灌水乐园】发言


