


服务器端
1)新建一个Dynamic Web Project ,在其中新建一个Servlet 继承HttpServlet
2)代码如下:
/**
* Servlet implementation class UserServlet
*/
@WebServlet("/UserServlet")
public class UserServlet extends HttpServlet {
private static final long serialVersionUID = 1L;
/**
* @see HttpServlet#HttpServlet()
*/
public UserServlet() {
super();
// TODO Auto-generated constructor stub
}
/**
* @see HttpServlet#doGet(HttpServletRequest request, HttpServletResponse response)
*/
protected void doGet(HttpServletRequest request, HttpServletResponse response) throws ServletException, IOException {
String userName=request.getParameter("userName");
String passWord=request.getParameter("passWord");
//在服务器端解决中文乱码问题 这个未弄懂
// userName=NewString.getNewString(userName);
// passWord=NewString.getNewString(passWord);
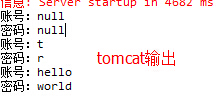
System.out.println("账号:"+userName);
System.out.println("密码:"+passWord); }
/**
* @see HttpServlet#doPost(HttpServletRequest request, HttpServletResponse response)
*/
protected void doPost(HttpServletRequest request, HttpServletResponse response) throws ServletException, IOException {
this.doGet(request, response);
}
}
手机端
MainActivity.java
public class MainActivity extends Activity {
	private EditText user_name, user_password;
	private Button button_login;;

	@Override
	protected void onCreate(Bundle savedInstanceState) {
		super.onCreate(savedInstanceState);
		setContentView(R.layout.activity_main);

		user_name = (EditText) findViewById(R.id.user_name);
		user_password = (EditText) findViewById(R.id.user_password);
		button_login = (Button) findViewById(R.id.button_login);

		button_login.setOnClickListener(new OnClickListener() {
			@Override
			public void onClick(View v) {
				new LoginAsync().execute();
			}
		});
	}
	class Login_Click implements OnClickListener{
		@Override
		public void onClick(View v) {
			new LoginAsync().execute();
		}
	}

	class LoginAsync extends AsyncTask<Void, Void, Boolean> {
		@Override
		protected Boolean doInBackground(Void... params) {
			// 取得用户输入的账号和密码
			String name = user_name.getText().toString();
			String pass = user_password.getText().toString();
			boolean result = UserService.check(name, pass);
			return result;
		}

		@Override
		protected void onPostExecute(Boolean resultBoolean) {
			super.onPostExecute(resultBoolean);
			//下面涉及到UI方面  千万不要放在doInBackground 就是这样折腾了半天
			if (resultBoolean) {
				Toast.makeText(getApplicationContext(), "success", 1).show();
			} else {
				Toast.makeText(getApplicationContext(), "fail", 1).show();
			}
		}
	}

	public static class UserService {
		/**
		 * 验证用户登录是否合法 返回值:请求是否成功
		 */
		public static boolean check(String name, String pass) {
			String path = "http://10.0.2.2:8080/ServerForLogin/UserServlet";
			// 将用户名和密码放入HashMap中
			Map<String, String> params = new HashMap<String, String>();
			params.put("userName", name);
			params.put("passWord", pass);
			try {
				return sendGETRequest(path, params, "UTF-8");
			} catch (MalformedURLException e) {
				e.printStackTrace();
			} catch (IOException e) {
				e.printStackTrace();
			}
			return false;
		}

		private static boolean sendGETRequest(String path,
				Map<String, String> params, String encode)
				throws MalformedURLException, IOException {
			StringBuilder url = new StringBuilder(path);
			url.append("?");
			for (Map.Entry<String, String> entry : params.entrySet()) {
				url.append(entry.getKey()).append("=");
				url.append(URLEncoder.encode(entry.getValue(), encode));//和中文乱码有关  未弄懂
				url.append("&");
			}
			// 删掉最后一个&
			url.deleteCharAt(url.length() - 1);
			HttpURLConnection conn = (HttpURLConnection) new URL(url.toString())
					.openConnection();
			conn.setConnectTimeout(5000);
			conn.setRequestMethod("GET");
			if (conn.getResponseCode() == 200) {
				return true;
			}
			return false;
		}
	}
}
acitivyt_main.xml
<LinearLayout xmlns:android="http://schemas.android.com/apk/res/android"
    xmlns:tools="http://schemas.android.com/tools"
    android:layout_width="match_parent"
    android:layout_height="match_parent"
    android:orientation="vertical"
    tools:context="${relativePackage}.${activityClass}" >

    <LinearLayout
        android:layout_width="wrap_content"
        android:layout_height="wrap_content"
        android:layout_gravity="center"
        android:layout_margin="10dp"
        android:orientation="horizontal" >

        <TextView
            android:layout_width="wrap_content"
            android:layout_height="wrap_content"
            android:text="用 户 名 : " />

        <EditText
            android:id="@+id/user_name"
            android:layout_width="100dp"
            android:layout_height="wrap_content" />
    </LinearLayout>

    <LinearLayout
        android:layout_width="wrap_content"
        android:layout_height="wrap_content"
        android:layout_gravity="center"
        android:layout_margin="10dp"
        android:orientation="horizontal" >

        <TextView
            android:layout_width="wrap_content"
            android:layout_height="wrap_content"
            android:text=" 密    碼 : " />

        <EditText
            android:id="@+id/user_password"
            android:layout_width="100dp"
            android:layout_height="wrap_content" />
    </LinearLayout>

    <Button
        android:layout_width="wrap_content"
        android:layout_height="wrap_content"
        android:text=" 登  陸  "
        android:id="@+id/button_login"
        android:layout_gravity="center"  />
</LinearLayout>
小记:
1)记得在AndroidManifest.xml中 增加<uses-permission android:name="android.permission.INTERNET" />
2)测试前 先打开Tomcat 看看能否用浏览器打开服务器端的Servlet文件
3)URL 请求格式为: http://域名/?key1=value1&key2=value2 ?隔开域名与传给服务器的参数 &隔开各个参数 =连接参数的key和value
服务器端 用request.getParameter("key")获取参数的vlaue
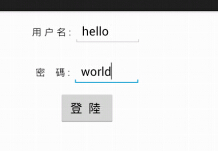
截图:


 1932
1932

 被折叠的 条评论
为什么被折叠?
被折叠的 条评论
为什么被折叠?
 到【灌水乐园】发言


