


本文主要包括以下内容:跑马灯效果、类似日志文本LogTextBox、TextView中添加电话URL链接、自定义字体、TextView中插入图片、文字阴影效果,TextView圆角边框和渐变背景
话不多说,先上预览图
1.跑马灯效果
TextView中添加代码如下
android:ellipsize="marquee"
android:marqueeRepeatLimit="1"
android:singleLine="true"
说明:
(1) android:ellipsizee有start,middle,end,none和marquee几个值
规定当TextView 文字长度长于可显示范围,如何处理
start为在文字开头显示”...“,end在末尾显示”...“,middle在中间显示”...“,none 不显示,marquee为跑马灯效果
(2)android:marqueeRepeatLimit
在ellipsize指定marquee的情况下,设置重复滚动的次数,当设置为marquee_forever时表示无限次。不设置此项时,默认为重复3次
(3)android:singleLine="true"
指定文本为单行
TextView实现文字滚动需要以下几个要点:
1.文字长度长于可显示范围并且设置:android:singleLine=”true”
2.设置可滚动:android:ellipsize=”marquee”
3.TextView只有在获取焦点后才会滚动显示隐藏文字
2.类似日志输出文本
新建一个类LogTextBox.java,继承自TextView
/*
 * Copyright (C) 2007 The Android Open Source Project
 *
 * Licensed under the Apache License, Version 2.0 (the "License");
 * you may not use this file except in compliance with the License.
 * You may obtain a copy of the License at
 *
 *      http://www.apache.org/licenses/LICENSE-2.0
 *
 * Unless required by applicable law or agreed to in writing, software
 * distributed under the License is distributed on an "AS IS" BASIS,
 * WITHOUT WARRANTIES OR CONDITIONS OF ANY KIND, either express or implied.
 * See the License for the specific language governing permissions and
 * limitations under the License.
 */

package com.antex.textview;

import android.text.method.ArrowKeyMovementMethod;
import android.widget.TextView;
import android.content.Context;
import android.text.method.ScrollingMovementMethod;
import android.text.method.MovementMethod;
import android.text.Editable;
import android.util.AttributeSet;

/**
 * This is a TextView that is Editable and by default scrollable,
 * like EditText without a cursor.
 *
 * <p>
 * <b>XML attributes</b>
 * <p>
 * See
 * {@link android.R.styleable#TextView TextView Attributes},
 * {@link android.R.styleable#View View Attributes}
 */
public class LogTextBox extends TextView {
    public LogTextBox(Context context) {
        this(context, null);
    }

    public LogTextBox(Context context, AttributeSet attrs) {
        this(context, attrs, android.R.attr.textViewStyle);
    }

    public LogTextBox(Context context, AttributeSet attrs, int defStyle) {
        super(context, attrs, defStyle);
    }

    @Override
    protected MovementMethod getDefaultMovementMethod() {
        return ArrowKeyMovementMethod.getInstance();
    }

    @Override
    public Editable getText() {
        return (Editable) super.getText();
    }

    @Override
    public void setText(CharSequence text, BufferType type) {
        super.setText(text, BufferType.EDITABLE);
    }
}
新建布局文件log_text_box_1.xml
<?xml version="1.0" encoding="utf-8"?>
<!-- Copyright (C) 2007 The Android Open Source Project

     Licensed under the Apache License, Version 2.0 (the "License");
     you may not use this file except in compliance with the License.
     You may obtain a copy of the License at

          http://www.apache.org/licenses/LICENSE-2.0

     Unless required by applicable law or agreed to in writing, software
     distributed under the License is distributed on an "AS IS" BASIS,
     WITHOUT WARRANTIES OR CONDITIONS OF ANY KIND, either express or implied.
     See the License for the specific language governing permissions and
     limitations under the License.
-->

<LinearLayout
    xmlns:android="http://schemas.android.com/apk/res/android"
    android:orientation="vertical"
    android:layout_width="match_parent"
    android:layout_height="match_parent"
    android:weightSum="10">

    <Button
        android:id="@+id/add"
        android:layout_width="wrap_content"
        android:layout_height="wrap_content"
        android:text="@string/log_text_box_1_add_text"/>

    <com.antex.textview.LogTextBox
        android:id="@+id/text"
        android:background="@drawable/box"
        android:layout_width="match_parent"
        android:layout_height="0dip"
        android:layout_weight="9"
        android:textIsSelectable="true"
        android:scrollbars="vertical"/>

    <Button
        android:id="@+id/clear"
        android:layout_width="wrap_content"
        android:layout_height="wrap_content"
        android:text="@string/log_text_box_1_clear_text"/>

</LinearLayout>
android:textIsSelectable=”true” 设置文本可选取
android:scrollbars=”vertical” 滚动条显示方式:垂直
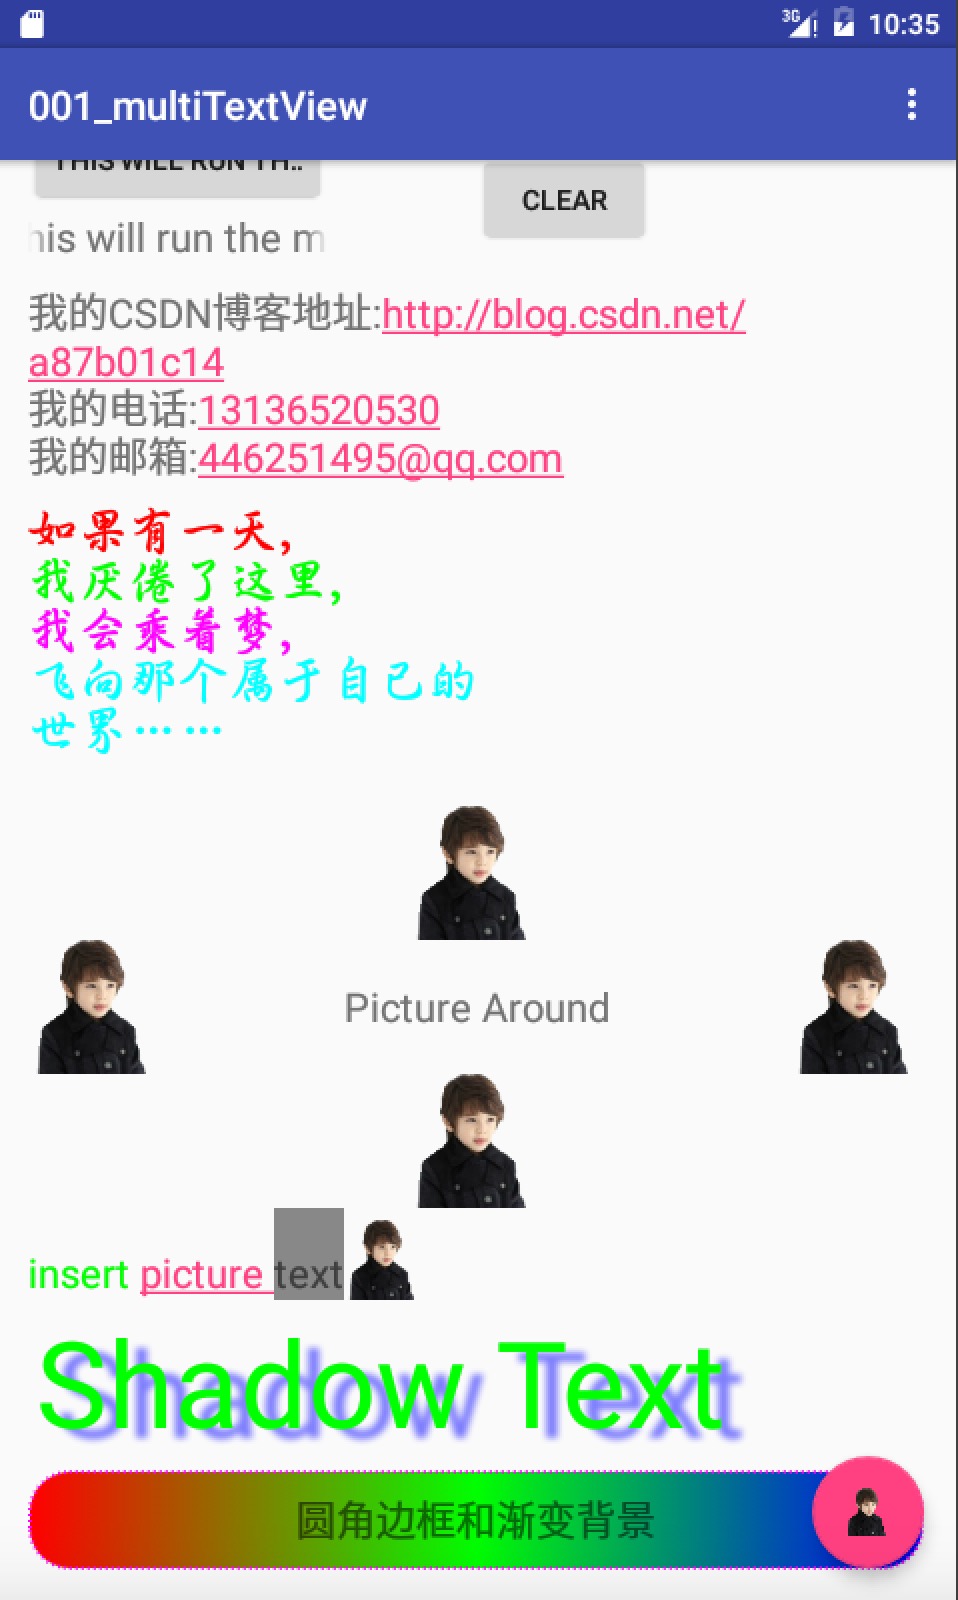
3.TextView中添加电话URL链接
在TexeView中添加属性android:autoLink=”all”,匹配所有链接
4.自定义字体
下载字体文件,在main文件夹下新建assets文件夹,assets文件夹下新建fonts文件夹,将下载好的字体放在该文件夹下
在资源文件中设置HTML字符串时,使用如下方法
<string name="custom_font_text"><Data><![CDATA[<font color="#ff0000">如果有一天,</font><br> <font color="#00ff00">我厌倦了这里,</font><br><font color="#ff00ff">我会乘着梦,</font><br><font color="#00ffff">飞向那个属于自己的<br>世界……</font><br>]]></Data></string>在java中调用
//自定义字体
        TextView textView1 = (TextView) view.findViewById(R.id.custom_font_textView);
        AssetManager mgr = getActivity().getAssets();//得到AssetManager
        Typeface tf = Typeface.createFromAsset(mgr, "fonts/jdxsj.TTF");//根据路径得到Typeface
        textView1.setTypeface(tf);//设置字体
        textView1.setText(Html.fromHtml(getActivity().getString(R.string.custom_font_text)));//格式化html格式字符串
        textView1.getPaint().setFakeBoldText(true);//设置中文加粗
        //textView1.setTypeface(Typeface.defaultFromStyle(Typeface.BOLD));//加粗方法2
5.TextView中插入图片
插入图片有两种方法
方法1:使用xml布局文件中一系列android:drawableXXX属性来实现插入图片。具体为:drawableBottom是在文本框内文本的底端绘制指定图像;drawableLeft是在文本框内文本的左边绘制指定图像;drawableRight是在文本框内文本的右边绘制指定图像;drawableTop是在文本框内文本的顶端绘制指定图像;drawablePadding设置文本框内文本与图像之间的间距
示例代码:
<TextView
            android:layout_width="match_parent"
            android:layout_height="wrap_content"
            android:drawableTop="@mipmap/yxs"
            android:drawableBottom="@mipmap/yxs"
            android:drawableLeft="@mipmap/yxs"
            android:drawableRight="@mipmap/yxs"
            android:text="@string/picture_around_text"
            android:textSize="20sp"
            android:gravity="center"
            />
方法2:用ImageGetter类来对图片的src属性进行转换。示例代码如下:
 //插入照片
  String htmlstring = "<img src='" + R.mipmap.yxs + "'/>";
        textView2.append(Html.fromHtml(htmlstring, new Html.ImageGetter() {

            @Override
            public Drawable getDrawable(String source) {
                int id = Integer.parseInt(source);
                Drawable d = getResources().getDrawable(id);
                //图片缩放
                d.setBounds(0, 0, 40, 40);
                return d;
            }
        }, null));
6.部分文字变色、添加点击事件监听
利用SpannableString类
TextView textView2 = (TextView) view.findViewById(R.id.insert_picture_textView);
        String string = getActivity().getString(R.string.insert_picture_text);
        String[] strings = string.split(" ");
        SpannableString spannableString = new SpannableString(string);
        //利用SpannableString设置文字颜色
        spannableString.setSpan(new ForegroundColorSpan(Color.GREEN), 0, strings[0].length(), Spanned.SPAN_EXCLUSIVE_EXCLUSIVE);
        //利用SpannableString设置文字点击
        spannableString.setSpan(new ClickableSpan() {
            @Override
            public void onClick(View widget) {
                Toast.makeText(getActivity(), "Click me!!!", Toast.LENGTH_SHORT).show();
            }
        }, strings[0].length() + 1, string.length() - strings[2].length(), Spanned.SPAN_EXCLUSIVE_EXCLUSIVE);

        //利用SpannableString设置背景颜色
        spannableString.setSpan(new BackgroundColorSpan(Color.GRAY), strings[0].length() + strings[1].length() + 2, string.length(), Spanned.SPAN_EXCLUSIVE_INCLUSIVE);
textView2.setText(spannableString);       textView2.setMovementMethod(LinkMovementMethod.getInstance());
7.文字阴影效果
方法1:java代码中
使用TextView 的setShadowLayer方法
第一个参数为模糊半径,越大越模糊。 第二个参数是阴影离开文字的x横向距离。 第三个参数是阴影离开文字的Y横向距离。 第四个参数是阴影颜色。
TextView textView3=(TextView)view.findViewById(R.id.shadow_textView);
textView3.setShadowLayer(10,15,10,0x7f0000ff);
方法2:设置TextView style属性。
res/values/styles.xml
 <style name="ShadowText">
        <item name="android:paddingLeft">4px</item>
        <item name="android:paddingBottom">4px</item>
        <item name="android:textColor">#0f0</item>
        <item name="android:textSize">60sp</item>
        <item name="android:shadowColor">#7f0000ff</item>
        <item name="android:shadowDx">10</item>
        <item name="android:shadowDy">5</item>
        <item name="android:shadowRadius">3</item>
</style>
在TextView中使用style
  <TextView
            android:id="@+id/shadow_textView"
            android:layout_width="match_parent"
            android:layout_height="wrap_content"
            android:text="@string/shadow_text"
            android:textSize="60sp"
            android:layout_gravity="center_vertical"
            style="@style/ShadowText"/>
8.圆角边框和渐变背景
利用shape实现
res/drawable/bg_border.xml
<?xml version="1.0" encoding="utf-8"?>
<shape xmlns:android="http://schemas.android.com/apk/res/android"
       android:shape="rectangle">

    <!-- 圆角 -->
    <corners
        android:bottomLeftRadius="20dp"
        android:bottomRightRadius="20dp"
        android:radius="9dp"
        android:topLeftRadius="20dp"
        android:topRightRadius="20dp"/>
    <!-- 设置圆角半径 -->

    <!-- 渐变 -->
    <gradient

        android:centerColor="#00ff00"
        android:endColor="#0000ff"
        android:startColor="#ff0000"
        android:type="linear"
        />

    <!-- 间隔 -->
    <padding
        android:bottom="2dp"
        android:left="2dp"
        android:right="2dp"
        android:top="2dp"/>
    <!-- 各方向的间隔 -->

    <!-- 大小 -->
    <size
        android:width="50dp"
        android:height="50dp"/>
    <!-- 宽度和高度 -->

    <!-- 填充 -->
    <!--<solid-->
    <!--android:color="@android:color/white"/>-->
    <!-- 填充的颜色 -->

    <!-- 描边 -->
    <stroke
        android:width="2dp"
        android:color="#f0f"
        android:dashGap="2dp"
        android:dashWidth="1dp"/>

</shape>
在TextView中使用shape
<TextView
            android:layout_width="match_parent"
            android:layout_height="wrap_content"
            android:text="@string/gradient_text"
            android:textSize="20sp"
            android:gravity="center"
            android:background="@drawable/bg_border"/>
开发工具:Android Studio1.4
SDK: Android 6.0
API 23
代码下载:MultiTextView.zip
本文为博主原创,如需转载请注明来源!


 804
804

 被折叠的 条评论
为什么被折叠?
被折叠的 条评论
为什么被折叠?
 到【灌水乐园】发言


