


 本文介绍了一个计算有向图中节点间共引网络和文献耦合网络的程序。通过寻找特定模体结构来高效计算节点间的共引值和文献耦合值,并输出最大共引值和文献耦合值的节点对及其值。
1.哎,这也没啥好说的。相对于无向图,就叫做CN即公共邻居;对于有向图,就有了共引和文献耦合这两个概念了。
2.之前学了点有趣的知识,所以就以此写了个关于求共引网络(矩阵)和文献耦合网络(矩阵)的程序,文件目录如下:
注意,当你创建文件目录的时候,如果出现不能import你自己写的.py文件时,请确保你放.py的文件夹是我下面的那样(方法为:右键该文件夹,Mark Directory as,Sources Root)

代码如下:
public_motif.pydef get_motif():
motifs = {
'M8': [[1, 0], [1, 2]],
'M2': [[0, 1], [1, 2], [2, 1], [2, 0]],
'M3': [[0, 1], [1, 2], [2, 1], [2, 0], [0, 2]],
'M4': [[0, 1], [1, 0], [1, 2], [2, 1], [0, 2], [2, 0]],
'M5': [[0, 1], [1, 2], [0, 2]],
'M6': [[1, 0], [1, 2], [2, 0], [0, 2]],
'M7': [[0, 1], [2, 1], [0, 2], [2, 0]],
'M11': [[0, 1], [1, 0], [1, 2]],
'M13': [[0, 1], [1, 0], [0, 2], [2, 0]],
'M1': [[0, 1], [1, 2], [2, 0]],
'M9': [[1, 0], [2, 1]],
'M10': [[0, 1], [2, 1]],
'M12': [[0, 1], [1, 0], [2, 1]],
}
return motifsstudy_cocitation.pyimport networkx as nx
import igraph
import pandas as pd
import numpy as np
import itertools
import matplotlib.pyplot as plt
import public_motif as motif
# cocitation,hig_order,polblogs
r_fpath = '../datas/study_datas/polblogs.txt'
data = pd.read_csv(filepath_or_buffer=r_fpath, sep='\t', header=None, names=['n1', 'n2'])
data_values = data[['n1', 'n2']].values
'''从0开始(看自己的喜好咯)'''
data_min = np.min(data_values)
data_max = np.max(data_values)
if not (np.any(data_values == 0)):
data_values = data_values - data_min
else:
data_values = data_values
'''网络的边'''
edges_graph = [tuple(ed) for ed in data_values.tolist()]
'''创建网络'''
graph_networkx = nx.DiGraph(edges_graph)
'''模体'''
motifs = motif.get_motif()
'''就是M8这个模型的话就很适合算共引矩阵,只需要在求子图同构的时候将范围放大就行咯'''
edges_motif = motifs['M8']
'''子图同构'''
'''创建网络,进行子图同构的查找'''
graph_igraph = igraph.Graph(edges_graph, directed=True)
motif_igraph = igraph.Graph(edges_motif, directed=True)
'''induced=False这个参数很有意思哦,也不是有意思,只不过当它为True的时候,A的某子图和B是完全一样,
但是当其为False的时候,只要你A的某个子图中含有(记住是含有)B的时候,他就返回一个映射,咱就设置为False哦'''
mappings = graph_igraph.get_subisomorphisms_lad(motif_igraph, induced=False)
mappings_set = set(tuple(sorted(i)) for i in mappings)
'''引用==指向'''
'''这个想法来自于“共引”该概念,因为两个节点共同被某一个节点引用的时候,就特别符合M8及包含M8的模体的那种结构,所以只要先找到哪些子图
包含了M8这个模体的结构,就直接便利这些子图,这样就不用遍历整个网络而导致效率低下了'''
tmp_cocitation = set()
for i in mappings_set:
for j in itertools.permutations(i, 2):
tmp_cocitation.add(tuple(sorted(j)))
'''和M8同构的子图包含的边'''
tmp_cocitation = sorted(tmp_cocitation)
'''该变量用于存储被引用过的节点,即有边指向该节点。其中key为被引用的节点的编号,对应的value为指向key的节点的编号'''
box = {}
'''含M8模体结构的子图所含的节点'''
nodes_compute = np.unique(np.array(mappings))
for node in nodes_compute:
in_edg = graph_networkx.in_edges(node)
if in_edg:
in_nod = np.unique(np.array(list(in_edg)))
in_nod = np.delete(in_nod, np.argwhere(in_nod == node))
box[node] = in_nod
'''从字典中得到被引用过的节点的编号'''
keys_box = box.keys()
#
'''共引网络'''
#
'''存储某两个节点的共引值'''
result_cocitation = {}
for i in tmp_cocitation:
node1 = i[0]
node2 = i[1]
if node1 in keys_box and node2 in keys_box:
'''得到某两个节点被共同的第三个节点引用的 总的个数。该值就是这两个节点的共引值'''
common_cocitation = len(np.intersect1d(box[node1], box[node2]))
if common_cocitation > 0:
result_cocitation[i] = common_cocitation
# print(result_cocitation)
max_cocitation_key = max(result_cocitation,key=result_cocitation.get)
max_cocitation_value = result_cocitation[max_cocitation_key]
'''用来测试输出共引矩阵(不要试图在图形化界面输出上万的矩阵)'''
matrix_cocitation = np.zeros([data_max, data_max])
for k, v in result_cocitation.items():
matrix_cocitation[k] = v
matrix_cocitation = matrix_cocitation + matrix_cocitation.T
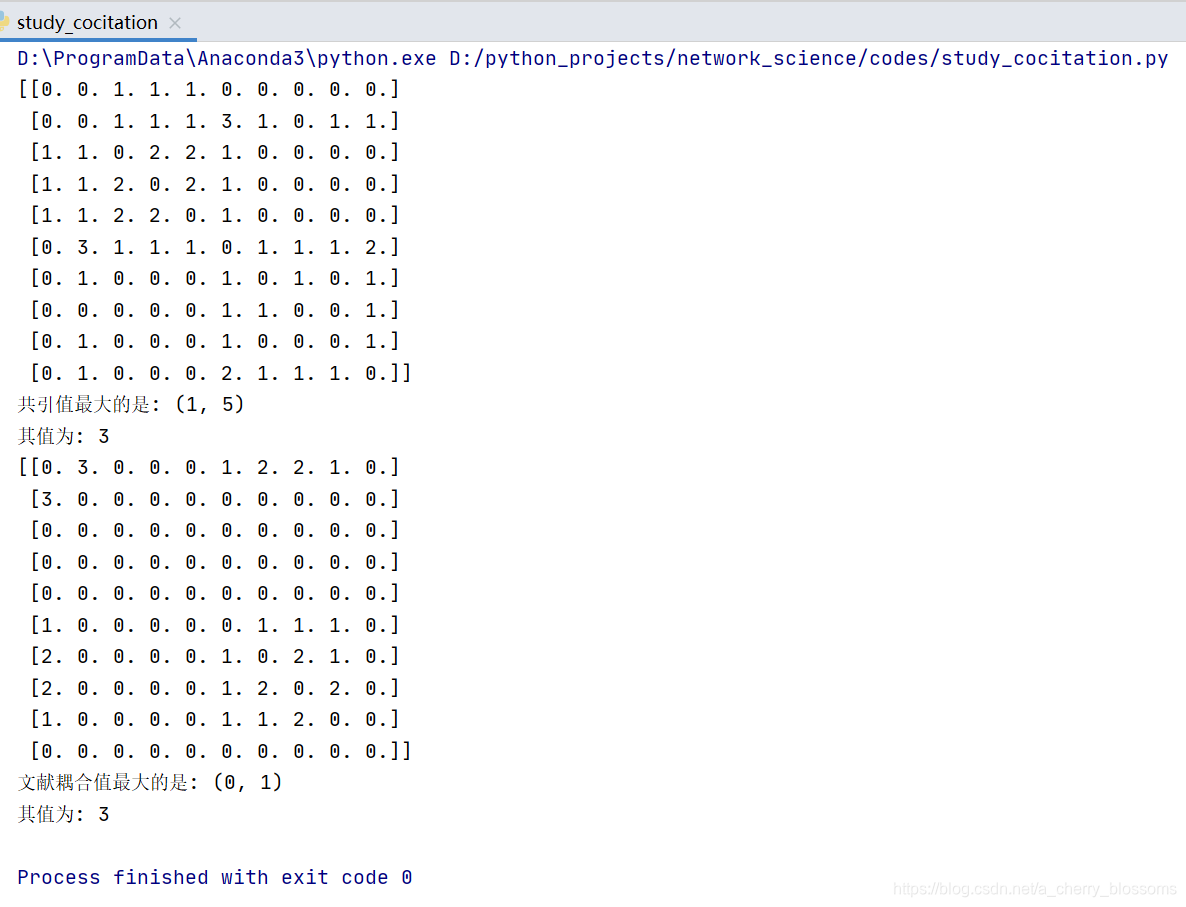
print(matrix_cocitation)
print('共引值最大的是:', max_cocitation_key)
print('其值为:', max_cocitation_value)
'''文献耦合网络'''
result_coupling = {}
tmp_coupling = {}
initial_value = 1
for v in box.values():
if len(v) > 1:
for i in itertools.combinations(v, 2):
if i not in result_coupling:
result_coupling[i] = 1
else:
result_coupling[i] += 1
# print(result_coupling)
max_coupling_key = max(result_coupling,key=result_coupling.get)
max_coupling_value = result_coupling[max_coupling_key]
'''用来测试输出文献耦合矩阵(不要试图在图形化界面输出上万的矩阵)'''
matrix_coupling = np.zeros([data_max, data_max])
for k, v in result_coupling.items():
matrix_coupling[k] = v
matrix_coupling = matrix_coupling + matrix_coupling.T
print(matrix_coupling)
print('文献耦合值最大的是:', max_coupling_key)
print('其值为:', max_coupling_value)
数据文件你们要运行的话就只试试这个hig_order.txt(中间的分隔符是制表符,所以用pandas读取的时候用的是sep='\t')吧(也可以自己下载有向图进行运行):
hig_order.txt1 2
1 3
1 4
1 5
1 6
7 2
7 6
8 2
8 6
8 9
8 10
9 6
9 7
9 8
9 10
2 1
2 3
2 4
2 5
6 2
6 7
3.运行结果:
4.推荐书籍《网络科学引论》--纽曼著,郭世泽译


 被折叠的 条评论
为什么被折叠?
被折叠的 条评论
为什么被折叠?
 到【灌水乐园】发言


