


 本文详细介绍了Android智能短信的实现过程,包括ConversationFragment的布局设计,如按钮点击背景切换、菜单动画的实现、会话查询源码分析及异步查询操作。此外,还讲解了CursorAdapter的使用、ViewHolder优化、ListView显示头像和日期的逻辑,以及选择模式下的条目交互处理,提供了一个全面理解Android智能短信UI交互的指南。
ConversationFragment的布局:
首先我们找到我们要写的Fragment布局文件。
<?xml version="1.0" encoding="utf-8"?>
<LinearLayout xmlns:android="http://schemas.android.com/apk/res/android"
    android:layout_width="match_parent"
    android:layout_height="match_parent"
    android:orientation="vertical" >

    <ListView
        android:id="@+id/lv_conversation_list"
        android:layout_width="match_parent"
        android:layout_height="0dp"
        android:layout_weight="1" >
    </ListView>

    <LinearLayout
        android:layout_width="match_parent"
        android:layout_height="60dp"
        android:background="@drawable/bg_conversion_menu"
        android:gravity="center"
        android:orientation="horizontal"
        android:paddingLeft="30dp"
        android:paddingRight="30dp" >

        <Button
            android:id="@+id/bt_edit"
            android:layout_width="0dp"
            android:layout_height="30dp"
            android:layout_marginEnd="30dp"
            android:layout_weight="1"
            android:background="@drawable/selector_bt_bg"
            android:text="编辑"
            style="?android:attr/buttonBarButtonStyle" />

        <Button
            android:id="@+id/bt_newSms"
            android:layout_width="0dp"
            android:layout_height="30dp"
            android:layout_weight="1"
            android:background="@drawable/selector_bt_bg"
            android:text="新建短信"
            style="?android:attr/buttonBarButtonStyle"/>
    </LinearLayout>

</LinearLayout>
然后添加一个Listview用来显示短信和一个菜单的组合布局。
我们为了给button设置点击的时候变换背景图片。
我们需要在res文件夹下面创建一个drawable的文件夹。然后创建一个selector文件作为设置我们动态的图片设置。
<?xml version="1.0" encoding="utf-8"?>
<selector xmlns:android="http://schemas.android.com/apk/res/android" >
    <item android:drawable="@drawable/bg_btn_normal" android:state_pressed="false"></item>
    <item android:drawable="@drawable/bg_btn_pressed" android:state_pressed="true"></item>

</selector>
这里的Item的作用就是可以设置我们的背景图片,在什么状态下进行改变。
比如我们设置这两个是在按下的时候,或者没有按下的时候显示不同的背景图片。
我们应该先显示一组在界面上,我们可以给linearLayout设置这样一个属性。
android:visibility="gone"让当前你设置的这个菜单不可见。
但是我们应该使用动画去实现它,所以我们不能直接使用gone去让这个菜单直接消失。
我们应该使用一个RelativeLayout让这两个控件叠加在一起。
<RelativeLayout
android:layout_width="match_parent"
android:layout_height="60dp" >
<LinearLayout
android:layout_width="match_parent"
android:layout_height="match_parent"
android:background="@drawable/bg_conversion_menu"
android:gravity="center"
android:orientation="horizontal"
android:paddingLeft="30dp"
android:paddingRight="30dp" >
<Button
android:id="@+id/bt_edit"
style="?android:attr/buttonBarButtonStyle"
android:layout_width="0dp"
android:layout_height="30dp"
android:layout_marginEnd="30dp"
android:layout_weight="1"
android:background="@drawable/selector_bt_bg"
android:text="编辑" />
<Button
android:id="@+id/bt_newSms"
style="?android:attr/buttonBarButtonStyle"
android:layout_width="0dp"
android:layout_height="30dp"
android:layout_weight="1"
android:background="@drawable/selector_bt_bg"
android:text="新建短信" />
</LinearLayout>
<LinearLayout
android:layout_width="match_parent"
android:layout_height="match_parent"
android:background="@drawable/bg_conversion_menu"
android:gravity="center"
android:orientation="horizontal"
android:paddingLeft="15dp"
android:paddingRight="15dp"
android:translationY="60dp"
>
<Button
style="?android:attr/buttonBarButtonStyle"
android:layout_width="0dp"
android:layout_height="30dp"
android:layout_marginEnd="15dp"
android:layout_weight="1"
android:background="@drawable/selector_bt_bg"
android:text="取消" />
<Button
style="?android:attr/buttonBarButtonStyle"
android:layout_width="0dp"
android:layout_height="30dp"
android:layout_marginEnd="15dp"
android:layout_weight="1"
android:background="@drawable/selector_bt_bg"
android:text="取消选择" />
<Button
style="?android:attr/buttonBarButtonStyle"
android:layout_width="0dp"
android:layout_height="30dp"
android:layout_weight="1"
android:background="@drawable/selector_bt_bg"
android:text="删除" />
</LinearLayout>
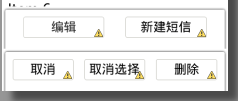
</RelativeLayout>这里我们使用RelativeLayout包围这两个控件之后他们会叠加在一起。然后我们给第二个菜单使用tanslateY让他先平移到显示器下方。然后当我们点击编辑的时候它才会平移上来,然后编辑菜单在平移下去。
——————————————————————
菜单动画的实现:
当我们点击编辑按钮的时候:会实现选择菜单变回原来的位置,当前的编辑菜单向下移出屏幕。
public class ConversionFragment extends BaseFragment {

	private Button bt_conversation_edit;
	private Button bt_conversation_newSms;
	private Button bt_conversation_selectAll;
	private Button bt_conversation_cancel;
	private Button bt_conversation_delete;
	private LinearLayout ll_conversation_edit;
	private LinearLayout ll_conversation_select;

	@Override
	public View initView(LayoutInflater inflater, ViewGroup container,
			Bundle savedInstanceState) {
		View view = inflater.inflate(R.layout.fragment_conversation, null);
		bt_conversation_edit = (Button) view
				.findViewById(R.id.bt_conversation_edit);
		bt_conversation_newSms = (Button) view
				.findViewById(R.id.bt_conversation_newSms);
		bt_conversation_selectAll = (Button) view
				.findViewById(R.id.bt_conversation_selectAll);
		bt_conversation_cancel = (Button) view
				.findViewById(R.id.bt_conversation_cancel);
		bt_conversation_delete = (Button) view
				.findViewById(R.id.bt_conversation_delete);
		ll_conversation_edit = (LinearLayout) view
				.findViewById(R.id.ll_conversation_edit);
		ll_conversation_select = (LinearLayout) view
				.findViewById(R.id.ll_conversation_select);
		return view;
	}

	@Override
	public void initListener() {
		bt_conversation_edit.setOnClickListener(this);
		bt_conversation_newSms.setOnClickListener(this);
		bt_conversation_selectAll.setOnClickListener(this);
		bt_conversation_cancel.setOnClickListener(this);
		bt_conversation_delete.setOnClickListener(this);
	}

	@Override
	public void initData() {

	}

	@Override
	public void processClick(View v) {
		switch (v.getId()) {
		case R.id.bt_conversation_edit:
showSelectMenu();
			break;

		case R.id.bt_conversation_cancel:
showEditMenu();
			break;

		}
	}

	private void showEditMenu() {
		ViewPropertyAnimator.animate(ll_conversation_select).translationY(ll_conversation_edit.getHeight()).setDuration(200);
		new Handler().postDelayed(new Runnable() {

			@Override
			public void run() {
				ViewPropertyAnimator.animate(ll_conversation_edit).translationY(0).setDuration(200);

			}
		}, 200);

	}

	private void showSelectMenu() {
	ViewPropertyAnimator.animate(ll_conversation_edit).translationY(ll_conversation_edit.getHeight()).setDuration(200);
	new Handler().postDelayed(new Runnable() {

		@Override
		public void run() {
			ViewPropertyAnimator.animate(ll_conversation_select).translationY(0).setDuration(200);

		}
	}, 200);

	}

}
这里使用Handler的延时操作来实现当这个编辑菜单下去了之后 选择菜单才会向上移动。
我们给tanslationY(0)设置为0是因为我们默认给他设置已经移动到屏幕外,设置0的意思就是让这个控件回到原来的位置。
————————————————————————————
看源码分析如何查会话:
我们要先去看看源码怎么查询会话,发现他是在sms的conversations这个uri进行查询的
所以我们定义一个常量类去设置这个uri常量。
public class ConstantValues {
public interface URI{
	Uri URI_SMS_CONVERSATION=Uri.parse("content://sms//conversations");
}
}
我们在Fragment里面想去获取内容解析者,需要先去获取getActivity()然后再去获取内容解析者。
我们在Fragment里面的initData方法里面我们这样去查询
	public void initData() {
      getActivity().getContentResolver().query(ConstantValues.URI.URI_SMS_CONVERSATION, null, null, null, null);
	}
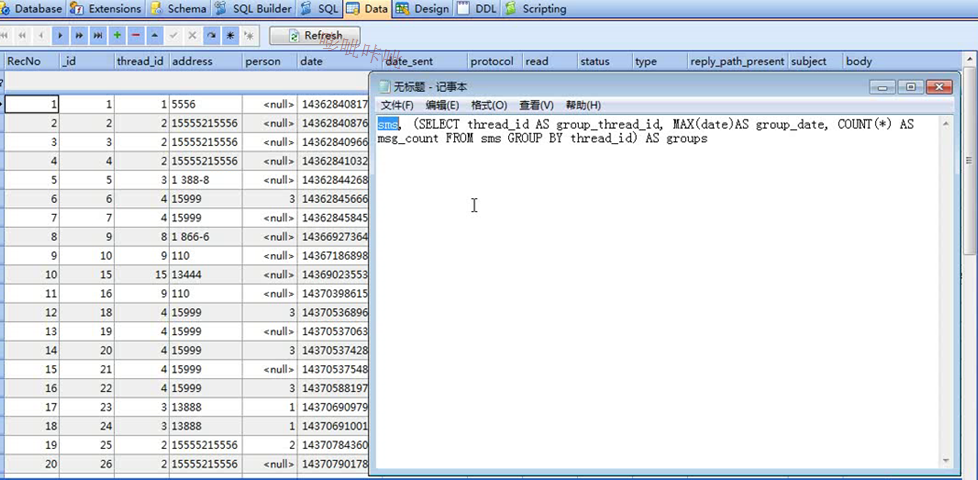
看完源码我们发现他内部其实是这样进行查询的

查询到的结果是这样的
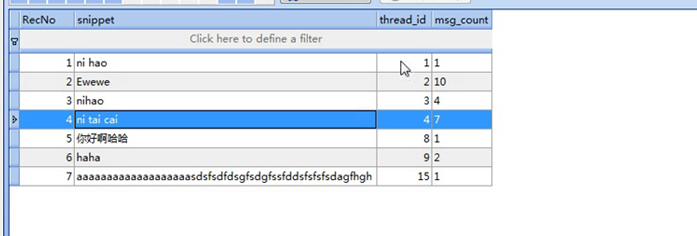
也就是说他能查询到最新的一条会话,和这个会话的id 还有这个id一共有多少条短信。
记住查询需要读短信的权限。
————————————————————————————
异步查询会话:
我们首先要先去查询你的Cursor里面有多少个数据。
我们定义一个CursorUtils去查询你的cursor里面的数据
	public void initData() {
      Cursor cursor = getActivity().getContentResolver().query(ConstantValues.URI.URI_SMS_CONVERSATION, null, null, null, null);
      CursorUtils.printCursor(cursor);
	}
public class CursorUtils {
	public static void printCursor(Cursor cursor){
		LogUtils.i("sys", "条数:"+cursor.getCount());
		while (cursor.moveToNext()) {
		for (int i = 0; i < cursor.getColumnCount(); i++) {
			String name=cursor.getColumnName(i);
			String content=cursor.getString(i);
			LogUtils.i("sys", name+":"+content);
		}
		LogUtils.i("sys", "++++++++++++++++++++++++++++++");

		}
	}

}
但是我们发现一个问题,如果你的短信数据很多,那么查询就会很慢。所以我们应该异步的去查询。
异步处理我们可以使用去new 一个子线程。但是每次都去创建子线程这样会让你的代码变得不工整。
所以我们直接创建一个类,这个类就是专门用于处理异步查询。
由于我们对数据库操作,所以创建一个dao包。
然后创建一个AsyncQueryHandler类进行异步查询。
public class SimpleQueryHandler extends AsyncQueryHandler {

	public SimpleQueryHandler(ContentResolver cr) {
		super(cr);

	}

}
SimpleQueryHandler queryHandler = new SimpleQueryHandler(getActivity().getContentResolver());
queryHandler.startQuery(token, cookie, uri, projection, selection, selectionArgs, orderBy);token和cookie是用来传递对象用的,一个是int 和object类型.
这个异步查询是没有返回值的,所以我们可以去他的类里面调用 方法去获取他的返回值,然后再去获取他的查询内容。
public class SimpleQueryHandler extends AsyncQueryHandler {


	//这个方法就是用来接收刚刚传递的两个参数,当查询完成的时候调用
     @Override
    protected void onQueryComplete(int token, Object cookie, Cursor cursor) {

    	super.onQueryComplete(token, cookie, cursor);
    }
}
Cursor就是查询结果 查询出来的结果会传递过来。
————————————————————————————
创建CursorAdapter:
这个类是BaseAdapter的一个子类。
为什么我们不直接用BaseAdapter,而用CursorAdapter.
因为我们的BaseAdapter的使用集合比较多。
然后List如果你先显示三个数据。然后你再add一个数据,他并不会显示到listView上面。
你需要刷新才能显示上去。
所以我们使用CursorAdapter 它有一个方法是notifyDataSetChanged();可以用来刷新数据当你的数据改变的时候。
CursorAdapter 专门用来显示数据库数据的
public class ConversationListAdapter extends CursorAdapter {


	public ConversationListAdapter(Context context, Cursor c, int flags) {
		super(context, c, flags);

	}
//返回的view对象是就是listview的条目getView()
	@Override
	public View newView(Context context, Cursor cursor, ViewGroup parent) {
		// TODO Auto-generated method stub
		return null;
	}
//设置Listview每个条目显示的内容
	@Override
	public void bindView(View view, Context context, Cursor cursor) {
		// TODO Auto-generated method stub

	}

}
记住CursorAdapter不是v4包下的。
我们这里先把自己创建的CursorAdapter的子类创建出来。
@Override
	public void initData() {
		ConversationListAdapter adapter = new ConversationListAdapter(getActivity(), null);
		lv_conversation_list.setAdapter(adapter);
		SimpleQueryHandler queryHandler = new SimpleQueryHandler(getActivity().getContentResolver());
		queryHandler.startQuery(0, adapter, ConstantValues.URI.URI_SMS_CONVERSATION, null, null, null, null);
    /*  Cursor cursor = getActivity().getContentResolver().query(ConstantValues.URI.URI_SMS_CONVERSATION, null, null, null, null);
      CursorUtils.printCursor(cursor);*/

	}
这里我们给构造函数 设置context为getActivity();给cursor设置为null
因为我们是在查询完成的时候才能获取到cursor对象。
所以我们给第二个参数设置为adapter 让他传递进去,然后在完成查询的时候给他设置cursor。
public class SimpleQueryHandler extends AsyncQueryHandler {

	public SimpleQueryHandler(ContentResolver cr) {
		super(cr);

	}
	//这个方法就是用来接收刚刚传递的两个参数,当查询完成的时候调用
     @Override
    protected void onQueryComplete(int token, Object cookie, Cursor cursor) {

    	super.onQueryComplete(token, cookie, cursor);
    	if(cookie!=null&& cookie instanceof CursorAdapter){
			//查询得到的cursor,交给CursorAdapter,由它把cursor的内容显示至listView
			((CursorAdapter)cookie).changeCursor(cursor);
    	}
    }
}
______________________________
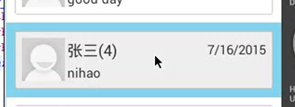
会话列表的布局文件:
<?xml version="1.0" encoding="utf-8"?>
<LinearLayout xmlns:android="http://schemas.android.com/apk/res/android"
    android:layout_width="match_parent"
    android:layout_height="wrap_content"
    android:orientation="horizontal"
    android:padding="8dp" >


    <RelativeLayout
        android:layout_width="match_parent"
        android:layout_height="wrap_content"
        android:background="@drawable/selector_bt_bg"
        android:padding="8dp" >


        <ImageView
            android:id="@+id/iv_conversation_avator"
            android:layout_width="50dp"
            android:layout_height="50dp"
            android:background="@drawable/img_default_avatar" />


        <TextView
            android:id="@+id/tv_conversation_date"
            android:layout_width="wrap_content"
            android:layout_height="wrap_content"
            android:layout_alignParentRight="true"
            android:layout_marginLeft="3dp"
            android:layout_marginTop="3dp"
            android:text="年月日"
            android:textSize="15sp" />


        <TextView
            android:id="@+id/tv_conversation_address"
            android:layout_width="wrap_content"
            android:layout_height="wrap_content"
            android:layout_marginLeft="3dp"
            android:layout_marginTop="3dp"
            android:layout_toLeftOf="@id/tv_conversation_date"
            android:layout_toRightOf="@id/iv_conversation_avator"
            android:singleLine="true"
            android:text="名字111111111111111"
            android:textSize="18sp" />


        <TextView
            android:id="@+id/tv_conversation_body"
            android:layout_width="wrap_content"
            android:layout_height="wrap_content"
            android:layout_alignBottom="@id/iv_conversation_avator"
            android:layout_marginLeft="3dp"
            android:layout_marginTop="3dp"
            android:layout_toRightOf="@id/iv_conversation_avator"
            android:singleLine="true"
            android:text="阿卡还得靠就爱上疯狂绝代双骄法律客户端是否快速的凤凰山"
            android:textSize="13sp" />
    </RelativeLayout>


</LinearLayout>
这里有一个小细节,为什么我们需要先定义日期的textview。是因为如果你名字过长
那么他可能会覆盖掉你的日期。所以我们先定义出日期的控件。
然后在名字的textview里面使用toleftof日期的textview的id.这样名字过长就不会覆盖掉日期。
————————————————————————————————
创建ViewHolder用于封装条目的所有组件:
ListView我们都只要需要优化。不然内存会大量的使用。
不过cursorAdapter已经帮你做了复用缓存了。
但是ViewHolder没有帮我们实现。
所以我们自己去实现。
先定义出ViewHolder类:
class ViewHolder{
		private ImageView iv_conversation_avator;
		private ImageView tv_conversation_address;
		private ImageView tv_conversation_body;
		private ImageView tv_conversation_date;

		public ViewHolder(View view) {
			iv_conversation_avator = (ImageView) view.findViewById(R.id.iv_conversation_avator);
			tv_conversation_address = (ImageView) view.findViewById(R.id.tv_conversation_address);
			tv_conversation_body = (ImageView) view.findViewById(R.id.tv_conversation_body);
			tv_conversation_date = (ImageView) view.findViewById(R.id.tv_conversation_date);

		}
由于CursorAdapter内部是这样实现的:
public ConversationListAdapter(Context context, Cursor c) {
super(context, c);
// TODO Auto-generated constructor stub
}
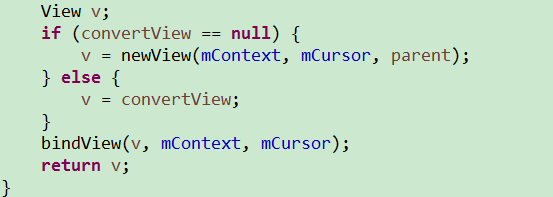
//返回的view对象是就是listview的条目getView()
@Override
public View newView(Context context, Cursor cursor, ViewGroup parent) {
//这个类就是用来设置布局文件给listView来显示的
return View.inflate(context, R.layout.item_conversation,null);
}
//设置Listview每个条目显示的内容
@Override
public void bindView(View view, Context context, Cursor cursor) {
//通过这个就可以使用ViewHolder里面的控件了
ViewHolder holder = getViewHolder(view);
}
public ViewHolder getViewHolder(View view){
//判断你你的holder对象是否已经存在,如果存在直接使用
ViewHolder holder = (ViewHolder) view.getTag();
//如果不存在就创建出来
if(holder==null){
holder = new ViewHolder(view);
//setTag可以用于存放数据。
view.setTag(holder);
}
return holder;
}
class ViewHolder{
private ImageView iv_conversation_avator;
private ImageView tv_conversation_address;
private ImageView tv_conversation_body;
private ImageView tv_conversation_date;
public ViewHolder(View view) {
iv_conversation_avator = (ImageView) view.findViewById(R.id.iv_conversation_avator);
tv_conversation_address = (ImageView) view.findViewById(R.id.tv_conversation_address);
tv_conversation_body = (ImageView) view.findViewById(R.id.tv_conversation_body);
tv_conversation_date = (ImageView) view.findViewById(R.id.tv_conversation_date);
}
}
}这样有一个好处,就是你不需要每一次都去创建view控件,这样会浪费内存。
我们定义这样一个ViewHolder,就是当你第一次创建的时候去new 一个对象。
下次使用的时候可以直接使用。
——————————————————————
ListView显示查询的会话:
由于我们bindView(View view, Context context, Cursor cursor);
获得的Cursor对象,去使用的时候不是很清晰。所以我们还是创建一个bean。
把Cursor里面的数据保存到bean里面。这样使用起来比较方便清晰。
public class ConversationBean {
	private String snippet;
	private String thread_id;
	private String msg_count;
	private String address;
	private Long date;

	public String getAddress() {
		return address;
	}

	public void setAddress(String address) {
		this.address = address;
	}

	public Long getDate() {
		return date;
	}

	public void setDate(Long date) {
		this.date = date;
	}

	public static ConversationBean creatConversationCursor(Cursor cursor) {
		ConversationBean conversationBean = new ConversationBean();
		conversationBean.setSnippet(cursor.getString(cursor
				.getColumnIndex("snippet")));
		conversationBean.setThread_id(cursor.getString(cursor
				.getColumnIndex("_id")));
		conversationBean.setMsg_count(cursor.getString(cursor
				.getColumnIndex("msg_count")));
		conversationBean.setAddress(cursor.getString(cursor
				.getColumnIndex("address")));
		conversationBean.setDate(cursor.getLong(cursor
				.getColumnIndex("date")));
		return conversationBean;

	}

	public String getSnippet() {
		return snippet;
	}

	public void setSnippet(String snippet) {
		this.snippet = snippet;
	}

	public String getThread_id() {
		return thread_id;
	}

	public void setThread_id(String thread_id) {
		this.thread_id = thread_id;
	}

	public String getMsg_count() {
		return msg_count;
	}

	public void setMsg_count(String msg_count) {
		this.msg_count = msg_count;
	}

}
通过这个静态方法去调用这里面的数据。public static ConversationBean creatConversationCursor(Cursor cursor)
	@Override
	public void bindView(View view, Context context, Cursor cursor) {
		//通过这个就可以使用ViewHolder里面的控件了
		ViewHolder holder = getViewHolder(view);

		ConversationBean conversationBean = ConversationBean.creatConversationCursor(cursor);


	}
这里其实有一个小问题,就是我们没有对cursor进行移动,为什么它却会显示其他的数据。
这是因为CursorAdapter源码已经对cursor进行了移动判断了。
由于他给我们提供的
queryHandler.startQuery(0, adapter,ConstantValues.URI_SMS_CONVERSATION, null, null, null, null);
这个方法只能查出 最新的一条短信的内容和短信数目,和短信的名字的id。
所以我们需要自己定义一些查询条件,去查找我们需要的日期和名字等。
但是我们查询的时候有一些注意事项。
第一点:就是当我们自己去创建查询字段的时候他会覆盖掉他默认查询的内容。
所以我们需要把他默认查询的内容也添加到查询字段中。
		String[] projection = {
				"sms.body AS snippet",
				"sms.thread_id AS _id",
				"groups.msg_count AS msg_count",
				"address",
				"date"
		};
AS代表给他一个别名。
		String[] projection = {
				"sms.body AS snippet",
				"sms.thread_id AS thead_id",
				"groups.msg_count AS msg_count",
				"Address AS address",
				"Date AS date"
		};
做完这些之后,我们需要把Cursor提交给Adapter.
    protected void onQueryComplete(int token, Object cookie, Cursor cursor) {

    	super.onQueryComplete(token, cookie, cursor);
    	if(cookie!=null&& cookie instanceof CursorAdapter){
			//查询得到的cursor,交给CursorAdapter,由它把cursor的内容显示至listView
			((CursorAdapter)cookie).changeCursor(cursor);
    	}
    }
但是你这样运行就会报错。
是因为CursorAdapter规定你的cursor当中必须有一个字段是_id 字段。
所以我们直接在查询的字段的时候随便把一个字段的别名改成_id即可:
	String[] projection = {
				"sms.body AS snippet",
				"sms.thread_id AS _id",
				"groups.msg_count AS msg_count",
				"address AS address",
				"date AS date"
		};
然后记住在bean里面添加这些字段进去。date日期我们使用Long类型。
然后我们就可以在Adapter里面设置内容了。
public void bindView(View view, Context context, Cursor cursor) {
		//通过这个就可以使用ViewHolder里面的控件了
		ViewHolder holder = getViewHolder(view);

		ConversationBean conversationBean = ConversationBean.creatConversationCursor(cursor);
		holder.tv_conversation_address.setText(conversationBean.getAddress());
		holder.tv_conversation_body.setText(conversationBean.getSnippet());
		holder.tv_conversation_date.setText(conversationBean.getDate()+"");


	}
这里只是粗略的显示 看看是否成功。但是不符合显示的规范
———————————————————————————
ListView显示头像、联系人姓名:
时间显示是这样的:如果是今天的就显示时间。如果是以前的就显示年月日。
我们可以使用DateUtils.isToday(long)判断是否是今天的时间,如果是返回true.
我们还可以使用DateFormat这个类来格式日期的显示格式。
使用getTimeFormat(context).format(long)方法去把long型的时间格式化成时分格式显示
使用getDateFormat(context),format(long)方法把long型的时间格式化成年月日格式显示
		if (DateUtils.isToday(conversationBean.getDate())) {
			holder.tv_conversation_date.setText(DateFormat.getTimeFormat(
					context).format(conversationBean.getDate()));
		} else {
			holder.tv_conversation_date.setText(DateFormat.getDateFormat(
					context).format(conversationBean.getDate()));
		}
然后我们还需要按date 进行排序。要是降序desc,因为今天的日期应该是最上面的。
这个在查询的时候进行排序即可。
		queryHandler.startQuery(0, adapter,
				ConstantValues.URI_SMS_CONVERSATION, projection, null, null, "date desc");
接下来我们需要去显示联系人中对应号码所对应的名字,我们先创建一个类去做数据库查询。
public class ContactDao {

public static String  getNameforAddress(ContentResolver resolver,String address){

	String name=null;
	Uri uri = Uri.withAppendedPath(PhoneLookup.CONTENT_FILTER_URI, address);
	 Cursor cursor = resolver.query(uri, new String []{PhoneLookup.DISPLAY_NAME}, null, null, null);
	 if (cursor.moveToFirst()) {
		 name = cursor.getString(0);
		 cursor.close();
	}
	return name;


}
}
	Uri uri = Uri.withAppendedPath(PhoneLookup.CONTENT_FILTER_URI, address);
	 Cursor cursor = resolver.query(uri, new String []{PhoneLookup.DISPLAY_NAME}, null, null, null);
这个方法是PhoneLookup提示使用的方法。
withAppendedPath()方法的作用是拼接Uri。将里面的数据拼接到Uri后面。
第一个参数是PhoneLookup提供的一个常量,里面封装的是联系人的主机名+路径。
第二个参数是我们要查询的数据。
PhoneLookup.DISPALY_NAME常量是我们联系人里面的名字,通过你第二个参数查询出来的名字。
因为一个号码通常对应一个名字,所以我们查出来的名字应该只有一个结果。
所以我们直接使用movetofirst就可以了。
		String name = ContactDao.getNameforAddress(
				context.getContentResolver(), conversationBean.getAddress());
		if (TextUtils.isEmpty(name)) {

			holder.tv_conversation_address
					.setText(conversationBean.getAddress() +" "
							+ conversationBean.getMsg_count());
		} else {

			holder.tv_conversation_address.setText(name + " "
					+ conversationBean.getMsg_count() );

		}
我们发现联系人和联系人之间有一个线。
我们需要去掉它

我们需要在ListView里面这样设置就可以去除这条线:
    <ListView
        android:id="@+id/lv_conversation_list"
        android:layout_width="match_parent"
        android:layout_height="0dp"
        android:layout_weight="1"
        android:divider="@android:color/transparent" >
    </ListView>
还有一个问题就是当你点击条目的时候会有一个蓝色的底色:
我们需要自己定义的灰色不需要这个蓝色的底色所以我们需要给ListView默认的selector去掉。
android:listSelector="@android:color/transparent"
——————————————————
显示联系人头像:
由于要使用数据库查询所以我们在dao里面创建一个方法:
public static Bitmap getAvatorByAddress(ContentResolver resolver,String address){
	Bitmap bitmap=null;
	  Uri uri = Uri.withAppendedPath(PhoneLookup.CONTENT_FILTER_URI, address);
	 Cursor cursor = resolver.query(uri, new String []{PhoneLookup._ID}, null, null, null);
	 if (cursor.moveToFirst()) {
		String _id = cursor.getString(0);
		InputStream is = Contacts.openContactPhotoInputStream(resolver, Uri.withAppendedPath(Contacts.CONTENT_URI, _id));
		bitmap=BitmapFactory.decodeStream(is);
	 }
	 return bitmap;

}
这个方法是直接查询你的联系人里面的头像,将他转化成一个输入流。
记住我们需要通过_id去查询。所以我们要用withAppendedPath()方法去拼接uri.
然后我们就获得了输入流既让他转换成Bitmap 返回就可以了。
然后我们在Adapter里面设置头像,就可以了
		Bitmap avtor = ContactDao.getAvatorByAddress(context.getContentResolver(), conversationBean.getAddress());
		if (avtor==null) {
			holder.iv_conversation_avator.setBackgroundResource(R.drawable.img_default_avatar);
		}else{
			holder.iv_conversation_avator.setBackgroundDrawable(new BitmapDrawable(avtor));

		}
这里我们要注意 不能将这段代码放在当你查出了联系人名字的时候才去调用这个。
		String name = ContactDao.getNameforAddress(
				context.getContentResolver(), conversationBean.getAddress());
		if (TextUtils.isEmpty(name)) {

			holder.tv_conversation_address.setText(conversationBean
					.getAddress() + " " + conversationBean.getMsg_count());
		} else {

			holder.tv_conversation_address.setText(name + " "
					+ conversationBean.getMsg_count());
			Bitmap avtor = ContactDao.getAvatorByAddress(context.getContentResolver(), conversationBean.getAddress());
			if (avtor==null) {
				holder.iv_conversation_avator.setBackgroundResource(R.drawable.img_default_avatar);
			}else{
				holder.iv_conversation_avator.setBackgroundDrawable(new BitmapDrawable(avtor));

			}
		}
假设你这样去写,如果没有联系人的话 他就不会去执行头像的代码,这样他就会复用你以前使用过的代码会出现 重复代码
————————————————————————
选择模式下选中条目:
我们现在布局中创建出一个imageView让他显示在联系人条目的左边
<ImageView
    android:id="@+id/iv_check"
    android:layout_width="wrap_content"
    android:layout_height="wrap_content"
    android:layout_marginRight="10dp"
    android:background="@drawable/common_checkbox_normal"
    android:layout_gravity="center"
    android:visibility="gone"
    />
我们设置他为不可见,然后当我们去点击编辑的时候才让他可见。
我们在Adapter里面定义出来一个标签。我们默认是 flase如果当我们点击编辑的时候才让他为true;
private boolean selectMode = false; public boolean getIsSelectMode() {
return selectMode;
}
public void setIsSelectMode(boolean selectMode) {
this.selectMode = selectMode;
}在Fragment里面:
	public void processClick(View v) {
		switch (v.getId()) {
		case R.id.bt_conversation_edit:
			showSelectMenu();
			adapter.setIsSelectMode(true);
			adapter.notifyDataSetChanged();
			break;

		case R.id.bt_conversation_cancel:
			showEditMenu();
			adapter.setIsSelectMode(false);
			adapter.notifyDataSetChanged();
			break;

		}
这里注意当我们设置完标签的时候我们一定要去刷新adapter,因为如果不刷新。
他就不会去显示。
然后我们在Adapter里面的bindView();方法里面去设置
		if (selectMode) {
			holder.iv_check.setVisibility(View.VISIBLE);

		}else
			holder.iv_check.setVisibility(View.GONE);

	}
这些设置完之后我们要去设置当我们点击条目的时候。imageView要换一个背景图片。
我们在Fragment里面创建一个lIstView的点击事件。
			@Override
			public void onItemClick(AdapterView<?> parent, View view,
					int position, long id) {
				//因为我们使用CursorAdapter这个类,他帮我们封装好了getItem可以返回你指定的Cursor对象
				if(adapter.getIsSelectMode()){
					//选择选框
				}else{
					//进入对话界面
				}


			}
		});
这里要注意,为什么我们要判断现在在什么界面。是因为如果我们不在选择界面的话,
那么我们点击条目应该进入对话详情。
如果是在选择界面,我们应该点击条目的时候我们需要选择这个条目,也就是改变选择按钮的背景图片。
接下来我们要创建一个集合,去保存我们点击的条目的thead_id。因为我们要判断我们这个条目是否点击过,如果点击过那么就变回去,如果没有就保存进来且变背景图片。
private List<integer> selectedConversationId=new ArrayList<integer>();
	public void SelectSingle(int position){
		Cursor cursor=(Cursor)getItem(position);
		ConversationBean conversationBean = ConversationBean.creatConversationCursor(cursor);
		if (selectedConversationId.contains(conversationBean.getThread_id())) {
		selectedConversationId.remove((Integer)conversationBean.getThread_id());
		}
		else{
		selectedConversationId.add(conversationBean.getThread_id());
		}
		notifyDataSetChanged();
	}
这里要注意我们 remove的时候必须把int转为对象。不然他就相当于删除你指定的索引
还要注意我们需要点击之后我们还需要刷新界面。
这里我们使用getItem()方法的时候,其实它内部已经调用了movetoposition方法。
直接移动到了当前cursor的位置。
所以我们可以直接使用getItem方法传递一个position进来获取指定的cursor
然后我们需要在编辑界面的时候给他定义背景图片,如果是编辑模式且你点击了那么
//判断当前是否进入选择模式
		if(isSelectMode){
			holder.iv_check.setVisibility(View.VISIBLE);
			//判断集合中是否包含会话id,从而确定该条目是否被选中
			if(selectedConversationIds.contains(conversation.getThread_id())){
				holder.iv_check.setBackgroundResource(R.drawable.common_checkbox_checked);
			}
			else{
				holder.iv_check.setBackgroundResource(R.drawable.common_checkbox_normal);
			}
		}
		else{
			holder.iv_check.setVisibility(View.GONE);
		}
全选和取消:
	public void SelectAll(){
		Cursor cursor = getCursor();
		cursor.moveToPosition(-1);
		while (cursor.moveToNext()) {
			ConversationBean conversationCursor = ConversationBean.creatConversationCursor(cursor);
	        selectedConversationId.add(conversationCursor.getThread_id());

		}
		notifyDataSetChanged();

	}
	public void Selectcanel(){
		selectedConversationId.clear();
		notifyDataSetChanged();
	}
全选的时候我们使用getCursor的时候获取的Cursor获取一个随机位置的Cursor。
所以我们需要先给他移动到-1的位置,然后在开始便利,把所有的id都存入集合中。
我们改成set集合,因为list集合会出现同样的。而set集合不会。


 3476
3476

 被折叠的 条评论
为什么被折叠?
被折叠的 条评论
为什么被折叠?
 到【灌水乐园】发言


