


商品分类页面(涉及到的表:tb_item_cat、tb_type_template)
1.实现了面包屑的显示点击查询
在itemCatController.js中添加两个方法
//实现面包屑跳转
    $scope.grade = 1;  //当前级别
    $scope.setGrade = function (value) {
        $scope.grade = value;
    }


    $scope.selectType = function (p_entity) {
        //新增商品分类时 这一商品的父id是p_entity的id
        $scope.parentId = p_entity.id;

        if ($scope.grade == 1) {
            $scope.entity_1 = null;
            $scope.entity_2 = null;
        }
        if ($scope.grade == 2) {
            $scope.entity_1 = p_entity;
            $scope.entity_2 = null;
        }
        if ($scope.grade == 3) {
            $scope.entity_2 = p_entity;
        }
        $scope.selectItemCatByParentId(p_entity.id);

    }
item_cat.html部分
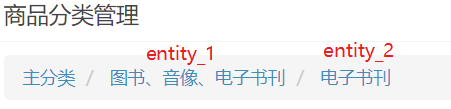
<body class="hold-transition skin-red sidebar-mini" ng-app="pinyougou" ng-controller="itemCatController" ng-init="grade=1;selectType({id:0})"><ol class="breadcrumb">
<li>
<a href="#" ng-click="grade=1;selectType({id:0})">主分类</a>
</li>
<li>
<a href="#" ng-click="grade=2;selectType(entity_1)">{{entity_1.name}}</a>
</li>
<li>
<a href="#" ng-click="grade=3;selectType(entity_2)">{{entity_2.name}}</a>
</li>
</ol><span ng-if="grade!=3">
<button type="button" class="btn bg-olive btn-xs" ng-click="setGrade(grade+1);selectType(entity)">查询下级</button>
</span>2.实现了商品分类的添加

item_cat.html部分
<tr>
	<td>上级商品分类</td>
	<td>
		{{entity_1.name}} >>  {{entity_2.name}}
	</td>
</tr>
<tr>
	<td>商品分类名称</td>
	<td><input ng-model="entity.name" class="form-control" placeholder="商品分类名称">  </td>
</tr>
<tr>
	<td>类型模板</td>
	<td>
	<input ng-model="entity.typeId" placeholder="商品类型模板" class="form-control" type="text"/>
	</td>
</tr>
别忘了商品分类的字段还有一个parentId,但是却没在新建栏中显示,所以得在js中添加
itemCatController.js部分

//保存
    $scope.save = function () {

        //给要添加的商品的父id赋值(哪里用写哪里)
        $scope.entity.parentId=$scope.parentId;

        var serviceObject;//服务层对象
        if ($scope.entity.id != null) {//如果有ID
            serviceObject = itemCatService.update($scope.entity); //修改
        } else {
            serviceObject = itemCatService.add($scope.entity);//增加
        }
        serviceObject.success(
            function (response) {
                if (response.success) {
                    //重新查询(保存成功,跳转查询当前当前父类商品下面所有的子商品)
                    $scope.selectItemCatByParentId($scope.parentId);//重新加载
                } else {
                    alert(response.message);
                }
            }
        );
    }
3.实现了商品分类的修改,在修改按钮上添加一个ng-click="findOne(传当前id)"就可以了
4.实现了商品分类的删除,在每个分类前的复选框中添加一个ng-click="updateSelection($event,传当前id),删除按钮上添加一个dele()方法
注意一点,删除操作不会删除其子类的所有商品,因为数据库中表与表之间是逻辑关系,而不是物理关系(表与表之间是主外键关联),这样的好处,用户感觉删除了,实则还有痕迹保存在数据库中,满足了当下大数据的形式,用户隐私在无形的泄露.
5.优化之前添加完一条新的商品分类数据再点击添加数据回显问题)新建标签上加:ng-click="entity={}"
完成运营商登陆与安全控制功能
1.第一步:在pom文件中添加与springsecurity安全框架相关的坐标(依赖)
2.第二步:在web.xml中添加安全框架的过滤器
<!--给商家添加安全认证过滤器-->

	<context-param>
		<param-name>contextConfigLocation</param-name>
		<param-value>classpath:spring/spring-security.xml</param-value>
	</context-param>
	<listener>
		<listener-class>
			org.springframework.web.context.ContextLoaderListener
		</listener-class>
	</listener>

	<filter>
		<filter-name>springSecurityFilterChain</filter-name>
		<filter-class>org.springframework.web.filter.DelegatingFilterProxy</filter-class>
	</filter>
	<filter-mapping>
		<filter-name>springSecurityFilterChain</filter-name>
		<url-pattern>/*</url-pattern>
	</filter-mapping>
3.第三步:在spring目录下添加spring-security.xml配置文件(里面配置三项内容):
其一,释放静态資源;
<!-- 设置页面不登陆也可以访问 -->
<http pattern="/*.html" security="none"></http>
<http pattern="/css/**" security="none"></http>
<http pattern="/img/**" security="none"></http>
<http pattern="/js/**" security="none"></http>
<http pattern="/plugins/**" security="none"></http>
其二,配置页面的拦截规则:
<!-- 页面的拦截规则    use-expressions:是否启动SPEL表达式 默认是true -->
	<http use-expressions="false">
		<!-- 当前用户必须有ROLE_USER的角色 才可以访问根目录及所属子目录的资源 -->
		<intercept-url pattern="/**" access="ROLE_SELLER"/>
		<!-- 开启表单登陆功能 -->
		<form-login  login-page="/login.html" default-target-url="/admin/index.html" always-use-default-target="true"/>
		<csrf disabled="true"/>
		<!-- 为了解决frame框架访问问题默认是deny不允许访问,改成同一域下可以进行访问-->
		<headers>
                        <!--//DENY:浏览器拒绝当前页面加载任何Frame页面
			//SAMEORIGIN:frame页面的地址只能为同源域名下的页面
			//ALLOW-FROM:origin为允许frame加载的页面地址。-->
		    <frame-options policy="SAMEORIGIN"/>
		</headers>
		<!--这里增加logout后,可通过logout进行调用-->
		<logout></logout>
	</http>
其三,如果想去数据库中查认证信息,就自己配置认证信息
<!-- 认证管理器 -->
	<authentication-manager>
		<!-- 认证提供者 -->
		<authentication-provider>
			<user-service>
				<!-- 配置当前系统的用户 authorities该用户属于哪个角色 -->
				<user name="admin" password="123456" authorities="ROLE_USER" />
			</user-service>
		</authentication-provider>
	</authentication-manager>
最后别忘了在去登陆界面检查用户名和密码的文本框的name值必须为username和password,是否为post提交,提交路径是否为"/login",如果是Tomcat启动时配置了项目名,这里也需要加上项目名
4.实现了登陆成功跳转到index.html页面后用户名的显示

index.html页面的body标签:
<body class="hold-transition skin-green sidebar-mini" ng-app="pinyougou" ng-controller="loginController" ng-init="getLoginName()">
head标签引入的js文件
<script type="text/javascript" src="../plugins/angularjs/angular.min.js"></script>
<script type="text/javascript" src="../js/base.js" ></script>
<script type="text/javascript" src="../js/service/loginService.js" ></script>
<script type="text/javascript" src="../js/controller/loginController.js" ></script>
loginController.js页面
app.controller('loginController',function ($scope, loginService) {
    $scope.getLoginName=function () {
        loginService.getLoginName().success(
            function (response) {
                $scope.loginName=response.loginName;
            }
        )
    }
})
loginService.js页面
app.service('loginService',function ($http) {
    //获取当前登陆的名
    this.getLoginName=function () {
        return $http.get('../login/getName.do');
    }
})
LoginController页面(从安全框架的域中获取登陆的用户信息)
@RestController
@RequestMapping("/login")
public class LoginController {
    @RequestMapping("/getName")
    public Map getName(){
        String name = SecurityContextHolder.getContext().getAuthentication().getName();
        Map map = new HashMap<>();
        map.put("loginName",name);
        return map;
    }
}
5.实现了index.html页面注销按钮
<div class="pull-right">
   <!--前提是一定要在spring-securtiy中配置<logout></logout>标签-->
   <a href="../logout" class="btn btn-default btn-flat">注销</a>
</div>
完成商家系统登陆与安全控制功能
1.在pyg_parent父工程下创建一个新的子工程,名为pyg_shop_web,里面的pom配置文件:
<packaging>war</packaging>
<dependencies>
        <dependency>
            <groupId>com.fighting</groupId>
            <artifactId>pyg_sellergoods_interface</artifactId>
            <version>1.0-SNAPSHOT</version>
        </dependency>
</dependencies>
<build>
        <plugins>
            <plugin>
                <groupId>org.apache.tomcat.maven</groupId>
                <artifactId>tomcat7-maven-plugin</artifactId>
                <version>2.2</version>
                <configuration>
                    <!-- 指定端口 -->
                    <port>9102</port>
                    <!-- 请求路径 -->
                    <path>/</path>
                </configuration>
            </plugin>
        </plugins>
</build>
2.将静态資源全部导入webapp中,在WEB-INF下面的web.xml文件中还是添加安全框架的认证过滤器(上文有)
3.同时,在resources目录下的spring目录下添加spring-security.xml配置文件,里面还是三大内容,只不过这次认证信息不在配置文件中配置了,而是去数据库中查
<!-- 设置页面不登陆也可以访问 -->
<http pattern="/*.html" security="none"></http>
<http pattern="/css/**" security="none"></http>
<http pattern="/img/**" security="none"></http>
<http pattern="/js/**" security="none"></http>
<http pattern="/plugins/**" security="none"></http>
<http pattern="/seller/add.do" security="none"></http>
<!-- 页面的拦截规则 use-expressions:是否启动SPEL表达式 默认是true -->
<http use-expressions="false">
<!-- 当前用户必须有ROLE_USER的角色 才可以访问根目录及所属子目录的资源 -->
<intercept-url pattern="/**" access="ROLE_SELLER"/>
<!-- 开启表单登陆功能 -->
<form-login login-page="/shoplogin.html" default-target-url="/admin/index.html" authentication-failure-url="/shoplogin.html" always-use-default-target="true"/>
<csrf disabled="true"/>
<!-- 为了解决frame框架访问问题默认是deny不允许访问,改成同一域下可以进行访问-->
<headers>
<frame-options policy="SAMEORIGIN"/>
</headers>
<logout/>
</http>
<!-- 认证管理器 -->
<authentication-manager>
<authentication-provider user-service-ref="userDetailService">
<!--密码加密-->
<!--<password-encoder ref="bcryptEncoder"></password-encoder>-->
</authentication-provider>
</authentication-manager>
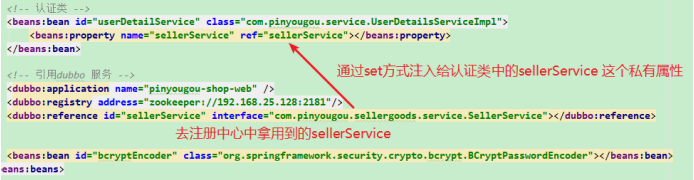
<!-- 认证类 -->
<beans:bean id="userDetailService" class="com.pinyougou.service.UserDetailsServiceImpl">
<beans:property name="sellerService" ref="sellerService"></beans:property>
</beans:bean>
<!-- 引用dubbo 服务 -->
<dubbo:application name="pinyougou-shop-web" />
<dubbo:registry address="zookeeper://192.168.25.128:2181"/>
<dubbo:reference id="sellerService" interface="com.pinyougou.sellergoods.service.SellerService"></dubbo:reference>
<beans:bean id="bcryptEncoder" class="org.springframework.security.crypto.bcrypt.BCryptPasswordEncoder"></beans:bean>4.检查shoplogin.html登陆界面的文本框的name值是否为username和password,action路径是否为:/login,请求方式是否为post
5.从代码生成器中取与Seller有关的文件


6.依据spring-security的配置文件去对应的目录下创建一个认证类(注意目录结构):
public class UserDetailsServiceImpl implements UserDetailsService {


    private SellerService sellerService;

    //在spring-security的配置类中已经加了一个私有属性,所以这里必须要提供一个set方法,替代了之前的reference注解
    public void setSellerService(SellerService sellerService) {
        this.sellerService = sellerService;
    }

    @Override
    public UserDetails loadUserByUsername(String username) throws UsernameNotFoundException {
        TbSeller seller = sellerService.findOne(username);
        if (seller != null) {
            ArrayList<SimpleGrantedAuthority> authorities = new ArrayList<>();
            authorities.add(new SimpleGrantedAuthority("ROLE_SELLER"));
            return new User(username,seller.getPassword(),authorities);
        }
        return null;
    }
}


 231
231


 被折叠的 条评论
为什么被折叠?
被折叠的 条评论
为什么被折叠?
 到【灌水乐园】发言


