


1.消息中间件解决方案出现的背景:
目前父工程pyg_parent模块下有多个子模块,而且子模块之间的调用关系很多,如shop_web(商家模块),调用关系最多,用到了图下四种服务,这些模块之间的依赖关系称为耦合,耦合越多,维护就越困难.由此为了改善系统模块调用关系、减少模块之间的耦合,消息中间件就产生了

2.什么是消息中间件
消息中间件利用高效可靠的消息传递机制进行平台无关的数据交流,并基于数据通信来进行分布式系统的集成。通过提供消息传递和消息排队模型,它可以在分布式环境下扩展进程间的通信。对于消息中间件,常见的角色大致也就有Producer(生产者)、Consumer(消费者),常见的消息中间件的产品:ActiveMQ,RabbitMQ,ZeroMQ,Kafka
3.项目中引入消息中间件activeMQ后,使pyg_shop_web商家系统与solr搜索服务、freemarker静态页面生成服务解除了耦合,如图:

4.JMS就是Java平台上有关面向消息中间件的技术规范,它便于消息系统中的Java应用程序进行消息交换,JMS就是一种提供给外界厂商使用的接口规范,用来访问消息收发系统,类似于JDBC(Java DataBase Connectivity)
5.JMS 定义的五种不同的消息类型:
TextMessage-----一个字符串对象
MapMessage-----一套名称-值对
ObjectMessage-----一个序列化的 Java 对象
BytesMessage-----一个字节的数据流
StreamMessage-----Java 原始值的数据流
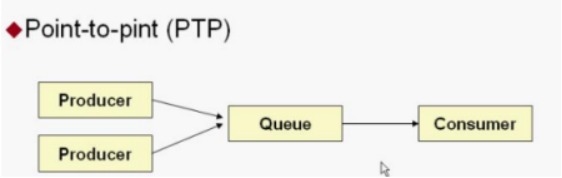
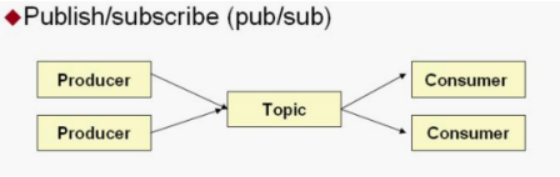
6.JMS的两种消息传递类型
一是点对点模式,即一个生产者和一个消费者一一对应.这种模式可以先发消息,然后再开启监听.可以有多个消费者,但生产者发送一个消息只能有一个消费者接收,其他消费者不接收
二是发布/ 订阅模式,即一个生产者产生消息并进行发送后,可以由多个消费者进行接收.这种模式是先在consumer消费方提供监听并先于producer生产方开启.一个消息发送可以被多个消费者接收(例子:老师在讲课发送消息,全班的学生接收消息)
7.今日完成了在虚拟机的Linux服务器上安装ActiveMQ
将apache-activemq-5.14.5-linux.tar.gz拖到Linux服务器上的soft目录下,并完成解压
接着进入解压后的apache-activemq-5.14.5文件目录下的bin目录下,开启activeMQ的服务

在本机上谷歌浏览器上访问http://192.168.25.128:8161(activemq的后台页面,控制台)测试activemq服务是否开启成功,成功页面如下:
输入用户名和密码即可访问(都是admin)


8.完成了一个Spring整合JMS的Demo
创建一个新模块SpringJmsDemo,在模块中完成练习
在pom文件中导入依赖activemq相关的依赖
<properties>
    <spring.version>4.2.4.RELEASE</spring.ve
</properties>
<dependencies>
    <!-- Spring -->
    <dependency>
        <groupId>org.springframework</groupI
        <artifactId>spring-context</artifact
        <version>${spring.version}</version>
    </dependency>
    <dependency>
        <groupId>org.springframework</groupI
        <artifactId>spring-beans</artifactId
        <version>${spring.version}</version>
    </dependency>
    <dependency>
        <groupId>org.springframework</groupI
        <artifactId>spring-jms</artifactId>
        <version>${spring.version}</version>
    </dependency>
    <dependency>
        <groupId>org.springframework</groupI
        <artifactId>spring-test</artifactId>
        <version>${spring.version}</version>
    </dependency>
    <dependency>
        <groupId>org.apache.activemq</groupI
        <artifactId>activemq-all</artifactId
        <version>5.11.2</version>
    </dependency>
    <dependency>
        <groupId>junit</groupId>
        <artifactId>junit</artifactId>
        <version>4.9</version>
    </dependency>
</dependencies>
在resources目录下新建一个spring目录
分别拷贝applicationContext-activemq-producer.xml配置文件
<context:component-scan base-package="cn.itcast.demo"></context:component-scan>

<!-- 真正可以产生Connection的ConnectionFactory,由对应的 JMS服务厂商提供-->
<bean id="targetConnectionFactory" class="org.apache.activemq.ActiveMQConnectionFacto
    <property name="brokerURL" value="tcp://192.168.25.128:61616"/>
</bean>

<!-- Spring用于管理真正的ConnectionFactory的ConnectionFactory -->
<bean id="connectionFactory" class="org.springframework.jms.connection.SingleConnecti
<!-- 目标ConnectionFactory对应真实的可以产生JMS Connection的ConnectionFactory -->
    <property name="targetConnectionFactory" ref="targetConnectionFactory"/>
</bean>

<!-- Spring提供的JMS工具类,它可以进行消息发送、接收等 -->
<bean id="jmsTemplate" class="org.springframework.jms.core.JmsTemplate">
    <!-- 这个connectionFactory对应的是我们定义的Spring提供的那个ConnectionFactory对象 -->
    <property name="connectionFactory" ref="connectionFactory"/>
</bean>
<!--这个是队列目的地,点对点的  文本信息-->
<bean id="queueTextDestination" class="org.apache.activemq.command.ActiveMQQueue">
    <constructor-arg value="queue_text"/>
</bean>
<!--这个是订阅模式  文本信息-->
<bean id="topicTextDestination" class="org.apache.activemq.command.ActiveMQTopic">
    <constructor-arg value="topic_text"/>
</bean>
和applicationContext-activemq-consumer.xml的配置文件
<!-- 真正可以产生Connection的ConnectionFactory,由对应的 JMS服务厂商提供-->
<bean id="targetConnectionFactory" class="org.apache.activemq.ActiveMQConnectionFactory">
    <property name="brokerURL" value="tcp://192.168.25.128:61616"/>
</bean>

<!-- Spring用于管理真正的ConnectionFactory的ConnectionFactory -->
<bean id="connectionFactory" class="org.springframework.jms.connection.SingleConnectionFacto
<!-- 目标ConnectionFactory对应真实的可以产生JMS Connection的ConnectionFactory -->
    <property name="targetConnectionFactory" ref="targetConnectionFactory"/>
</bean>
<!--这个是队列目的地,点对点的  文本信息-->
<bean id="queueTextDestination" class="org.apache.activemq.command.ActiveMQQueue">
    <constructor-arg value="queue_text"/>  <!--value值必须和producter配置文件中消息的名称对应-->
</bean>
<!-- 我的监听类 -->
<bean id="myMessageListener" class="cn.itcast.demo.MyMessageListener"></bean>
<!-- 消息监听容器 -->
<bean class="org.springframework.jms.listener.DefaultMessageListenerContainer">
	<property name="connectionFactory" ref="connectionFactory" />
	<property name="destination" ref="queueTextDestination" />
	<property name="messageListener" ref="myMessageListener" />
</bean>
一、练习通过SpringJMS发送Queue的消息
首先根据applicationContext-activemq-producer.xml配置文件,创建一个包扫描的目录,并在目录下创建一个对象,用来发送消息
@Component
public class SpringJmsQueueProductSend {
    @Autowired
    private JmsTemplate jmsTemplate;//JavaJms整合用来操作activemq的工具类
    @Autowired
    private ActiveMQQueue queueTextDestination;//这个是Queue的类型的消息,看applicationContext-activemq-producer.xml配置文件

    @Test
    public void sendQueue(final String value){//匿名内部类只可以引用外面被final修饰的参数
        //参数传一个Queue类型的消息和一个文本类型的消息
        jmsTemplate.send(queueTextDestination, new MessageCreator() {
            @Override
            public Message createMessage(Session session) throws JMSException {
                //原生的是从连接中获取session,再通过session发送信息
                return session.createTextMessage(value);
            }
        });
    }
}
建立一个测试方法,用来模拟一个发送Queue消息的服务器,调用sendQueue方法并传递参数
ApplicationContext ac = new ClassPathXmlApplicationContext("spring/applicationContext-activemq-producer.xml");
SpringJmsQueueProductSend sqps= (SpringJmsQueueProductSend) ac.getBean("springJmsQueueProductSend");
sqps.sendQueue("spring整合的jms消息中间件生产者发送的queue");
System.out.println("发送完毕");
根据applicationContext-activemq-consumer.xml配置文件在对应的目录下建立一个监听器,名称必须对应,而且这个监听器必须实现MessageListener接口,实现接口中onMessage方法
@Override
public void onMessage(Message message) {
    //根据消息发出的类型来转成对应的类型(看session.create*****什么方法)
    TextMessage textMessage= (TextMessage) message;
    try {
        System.out.println(textMessage.getText());
    } catch (JMSException e) {
        e.printStackTrace();
    }
}
建立一个类用来读取applicationContext-activemq-consumer.xml配置文件中的配置,生成监听器,并且模拟服务器一直开启的状态,监听器处于一直监听状态
@RunWith(SpringJUnit4ClassRunner.class)
@ContextConfiguration("classpath:spring/applicationContext-activemq-consumer.xml")
public class SpringQueueReceiverTest {
    @Test
    public void run(){
        while (true){

        }
    }
}
开始验证:顺序:先发送消息(运行测试方法传递参数),然后开启监听,结果是监听器收到Text类型的消息
发送端:
监听端:

验证成功,发送的Queue模式的消息如果有多个监听器,但只发送一个消息,结果只有一个监听器会监听到
二、练习通过SpringJMS发送Topic的消息
在配置文件中的包扫描路径下建立一个类发送Topic类型的消息
@Component
public class SpringJmsTopicProductSend {
    @Autowired
    private JmsTemplate jmsTemplate;
    @Autowired
    private ActiveMQTopic topicTextDestination;
    @Test
    public void sendTopic(){
        jmsTemplate.send(topicTextDestination, new MessageCreator() {
            @Override
            public Message createMessage(Session session) throws JMSException {
                MapMessage mapMessage = session.createMapMessage();
                mapMessage.setString("name","LBH");
                mapMessage.setString("password","123");
                return mapMessage;
            }
        });
    }
}
还是看配置文件,传入配置文件中的Topic(订阅模式)的消息
在applicationContext-activemq-consumer.xml的配置文件中添加配置监听器,需要加上Topic类型的消息配置,在下面配置以下内容
<!--这个是订阅模式  文本信息-->
<bean id="topicTextDestination" class="org.apache.activemq.command.ActiveMQTopic">
	<constructor-arg value="topic_text"/>
</bean>
<!-- 我的监听类 -->
<bean id="myMessageListener" class="cn.itcast.demo.MyMessageListener"></bean>
<!-- 消息监听容器 -->
<bean class="org.springframework.jms.listener.DefaultMessageListenerContainer">
	<property name="connectionFactory" ref="connectionFactory" />
	<property name="destination" ref="topicTextDestination" /><!--监听的目标Topic类型的消息-->
	<property name="messageListener" ref="myMessageListener" />
</bean>
创建监听器来监听Topic类型的消息,实现MessageListener接口
public void onMessage(Message message) {
    MapMessage mapMessage= (MapMessage) message;
    try {
        System.out.println(mapMessage.getString("name"));
        System.out.println(mapMessage.getString("password"));
    } catch (JMSException e) {
        e.printStackTrace();
    }
}
还是建立一个类用来读取applicationContext-activemq-consumer.xml配置文件中的配置,生成监听器,并且模拟服务器一直开启的状态,监听器处于一直监听状态
@RunWith(SpringJUnit4ClassRunner.class)
@ContextConfiguration("classpath:spring/applicationContext-activemq-consumer.xml")
public class SpringQueueReceiverTest {
    @Test
    public void run(){
        while (true){

        }
    }
}
开始验证,Topic订阅模式要先开启监听器,然后在发送消息(注意顺序)
发送端:
接收端:
Topic模式验证成功
9.解除了pyg_shop_web模块与search_web、page_web模块之间的耦合,在商品上架成功之后去solr库添加商品数据(Queue消息)、生成商品静态页面(Topic消息),商品下架之后去solr库中删除数据、删除商品静态页面.(原理:通过activemq发送消息给search模块和page模块)
步骤:
删除shop_web的pom文件中与search和page模块之间的依赖,弃用dubbo服务
删除之后shop_web模块的pom文件
<dependencies>
    <dependency>
        <groupId>com.fighting</groupId>
        <artifactId>pyg_sellergoods_interface</artifactId>
        <version>1.0-SNAPSHOT</version>
    </dependency>
    <dependency>
        <groupId>com.fighting</groupId>
        <artifactId>pyg_common</artifactId>
        <version>1.0-SNAPSHOT</version>
    </dependency>
</dependencies>
在shop_web模块的spring目录下添加spring-activemq.xml配置文件
<!-- 真正可以产生Connection的ConnectionFactory,由对应的 JMS服务厂商提供-->
<bean id="targetConnectionFactory" class="org.apache.activemq.ActiveMQConnectionFactory">
    <property name="brokerURL" value="tcp://192.168.25.128:61616"/>
</bean>

<!-- Spring用于管理真正的ConnectionFactory的ConnectionFactory -->
<bean id="connectionFactory" class="org.springframework.jms.connection.SingleConnectionFacto
<!-- 目标ConnectionFactory对应真实的可以产生JMS Connection的ConnectionFactory -->
    <property name="targetConnectionFactory" ref="targetConnectionFactory"/>
</bean>
<bean id="jmsTemplate" class="org.springframework.jms.core.JmsTemplate">
    <!-- 这个connectionFactory对应的是我们定义的Spring提供的那个ConnectionFactory对象 -->
    <property name="connectionFactory" ref="connectionFactory"/>
</bean>
<!-- solr库添加内容的queue消息-->
<bean id="queueSolrCreateDestination" class="org.apache.activemq.command.ActiveMQQueue">
    <constructor-arg value="pinyougou_queue_solr_create"/>
</bean>
<!-- solr库删除内容的queue消息-->
<bean id="queueSolrDeleteDestination" class="org.apache.activemq.command.ActiveMQQueue">
    <constructor-arg value="pinyougou_queue_solr_delete"/>
</bean>
<!-- 生成页面的topic消息 -->
<bean id="topicPageCreateDestination" class="org.apache.activemq.command.ActiveMQTopic">
    <constructor-arg value="pinyougou_topic_page_create"/>
</bean>
<!-- 删除页面的topic消息 -->
<bean id="topicPageDeleteDestination" class="org.apache.activemq.command.ActiveMQTopic">
    <constructor-arg value="pinyougou_topic_page_delete"/>
</bean>
修改web.xml配置文件

shop_web模块下的GoodsController中:
@Autowired
private JmsTemplate jmsTemplate;
//引入四个消息
@Autowired
private ActiveMQQueue queueSolrCreateDestination;
@Autowired
private ActiveMQQueue queueSolrDeleteDestination;
@Autowired
private ActiveMQTopic topicPageCreateDestination;
@Autowired
private ActiveMQTopic topicPageDeleteDestination;


@RequestMapping("/updateStatus")
public Result updateStatus(Long[] ids, String status) {
    try {
        goodsService.updateStatus(ids, status);
        //如果商品上架或者是下架,就去把数据添加到solr中或者从solr中移除
        if ("5".equals(status)) {
            //就是上架,就要把新的SKU数据添加到solr中
            //itemSearchService.importItems(ids);解除原来的dubbo耦合去找itemSearchService类
            //用ActiveMq去发送Queue(队列)类型的消息
            jmsTemplate.send(queueSolrCreateDestination, new MessageCreator() {
                @Override
                public Message createMessage(Session session) throws JMSException {
                    return session.createObjectMessage(ids);
                }
            });
            //如果商品上架成功,就根据FreeMarker的模板根据id创建指定的商品页面,一个id一个网页
            //一个Good一个网页
            /*for (Long id : ids) {
                //生成静态页面
                itemPageService.createItemHtml(id);
            }*/
            jmsTemplate.send(topicPageCreateDestination, new MessageCreator() {
                @Override
                public Message createMessage(Session session) throws JMSException {
                    return session.createObjectMessage(ids);
                }
            });
        }
        if ("6".equals(status)) {
            //就是下架,将solr中对应的SKU数据删除
            //itemSearchService.removeItems(ids);
            jmsTemplate.send(queueSolrDeleteDestination, new MessageCreator() {
                @Override
                public Message createMessage(Session session) throws JMSException {
                    return session.createObjectMessage(ids);
                }
            });
            //如果商品下架,删除对应的静态页面
            //itemPageService.removeItemHtml(ids);
            jmsTemplate.send(topicPageDeleteDestination, new MessageCreator() {
                @Override
                public Message createMessage(Session session) throws JMSException {
                    return session.createObjectMessage(ids);
                }
            });
        }
        return new Result(true, "修改商品状态成功");
    } catch (Exception e) {
        e.printStackTrace();
        return new Result(false, "修改商品状态失败");
    }
}
pyg_search_service模块中spring目录下添加配置文件applicationContext-activemq-consumer.xml,控制监听的,接收消息的
<context:component-scan base-package="com.pinyougou.search.service.impl"/>
<!-- 真正可以产生Connection的ConnectionFactory,由对应的 JMS服务厂商提供-->
<bean id="targetConnectionFactory" class="org.apache.activemq.ActiveMQConnectionFactory">
    <property name="brokerURL" value="tcp://192.168.25.128:61616"/>
</bean>

<!-- Spring用于管理真正的ConnectionFactory的ConnectionFactory -->
<bean id="connectionFactory" class="org.springframework.jms.connection.SingleConnectionFactory">
<!-- 目标ConnectionFactory对应真实的可以产生JMS Connection的ConnectionFactory -->
    <property name="targetConnectionFactory" ref="targetConnectionFactory"/>
</bean>
 <!-- solr库添加内容的queue消息-->
<bean id="queueSolrCreateDestination" class="org.apache.activemq.command.ActiveMQQueue">
    <constructor-arg value="pinyougou_queue_solr_create"/>
</bean>
<!-- solr库删除内容的queue消息-->
<bean id="queueSolrDeleteDestination" class="org.apache.activemq.command.ActiveMQQueue">
    <constructor-arg value="pinyougou_queue_solr_delete"/>
</bean>
<!-- 消息监听容器 -->
<bean class="org.springframework.jms.listener.DefaultMessageListenerContainer">
	<property name="connectionFactory" ref="connectionFactory" />
	<property name="destination" ref="queueSolrCreateDestination" />
	<property name="messageListener" ref="itemSearchCreateListener" />
</bean>
<!-- 消息监听容器 -->
<bean class="org.springframework.jms.listener.DefaultMessageListenerContainer">
	<property name="connectionFactory" ref="connectionFactory" />
	<property name="destination" ref="queueSolrDeleteDestination" />
	<property name="messageListener" ref="itemSearchDeleteListener" />
</bean>
根据applicationContext-activemq-consumer.xml配置文件在包扫描的目录下建立两个监听去solr库里生成和删除商品数据消息的类

ItemSearchCreateListener中:
//根据配置文件创建一个监听器(负责接收去solr库中添加商品的监听器)
@Component
public class ItemSearchCreateListener implements MessageListener {
    @Autowired
    private ItemSearchService itemSearchService;
    @Override
    public void onMessage(Message message) {
        ObjectMessage objectMessage= (ObjectMessage) message;
        try {
            Long[] ids= (Long[]) objectMessage.getObject();
            //去solr库中添加商品
            itemSearchService.importItems(ids);
        } catch (JMSException e) {
            e.printStackTrace();
        }
    }
}
ItemSearchDeleteListener中:
@Component
public class ItemSearchDeleteListener implements MessageListener {
    @Autowired
    private ItemSearchService itemSearchService;
    @Override
    public void onMessage(Message message) {
        ObjectMessage objectMessage= (ObjectMessage) message;
        try {
            Long[] ids= (Long[]) objectMessage.getObject();
            itemSearchService.removeItems(ids);
        } catch (JMSException e) {
            e.printStackTrace();
        }
    }
}
pyg_page_service模块中也同样添加一个监听静态页面生成的配置文件applicationContext-activemq-consumer.xml

applicationContext-activemq-consumer.xml中:
<context:component-scan base-package="com.pinyougou.page.service.impl"/>
<!-- 真正可以产生Connection的ConnectionFactory,由对应的 JMS服务厂商提供-->
<bean id="targetConnectionFactory" class="org.apache.activemq.ActiveMQConnectionFactory">
    <property name="brokerURL" value="tcp://192.168.25.128:61616"/>
</bean>

<!-- Spring用于管理真正的ConnectionFactory的ConnectionFactory -->
<bean id="connectionFactory" class="org.springframework.jms.connection.SingleConnectionFactory">
<!-- 目标ConnectionFactory对应真实的可以产生JMS Connection的ConnectionFactory -->
    <property name="targetConnectionFactory" ref="targetConnectionFactory"/>
</bean>
<!-- 生成页面的topic消息 -->
<bean id="topicPageCreateDestination" class="org.apache.activemq.command.ActiveMQTopic">
    <constructor-arg value="pinyougou_topic_page_create"/>
</bean>
<!-- 删除页面的topic消息 -->
<bean id="topicPageDeleteDestination" class="org.apache.activemq.command.ActiveMQTopic">
    <constructor-arg value="pinyougou_topic_page_delete"/>
</bean>
<!-- 消息监听容器 -->
<bean class="org.springframework.jms.listener.DefaultMessageListenerContainer">
	<property name="connectionFactory" ref="connectionFactory" />
	<property name="destination" ref="topicPageCreateDestination" />
	<property name="messageListener" ref="itemPageCreateListener" />
</bean>
<!-- 消息监听容器 -->
<bean class="org.springframework.jms.listener.DefaultMessageListenerContainer">
	<property name="connectionFactory" ref="connectionFactory" />
	<property name="destination" ref="topicPageDeleteDestination" />
	<property name="messageListener" ref="itemPageDeleteListener" />
</bean>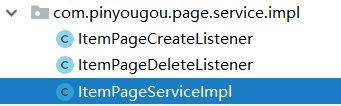
ItemPageCreateListener中:
@Component
public class ItemPageCreateListener implements MessageListener {
    @Autowired
    private ItemPageService itemPageService;
    @Override
    public void onMessage(Message message) {
        ObjectMessage objectMessage= (ObjectMessage) message;
        try {
            Long[] ids= (Long[]) objectMessage.getObject();
            for (Long id : ids) {
                itemPageService.createItemHtml(id);
            }
        } catch (JMSException e) {
            e.printStackTrace();
        }
    }
}
ItemPageDeleteListener中:
@Component
public class ItemPageDeleteListener implements MessageListener {
    @Autowired
    private ItemPageService itemPageService;
    @Override
    public void onMessage(Message message) {
        ObjectMessage objectMessage= (ObjectMessage) message;
        try {
            Long[] ids= (Long[]) objectMessage.getObject();
            itemPageService.removeItemHtml(ids);
        } catch (JMSException e) {
            e.printStackTrace();
        }
    }
}
完成!


 547
547


 被折叠的 条评论
为什么被折叠?
被折叠的 条评论
为什么被折叠?
 到【灌水乐园】发言


