


1. 概述
在我们学习 SpringBoot 原理和源码前,先了解下 SpringBoot 中用到的 Spring 注解,以便后续更好的理解 SpringBoot 原理。
2. 注解
@ComponentScan、@Import、@EnableXXX是 Spring3.x 版本提供的注解
@Conditonal是 Spring4.x 提供的注解
@Indexed是 Spring5.x 提供的注解
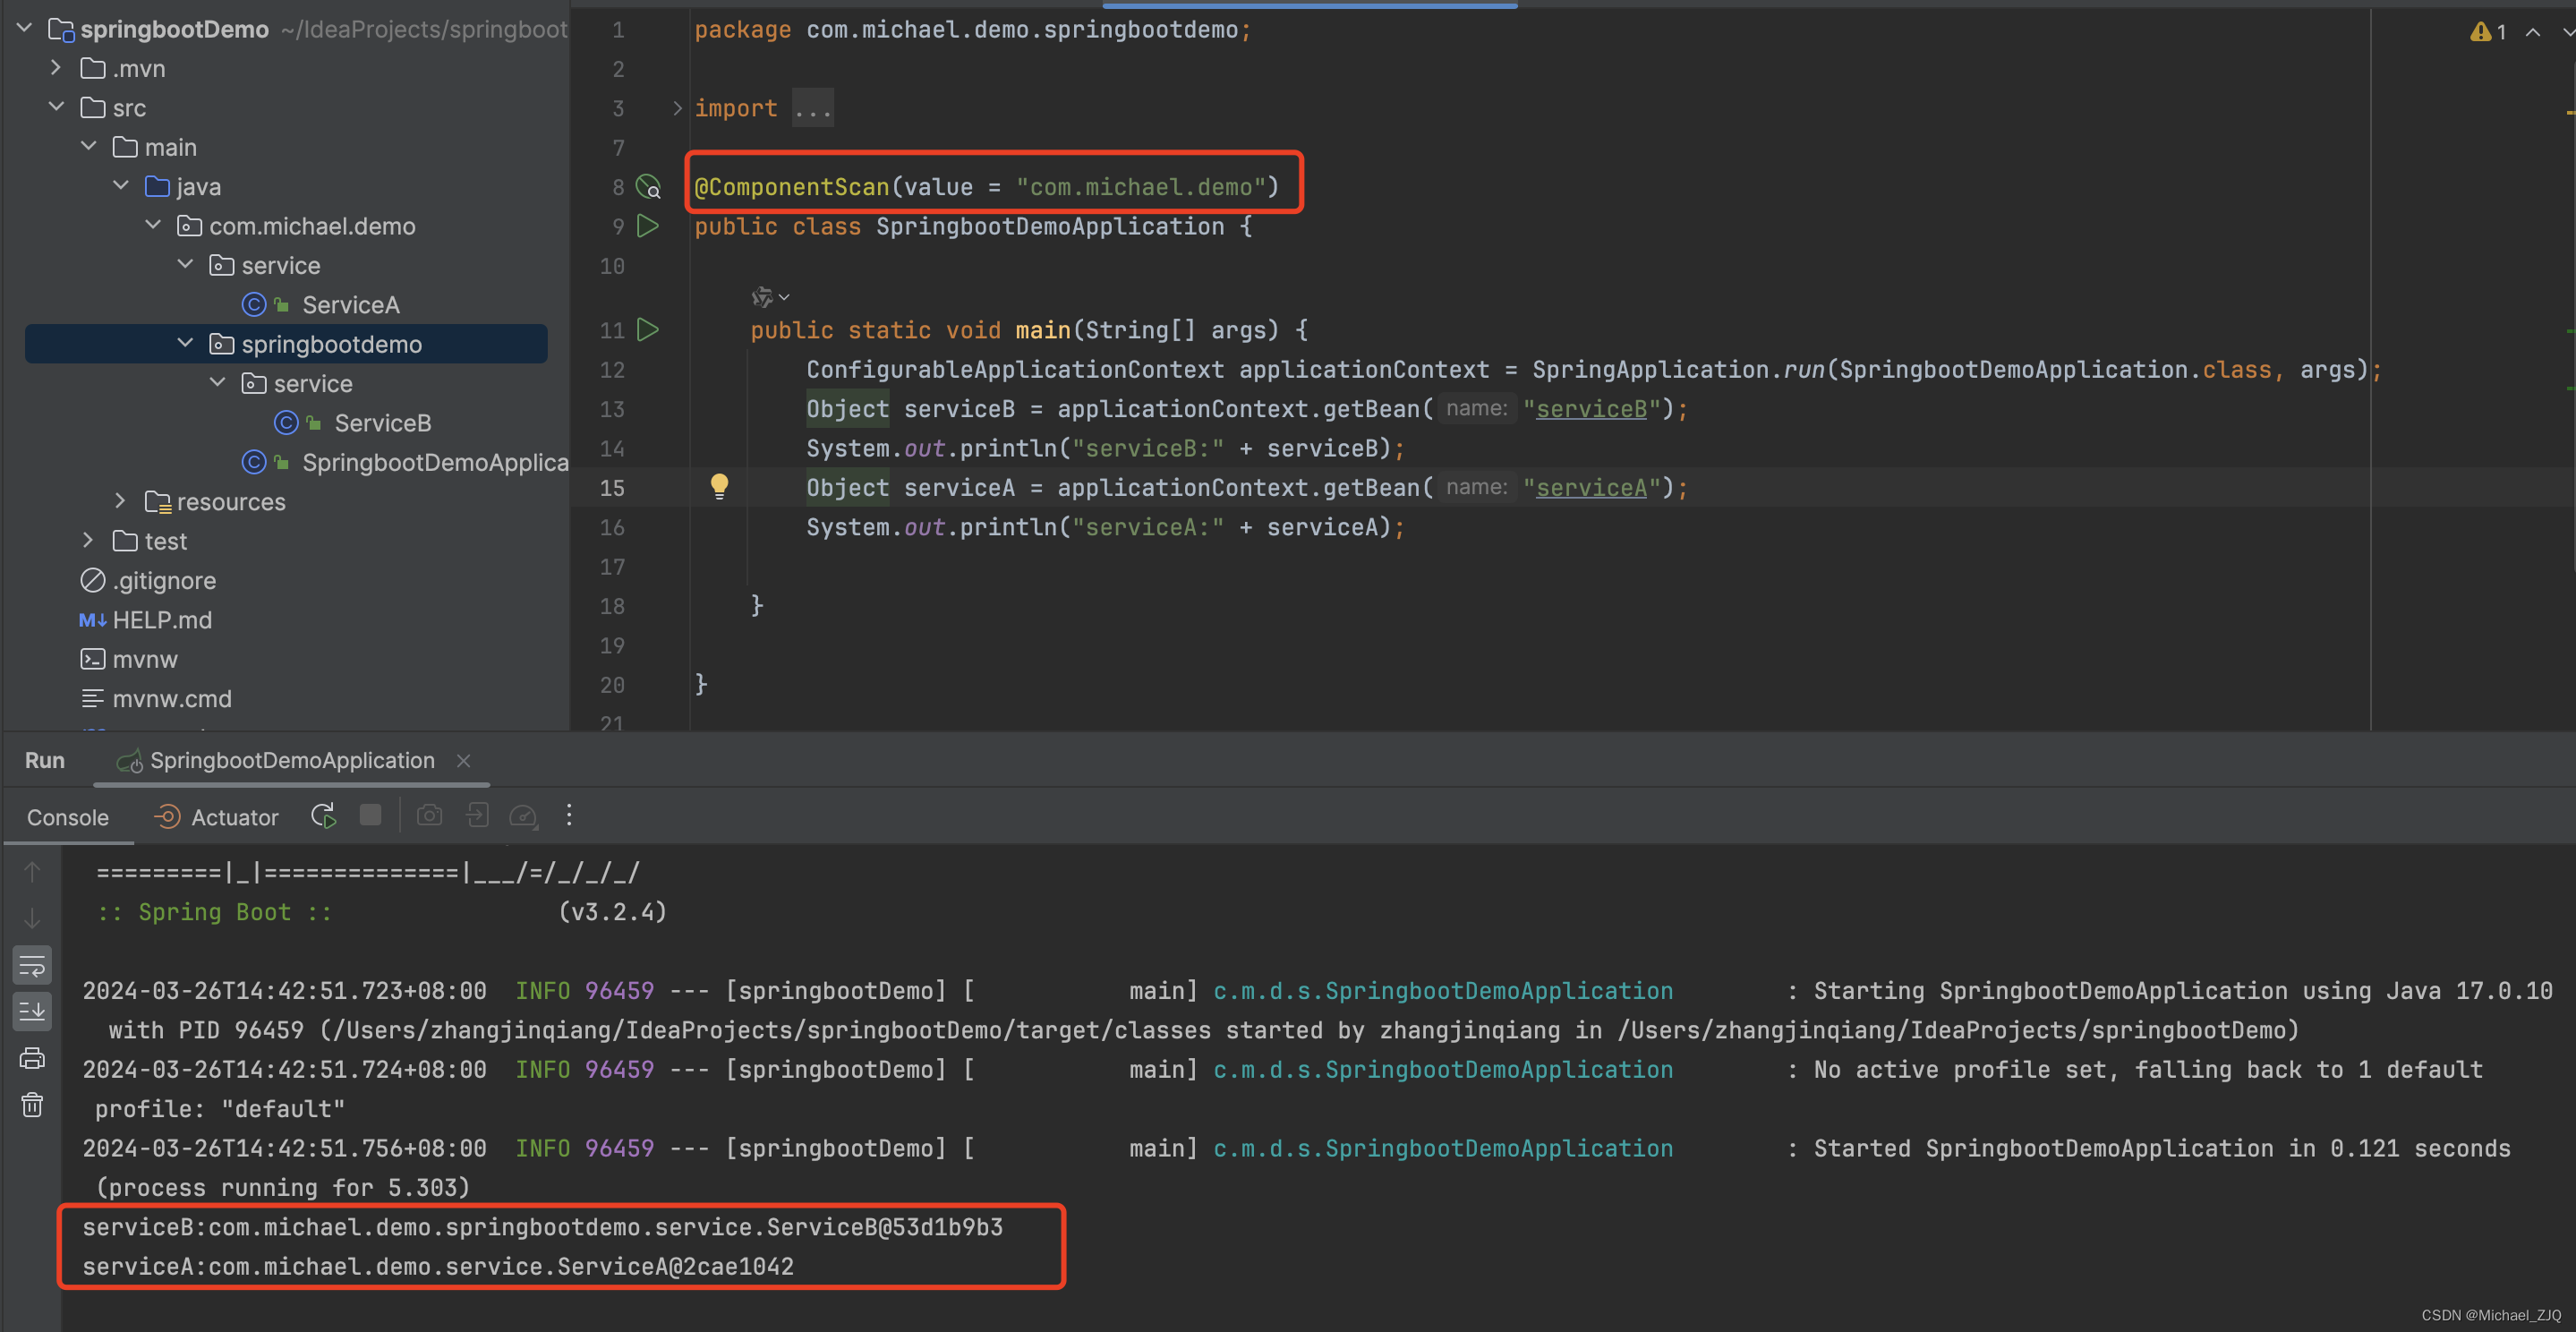
2.1 @ComponentScan
作用: 指定扫描路径,默认扫描路径为当前注解类所在包及其子包,也可以适用注解的属性Value指定扫描的包。
定义了两个 service 类,分别在不同的包下,一个在启动类包的子包下,一个是与启动类的包一个等级下。在启动类中分别获取两个 bean。

自定义扫描路径
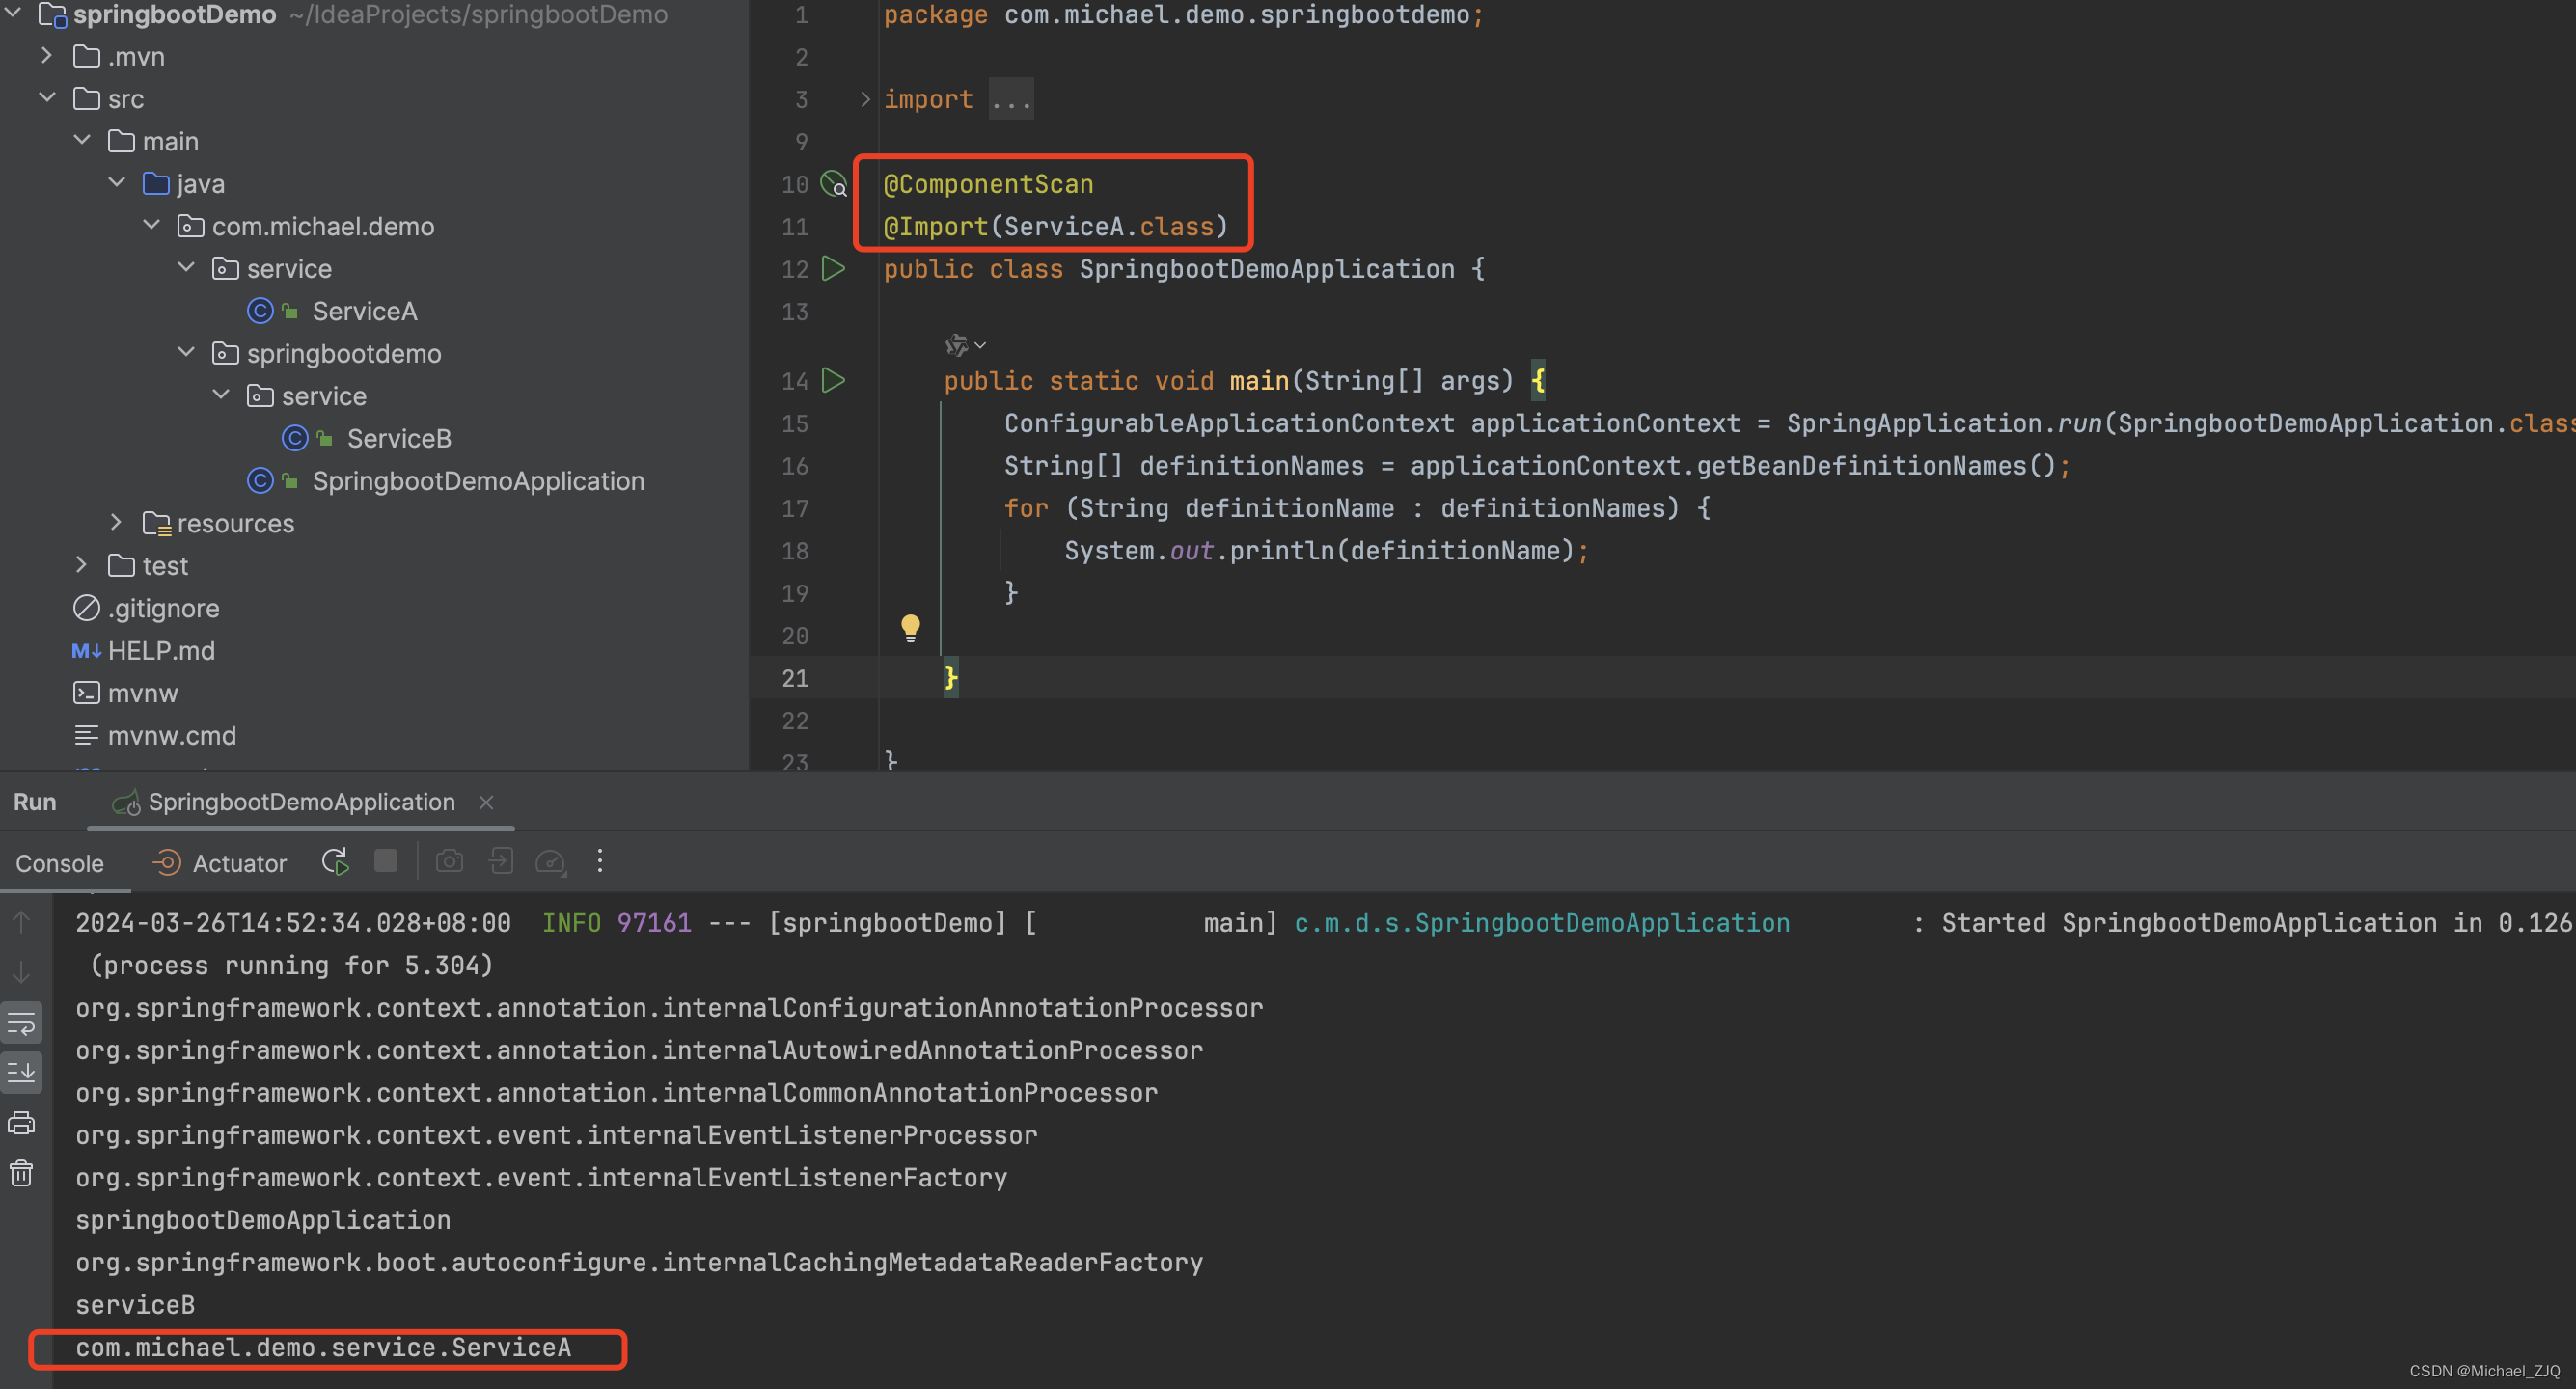
2.2 @Import
作用: 只能作用在类上,将实例注入到 IOC 容器中。
其将实例注入 IOC 容器方式有三种,分别为:
-
静态导入
直接将要导入的类型添加到 Import 注解中
-
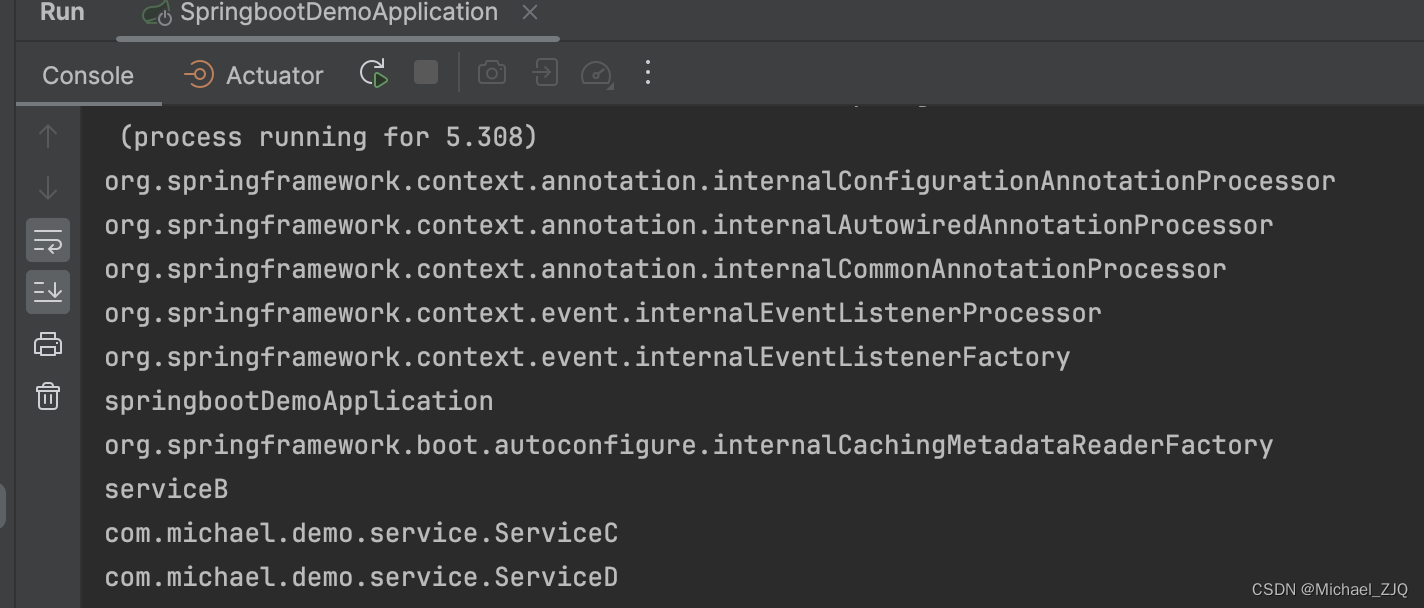
ImportSelector
定义一个实现类,实现ImportSelector接口,并添加到Import注解中,此方式不会将实现类类型导入 IOC 容器,而是调用接口方法selectImports,将该方法的返回的字符串数组的类型添加到容器中。
定义两个类
public class ServiceC {
}
public class ServiceD {
}
定义ImportSelector实现类
public class MyImportSelector implements ImportSelector {
    @Override
    public String[] selectImports(AnnotationMetadata importingClassMetadata) {
        return new String[]{ServiceC.class.getName(), ServiceD.class.getName()};
    }
}
修改启动类
@ComponentScan
@Import(MyImportSelector.class)
public class SpringbootDemoApplication {

    public static void main(String[] args) {
        ConfigurableApplicationContext applicationContext = SpringApplication.run(SpringbootDemoApplication.class, args);
        String[] definitionNames = applicationContext.getBeanDefinitionNames();
        for (String definitionName : definitionNames) {
            System.out.println(definitionName);
        }

    }

}
结果展示:
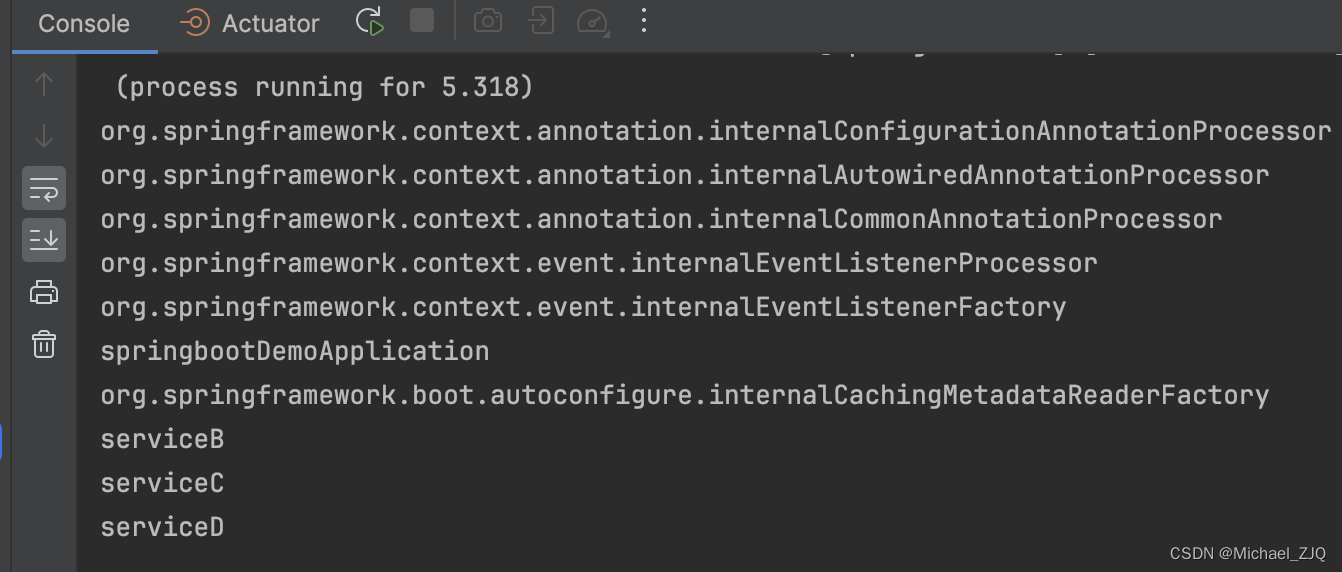
- ImportBeanDefinitionRegistrar
除了上面的ImportSelector方式,还有ImportBeanDefinitionRegistrar接口也可以实现,这种方式是直接在接口方法中将实例导入
public class MyImportBeanDefinitionRegistrar implements ImportBeanDefinitionRegistrar {

    @Override
    public void registerBeanDefinitions(AnnotationMetadata importingClassMetadata, BeanDefinitionRegistry registry) {
        // 将需要注册的对象封装为 RootBeanDefinition 对象
        RootBeanDefinition serviceC = new RootBeanDefinition(ServiceC.class);
        registry.registerBeanDefinition("serviceC", serviceC);

        RootBeanDefinition serviceD = new RootBeanDefinition(ServiceD.class);
        registry.registerBeanDefinition("serviceD", serviceD);
    }
}
@ComponentScan
//@Import(MyImportSelector.class)
@Import(MyImportBeanDefinitionRegistrar.class)
public class SpringbootDemoApplication {

    public static void main(String[] args) {
        ConfigurableApplicationContext applicationContext = SpringApplication.run(SpringbootDemoApplication.class, args);
        String[] definitionNames = applicationContext.getBeanDefinitionNames();
        for (String definitionName : definitionNames) {
            System.out.println(definitionName);
        }

    }

}
结果:
2.3 @EnableXXX
@EnableXXX注解是启动 XXX 功能的意思,在后续的 SpringBoot 中会大量的使用。
定义配置类,配置类中定义一个注解
public class HelloWorldConfiguration {

    @Bean
    public String helloWorld(){
        return "Hello World";
    }
}
定义自定义注解
/**
 * 定义@Enable注解
 * 在该注解中通过 @Import 注解导入我们自定义的模块,使之生效。
 */
@Target(ElementType.TYPE)
@Retention(RetentionPolicy.RUNTIME)
@Documented
@Import(HelloWorldConfiguration.class)
public @interface EnableHelloWorld {
}
修改启动类
@ComponentScan
//@Import(MyImportSelector.class)
//@Import(MyImportBeanDefinitionRegistrar.class)
// 加载 自定义 模块
@EnableHelloWorld
public class SpringbootDemoApplication {

    public static void main(String[] args) {
        ConfigurableApplicationContext applicationContext = SpringApplication.run(SpringbootDemoApplication.class, args);
        Object helloWorld = applicationContext.getBean("helloWorld");
        System.out.println(helloWorld);

    }

}
2.4 @Conditional
定义
// 该注解可以在 类和方法中使用
@Target({ElementType.TYPE, ElementType.METHOD})
@Retention(RetentionPolicy.RUNTIME)
@Documented
public @interface Conditional {

    /**
     * 注解中添加的类型必须是 实现了 Condition 接口的类型
     * 需要实现matches方法,返回true则注入bean,false则不注入。
     */
    Class<? extends Condition>[] value();

}
定义sevice 类
public class ServiceE {
}
定义 condition 接口实现类
public class MyCondition implements Condition {
    @Override
    public boolean matches(ConditionContext context, AnnotatedTypeMetadata metadata) {
    // 返回 true,启动类可以获取到 serviceE,
    // 返回 false,启动类找不到 servieE 并且报错
        return true;
    }
}
修改启动类
@ComponentScan
public class SpringbootDemoApplication {

    public static void main(String[] args) {
        ConfigurableApplicationContext applicationContext = SpringApplication.run(SpringbootDemoApplication.class, args);
        Object serviceE = applicationContext.getBean("serviceE");
        System.out.println(serviceE);

    }

    @Conditional(MyCondition.class)
    @Bean
    public ServiceE serviceE(){
        return new ServiceE();
    }
}
2.5 @Indexed
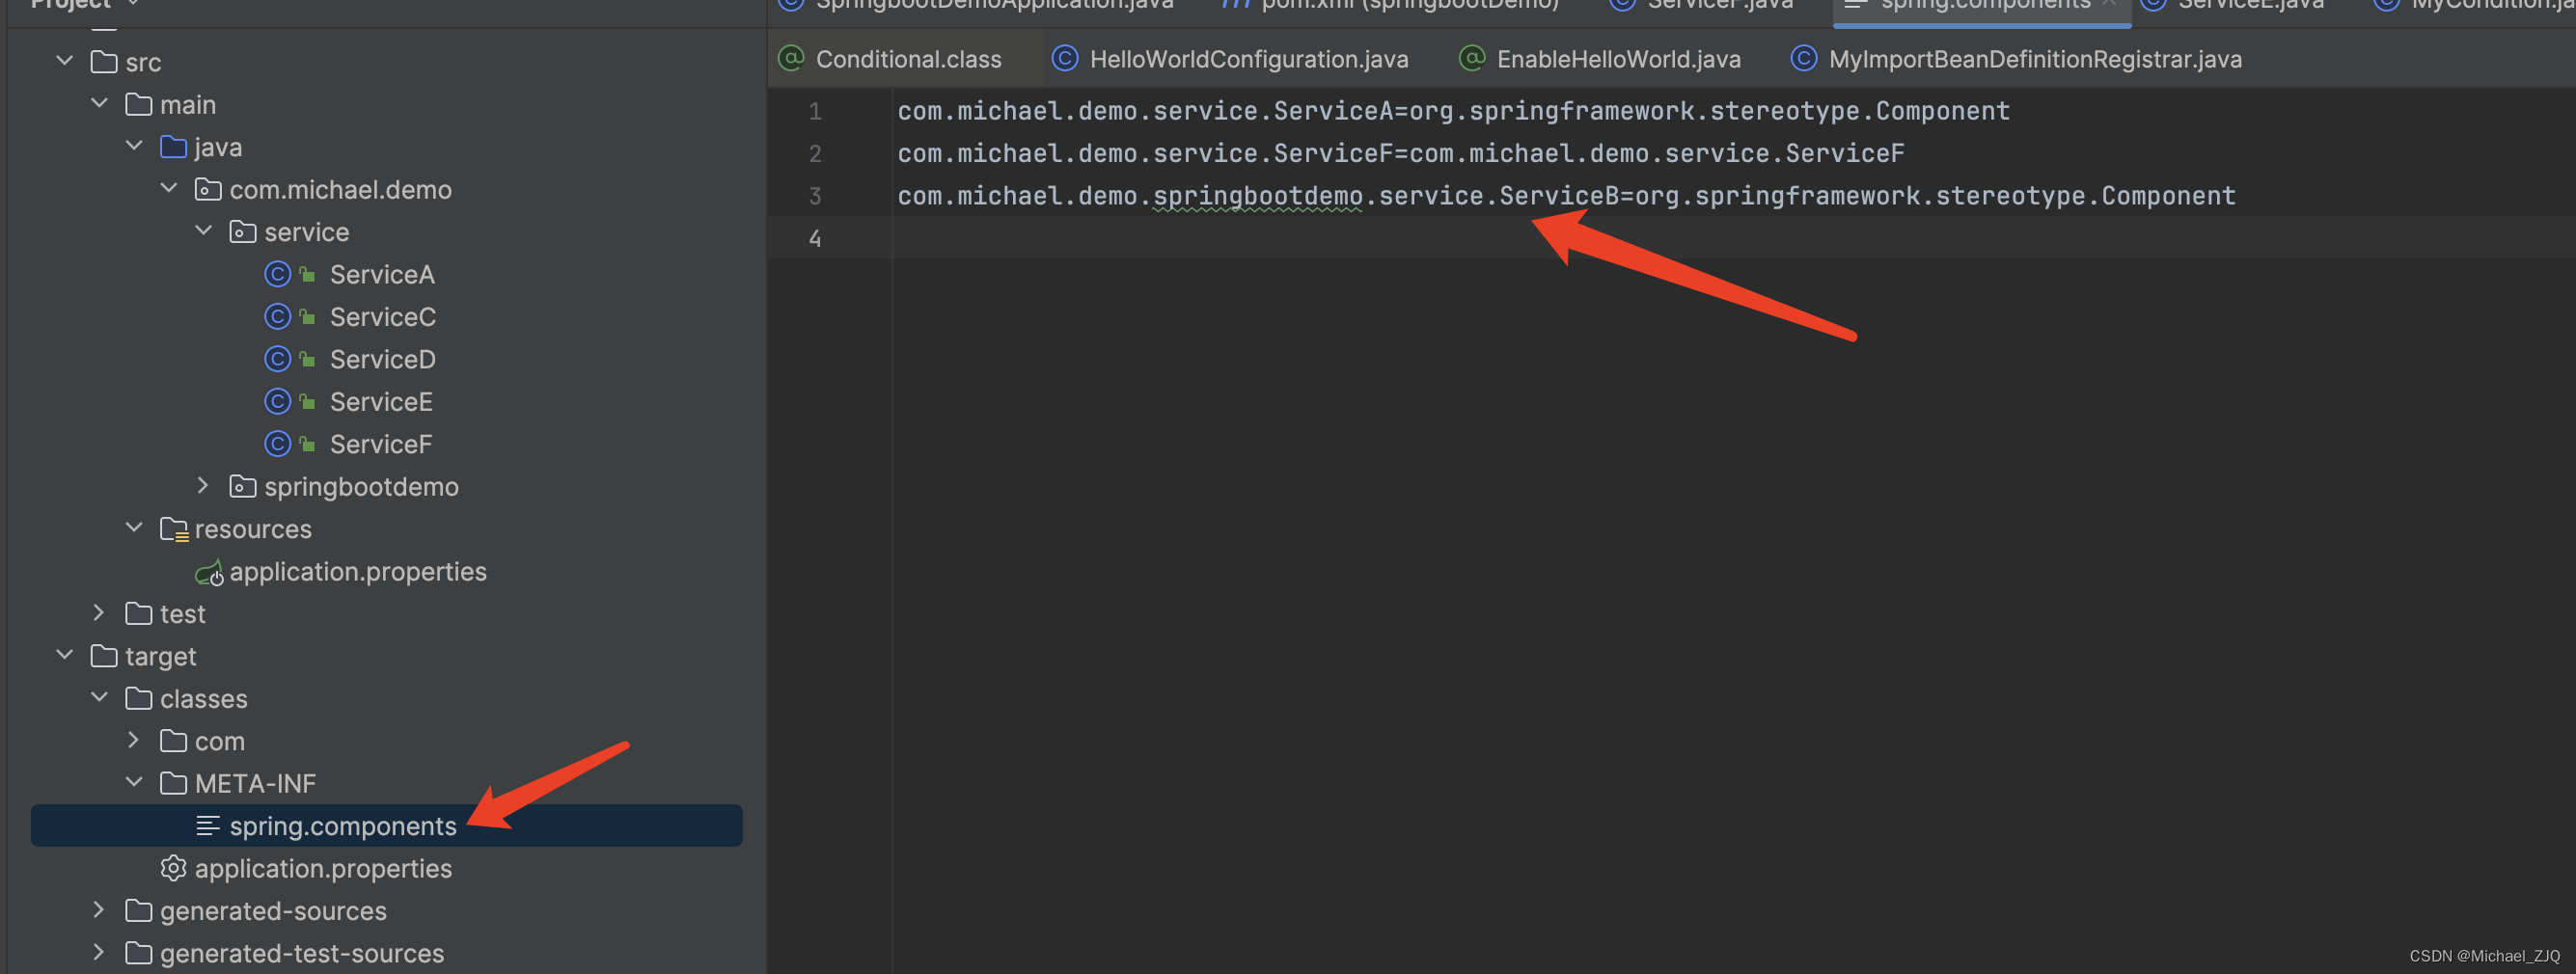
在Spring Boot应用场景中,大量使用 @ComponentScan 扫描,导致Spring模式的注解解析时间耗时增大,因此,5.0时代引入 @Indexed ,为Spring模式注解添加索引。
在项目中使用了 @Indexed 之后,编译打包的时候会在项目中自动生成 META-INT/spring.components文件。当Spring应用上下文执行 ComponentScan扫描时,META-INT/spring.components将会被 CandidateComponentsIndexLoader 读取并加载,转换为 CandidateComponentsIndex对象,这样的话 @ComponentScan 不在扫描指定的package,而是读取 CandidateComponentsIndex对象,从而达到提升性能的目的。

3. SPI
Java 的 SPI(Service Provider Interface)机制允许第三方为 Java 平台提供服务或实现功能。通过 SPI,Java 能够 dynamically load service providers at runtime,这样,就可以在运行时根据需要加载实现特定功能的库或模块。
SPI 机制主要使用 java.util.ServiceLoader 类来加载实现某个接口的服务提供者。服务提供者通常以jar文件的形式存在,并在其META-INF/services目录下创建与接口名称匹配的文件,文件名就是接口的完全限定名,文件内容则是实现该接口的类的全限定名。
下面通过一个简单的例子来演示 SPI 机制的使用。它会将一个字符串转换为大写。
首先,我们定义一个服务接口:
public interface CaseConverter {
    String convert(String input);
}
然后,我们实现这个接口:
public class UpperCaseConverter implements CaseConverter {
    @Override
    public String convert(String input) {
        return input.toUpperCase();
    }
}
接下来,我们需要为我们的服务提供者创建一个配置文件。这个文件必须放在 META-INF/services/ 目录下,并且文件名应该与服务接口的完全限定名相同。在这个例子中,文件名应该是 META-INF/services/java.util.CaseConverter。文件的内容是我们实现类的全限定名:
com.example.UpperCaseConverter
最后,我们使用 ServiceLoader 来加载和使用这个服务:
import java.util.ServiceLoader;

public class SPITest {
    public static void main(String[] args) {
        // 创建一个ServiceLoader的实例,参数是服务接口的类对象
        ServiceLoader<CaseConverter> serviceLoader = ServiceLoader.load(CaseConverter.class);
        // 迭代并使用服务提供者
        for (CaseConverter converter : serviceLoader) {
            System.out.println(converter.convert("Hello World"));
        }
    }
}
当你运行 SPITest 类的 main 方法时,ServiceLoader 会自动查找符合 CaseConverter 接口的所有服务提供者。在这个例子中,它会找到 UpperCaseConverter 类,并使用它来转换字符串 “Hello World” 为大写。
输出结果将是:
HELLO WORLD
这个例子展示了如何使用 SPI 机制在 Java 中动态加载和使用服务提供者。这种方法特别适用于需要扩展性或插件架构的应用程序,因为它允许新的服务提供者在不修改现有代码的情况下被添加到系统中。


 907
907


 被折叠的 条评论
为什么被折叠?
被折叠的 条评论
为什么被折叠?
 到【灌水乐园】发言


