


一 UITableView
- 什么是UITableView
- 在iOS中要实现展示列表数据,最常用的做法就是使用UITableView
- UITableView继承自UIScrollView,因此支持垂直滚动,而且性能极佳
- UITableView的两种样式(Table View→Style)
- UITableViewStylePlain(普通样式)
- UITableViewStyleGrouped(分组样式)
- 如何展示数据
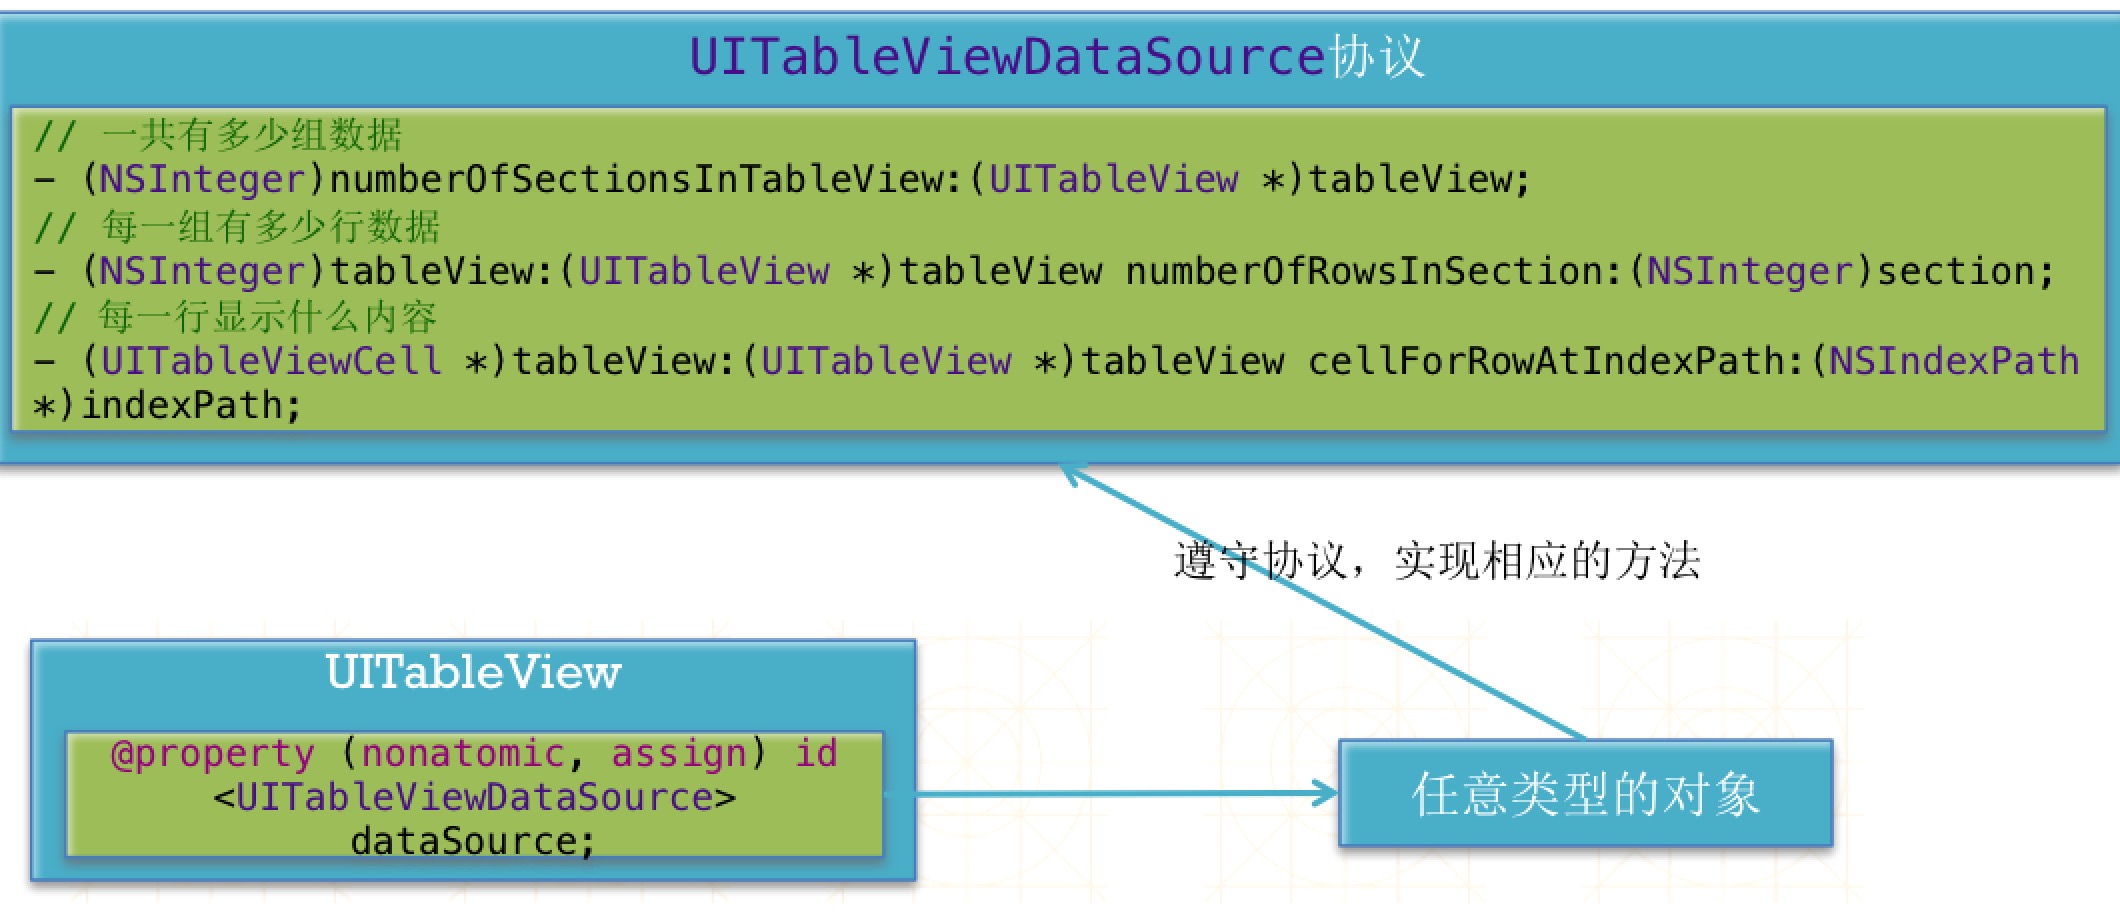
- UITableView需要一个数据源(dataSource)来显示数据
- UITableView会向数据源查询一共有多少行数据以及每一行显示什么数据等
- 凡是遵守UITableViewDataSource协议的OC对象,都可以是UITableView的数据源
- tableView和数据源
二 UITableView基本用法
- 设置数据源
self.tableView.dataSource = self;- 数据源遵守数据源协议
@interface ViewController () <UITableViewDataSource>- 实现数据源方法
// 1.返回有多少组数据
- (NSInteger)numberOfSectionsInTableView:(UITableView *)tableView
{
    return 1;
}
// 2.返回每组有多少行数据
- (NSInteger)tableView:(UITableView *)tableView numberOfRowsInSection:(NSInteger)section
{
    return self.wines.count;
}
// 3.返回每一行的内容(UITableViewCell类型)
- (UITableViewCell *)tableView:(UITableView *)tableView cellForRowAtIndexPath:(NSIndexPath *)indexPath;
4.tablView的常见属性
//1. 修改tableView的行高
    self.tableView.rowHeight = 100;

    // 2.组头组尾的高
    self.tableView.sectionHeaderHeight = 55;
    self.tableView.sectionFooterHeight = 22;

    // 3.设置整个tablView的头部/尾部视图
    self.tableView.tableHeaderView = [[UISwitch alloc] init];
    self.tableView.tableFooterView = [UIButton buttonWithType:UIButtonTypeInfoDark];

    // 4.设置我们分割线颜色(clearColor相当于取消系统分割线)
    //self.tableView.separatorColor = [UIColor clearColor];

    // 5.设置分割线样式
    self.tableView.separatorStyle = UITableViewCellSeparatorStyleNone;

    // 设置索引条内部文字颜色为不纯洁颜色
    self.tableView.sectionIndexColor = [UIColor colorWithRed:1 green:1 blue:1 alpha:1];
    // 设置索引条背景颜色为纯洁颜色
    self.tableView.sectionIndexBackgroundColor = [UIColor colorWithRed:0 green:0 blue:0 alpha:1];
- tableViewCell 的常见属性
// 设置cell右边样式
    cell.accessoryType;
    cell.accessoryView;
// cell.accessoryView优先级 > accessoryType
    // selectedBackgroundView设置选中背景优先级是比selectionStyle高
    UIView *bg = [[UIView alloc] init];
    bg.backgroundColor = [UIColor purpleColor];
//    cell.selectedBackgroundView = bg;
//    //UITableViewCellSelectionStyleBlue 在iOS7之后和Gray效果相同
//    cell.selectionStyle = UITableViewCellSelectionStyleBlue;

    // backgroundView它的优先级比backgroundColor高,并且这俩是并存
    cell.backgroundView = bg;
    cell.backgroundColor = [UIColor yellowColor];

    cell.contentView;
- tableView常用代理方法
// 当选中index行cell时候会调用
- (void)tableView:(UITableView *)tableView didSelectRowAtIndexPath:(NSIndexPath *)indexPath

// 当取消选中cell时候调用
- (void)tableView:(UITableView *)tableView didDeselectRowAtIndexPath:(NSIndexPath *)indexPath

// 返回对应行的高度
- (CGFloat)tableView:(UITableView *)tableView heightForRowAtIndexPath:(NSIndexPath *)indexPath

// 返回对应组的组头高度
- (CGFloat)tableView:(UITableView *)tableView heightForHeaderInSection:(NSInteger)section

// 返回对应组头试图
- (UIView *)tableView:(UITableView *)tableView viewForHeaderInSection:(NSInteger)section
三 展示多组数据
- 字典样式
@interface ViewController () <UITableViewDataSource>
@property (nonatomic, strong) NSArray *carGroups; /**< carGroup模型数组 */
@end
- (NSArray *)carGroups
{
if (!_carGroups) {
NSArray *cars = @[[XMGCar carWithName:@"奔驰" Logo:@"m_2_100"],
[XMGCar carWithName:@"宝马" Logo:@"m_3_100"],
];
XMGCarGroup *carGroup0 = [XMGCarGroup carGroupWithHeader:@"德系品牌" Footer:@"的新品牌高大上的footer" Cars:cars];
NSArray *cars1 = @[
[XMGCar carWithName:@"法拉利" Logo:@"m_91_100"],
[XMGCar carWithName:@"兰博基尼" Logo:@"m_86_100"],
[XMGCar carWithName:@"玛莎拉蒂" Logo:@"m_93_100"],
];
XMGCarGroup *carGroup1 = [XMGCarGroup carGroupWithHeader:@"意大利系品牌" Footer:@"意大利的新品牌高大上的footer" Cars:cars1];
NSArray *cars2 = @[[XMGCar carWithName:@"比亚迪" Logo:@"m_15_100"],
];
XMGCarGroup *carGroup2 = [XMGCarGroup carGroupWithHeader:@"天系品牌" Footer:@"china的新品牌高大上的footer" Cars:cars2];
_carGroups = @[carGroup0, carGroup1, carGroup2];
}
return _carGroups;
}- 字典转模型方法(XMGCarGroup)
+ (instancetype)carGroupWithDict:(NSDictionary *)dict
{
    XMGCarGroup *carGroup = [[XMGCarGroup alloc] init];

    carGroup.header = dict[@"header"];
    carGroup.footer = dict[@"footer"];

    // 1.拿到字典数组
    NSArray *dictCars = dict[@"cars"];
    // 2.字典数组-> 模型数组
    NSMutableArray *arrayM = [NSMutableArray arrayWithCapacity:dictCars.count];
    for (NSDictionary *dictCar in dictCars) {
        XMGCar *car = [XMGCar carWithDict:dictCar];
        [arrayM addObject:car];
    }
    // 要求cars是car模型数组,而不是字典数组
    carGroup.cars = [arrayM copy];

    return carGroup;
}- 组头组尾设置
// 返回组头文字:note:(如果是英文他会自动变成大写)
- (NSString *)tableView:(UITableView *)tableView titleForHeaderInSection:(NSInteger)section
{
    XMGCarGroup *carGroup = self.carGroups[section];
    return carGroup.header;
}

// 返回组尾文字
- (NSString *)tableView:(UITableView *)tableView titleForFooterInSection:(NSInteger)section
{
    XMGCarGroup *carGroup = self.carGroups[section];
    return carGroup.footer;
}- 复杂plist解析→数组转模型
// 懒加载
#warning 当不展示数据时,先看!_carGroups的!是否写了,再看plist是否敲对
- (NSArray *)carGroups
{
    if (!_carGroups) {
        // 1.获取我们的plist文件路径
        NSString *filePath = [[NSBundle mainBundle] pathForResource:@"cars" ofType:@"plist"];


        // 2.获取dict数组
        NSArray *dictCarGroups = [NSArray arrayWithContentsOfFile:filePath];

        // 3.将dict数组->模型数组
        NSMutableArray *arrayM = [NSMutableArray arrayWithCapacity:dictCarGroups.count];
        for (NSDictionary *dict in dictCarGroups) {
            XMGCarGroup *carGroup = [XMGCarGroup carGroupWithDict:dict];
            [arrayM addObject:carGroup];
        }
        // 4.赋值
        _carGroups = [arrayM copy];
        }
    return _carGroups;
}
- 实现tableView样式
- (NSInteger)numberOfSectionsInTableView:(UITableView *)tableView
{
    return self.carGroups.count;
}

- (NSInteger)tableView:(UITableView *)tableView numberOfRowsInSection:(NSInteger)section
{
    XMGCarGroup *carGroup = self.carGroups[section];
    return carGroup.cars.count;
}

- (UITableViewCell *)tableView:(UITableView *)tableView cellForRowAtIndexPath:(NSIndexPath *)indexPath
{
    // 1.创建cell
    UITableViewCell *cell = [[UITableViewCell alloc] init];

    // 2.设置cell右边样式
    cell.accessoryType = UITableViewCellAccessoryDisclosureIndicator;

    // 3.设置cell内部的数据
    XMGCarGroup *carGroup = self.carGroups[indexPath.section];
    XMGCar *car = carGroup.cars[indexPath.row];

    cell.textLabel.text = car.name;
    cell.imageView.image = [UIImage imageNamed:car.icon];

    // 4.返回
    return cell;
}
三 展示单组数据
// 懒加载
- (NSArray *)wines
{
    if (nil == _wines) {
        // 1.
        NSString *filePath = [[NSBundle mainBundle] pathForResource:@"wine.plist" ofType:nil];
        // 2.加载字典数组
        NSArray *dictWines = [NSArray arrayWithContentsOfFile:filePath];
        // 3.数组转字典
        NSMutableArray *arrayM = [NSMutableArray arrayWithCapacity:dictWines.count];
        for (NSDictionary *dict in dictWines) {
            XMGWine *wine = [XMGWine wineWithDict:dict];
            [arrayM addObject:wine];
        }
        _wines = [arrayM copy];
    }
    return _wines;
}
Cell简介
- UITableView的每一行都是一个UITableViewCell,
- 通过dataSource的tableView:cellForRowAtIndexPath:方法来初始化每一行
- UITableViewCell内部有个默认的子视图:contentView,
- contentView是UITableViewCell所显示内容的父视图,可显示一些辅助指示视图
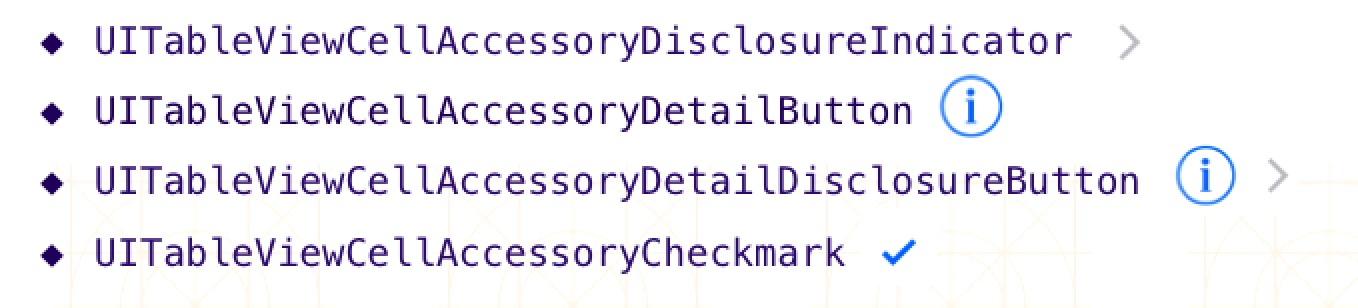
- 辅助指示视图可以通过设置UITableViewCell的accessoryType来显示
- 默认是UITableViewCellAccessoryNone(不显示辅助指示视图),其他值如下:
- 默认是UITableViewCellAccessoryNone(不显示辅助指示视图),其他值如下:
- UITableView的每一行都是一个UITableViewCell,
UITableViewCell的contentView
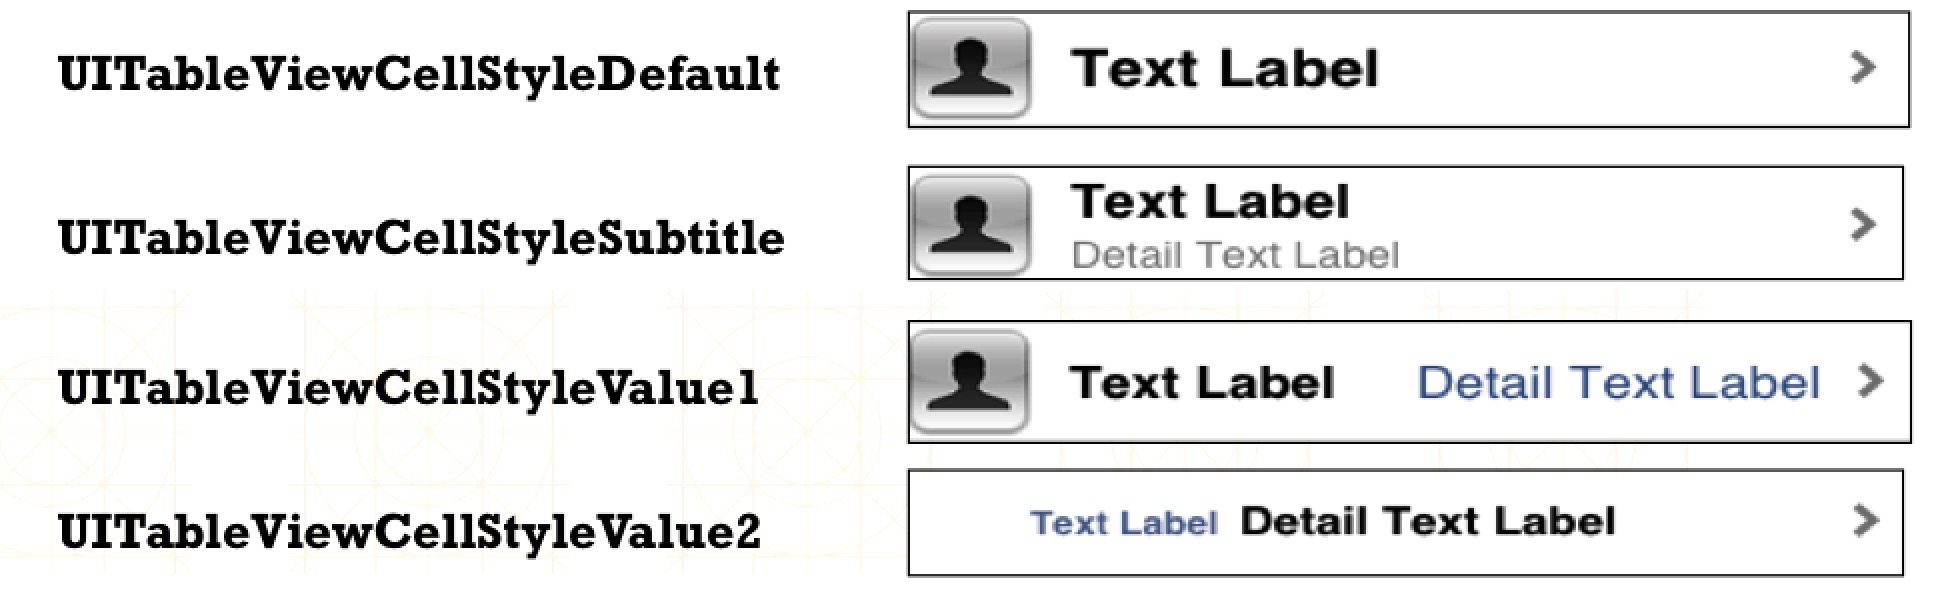
- contentView下默认有3个子视图
- 2个是UILabel(通过UITableViewCell的textLabel和detailTextLabel属性访问)
- 第3个是UIImageView(通过UITableViewCell的imageView属性访问)
- UITableViewCellStyle属性
- 作用决定这些子视图在contentView中的位置
- 作用决定这些子视图在contentView中的位置
- contentView下默认有3个子视图
四 性能优化
- 系统可以做到cell用到几个创建几个,存在问题就是重复创建cell
- cell样式一样,地址不一样
性能优化(缓存池)
- 通过一个标识去缓存池中找可循环利用的cell
- 如果缓存池中找不到可循环利用的cell,创建一个新的cell,给cell贴上标识
- 给cell设置新的数据
cell的循环利用
传统的写法
/**
*  每当有一个cell要进入视野范围内,就会调用一次
*/
- (UITableViewCell *)tableView:(UITableView *)tableView cellForRowAtIndexPath:(NSIndexPath *)indexPath
{
static NSString *ID = @"wine";

// 1.先去缓存池中查找可循环利用的cell
UITableViewCell *cell = [tableView dequeueReusableCellWithIdentifier:ID];

// 2.如果缓存池中没有可循环利用的cell
if (!cell) {
    cell = [[UITableViewCell alloc] initWithStyle:UITableViewCellStyleDefault reuseIdentifier:ID];
}

// 3.设置数据
cell.textLabel.text = [NSString stringWithFormat:@"%zd行的数据", indexPath.row];

return cell;
}
新的写法(注册cell)
NSString *ID = @"wine";

- (void)viewDidLoad {
[super viewDidLoad];

// 注册某个重用标识 对应的 Cell类型
[self.tableView registerClass:[UITableViewCell class] forCellReuseIdentifier:ID];
}

- (UITableViewCell *)tableView:(UITableView *)tableView cellForRowAtIndexPath:(NSIndexPath *)indexPath
{
// 1.先去缓存池中查找可循环利用的cell
UITableViewCell *cell = [tableView dequeueReusableCellWithIdentifier:ID];

// 2.设置数据
cell.textLabel.text = [NSString stringWithFormat:@"%zd行的数据", indexPath.row];

return cell;
}
五 索引条
做法一:
- (NSArray *)sectionIndexTitlesForTableView:(UITableView *)tableView
{
return [self.carGroups valueForKeyPath:@"title"];
}
做法二:
- (NSArray *)sectionIndexTitlesForTableView:(UITableView *)tableView
{
NSMutableArray *arrayM = [NSMutableArray array];
for (XMGCarGroup *carGroup in self.carGroups) {
[arrayM addObject:carGroup.title];
}
return arrayM;
}


 588
588


 被折叠的 条评论
为什么被折叠?
被折叠的 条评论
为什么被折叠?
 到【灌水乐园】发言


