


一 添加子控制器的view
- 方法1
/**
 * 当滚动动画完毕的时候调用(通过代码setContentOffset: animated: 让scrollView滚动完毕后,就会调用这个方法)
 */
- (void)scrollViewDidEndScrollingAnimation:(UIScrollView *)scrollView
- 方法2
/**
 * 当减速完毕的时候调用(人为拖拽scrollView,手松开后scrollView慢慢减速完毕到静止)
 */
- (void)scrollViewDidEndDecelerating:(UIScrollView *)scrollView- 滚动到某位置,创建一个对应界面
 - (void)scrollViewDidEndScrollingAnimation:(UIScrollView *)scrollView
 {
    // 取出对应的子控制器
  int index = scrollView.contentOffset.x / scrollView.width;
  UIViewController *willShowChildVc = self.childViewControllers[index];
    // 如果控制器的view已经被创建过,就直接返回
    if (willShowChildVc.isViewLoaded) return;
 //    if (willShowChildVc.view.superview) return;
 //    if (willShowChildVc.view.window) return;
    // 添加子控制器的view到scrollView身上
   willShowChildVc.view.frame = scrollView.bounds;
   [scrollView addSubview:willShowChildVc.view];
}- willShowChildVc.view.x的3种写法:
方法1: willShowChildVc.view.x = scrollView.contentOffset.x;
方法2: willShowChildVc.view.x = scrollView.bounds.origin.x;
方法3: willShowChildVc.view.x = index * scrollView.width;- cell可以穿透导航栏底部和Tabbar顶部
// 不要自动调整scrollView的contentInset
self.automaticallyAdjustsScrollViewInsets = NO;- 判断控制器View在不在界面上
- 方法1:有没有父控件 : willShowChildVc.view.superview
- 方法2:window有没有值 : willShowChildVc.view.window
- 方法3:控制器的view是否被创建 : willShowChildVc.isViewLoaded
二 分页
- 默认显示第0个控制器
[self scrollViewDidEndScrollingAnimation:scrollView];如果执行完setContentOffset:animated:后,scrollView的偏移量并没有发生改变的话,就不会调用scrollViewDidEndScrollingAnimation:方法
- scrollView能分页
scrollView.pagingEnabled = YES;- 拖拽scrollview对应到对应标签
- (void)scrollViewDidEndDecelerating:(UIScrollView *)scrollView
{
    [self scrollViewDidEndScrollingAnimation:scrollView];
    // 点击按钮
    int index = scrollView.contentOffset.x / scrollView.width;
    [self titleClick:self.titleButtons[index]];
}
注意使用tag不能用,当tag=0时,取出来不是按钮,而是本身(tag会先搜索自己及所有子控件有没有对应值)
三 内边距
让一个scrollView的内容能够穿透整个屏幕
- 让scrollView的frame占据整个屏幕
要想让用户能看清楚所有的内容,不被导航栏和tabbar挡住
- 设置scrollView的contentInset属性
self.tableView.contentInset = UIEdgeInsetsMake(64 + 35, 0, 49, 0);- 滚动条设置内边距
self.tableView.scrollIndicatorInsets = self.tableView.contentInset;四 请求数据
- 面向字典开发,建一个模型
- 加载最新的帖子数据
- (void)loadNewTopics
{
    // 取消之前的所有请求
    [self.manager.tasks makeObjectsPerformSelector:@selector(cancel)];

    // 请求参数
    NSMutableDictionary *params = [NSMutableDictionary dictionary];
    params[@"a"] = @"list";
    params[@"c"] = @"data";
    params[@"type"] = @1;//@"1";

    // 发送请求
    XMGWeakSelf;
    [self.manager GET:XMGRequestURL parameters:params success:^(NSURLSessionDataTask *task, id responseObject) {
        // 字典数组 -> 模型数组
        weakSelf.topics = [XMGTopic objectArrayWithKeyValuesArray:responseObject[@"list"]];
        // 存储maxtime
        weakSelf.maxtime = responseObject[@"info"][@"maxtime"];
        // 刷新表格
        [weakSelf.tableView reloadData];
        // 结束刷新
        [weakSelf.tableView.header endRefreshing];
    } failure:^(NSURLSessionDataTask *task, NSError *error) {
        // 结束刷新
        [weakSelf.tableView.header endRefreshing];
    }];
}
下拉刷新
方法1:苹果自带
UIRefreshControl *control = [[UIRefreshControl alloc] init];
[control addTarget:self action:@selector(loadNewTopics:) forControlEvents:UIControlEventValueChanged];
[self.tableView addSubview:control];
方法2
self.tableView.header = [MJRefreshNormalHeader headerWithRefreshingTarget:self refreshingAction:@selector(loadNewTopics)];方法3:进入刷新状态来到block
 self.tableView.header = [MJRefreshNormalHeader headerWithRefreshingBlock:^{
        XMGLogFunc;
 }];
- 方法2扩展:
  // 自动改变透明度
  self.tableView.header.automaticallyChangeAlpha = YES;
  // 马上进入刷新状态
[self.tableView.header beginRefreshing];- 上拉刷新
self.tableView.footer = [XMGMyFooter footerWithRefreshingTarget:self refreshingAction:@selector(loadMoreTopics)];- 方法介绍
- MJRefreshAutoGifFooter 自动刷新gif图片
- MJRefreshAutoNormalFooter 自动刷新普通图片
- MJRefreshBackGifFooter 回弹刷新gif图片
- MJRefreshBackNormalFooter 回弹刷新普通图片
- footer出现多少比例时就刷新
 // footer出现一半时就会自动进入刷新状态
footer.appearencePercentTriggerAutoRefresh = 0.5;- 加载更多的帖子数据
- (void)loadMoreTopics
{
    // 取消之前的所有请求
    [self.manager.tasks makeObjectsPerformSelector:@selector(cancel)];

    // 请求参数
    NSMutableDictionary *params = [NSMutableDictionary dictionary];
    params[@"a"] = @"list";
    params[@"c"] = @"data";
    params[@"type"] = @1;
    params[@"maxtime"] = self.maxtime;

    // 发送请求
    XMGWeakSelf;
    [self.manager GET:XMGRequestURL parameters:params success:^(NSURLSessionDataTask *task, id responseObject) {
        // 字典数组 -> 模型数组
        NSArray *moreTopics = [XMGTopic objectArrayWithKeyValuesArray:responseObject[@"list"]];
        [weakSelf.topics addObjectsFromArray:moreTopics];
        // 存储maxtime
        weakSelf.maxtime = responseObject[@"info"][@"maxtime"];

        // 刷新表格
        [weakSelf.tableView reloadData];
        // 结束刷新
        [weakSelf.tableView.footer endRefreshing];
    } failure:^(NSURLSessionDataTask *task, NSError *error) {
        // 结束刷新
        [weakSelf.tableView.footer endRefreshing];
    }];
}
addObject与addObjectsFromArray区别
- addObject: 把数组A里面每个元素加到数组B里面
- addObjectsFromArray:把数组A作为个整体加到数组B里面
当网速慢的时候,下拉刷新和上拉刷新一起出现
- 每当要发请求时,把上一个请求取消掉
 // 取消之前的所有请求
    [self.manager.tasks makeObjectsPerformSelector:@selector(cancel)];
五 自定义cell
- cell设置
- (void)setupTable
{
    self.tableView.backgroundColor = XMGCommonBgColor;
    self.tableView.contentInset = UIEdgeInsetsMake(XMGNavBarMaxY + XMGTitlesViewH, 0, XMGTabBarH, 0);
    self.tableView.scrollIndicatorInsets = self.tableView.contentInset;
    // 去掉分割线
    self.tableView.separatorStyle = UITableViewCellSeparatorStyleNone;
    // 注册
    [self.tableView registerNib:[UINib nibWithNibName:NSStringFromClass([XMGTopicCell class]) bundle:nil] forCellReuseIdentifier:XMGTopicCellId];
    self.tableView.rowHeight = 200;
}- 传模型数据
- (void)setTopic:(XMGTopic *)topic
{
    _topic = topic;

    [self.profileImageView setHeader:topic.profile_image];
    self.nameLabel.text = topic.name;
    self.createdAtLabel.text = topic.created_at;
    self.text_label.text = topic.text;

    // 设置底部工具条的数字
    [self setupButtonTitle:self.dingButton number:topic.ding placeholder:@"顶"];
    [self setupButtonTitle:self.caiButton number:topic.cai placeholder:@"踩"];
    [self setupButtonTitle:self.repostButton number:topic.repost placeholder:@"分享"];
    [self setupButtonTitle:self.commentButton number:topic.comment placeholder:@"评论"];
}- cell之间添加间距:保持cell位置不变,高度在原来基础上减间距
- (void)setFrame:(CGRect)frame
{
frame.origin.y += XMGCommonMargin; // 第一个cell需要间距
frame.size.height -= XMGCommonMargin;
[super setFrame:frame];
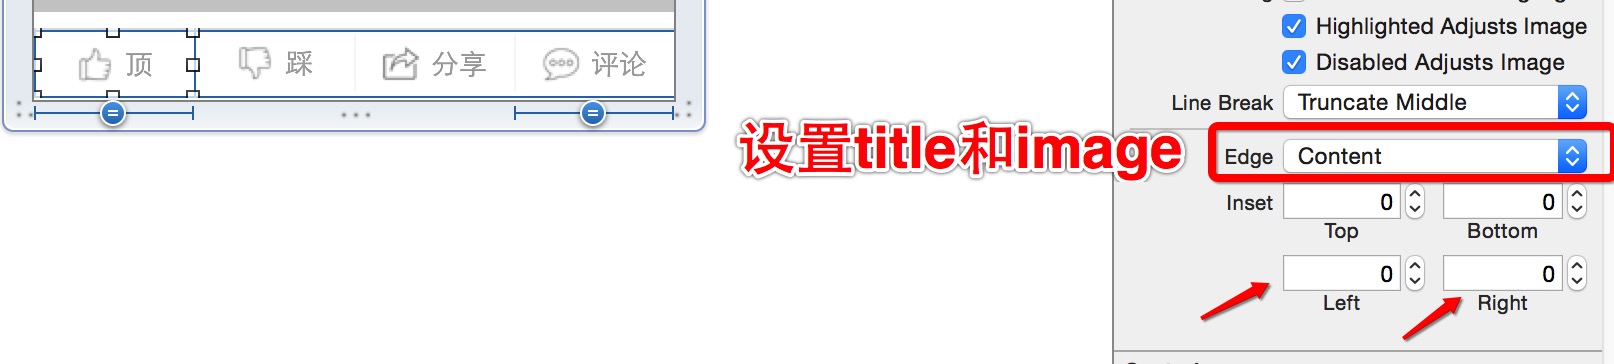
}底部工具条Button中图片与文字间距调整
- 标题左移5,图片右移5
Button之间分割线
- 拖一个高度为1的view,设置上下左间距0;
- 调整View→Mode→Center
- 工具条数字比较大,超过x万显示格式
- (void)setupButtonTitle:(UIButton *)button number:(NSInteger)number placeholder:(NSString *)placeholder
{
    if (number >= 10000) {
        [button setTitle:[NSString stringWithFormat:@"%.1f万", number / 10000.0] forState:UIControlStateNormal];
    } else if (number > 0) {
        [button setTitle:[NSString stringWithFormat:@"%zd", number] forState:UIControlStateNormal];
    } else {
        [button setTitle:placeholder forState:UIControlStateNormal];
    }
}
弹窗,监听点击
UIAlertView:弹窗中间弹出
  UIAlertView *alertView = [[UIAlertView alloc] initWithTitle:@"哈哈" message:@"呵呵呵呵" delegate:nil cancelButtonTitle:@"Ok" otherButtonTitles:@"其它", nil];
  [alertView show];
UIActionSheet:弹窗底部弹出
UIActionSheet *sheet = [[UIActionSheet alloc] initWithTitle:nil delegate:nil cancelButtonTitle:@"取消" destructiveButtonTitle:nil otherButtonTitles:@"收藏", @"举报", nil];
[sheet showInView:self];
ios8之后,UIAlertController替代上面2个方法
  UIAlertController *alert = [UIAlertController alertControllerWithTitle:nil message:nil preferredStyle:UIAlertControllerStyleActionSheet];

  [alert addAction:[UIAlertAction actionWithTitle:@"收藏" style:UIAlertActionStyleDefault handler:^(UIAlertAction *action) {
        XMGLog(@"收藏");
    }]];

   ……

  [self.window.rootViewController presentViewController:alert animated:YES completion:nil];
六 日期处理
- NSDateFormatte方法:字符转日期
- (NSString *)created_at
{
    // 日期格式化类
    NSDateFormatter *fmt = [[NSDateFormatter alloc] init];
    fmt.dateFormat = @"yyyy-MM-dd HH:mm:ss";
    // NSString -> NSDate
    NSDate *createdAtDate = [fmt dateFromString:_created_at];
    // 比较【发帖时间】和【手机当前时间】的差值
    NSDateComponents *cmps = [createdAtDate intervalToNow];
    XMGLog(@"%@", cmps);
    return @"刚刚";
}
时间格式注意:按服务器返回时间格式写,HH对应24小时制 hh对应12小时制
- 比较2个NSDate时间差
- 比较出来时间差是秒数,需要分、小时等还要计算
// NSString -> NSDate
   NSDateFormatter *fmt = [[NSDateFormatter alloc] init];
// 设置日期格式(解析字符串中的日期元素)
   fmt.dateFormat = @"yyyy-MM-dd HH:mm:ss";
// 生成2个NSDate对象,用来比较时间差值
   NSDate *createdAtDate = [fmt dateFromString:topic.created_at]; // 发帖时间
   NSDate *nowDate = [NSDate date]; // 手机当前时间
// 获得createdAtDate和nowDate之间相差的秒数
   NSTimeInterval interval = [nowDate timeIntervalSinceDate:createdAtDate];
日历处理
获取时间元素
- (void)getCmps
{
// 日期格式化类
NSDateFormatter *fmt = [[NSDateFormatter alloc] init];
fmt.dateFormat = @"yyyy/MM/dd HH:mm:ss";

// NSString -> NSDate
NSDate *date = [fmt dateFromString:@"2014/09/08 17:56:47"];

// 日历对象
NSCalendar *calendar = [NSCalendar currentCalendar];

// 获得一个时间元素
//  NSInteger cmp = [calendar component:NSCalendarUnitHour fromDate:date];
NSCalendarUnit unit = NSCalendarUnitYear | NSCalendarUnitMonth | NSCalendarUnitDay | NSCalendarUnitHour | NSCalendarUnitMinute | NSCalendarUnitSecond;
NSDateComponents *cmps = [calendar components:unit fromDate:date];
NSLog(@"%@", cmps);
}
开始比较
- (void)compare
{
// 日期格式化类
NSDateFormatter *fmt = [[NSDateFormatter alloc] init];
fmt.dateFormat = @"yyyy/MM/dd HH:mm:ss";

// NSString -> NSDate
NSDate *date1 = [fmt dateFromString:@"2014/09/08 17:56:47"];
NSDate *date2 = [fmt dateFromString:@"2014/09/16 04:15:18"];

// 日历对象
NSCalendar *calendar = [NSCalendar currentCalendar];
NSCalendarUnit unit = NSCalendarUnitYear | NSCalendarUnitMonth | NSCalendarUnitDay | NSCalendarUnitHour | NSCalendarUnitMinute | NSCalendarUnitSecond;
NSDateComponents *cmps = [calendar components:unit fromDate:date1 toDate:date2 options:0];
NSLog(@"%@", cmps);
}
- 封装一个日历处理
- (NSDateComponents *)intervalToDate:(NSDate *)date
{
    // 日历对象
    NSCalendar *calendar = [NSCalendar currentCalendar];

    // 想比较哪些元素
    NSCalendarUnit unit = NSCalendarUnitYear | NSCalendarUnitMonth | NSCalendarUnitDay | NSCalendarUnitHour | NSCalendarUnitMinute | NSCalendarUnitSecond;

    // 比较
    return [calendar components:unit fromDate:self toDate:date options:0];
}
//  直接算下当前时间
- (NSDateComponents *)intervalToNow
{
    return [self intervalToDate:[NSDate date]];
}
服务器返回的日期格式
- 时间字符串:2015-09-13 18:13:03
- 时间戳:从1970-1-1 00:00:00开始到现在为止走过的毫秒数
NSDate *date = [NSDate dateWithTimeIntervalSince1970:时间戳/1000.0];


 207
207

 被折叠的 条评论
为什么被折叠?
被折叠的 条评论
为什么被折叠?
 到【灌水乐园】发言


