实现分析
- 控制器的 view上有一个 scrollview,scrollview 上添加 view;
- UIPageController添加到控制器 view 上(不能加到scrollview)
代码实现
- 新特性页面GGNewfeatureViewController
#define GGNewfeatureCount 4
- (void)viewDidLoad {
[super viewDidLoad];
UIScrollView *scrollView = [[UIScrollView alloc] init];
scrollView.frame = self.view.bounds;
[self.view addSubview:scrollView];
self.scrollView = scrollView;
CGFloat scrollW = scrollView.width;
CGFloat scrollH = scrollView.height;
for (int i = 0; i < GGNewfeatureCount; i++) {
UIImageView *imageView = [[UIImageView alloc] init];
imageView.width = scrollW;
imageView.height = scrollH;
imageView.y = 0;
imageView.x = i * scrollW;
NSString *name = [NSString stringWithFormat:@"new_feature_%d", i + 1];
imageView.image = [UIImage imageNamed:name];
[scrollView addSubview:imageView];
if (i == GGNewfeatureCount - 1) {
[self setupLastImageView:imageView];
}
}
#warning 默认情况下,scrollView一创建出来,它里面可能就存在一些子控件了
#warning 就算不主动添加子控件到scrollView中,scrollView内部还是可能会有一些子控件
scrollView.contentSize = CGSizeMake(GGNewfeatureCount * scrollW, 0);
scrollView.bounces = NO;
scrollView.pagingEnabled = YES;
scrollView.showsHorizontalScrollIndicator = NO;
scrollView.delegate = self;
UIPageControl *pageControl = [[UIPageControl alloc] init];
pageControl.numberOfPages = GGNewfeatureCount;
pageControl.currentPageIndicatorTintColor = GGColor(253, 98, 42);
pageControl.pageIndicatorTintColor = GGColor(1889, 189, 189);
pageControl.centerX = scrollW * 0.5;
pageControl.centerY = scrollH - 50;
[self.view addSubview:pageControl];
self.pageControl = pageControl;
}
- 计算页面方法
(int)(page + 0.5)
- 1.3四舍五入 1.3 + 0.5 = 1.8 强转为整数(int)1.8= 1
- (void)scrollViewDidScroll:(UIScrollView *)scrollView
{
double page = scrollView.contentOffset.x / scrollView.width;
self.pageControl.currentPage = (int)(page + 0.5);
}
- (void)setupLastImageView:(UIImageView *)imageView
{
imageView.userInteractionEnabled = YES;
UIButton *shareBtn = [[UIButton alloc] init];
[shareBtn setImage:[UIImage imageNamed:@"new_feature_share_false"] forState:UIControlStateNormal];
[shareBtn setImage:[UIImage imageNamed:@"new_feature_share_true"] forState:UIControlStateSelected];
[shareBtn setTitle:@"分享给大家" forState:UIControlStateNormal];
[shareBtn setTitleColor:[UIColor blackColor] forState:UIControlStateNormal];
shareBtn.titleLabel.font = [UIFont systemFontOfSize:15];
shareBtn.width = 200;
shareBtn.height = 30;
shareBtn.centerX = imageView.width * 0.5;
shareBtn.centerY = imageView.height * 0.65;
[shareBtn addTarget:self action:@selector(shareClick:) forControlEvents:UIControlEventTouchUpInside];
[imageView addSubview:shareBtn];
UIButton *startBtn = [[UIButton alloc] init];
[startBtn setBackgroundImage:[UIImage imageNamed:@"new_feature_finish_button"] forState:UIControlStateNormal];
[startBtn setBackgroundImage:[UIImage imageNamed:@"new_feature_finish_button_highlighted"] forState:UIControlStateHighlighted];
startBtn.size = startBtn.currentBackgroundImage.size;
startBtn.centerX = shareBtn.centerX;
startBtn.centerY = imageView.height * 0.75;
[startBtn setTitle:@"开始微博" forState:UIControlStateNormal];
[startBtn addTarget:self action:@selector(startClick) forControlEvents:UIControlEventTouchUpInside];
[imageView addSubview:startBtn];
}
- titleEdgeInsets、imageEdgeInsets和contentEdgeInsets对比
- EdgeInsets: 自切
- contentEdgeInsets:会影响按钮内部的所有内容(里面的imageView和titleLabel)
- titleEdgeInsets:只影响按钮内部的titleLabel
- imageEdgeInsets:只影响按钮内部的imageView
- 取反逻辑
- (void)shareClick:(UIButton *)shareBtn
{
shareBtn.selected = !shareBtn.isSelected;
}
- (void)startClick
{
UIWindow *window = [UIApplication sharedApplication].keyWindow;
window.rootViewController = [[HWTabBarViewController alloc] init];
}
版本判断
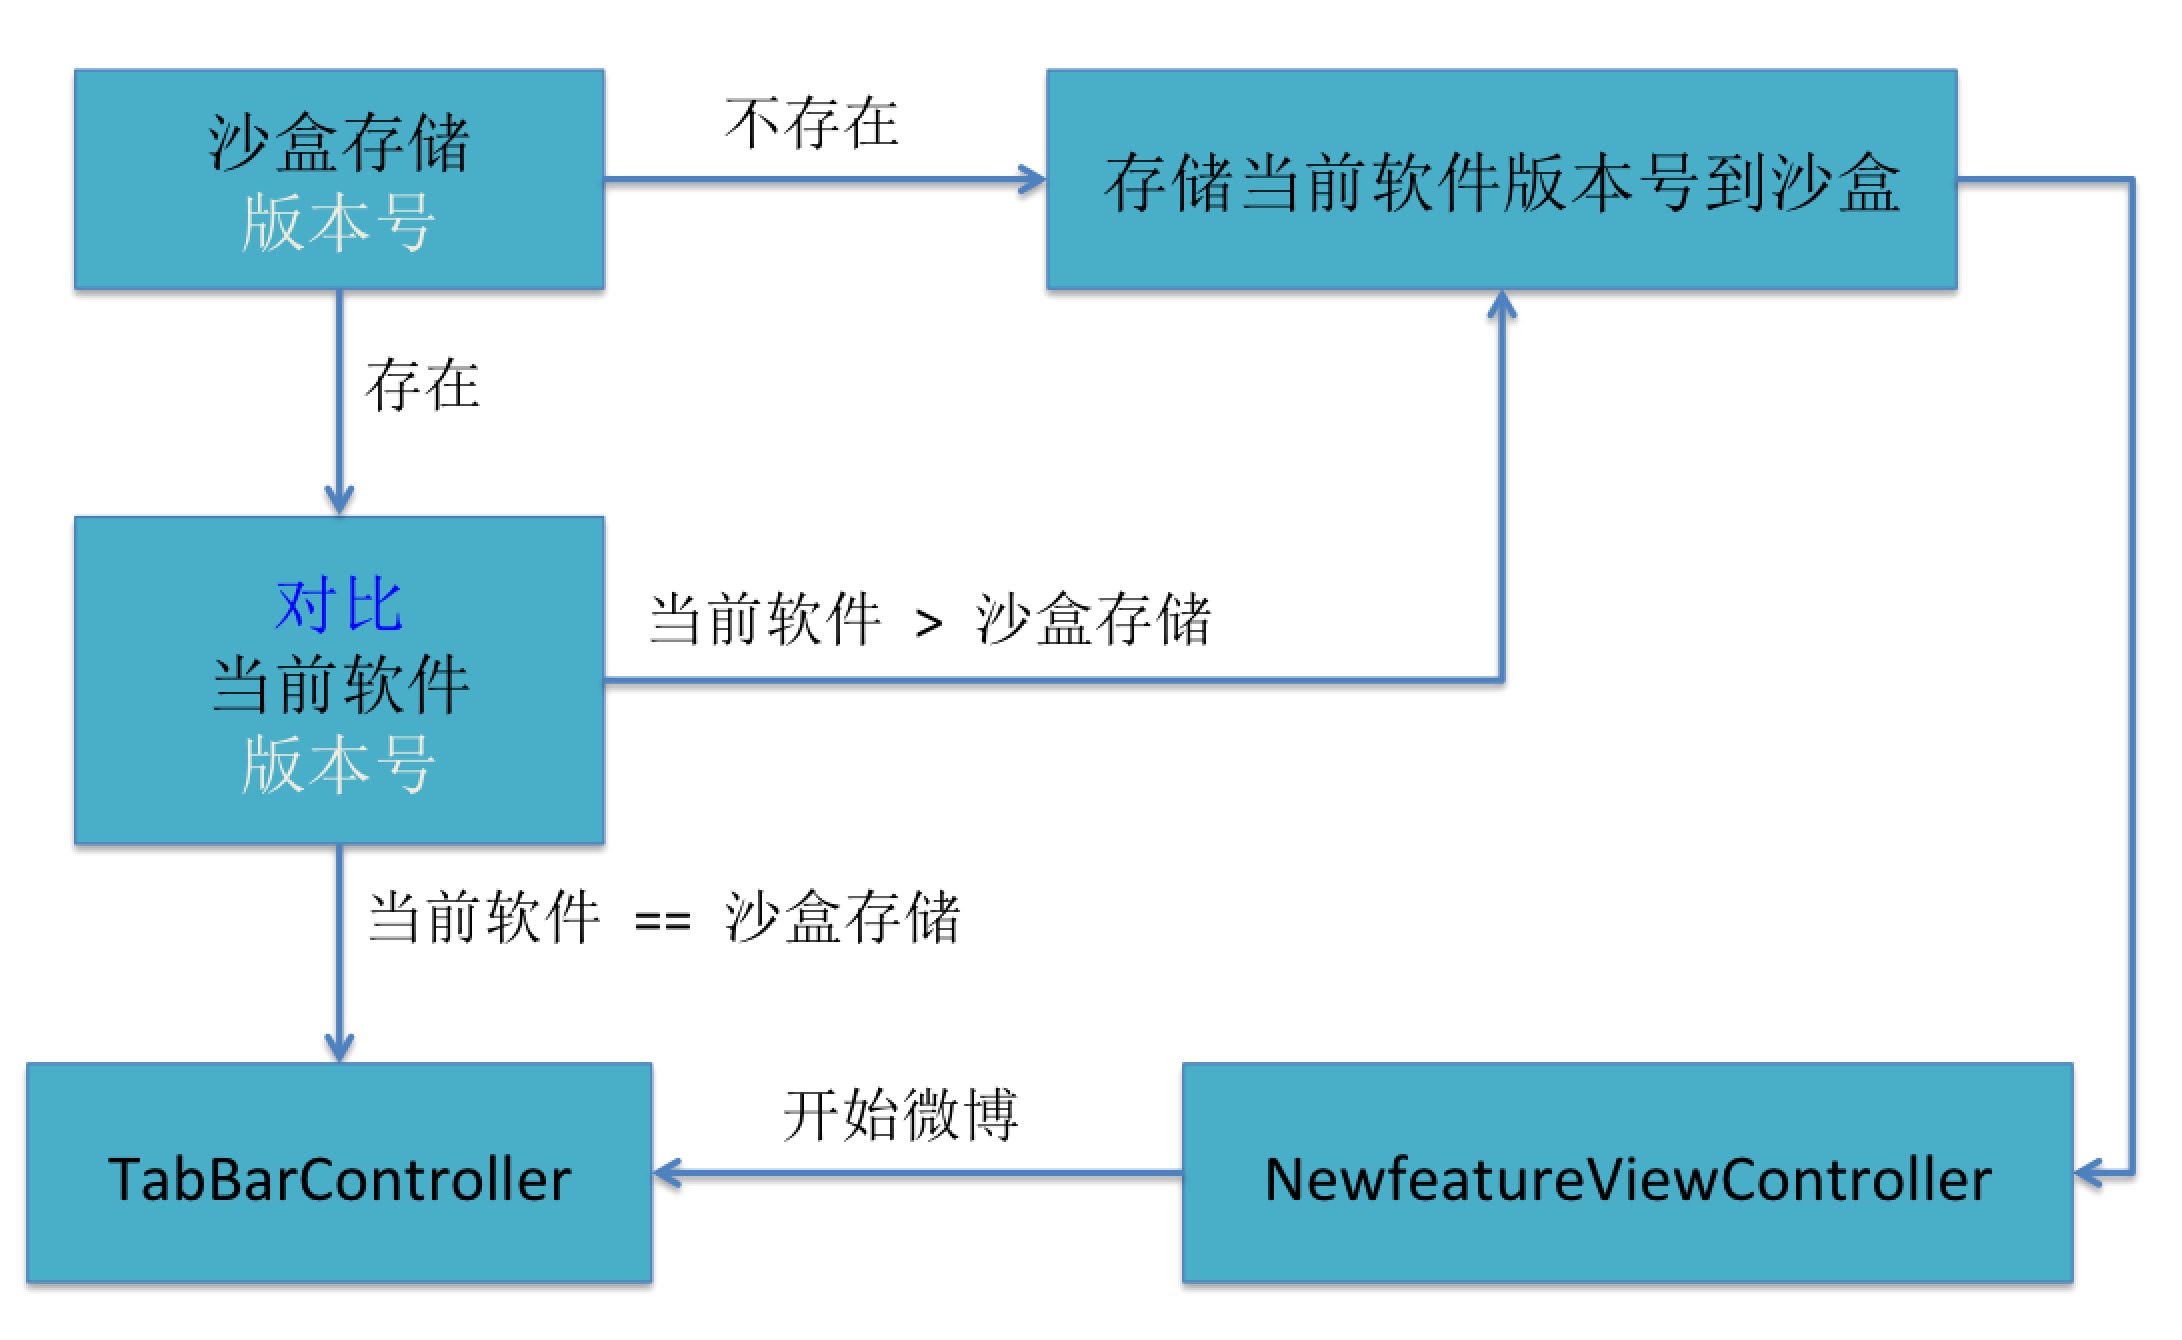
- (BOOL)application:(UIApplication *)application didFinishLaunchingWithOptions:(NSDictionary *)launchOptions {
self.window = [[UIWindow alloc] init];
self.window.frame = [UIScreen mainScreen].bounds;
NSString *key = @"CFBundleVersion";
NSString *lastVersion = [[NSUserDefaults standardUserDefaults] objectForKey:key];
NSString *currentVersion = [NSBundle mainBundle].infoDictionary[key];
if ([currentVersion isEqualToString:lastVersion]) {
self.window.rootViewController = [[GGTabBarController alloc] init];
} else {
self.window.rootViewController = [[GGNewfeatureViewController alloc] init];
[[NSUserDefaults standardUserDefaults] setObject:currentVersion forKey:key];
[[NSUserDefaults standardUserDefaults] synchronize];
}
[self.window makeKeyAndVisible];
return YES;
}
更换系统自带 TabBar 注意事项
 GGTabBar *tabBar = [[HWTabBar alloc] init];
 tabBar.delegate =self;  // 注意顺序,不能颠倒
 [self setValue:tabBar forKeyPath:@"tabBar"];
[self setValue:tabBar forKeyPath:@"tabBar"];这行代码过后,tabBar的delegate就是
GGTabBarViewController
- 不用再设置tabBar.delegate = self;
- 注意:
- 如果tabBar设置完delegate后,再执行
tabBar.delegate = self;修改delegate,就会报错
 错误信息:Changing the delegate of a tab bar managed by a tab bar controller is not allowed.
 错误意思:不允许修改TabBar的delegate属性(这个TabBar是被TabBarViewController所管理的)


 2926
2926

 被折叠的 条评论
为什么被折叠?
被折叠的 条评论
为什么被折叠?
 到【灌水乐园】发言


