


文章目录
一、什么是爬虫?
爬虫就是程序从互联网中各个网站上爬取数据,做数据清洗再入库。
本质原理
从技术层面来说就是:通过程序模拟浏览器请求站点的行为,把站点返回的HTML代码/JSON数据/二进制数据(图片、视频等)爬取到本地,进而提取自己需要的数据,存放起来使用
通俗的说就是:通过模拟发送http请求从而去别人的服务端获取数据,然后把获取的数据入库
爬虫是否合法?
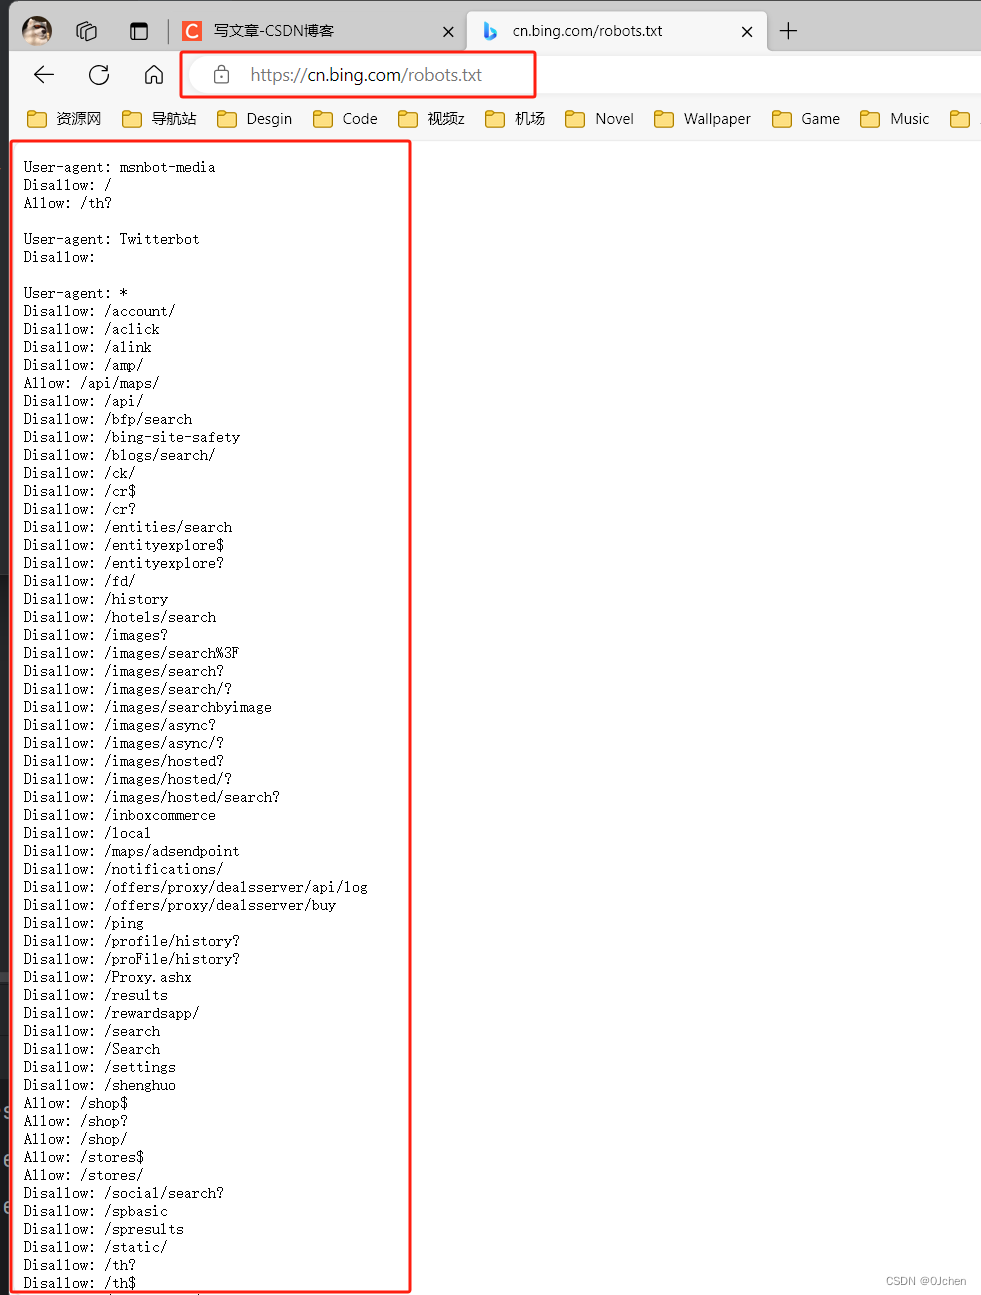
爬虫有爬虫协议
(是一个君子协议):每个网站根路径下都有robots.txt,这个文件规定了该网站,哪些可以爬取,哪些不能爬取
二、爬虫基本流程
用户获取网络数据的方式:
- 方式1:浏览器提交请求—>下载网页代码—>解析成页面
- 方式2:模拟浏览器发送请求(获取网页代码)—>提取有用的数据—>存放到数据库或文件中
而爬虫就是使用 方式2来实现的
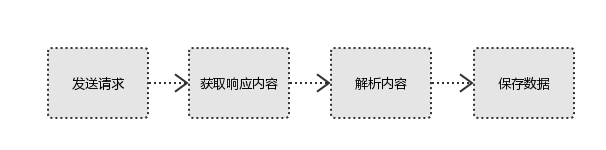
	1.发起请求(模拟发送http请求)
		使用http库向目标站点发送请求,即发送一个request请求
		request包含:请求头、请求体等
		需要使用到爬虫模块
			1.reqeusts模块
			2.selenium
			'网页反扒:封id:ip代理,封账号:cookie池'

	2.获取响应内容
		如果服务器能正常响应,则会得到一个Response
		Response包含:html,json,图片,视频等

	3.解析数据内容
		解析html数据:正则表达式(RE模块),第三方解析库如Beautifulsoup,pyquery等
		解析json数据:json模块
		解析二进制数据:以wb的方式写入文件

	4.保存数据(数据入库)
		数据库(MySQL,Mongdb、Redis)
		文件中
三、requests模块介绍
使用
python如何向网页发送http请求,本质是requests模块,封装了python内置模块urllib,使用requests可以模拟浏览器的请求(http),比起之前用到的urllib,requests模块的api更加便捷(本质就是封装了urllib3)
requests库发送请求将网页内容下载下来以后,并不会执行js代码,这需要我们自己分析目标站点然后发起新的request请求
安装reqeusts模块
pip install requests
四、requests模块发送Get请求
	import requests

	res = requests.get('https://www.cnblogs.com/')
	# print(res)  # <Response [200]>
	print(res.text)  # http响应体文本内容

	'''如果有的网站,发送请求后,不返回数据或者拦截,这是别人做了反扒'''
	# http请求:请求头中没带东西,没带cookie,客户端类型,referer....
	res = requests.get('https://dig.chouti.com/')
	print(res.text)
五、Get请求携带参数
	import requests
	'方式一:直接拼到路径中'
	res = requests.get('https://www.baidu.com?info=jack')
	print(res.url)  # https://www.baidu.com/?info=jack

	'方式二:使用params参数携带'
	res = requests.get('https://www.baidu.com',params={'info':'jack','age':19})
	print(res.url) #https://www.baidu.com/?info=jack&age=19

	# print(res.text) # 响应体内容
URL编码与解码
	'从地址栏里拿出数据 都会被URL进行编码和解码'
	from urllib.parse import quote,unquote   # 内置模块
	info = quote('上海')  # 编码
	print(info)  # %E4%B8%8A%E6%B5%B7
	info1 = unquote('%E4%B8%8A%E6%B5%B7')  # 解码
	print(info1)  # 上海
六、携带请求头
http请求中,请求头中有一个很重要的参数 :
User-Agent,如果向后端发送请求没有带这个请求头,后端就禁止访问。大多网站没有携带该参数就被禁止了。
用户代理(User Agent,简称 UA),是一个特殊字符串头,使得服务器能够识别客户使用的操作系统及版本、CPU 类型、浏览器及版本、浏览器渲染引擎、浏览器语言、浏览器插件等。
	import requests
	headers = {
	    'User-Agent':'Mozilla/5.0 (Windows NT 10.0; Win64; x64) AppleWebKit/537.36 (KHTML, like Gecko) Chrome/121.0.0.0 Safari/537.36'
	}
	res = requests.get('https://dig.chouti.com/',headers=headers)
	'''
	def request(method, url, **kwargs):
	    :param headers: (optional) Dictionary of HTTP Headers to send with the :class:`Request`.
	'''
	print(res.text)
	'User-Agent:客户端类型:有浏览器、手机端浏览器、爬虫类型,程序,scrapy一般伪造成浏览器'
我们去爬某个网站,发送请求不能正常返回数据,说明模拟的不够像,需要携带参数,只要参数对应上就能返回相应的数据。
一般网站可以通过Referer来做反扒如果要登录,模拟向登录接口发请求,正常操作必须在登录页面上才能干这事。如果没有携带referer,它就认为你是恶意的就会拒绝。
七、发送post请求
	import requests
	headers = {
	    'User-Agent':'Mozilla/5.0 (Windows NT 10.0; Win64; x64) AppleWebKit/537.36 (KHTML, like Gecko) Chrome/121.0.0.0 Safari/537.36',
	    'Cookie':'iJ9flkdsjaxxxx=...'
	}
	data = {'linkId':'41569712',}  # 发送请求携带的文章id
	res = requests.post('https://dig.chouti.com/link/vote',headers=headers,data=data)
	print(res.text)  # {"data":4,"code":200,"success":true}
八、携带cookie
方式一:放在请求头中
	'模拟抽屉网点赞信息'
	import requests
	'''
	是否登录---》有个标志
	 1 前后端混合项目---》登录信息-->放在cookie中了
	 2 前后端分离项目---》登录信息--》后端规定的--》放在请求头的
	'''
	headers = {
	    'User-Agent':'Mozilla/5.0 (Windows NT 10.0; Win64; x64) AppleWebKit/537.36 (KHTML, like Gecko) Chrome/121.0.0.0 Safari/537.36',
	    'Cookie':'deviceId=web.eyJ0eXAiOiJKV1QiLCJhbGciOiJIUzI1NiJ9flkdsjaxxxx=...'
	}
	data = {'linkId':'41569712',}  # 发送请求携带的文章id
	res = requests.post('https://dig.chouti.com/link/vote',headers=headers,data=data)
	print(res.text)  # {"data":4,"code":200,"success":true}
方式二:放在cookie参数中
	通过cookie参数:因为cookie很特殊,一般都需要携带,模块把cookie单独抽取成一个参数,是字典类型,以后可以通过参数传入
	headers = {
	    'User-Agent':'Mozilla/5.0 (Windows NT 10.0; Win64; x64) AppleWebKit/537.36 (KHTML, like Gecko) Chrome/121.0.0.0 Safari/537.36',
	}
	data = {'linkId':'41569712',}  # 发送请求携带的文章id
	cookie = {
		'token':'eyJ0eXAiOiJKV1QiLCJhbGciOiJIUzI1NiJ9xxxxx'
	}  # cookies格式都是字典格式 按照输入即可
	res = requests.post('https://dig.chouti.com/link/vote',headers=headers,data=data,cookies=cookie)
	print(res.text)  # {"data":5,"code":200,"success":true}
九、post请求携带参数
	import requests
	'''post请求:三种编码方式:json、Urlencoded、form-data'''
	'方式一:data参数'
	# 咱们以data字典形式携带,它使用的Urlencoded编码,最终编码为name=jack&age=19,然后放在请求体中
	':param data: (optional) Dictionary, list of tuples, bytes, or file-like'
	\res = requests.post('地址',data={'name':'jack','age':19})
	# res = requests.post('地址',data=b'name=jack&age=19')

	'方式二:json编码'
	# 咱们以json字典形式携带,它使用的json编码,最终编码为{'name':'jack','age':19},然后放在请求体中
	':param json: (optional) A JSON serializable Python object to send in the body of the :class:`Request`'
	res = requests.post('地址',json={'name':'jack','age':19})
十、模拟登录
方式一
	先发送错误登录请求 看返回数据是否对错 输入对的密码 获取cookie 通过Cookie登录
	import requests
	data = {
	    'username': 'jack',
	    'password': '123',
	    'captcha': '111',
	    'remember': '1',
	    'ref': 'http://www.aa7a.cn/',  # 登录成功重定向到这个地址
	    'act': 'act_login'
	}
	res = requests.post('http://www.aa7a.cn/user.php',data=data)
	print(res.text)  # {"error":5}
	print(res.cookies)  # RequestsCookieJar对象响应头中得cookie,如果正常登录,这个cookie,就是登录后的cookie

	res1 = requests.get('http://www.aa7a.cn/',cookies=res.cookies)  # 访问首页,携带cookie
	print('jack' in res.text)
方式二
	data = {
	    'username': 'xxxxx',
	    'password': 'xxxxx',   # 错误的 请求码是 error 5 正确的是0
	    'captcha': 'cccc',
	    'remember': 1,
	    'ref': 'http://www.aa7a.cn/',
	    'act': 'act_login'
	}
	res = requests.post('http://www.aa7a.cn/user.php', json= {"key": "Value"})
十一、session对象
	# http 请求,每次都是一个新的---》cookie需要自己处理携带
	# session可以自动处理cookie,不需要手动携带了
	import requests
	session=requests.session()
	data = {
	    'username': 'jack',
	    'password': '123',
	    'captcha': '111',
	    'remember': '1',
	    'ref': 'http://www.aa7a.cn/',  # 登录成功重定向到这个地址
	    'act': 'act_login'
	}
	res = session.post('http://www.aa7a.cn/user.php',data=data)
	print(res.text)  # {"error":5}
	'使用session对象,就无需在请求中携带cookie,会自动携带'
	res1 = session.get('http://www.aa7a.cn/') # 自动保持登录状态,自动携带cookie
	print('jack' in res.text)
十二、响应response对象
	使用requests模块
	1.发送请求:request对象:请求头,请求参数,请求体---》本质就是http请求--》被包装成一个对象
	2.响应回来:response对象:http响应--》cookie,响应头,响应体。。

	import requests
	# response对象有很多属性和方法
	headers={
	   'User-Agent':'Mozilla/5.0 (Windows NT 10.0; Win64; x64) AppleWebKit/537.36 (KHTML, like Gecko) Chrome/121.0.0.0 Safari/537.36'
	}
	respone = requests.get('https://www.jianshu.com/',headers=headers)
	# respone属性
	print(respone.text)  # 响应体的文本内容
	print(respone.content)  # 响应体的二进制内容
	print(respone.status_code)  # 响应状态码
	print(respone.headers)  # 响应头
	print(respone.cookies)  # 响应cookie
	print(respone.cookies.get_dict())  # cookieJar对象,获得到真正的字段
	print(respone.cookies.items())  # 获得cookie的所有key和value值
	print(respone.url)  # 请求地址
	print(respone.history)  # 访问这个地址,可能会重定向,放了它重定向的地址
	print(respone.encoding)  # 页面编码

	'''
		# 有的网站,打印
		res.text --->发现乱码---》请求回来的二进制---》转成了字符串---》默认用utf8转---》
		response.encoding='gbk'
		再打印res.text它就用gbk转码
	'''
十三、下载图片
1.没有带图片防盗链的图片地址
res = requests.get('https://img.zcool.cn/community/0186025d143ecaa8012051cd9c2eb7.jpg@1280w_1l_2o_100sh.jpg')
res = requests.get('https://pic.3gbizhi.com/uploads/20210611/a070a0d807c9042c9d123597d83797f0.jpg')
res = requests.get('https://c-ssl.dtstatic.com/uploads/blog/202311/01/wgSLoQZi9oAPeg.thumb.1000_0.jpeg')
# print(res.content)
with open('feng.jpg','wb') as f:
f.write(res.content)
with open('chognwu.jpg', 'wb') as f:
for line in res.iter_content(chunk_size=1024):
f.write(line)
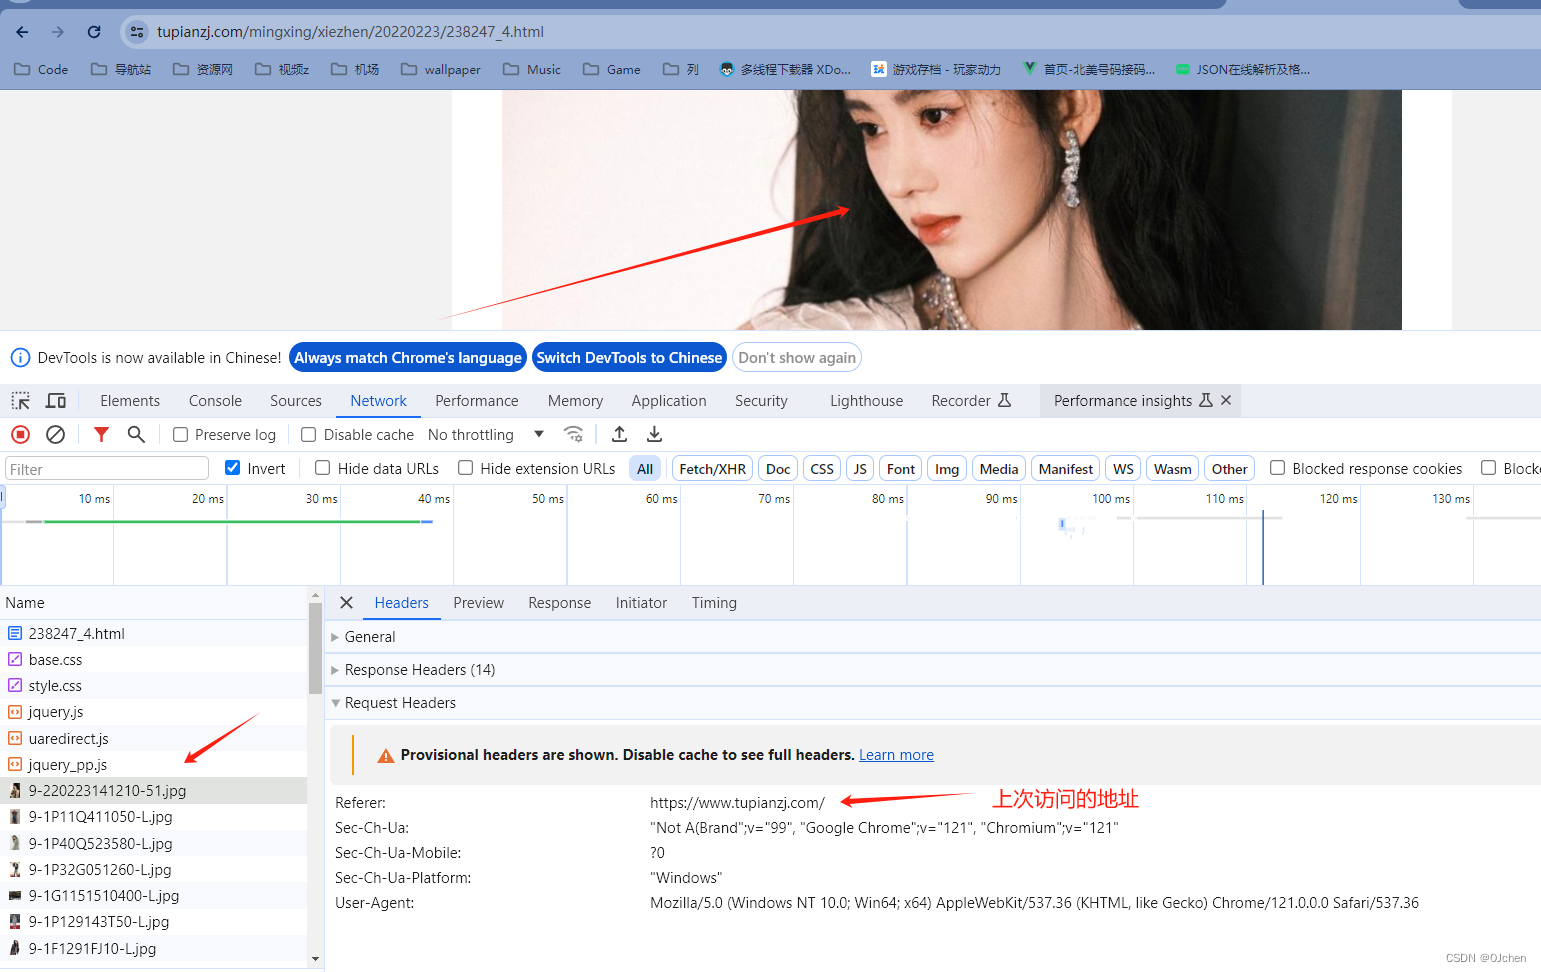
2.带有图片防盗链的图片地址
'以上是没有带图片防盗链的,如果到了图片防盗链,需要在请求头中添加一个referer参数,里面写的是上次访问的地址'
headers = {
'Referer':'https://www.tupianzj.com/'
}
res = requests.get('https://img.lianzhixiu.com/uploads/allimg/220223/9-220223141210-51.jpg',headers=headers)
with open('ju.jpg','wb') as f:
for line in res.iter_content():
f.write(line)
获取视频的操作同上面一样
十四、ssl认证
	http协议
	HTTP协议以明文方式发送内容,不提供任何方式的数据加密。HTTP协议不适合传输一些敏感信息

	https协议:http+ssl/tsl
	https则是具有安全性的ssl加密传输协议。HTTP+ SSL / TLS,也就是在 http上又加了一层处理加密信息的模块,比 http安全,可防止数据在传输过程中被窃取、改变,确保数据的完整性
http版本区别
	  0.9:底层基于tcp,每次http请求,都是建立一个tcp连接,三次握手,请求结束需要四次挥手
      1.1:请求头中有个参数Keep-alive,可以保证多个http请求公用一个TCP连接
      2.x:多路复用,多个请求使用同一个数据包

    -请求协议:
           请求首行:请求头地址,请求方式,http的版本
           请求头:key-value
           请求体
    -响应协议:
           响应首行:响应状态码,响应字符串描述
           响应头:key-vaule,响应状态码,cookie
           响应体

	'简单了解:https比http多了ssl和tls协议,多了一层处理加密信息的模块。'
解决证书提示错误问题
1.不验证证书—加入verify=False
	import requests
	respone=requests.get('https://www.12306.cn',verify=False) #不验证证书,报警告,返回200
	print(respone.status_code) # 200
2.关闭警告
	import requests
	from requests.packages import urllib3
	urllib3.disable_warnings() #关闭警告
	respone=requests.get('https://www.12306.cn',verify=False)
	print(respone.status_code)
3.手动携带证书-了解
	import requests
	respone=requests.get('https://www.12306.cn',
	                     cert=('/path/server.crt',
	                           '/path/key'))
	print(respone.status_code)
十五、超时设置,异常处理,上传文件
	import requests
	1.超时设置
	# res = requests.get('https://www.baidu.com/',timeout=0.0001)
	# print(res.text)

	2.异常处理
	from requests.exceptions import * #可以查看requests.exceptions获取异常类型
	try:
	    r=requests.get('https://www.baidu.com',timeout=0.0001)
	except ReadTimeout:
	    print('--------')
	# except ConnectionError: #网络不通
	#     print('-----')
	# except Timeout:
	#     print('aaaaa')
	except RequestException:  # 通用方案
	    print('Error')


	3.上传文件
	files={'file':open('ju.jpg','rb')}
	respone=requests.post('http://httpbin.org/post',files=files)
	print(respone.status_code)
十六、使用代理
	免费代理池:https://github.com/jhao104/proxy_pool
	'原理:有些网站提供免费的代理--》爬虫技术---》爬取别人的免费代理--》验证过后---》自己用'
	import requests
	res = requests.get('http://demo.spiderpy.cn/get/?type=https')
	print(res.json())
	print(res.json()['proxy'])

	# 111.177.63.86:8888
	headers={
	   'User-Agent':'Mozilla/5.0 (Windows NT 10.0; Win64; x64) AppleWebKit/537.36 (KHTML, like Gecko) Chrome/121.0.0.0 Safari/537.36'
	}
	respone = requests.get('https://www.jianshu.com/',headers=headers,proxies={'https':res.json()['proxy']})
	print(respone.text)


 2423
2423


 被折叠的 条评论
为什么被折叠?
被折叠的 条评论
为什么被折叠?
 到【灌水乐园】发言


