


 本文深入解析Android中LinearLayout与RelativeLayout的特性及应用,通过实例演示如何利用相对布局实现控件的精确定位,适合Android开发者进阶学习。
一、引入:
Android中常用的布局方式有三种,LinearLayout、RelativeLayout和FrameLayout,相较于后面一种的场景局限性,前两者使用的场景更多。在实际开发中,我们经常会遇到下面一种情况,如何将控件在布局当中的任意位置进行摆放,前面两种布局都可以做到,当然,更加推荐使用相对布局(RelativeLayout),比如类似下面的这种控件摆放场景,直接上效果图:
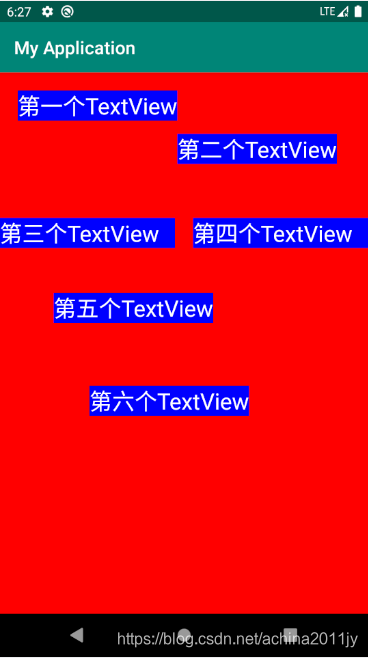
为了区别布局和控件,我们分别对其进行了背景色的设置,可以看到,所有的控件是垂直分布的,他们距离边框或者其它控件的位置不能直接用肉眼测量出来,给人一种任意摆放的感觉,实际上,只要掌握了相对布局的几个属性,确实可以将控件放在布局中的任意位置。下面先说一些布局的一些概念,最后讲解下这个布局的代码实现。
二、线性布局:
首先需要说明的是,线性布局也能够实现上面的效果,但是很麻烦,不过,作为使用场景最多的布局,我们还是需要理清一些概念:
- layout_gravity和gravity有什么区别?
layout_gravity和gravity的区别在于前者针对的是控件在布局中的位置设置,后者是控件中的内容在控件中的位置设置;
2. 默认情况下,线性布局会按照水平方向布局,所以,需要进行控件的垂直摆放时,请在布局中设定android:orientation; - 当父布局的属性为android:orientation="horizontal"时,子控件属性android:layout_gravity="right"将失效(当然还有left等等);
- 当父布局的属性为android:orientation="vertical"时,子控件属性android:layout_gravity="bottom"将失效(当然还有top等等);
这两点很重要,归纳起来就是:
如果父布局规定了其子控件按照某一方向进行,那么子控件在该方向上调整自己位置的能力将消失;
所以,如果我们想要实现一个控件摆放在任意位置,比如与某一边间隔多少间隙,与某个控件的间隙又是多少等等,如果想要在线性布局中实现的话,要么需要使用很多控件进行填白(将控件颜色设置为背景色),而且,还需要去大量的使用layout_wight这个属性来进行不同控件的比例分配,才能实现文中开始的那种效果。而相对布局,就简单的多了。
三、相对布局:
我们只需要记住下面的属性就可以实现控件的任意位置摆放了:
①第一类:属性值为true或false
android:layout_centerHrizontal 水平居中
android:layout_centerVertical 垂直居中
android:layout_centerInparent 相对于父元素完全居中
android:layout_alignParentBottom 贴紧父元素的下边缘
android:layout_alignParentLeft 贴紧父元素的左边缘
android:layout_alignParentRight 贴紧父元素的右边缘
android:layout_alignParentTop 贴紧父元素的上边缘
②第二类:属性值必须为id的引用名“@id/id-name”
android:layout_below 在某元素的下方
android:layout_above 在某元素的的上方
android:layout_toLeftOf 在某元素的左边
android:layout_toRightOf 在某元素的右边
android:layout_alignTop 本元素的上边缘和某元素的的上边缘对齐
android:layout_alignLeft 本元素的左边缘和某元素的的左边缘对齐
android:layout_alignBottom 本元素的下边缘和某元素的的下边缘对齐
android:layout_alignRight 本元素的右边缘和某元素的的右边缘对齐
③第三类:属性值为具体的值
android:layout_marginBottom 离某元素底边缘的距离
android:layout_marginLeft 离某元素左边缘的距离
android:layout_marginRight 离某元素右边缘的距离
android:layout_marginTop 离某元素上边缘的距离
可以看到,这些值都是有规律可循的,熟悉了一两个之后,你就会掌握其他的了,文章开头的效果图代码如下:
<?xml version="1.0" encoding="utf-8"?>
<RelativeLayout xmlns:android="http://schemas.android.com/apk/res/android"
    xmlns:app="http://schemas.android.com/apk/res-auto"
    xmlns:tools="http://schemas.android.com/tools"
    android:layout_width="match_parent"
    android:layout_height="match_parent"
    android:background="#ff0000"
    android:orientation="vertical"
    tools:context=".MainActivity">

    <TextView
        android:id="@+id/textView1"
        android:layout_width="wrap_content"
        android:layout_height="wrap_content"
        android:layout_alignParentLeft="true"
        android:layout_alignParentTop="true"
        android:layout_marginLeft="20dp"
        android:layout_marginTop="20dp"
        android:background="#0000ff"
        android:text="第一个TextView"
        android:textColor="#ffffff"
        android:textSize="25sp" />

    <TextView
        android:id="@+id/textView2"
        android:layout_width="wrap_content"
        android:layout_height="wrap_content"
        android:layout_below="@+id/textView1"
        android:layout_marginTop="15dp"
        android:layout_toRightOf="@+id/textView1"
        android:background="#0000ff"
        android:text="第二个TextView"
        android:textColor="#ffffff"
        android:textSize="25sp" />

    <LinearLayout
        android:id="@+id/linearLayout1"
        android:layout_width="match_parent"
        android:layout_height="wrap_content"
        android:layout_below="@id/textView2"
        android:layout_marginTop="60dp"
        android:orientation="horizontal">

        <TextView
            android:id="@+id/textView3"
            android:layout_width="0dp"
            android:layout_height="wrap_content"
            android:layout_weight="1"
            android:background="#0000ff"
            android:text="第三个TextView"
            android:textColor="#ffffff"
            android:textSize="25sp" />

        <TextView
            android:id="@+id/textView4"
            android:layout_width="0dp"
            android:layout_height="wrap_content"
            android:layout_weight="1"
            android:layout_marginLeft="20dp"
            android:background="#0000ff"
            android:text="第四个TextView"
            android:textColor="#ffffff"
            android:textSize="25sp" />
    </LinearLayout>

    <TextView
        android:id="@+id/textView5"
        android:layout_width="wrap_content"
        android:layout_height="wrap_content"
        android:layout_below="@+id/linearLayout1"
        android:layout_marginTop="50dp"
        android:layout_marginLeft="60dp"
        android:background="#0000ff"
        android:text="第五个TextView"
        android:textColor="#ffffff"
        android:textSize="25sp" />


    <TextView
        android:id="@+id/textView6"
        android:layout_width="wrap_content"
        android:layout_height="wrap_content"
        android:layout_below="@+id/textView5"
        android:layout_marginTop="70dp"
        android:layout_marginLeft="100dp"
        android:background="#0000ff"
        android:text="第六个TextView"
        android:textColor="#ffffff"
        android:textSize="25sp" />


</RelativeLayout>
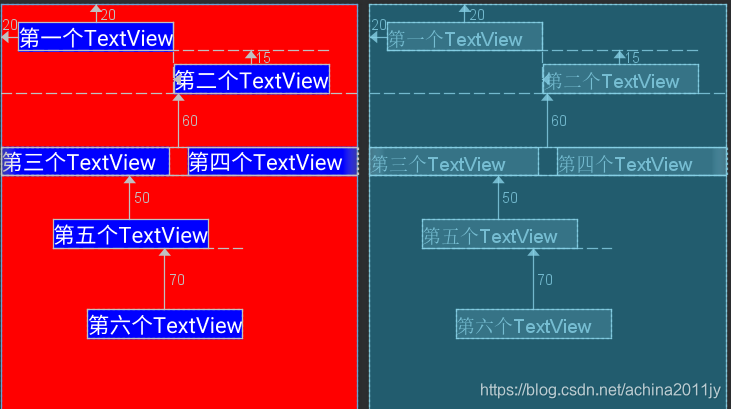
代码中可以看出,相对于父布局,子布局和控件都是平级操作的(操作的时候,我们可以直接把子布局当成一个“大控件”),相对位置的选取,我们一样可以对布局进行id的命名来实现,借助Android studio,我们能够更加清晰的看到各个控件相对于其他控件的位置:


 1964
1964

 被折叠的 条评论
为什么被折叠?
被折叠的 条评论
为什么被折叠?
 到【灌水乐园】发言


