


内容
使用 框架为Vue2,开发地图大屏,包含的内容有
1.渲染中国地图
2.打点
3.连线
4.下钻
5.返回
6.地图拖拽
等一系列常见的地图功能详解,代码中使用的JSON文件有需要的可以问我要,给我点个赞就行,谢谢大家。
素材链接:https://pan.baidu.com/s/1EB3bv2JgvSlDDz2h5caDXw
提取码:9hj8
地图效果如下
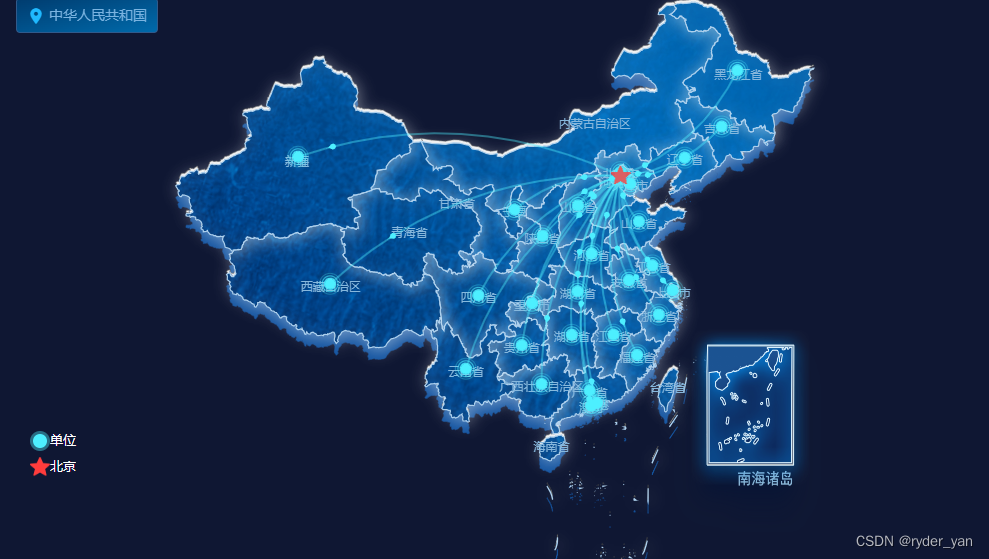
第一步是地图渲染
首先需要 npm install echarts 引入echarts
在<template> 中 增加 id为china 的div
<template>
  <div>
    <div id="china" style="width: 1300px;height: 650px;"></div>
  </div>
</template>
在<script>中的 引入 echars 和 地图JSON china.json 文件
import china from "./mapJson/china.json";
import * as echarts from "echarts";
data中声明 chart 和 options
 data() {
    return {
      chart: null,
      options: null,
    };
  },
initMap() 函数里为 options 赋值并注册地图
options 中的特殊操作有
1.为地图增加了背景图片,通过创造img标签后并添加图片路径,并在 series type=‘map’ 对象的 itemStyle 中使用;
2.geo 层隐藏南海诸岛。 通过regions 调整透明度为0实现 opacity:0
3.geo 和 series 中的 layoutCenter 为偏移量,geo层 y 轴偏移 0.5 可以使地图有两层的效果。
 initMap() {
      echarts.registerMap("china", china);
      // 加载纹理图片
      let mapTexture = document.createElement("img");
      mapTexture.src = require("./image/chinese_map_texture.png");
      this.options = {
        tooltip: {
          show: false,
        },
        //叠加阴影层
        geo: {
          map: "china",
          aspectScale: 0.8,
          layoutCenter: ["40%", "49.5%"],
          layoutSize: "100%",
          label: {
            emphasis: {
              show: false,
            },
          },
          itemStyle: {
            shadowColor: "#1253A0",
            shadowOffsetX: 0,
            shadowOffsetY: 15,
          },
          emphasis: {
            areaColor: "#101B3B",
          },
          regions: [
            { //隐藏geo层的南海诸岛 防止样式重叠
              name: "南海诸岛",
              itemStyle: {
                areaColor: "#101B3B",
                borderColor: "#101B3B",
                opacity: 0,
                label: {
                  show: false,
                  color: "#009cc9",
                },
              },
              label: {
                show: false,
                color: "#FFFFFF",
                fontSize: 12,
              },
            },
          ],
        },
        series: [
          {
            type: "map",
            selectedMode: "single",
            map: "china",
            aspectScale: 0.8,
            layoutCenter: ["40%", "50%"], //地图位置
            layoutSize: "100%",
            zoom: 1, //当前视角的缩放比例
            label: {
              show: true,
              color: "#87B8DD",
              fontSize: 12,
            },

            itemStyle: {
              // 渲染背景图片
              areaColor: {
                image: mapTexture,
                repeat: "repeat",
              },
              borderColor: "#ADD0ED",
              borderWidth: 1.2,
              shadowColor: "rgba(255, 255, 255, 0.4)", // 设置阴影颜色,带有透明度
              shadowBlur: 15, // 设置阴影的模糊大小
              shadowOffsetX: 2, // 设置阴影在 X 轴方向上的偏移
              shadowOffsetY: 2, // 设置阴影在 Y 轴方向上的偏移
            },
            emphasis: {
              //区域
              areaColor: "#ffeb3b", // 高亮时的颜色
              itemStyle: {
                areaColor: "#1785BF",
              },
              label: {
                show: true,
                color: "#fff",
              },
            },
          },
        ],
      };
      const el = document.getElementById("china");
      this.chart = this.$echarts.init(el);
      this.chart.setOption(this.options);

    },
此时地图就渲染完成了!
完整的代码如下:
<template>
  <div>
    <div id="china" style="width: 1300px;height: 650px;"></div>
  </div>
</template>

<script>
import china from "./mapJson/china.json";
import * as echarts from "echarts";
export default {
  data() {
    return {
      chart: null,
      options: null,
    };
  },
  methods: {
    initMap() {
      echarts.registerMap("china", china);
      // 加载纹理图片
      let mapTexture = document.createElement("img");
      mapTexture.src = require("./image/chinese_map_texture.png");
      this.options = {
        tooltip: {
          show: false,
        },
        //叠加阴影层
        geo: {
          map: "china",
          aspectScale: 0.8,
          layoutCenter: ["40%", "49.5%"],
          layoutSize: "100%",
          label: {
            emphasis: {
              show: false,
            },
          },
          itemStyle: {
            shadowColor: "#1253A0",
            shadowOffsetX: 0,
            shadowOffsetY: 15,
          },
          emphasis: {
            areaColor: "#101B3B",
          },
          regions: [
            {
              name: "南海诸岛",
              itemStyle: {
                areaColor: "#101B3B",
                borderColor: "#101B3B",
                opacity: 0,
                label: {
                  show: false,
                  color: "#009cc9",
                },
              },
              label: {
                show: false,
                color: "#FFFFFF",
                fontSize: 12,
              },
            },
          ],
        },
        series: [
          {
            type: "map",
            selectedMode: "single",
            map: "china",
            aspectScale: 0.8,
            layoutCenter: ["40%", "50%"], //地图位置
            layoutSize: "100%",
            zoom: 1, //当前视角的缩放比例
            label: {
              show: true,
              color: "#87B8DD",
              fontSize: 12,
            },

            itemStyle: {
              // 渲染背景图片
              areaColor: {
                image: mapTexture,
                repeat: "repeat",
              },
              borderColor: "#ADD0ED",
              borderWidth: 1.2,
              shadowColor: "rgba(255, 255, 255, 0.4)", // 设置阴影颜色,带有透明度
              shadowBlur: 15, // 设置阴影的模糊大小
              shadowOffsetX: 2, // 设置阴影在 X 轴方向上的偏移
              shadowOffsetY: 2, // 设置阴影在 Y 轴方向上的偏移
            },
            emphasis: {
              //区域
              areaColor: "#ffeb3b", // 高亮时的颜色
              itemStyle: {
                areaColor: "#1785BF",
              },
              label: {
                show: true,
                color: "#fff",
              },
            },
          },
        ],
      };

      const el = document.getElementById("china");
      this.chart = this.$echarts.init(el);
      this.chart.setOption(this.options);

    },
  },
  mounted() {
    this.initMap();
  },
};
</script>


 1314
1314


 被折叠的 条评论
为什么被折叠?
被折叠的 条评论
为什么被折叠?
 到【灌水乐园】发言


