


需求
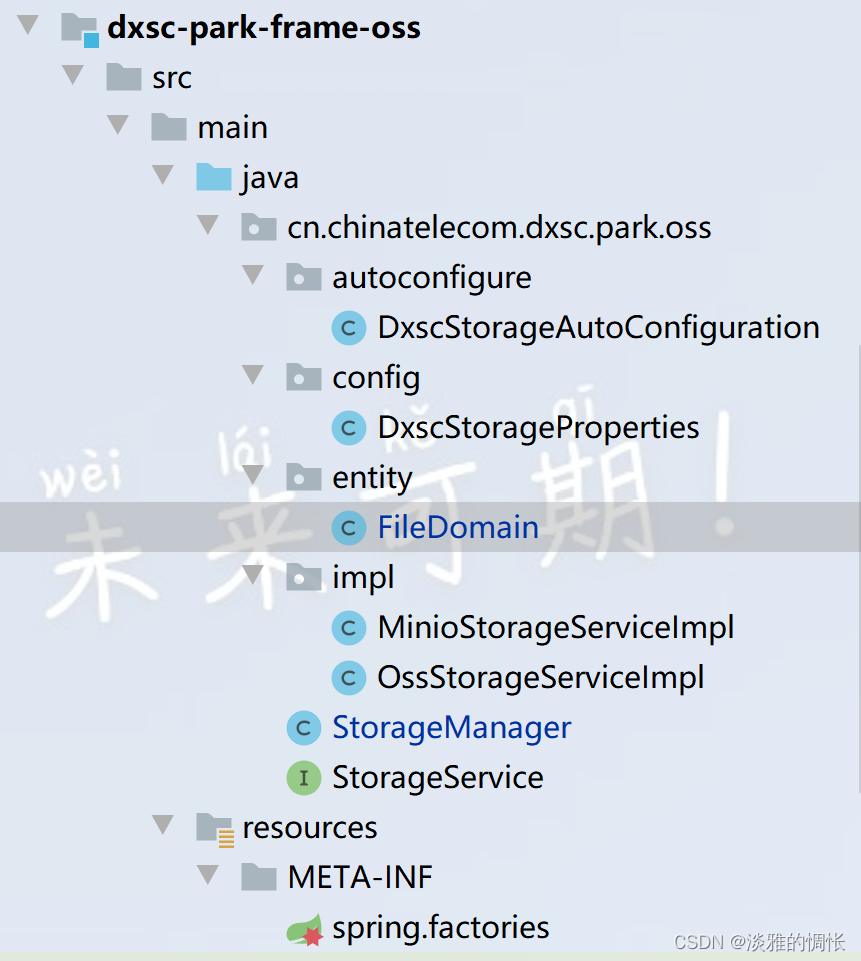
要实现的功能是:实现一个可以支持minio+oss两种方式,上传下载文件的自定义依赖。其中还包括一些创建桶、删除桶、删除文件等功能,但是最主要的是实现自动配置。
如果对spring理解很深的话,自动配置这些东西很容易理解,但是对于技术小白来讲只能按葫芦画瓢。
首先,StorageManager是我的自定义依赖对外提供的要注入spring的对象,其中的方法是对外提供的方法,方法返回的是StorageService接口。
package cn.chinatelecom.dxsc.park.oss;

import cn.chinatelecom.dxsc.park.oss.entity.FileDomain;
import org.slf4j.Logger;
import org.slf4j.LoggerFactory;
import org.springframework.web.multipart.MultipartFile;

import java.io.IOException;
import java.io.InputStream;
import java.time.LocalDate;
import java.time.format.DateTimeFormatter;
import java.util.UUID;

public class StorageManager {

    private static final Logger log = LoggerFactory.getLogger(StorageManager.class);

    private final StorageService storageService;

    public StorageManager(StorageService storageService) {
        this.storageService = storageService;
    }

    /**
     * 创建存储桶
     *
     * @param bucketName 桶名称
     */
    public void createBucket(String bucketName) {
        storageService.createBucket(bucketName);
    }

    /**
     * 删除桶
     * @param bucketName 桶名称
     * @return
     */
    public Boolean removeBucket(String bucketName) {
        Boolean removeBucket = storageService.removeBucket(bucketName);
        return removeBucket;
    }

    /**
     * 删除文件
     * @param fileName
     * @return
     */
    public Boolean remove(String fileName){
        return storageService.remove(fileName);
    }

    /**
     * 下载文件
     *
     * @param filePath 文件路径
     * @return 文件流
     */
    public InputStream getObject(String filePath) {
        return storageService.getObject(filePath);
    }


    /**
     * 上传文件
     * @param file
     * @return
     */
    public FileDomain saveFile(MultipartFile file) {
        FileDomain result = new FileDomain();
        try {
            InputStream in = file.getInputStream();
            long size = file.getSize();
            String contentType = file.getContentType();
            String fileName = generateName(file.getOriginalFilename());
            String filePath = generateKey(fileName);
            String url = storageService.saveFile(in, size, contentType, filePath);
            result.setSize(size);
            result.setUrl(url);
            result.setKey(filePath);
            result.setType(contentType);
        } catch (IOException e) {
            log.error("保存文件失败", e);
            throw new RuntimeException(e);
        }
        return result;
    }

    private String generateName(String originalFilename) {
        return UUID.randomUUID().toString().replace("-", "")  + originalFilename.substring(originalFilename.lastIndexOf("."));
    }

    private String generateKey(String fileName) {
    // 2022-10/24/b4c9106e3f574a61841ce4624494f0cc.jpg  在删除和下载文件时需要传入路径才可以删除和下载
        return LocalDate.now().format(DateTimeFormatter.ofPattern("yyyy-MM/dd")) + "/" + fileName;
    }

}
StorageService接口定义:
package cn.chinatelecom.dxsc.park.oss;

import io.minio.errors.*;

import java.io.IOException;
import java.io.InputStream;
import java.security.InvalidKeyException;
import java.security.NoSuchAlgorithmException;

public interface StorageService {

    /**
     * 创建存储桶
     * @param bucketName 桶名称
     */
    void createBucket(String bucketName);

    /**
     * 存储文件
     * @param inputStream 文件流
     * @param fileSize 文件大小
     * @param contentType 文件类型
     * @param keyName 文件名及路径
     */
    String saveFile(InputStream inputStream, long fileSize, String contentType, String keyName);


    /**
     * 下载文件
     * @param filePath 文件路径
     * @return
     */
    InputStream getObject(String filePath);

    /**
     * 删除文件
     * @param fileName
     * @return
     */
    Boolean remove(String fileName);

    /**
     * 删除桶
     * @param bucketName 桶名称
     * @return
     */
    Boolean removeBucket(String bucketName);
}
FileDomain是上传文件时返回的对象,其中包括文件url,文件在服务器的存储路径,文件类型、大小等等可以自己定义,这里没有使用@Data注解而是手写get和set方法,没有引入Lombok依赖是因为在实现自定义依赖的时候,尽量能不引入依赖就不引入依赖。如果你在自定义依赖里面引入版本2.0的Lombok,但是当别人引用你的依赖的时候,同时也引用的1.0的Lombok,这样就会出现最让人头疼的版本冲突问题,为了避免这种问题出现,尽量不要在底层引用过多依赖。
package cn.chinatelecom.dxsc.park.oss.entity;

public class FileDomain {

    /**
     * 路径名称
     */
    private String key;
    /**
     * 文件url
     */
    private String url;

    /**
     * 文件类型(contentType)
     */
    private String type;
    /**
     * 文件大小
     */
    private Long size;

    public String getKey() {
        return key;
    }

    public void setKey(String key) {
        this.key = key;
    }

    public String getUrl() {
        return url;
    }

    public void setUrl(String url) {
        this.url = url;
    }

    public String getType() {
        return type;
    }

    public void setType(String type) {
        this.type = type;
    }

    public Long getSize() {
        return size;
    }

    public void setSize(Long size) {
        this.size = size;
    }
}
接下来是自动配置的相关代码
DxscStorageProperties是需要配置的一些属性,比如accessKey以及accessSecret等等。
@ConfigurationProperties注解,在 SpringBoot 中,当想需要获取到配置文件数据时,除了可以用 Spring 自带的 @Value 注解外,SpringBoot 还提供了一种更加方便的方式:@ConfigurationProperties。只要在 Bean 上添加上了这个注解,指定好配置文件的前缀,那么对应的配置文件数据就会自动填充到 Bean 中。
package cn.chinatelecom.dxsc.park.oss.config;

import org.springframework.boot.context.properties.ConfigurationProperties;

@ConfigurationProperties(prefix = "dxsc.storage")
public class DxscStorageProperties {

    /**
     * 激活哪种存储
     */
    private String active;

    /**
     * oss地址
     */
    private String endpoint;
    /**
     * 桶名称
     */
    private String bucketName;

    private String accessKey;

    private String accessSecret;


    public String getActive() {
        return active;
    }

    public void setActive(String active) {
        this.active = active;
    }

    public String getEndpoint() {
        return endpoint;
    }

    public void setEndpoint(String endpoint) {
        this.endpoint = endpoint;
    }

    public String getBucketName() {
        return bucketName;
    }

    public void setBucketName(String bucketName) {
        this.bucketName = bucketName;
    }

    public String getAccessKey() {
        return accessKey;
    }

    public void setAccessKey(String accessKey) {
        this.accessKey = accessKey;
    }

    public String getAccessSecret() {
        return accessSecret;
    }

    public void setAccessSecret(String accessSecret) {
        this.accessSecret = accessSecret;
    }

}
接下来的代码才是重中之重DxscStorageAutoConfiguration,此类将DxscStorageProperties注入到spring中,Spring Boot 会扫描到类路径下的META-INF/spring.factories配置文件,把DxscStorageAutoConfiguration对应的的Bean值添加到容器中。
package cn.chinatelecom.dxsc.park.oss.autoconfigure;

import cn.chinatelecom.dxsc.park.oss.StorageManager;
import cn.chinatelecom.dxsc.park.oss.StorageService;
import cn.chinatelecom.dxsc.park.oss.config.DxscStorageProperties;
import cn.chinatelecom.dxsc.park.oss.impl.MinioStorageServiceImpl;
import cn.chinatelecom.dxsc.park.oss.impl.OssStorageServiceImpl;
import org.springframework.beans.factory.annotation.Autowired;
import org.springframework.boot.autoconfigure.condition.ConditionalOnProperty;
import org.springframework.boot.context.properties.EnableConfigurationProperties;
import org.springframework.context.annotation.Bean;
import org.springframework.context.annotation.Configuration;

@EnableConfigurationProperties(DxscStorageProperties.class)
@Configuration
public class DxscStorageAutoConfiguration {

    @Autowired
    private DxscStorageProperties dxscStorageProperties;


    @Bean
    public StorageManager storageManager(StorageService storageService) {
        return new StorageManager(storageService);
    }

    @Bean
    @ConditionalOnProperty(prefix = "dxsc.storage", value = "active", havingValue = "minio")
    public StorageService minioService() {
        return new MinioStorageServiceImpl(dxscStorageProperties);
    }
//prefix为前缀,value为选择哪个属性,havingValue就是启用哪种方式,当active属性为minio时就调用上面的,oss就调用下面的,
//大概就是这个意思
    @Bean
    @ConditionalOnProperty(prefix = "dxsc.storage", value = "active", havingValue = "oss")
    public StorageService OssService() {
        return new OssStorageServiceImpl(dxscStorageProperties);
    }


}
spring.factories文件:
org.springframework.boot.autoconfigure.EnableAutoConfiguration=\
cn.chinatelecom.dxsc.park.oss.autoconfigure.DxscStorageAutoConfiguration
其中MinioStorageServiceImpl和OssStorageServiceImpl就是实现的文件上传下载的接口,再此展示minion的接口:
oss接口可以查看官方文档,其中写得很清楚。
package cn.chinatelecom.dxsc.park.oss.impl;

import cn.chinatelecom.dxsc.park.oss.StorageService;
import cn.chinatelecom.dxsc.park.oss.config.DxscStorageProperties;
import io.minio.*;
import io.minio.http.Method;

import java.io.InputStream;

public class MinioStorageServiceImpl implements StorageService {

    private final DxscStorageProperties dxscStorageProperties;

    private final MinioClient minioClient;

    public MinioStorageServiceImpl(DxscStorageProperties dxscStorageProperties) {
        this.dxscStorageProperties =dxscStorageProperties;

        this.minioClient = MinioClient.builder()
                .endpoint(dxscStorageProperties.getEndpoint())
                .credentials(dxscStorageProperties.getAccessKey(), dxscStorageProperties.getAccessSecret())
                .build();
    }


    @Override
    public void createBucket(String bucketName){
        boolean isExist = false;
        // 检查存储桶是否已经存在
        try{
            isExist = minioClient.bucketExists(BucketExistsArgs.builder().bucket(bucketName).build());
            if (!isExist) {
                //创建桶
                minioClient.makeBucket(MakeBucketArgs.builder()
                        .bucket(bucketName)
                        .build());
                minioClient.setBucketPolicy(
                        SetBucketPolicyArgs.builder().bucket(bucketName)
                                .config(
                                        "{\"Version\":\"2023-2-20\",\"Statement\":[]}"
                                )
                                .build());
            }
        }catch (Exception e){
            throw new RuntimeException(e);
        }
    }

    @Override
    public String saveFile(InputStream inputStream, long fileSize, String contentType, String keyName) {
       try {
            PutObjectArgs objectArgs = PutObjectArgs.builder().bucket(dxscStorageProperties.getBucketName()).object(keyName)
                    .stream(inputStream, fileSize, -1).contentType(contentType).build();
            //文件名称相同会覆盖
            minioClient.putObject(objectArgs);
           // 查看文件地址
           GetPresignedObjectUrlArgs build = new GetPresignedObjectUrlArgs().builder().bucket(dxscStorageProperties.getBucketName()).object(keyName).method(Method.GET).build();
           try {
               return minioClient.getPresignedObjectUrl(build);
           } catch (Exception e) {
               throw new RuntimeException(e);
           }
        } catch (Exception e) {
            throw new RuntimeException(e);
        }
    }

    @Override
    public InputStream getObject(String filePath) {
        try{
            GetObjectArgs objectArgs = GetObjectArgs.builder().bucket(dxscStorageProperties.getBucketName())
                .object(filePath).build();
            return minioClient.getObject(objectArgs);
        }catch (Exception e){
            System.out.println("下载失败");
            throw new RuntimeException(e);
        }
    }

    @Override
    public Boolean remove(String fileName) {
        try {
            minioClient.removeObject(RemoveObjectArgs.builder().bucket(dxscStorageProperties.getBucketName()).object(fileName).build());
        } catch (Exception e) {
            return false;
        }
        return true;
    }

    @Override
    public Boolean removeBucket(String bucketName) {
        try {//在删除桶时,需要注意一下不能删除自身,当你的配置文件里的bucketName的test时还要删除test,是不能删除成功的
        //bucketName为test1时,删除test,是可以的
            minioClient.removeBucket(RemoveBucketArgs.builder()
                    .bucket(bucketName)
                    .build());
        } catch (Exception e) {
            return false;
        }
        return true;
    }
}
至此,自定义依赖完成,接下来是引用,引用方法为先将自定义依赖上传至本地maven库,然后才可以导入依赖,
		<dependency>
            <artifactId>dxsc-park-frame-oss</artifactId>
            <groupId>cn.chinatelecom</groupId>
            <version>1.0.0-SNAPSHOT</version>
        </dependency>
然后,配置minio或者oss的accessKey和accessSecret等属性:
(active为minio就是通过minion方式实现文件上传下载)
dxsc:
  storage:
    active: minio
    endpoint: http://***.168.30.27:9000
    bucketName: dxsc-park
    accessKey: minioadmin
    accessSecret: minioadmin
#  storage:
#    active: oss
#    endpoint: https://oss-cn-beijing.aliyuncs.com
#    bucketName: dxsc-park
#    accessKey: ***
#    accessSecret: ***
server:
  port: 1101
最后注入StorageManager,在一开始的时候就说过StorageManager是对外提供的:
package cn.chinatelecom.dxsc.park.test.controller;


import cn.chinatelecom.dxsc.park.oss.StorageManager;
import cn.chinatelecom.dxsc.park.oss.entity.FileDomain;
import org.apache.tomcat.util.http.fileupload.IOUtils;
import org.springframework.beans.factory.annotation.Autowired;
import org.springframework.web.bind.annotation.PostMapping;
import org.springframework.web.bind.annotation.RequestMapping;
import org.springframework.web.bind.annotation.RequestParam;
import org.springframework.web.bind.annotation.RestController;
import org.springframework.web.multipart.MultipartFile;

import javax.servlet.http.HttpServletResponse;
import java.io.IOException;
import java.io.InputStream;

@RestController
@RequestMapping("/minio")
public class TestController {

    @Autowired
    private StorageManager storageManager;

    @PostMapping("/createBucket")
    public void createBucket(@RequestParam("bucketName") String bucketName){
        storageManager.createBucket(bucketName);
    }

    @PostMapping("/removeBucket")
    public void removeBucket(@RequestParam("bucketName") String bucketName){
        storageManager.removeBucket(bucketName);
    }

    @PostMapping("/upload")
    public String upload(@RequestParam("file") MultipartFile file){
        FileDomain fileDomain = storageManager.saveFile(file);
        System.out.println(fileDomain.getUrl());
        return fileDomain.getKey();
    }

    @PostMapping("/remove")
    public Boolean remove(@RequestParam("fileName") String fileName){
        Boolean remove = storageManager.remove(fileName);
        return remove;
    }

    @PostMapping("/getObject")
    public void getObject(@RequestParam("filePath") String filePath, HttpServletResponse response) throws IOException {
        InputStream object = storageManager.getObject(filePath);

        response.setContentType("application/octet-stream");
        response.addHeader("Content-Disposition", "attachment;filename=" + "fileName");

        IOUtils.copy(object, response.getOutputStream());
        IOUtils.closeQuietly(object);
    }

}
以上就是我在实现自动配置的全部内容
一个集坚强与自信于一身的菇凉。


 443
443


 被折叠的 条评论
为什么被折叠?
被折叠的 条评论
为什么被折叠?
 到【灌水乐园】发言


