


Models in C++
C++中的模型
One of the most common ways to integrate C++ and QML is through models. A model provides data to a view such as ListViews, GridView, PathViews, and other views which take a model and create an instance of a delegate for each entry in the model. The view is smart enough to only create these instances which are visible or in the cache range. This makes it possible to have large models with tens of thousands of entries but still have a very slick user interface. The delegate acts like a template to be rendered with the model entries data. So in summary: a view renders entries from the model using a delegate as a template. The model is a data provider for views.
集成C++和QML最常用的方法之一是通过模型。模型向视图提供数据,例如ListView、GridView、PathView和其他视图,这些视图采用模型并为模型中的每个条目创建委托实例。该视图足够智能,只能创建可见或在缓存范围内的这些实例。这使得拥有数以万计条目的大型模型成为可能,但仍然有一个非常流畅的用户界面。委托的作用类似于要使用模型条目数据呈现的模板。总之:视图使用委托作为模板呈现模型中的条目。该模型是视图的数据提供者。
When you do not want to use C++ you can also define models in pure QML. You have several ways to provide a model for the view. For handling of data coming from C++ or a large amount of data, the C++ model is more suitable than this pure QML approach. But often you only need a few entries then these QML models are well suited.
当你不想使用C++时,你也可以在纯QML中定义模型。有几种方法可以为视图提供模型。为了处理来自C++或大量数据的数据,C++模型比这种纯QML方法更适合。但通常只需要几个条目,这些QML模型就非常适合了。
ListView {
    // using a integer as model
    model: 5
    delegate: Text { text: 'index: ' + index }
}

ListView {
    // using a JS array as model
    model: ['A', 'B', 'C', 'D', 'E']
    delegate: Text { 'Char['+ index +']: ' + modelData }
}

ListView {
    // using a dynamic QML ListModel as model
    model: ListModel {
        ListElement { char: 'A' }
        ListElement { char: 'B' }
        ListElement { char: 'C' }
        ListElement { char: 'D' }
        ListElement { char: 'E' }
    }
    delegate: Text { 'Char['+ index +']: ' + model.char }
}
The QML views know how to handle these different types of models. For models coming from the C++ world, the view expects a specific protocol to be followed. This protocol is defined in the API defined in QAbstractItemModel, together with documentation describing the dynamic behavior. The API was developed for driving views in the desktop widget world and is flexible enough to act as a base for trees, or multi-column tables as well as lists. In QML, we usually use either the list variant of the API, QAbstractListModel or, for the TableView element, the table variant of the API, QAbstractTableModel. The API contains some functions that have to be implemented and some optional ones that extend the capabilities of the model. The optional parts mostly handle the dynamic use cases for changing, adding or deleting data.
QML视图知道如何处理这些不同类型的模型。对于来自C++世界的模型,视图期望遵循特定的协议。该协议在QAbstracteModel中定义的API中定义,以及描述动态行为的文档。API是为驱动桌面窗体世界中的视图而开发的,它足够灵活,可以作为树、多列表和列表的基础。在QML中,我们通常使用列表变量的API,QAbstractListModel,或者对于TableView元素类型,使用表变量的API,QAbstractTableModel。API包含一些必须实现的函数和一些扩展模型功能的可选函数。可选部分主要处理更改、添加或删除数据的动态用例。
A simple model
一个简单的模型
A typical QML C++ model derives from QAbstractListModel and implements at least the data and rowCount function. In the example below, we will use a series of SVG color names provided by the QColor class and display them using our model. The data is stored into a QList<QString> data container.
一个典型的QML C++模型是从QAbstractListModel中派生出来的,并且至少实现了data和rowCount函数。在下面的示例中,我们将使用QColor类提供的一系列SVG颜色名称,并使用我们的模型显示它们。数据存储在QList<QString>数据容器中。
Our DataEntryModel is derived form QAbstractListModel and implements the mandatory functions. We can ignore the parent in rowCount as this is only used in a tree model. The QModelIndex class provides the row and column information for the cell, for which the view wants to retrieve data. The view is pulling information from the model on a row/column and role-based. The QAbstractListModel is defined in QtCore but QColor in QtGui. That is why we have the additional QtGui dependency. For QML applications it is okay to depend on QtGui but it should normally not depend on QtWidgets.
我们的DataEntryModel是从QAbstractListModel派生的,并实现了必需的函数。我们可以忽略rowCount中的父级,因为它仅用于树模型。QModelIndex类为视图想要检索数据的单元格提供行和列信息。视图以行/列和基于角色的方式从模型中提取信息。QAbstractListModel在QtCore中定义,而QColor在QtGui中定义。这就是为什么我们有额外的QtGui依赖。对于QML应用程序,可以依赖QtGui,但通常不应该依赖QTWidget。
#ifndef DATAENTRYMODEL_H
#define DATAENTRYMODEL_H

#include <QtCore>
#include <QtGui>

class DataEntryModel : public QAbstractListModel
{
    Q_OBJECT
public:
    explicit DataEntryModel(QObject *parent = 0);
    ~DataEntryModel();

public: // QAbstractItemModel interface
    virtual int rowCount(const QModelIndex &parent) const;
    virtual QVariant data(const QModelIndex &index, int role) const;
private:
    QList<QString> m_data;
};

#endif // DATAENTRYMODEL_H
On the implementation side, the most complex part is the data function. We first need to make a range check to ensure that we've been provided a valid index. Then we check that the display role is supported. Each item in a model can have multiple display roles defining various aspects of the data contained. The Qt::DisplayRole is the default text role a view will ask for. There is a small set of default roles defined in Qt which can be used, but normally a model will define its own roles for clarity. In the example, all calls which do not contain the display role are ignored at the moment and the default value QVariant() is returned.
在实现方面,最复杂的部分是数据函数。我们首先需要进行范围检查,以确保提供了有效的索引。然后检查是否支持显示角色。模型中的每个项都可以有多个显示角色,定义所包含数据的各个方面。Qt::DisplayRole是视图要求的默认文本角色。Qt中定义了一小部分可以使用的默认角色,但为了清晰起见,模型通常会定义自己的角色。在本例中,此时将忽略所有不包含display角色的调用,并返回默认值QVariant()。
#include "dataentrymodel.h"

DataEntryModel::DataEntryModel(QObject *parent)
    : QAbstractListModel(parent)
{
    // initialize our data (QList<QString>) with a list of color names
    m_data = QColor::colorNames();
}

DataEntryModel::~DataEntryModel()
{
}

int DataEntryModel::rowCount(const QModelIndex &parent) const
{
    Q_UNUSED(parent);
    // return our data count
    return m_data.count();
}

QVariant DataEntryModel::data(const QModelIndex &index, int role) const
{
    // the index returns the requested row and column information.
    // we ignore the column and only use the row information
    int row = index.row();

    // boundary check for the row
    if(row < 0 || row >= m_data.count()) {
        return QVariant();
    }

    // A model can return data for different roles.
    // The default role is the display role.
    // it can be accesses in QML with "model.display"
    switch(role) {
        case Qt::DisplayRole:
            // Return the color name for the particular row
            // Qt automatically converts it to the QVariant type
            return m_data.value(row);
    }

    // The view asked for other data, just return an empty QVariant
    return QVariant();
}
The next step would be to register the model with QML using the qmlRegisterType call. This is done inside the main.cpp before the QML file was loaded.
下一步是使用qmlRegisterType调用向QML注册模型。这是在main.cpp内完成的。加载QML文件之前。
#include <QtGui>
#include <QtQml>

#include "dataentrymodel.h"

int main(int argc, char *argv[])
{
    QGuiApplication app(argc, argv);

    // register the type DataEntryModel
    // under the url "org.example" in version 1.0
    // under the name "DataEntryModel"
    qmlRegisterType<DataEntryModel>("org.example", 1, 0, "DataEntryModel");

    QQmlApplicationEngine engine;
    engine.load(QUrl(QStringLiteral("qrc:/main.qml")));

    return app.exec();
}
Now you can access the DataEntryModel using the QML import statement import org.example 1.0 and use it just like other QML item DataEntryModel {}.
现在,您可以使用QML import语句import org.example 1.0载入DataEntryModel,并像其他QML项一样使用它,DataEntryModel{}。
We use this in this example to display a simple list of color entries.
在本例中,我们使用它来显示颜色条目的简单列表。
import org.example 1.0

ListView {
    id: view
    anchors.fill: parent
    model: DataEntryModel {}
    delegate: ListDelegate {
        // use the defined model role "display"
        text: model.display
    }
    highlight: ListHighlight { }
}
The ListDelegate is a custom type to display some text. The ListHighlight is just a rectangle. The code was extracted to keep the example compact.
ListDelegate是一种用于显示某些文本的自定义类型。ListHighlight只是一个矩形。提取代码是为了保持示例的紧凑性。
The view can now display a list of strings using the C++ model and the display property of the model. It is still very simple, but already usable in QML. Normally the data is provided from outside the model and the model would act as an interface to the view.
视图现在可以使用C++模型、模型的显示属性,显示字符串列表。它仍然非常简单,但已经可以在QML中使用。通常,数据是从模型外部提供的,模型将充当视图的接口。
TIP
注
To expose a table of data instead of a list, the
QAbstractTableModelis used. The only difference compared to implementing aQAbstractListModelis that you must also provide thecolumnCountmethod.要暴露数据表而不是列表,可以使用QAbstractTableModel。与实现QAbstractListModel相比,唯一的区别在于还必须提供columnCount方法。
More Complex Data
更多复杂数据
In reality, the model data is often much more complex. So there is a need to define custom roles so that the view can query other data via properties. For example, the model could provide not only the color as a hex string but maybe also the hue, saturation, and brightness from the HSV color model as “model.hue”, “model.saturation” and “model.brightness” in QML.
实际上,模型数据往往要复杂得多。因此,需要定义自定义角色,以便视图可以通过属性查询其他数据。例如,该模型不仅可以提供十六进制字符串形式的颜色,还可以提供HSV颜色模型中的色调、饱和度和亮度,如QML中的“model.hue”、“model.saturation”和“model.brightness”。
#ifndef ROLEENTRYMODEL_H
#define ROLEENTRYMODEL_H

#include <QtCore>
#include <QtGui>

class RoleEntryModel : public QAbstractListModel
{
    Q_OBJECT
public:
    // Define the role names to be used
    enum RoleNames {
        NameRole = Qt::UserRole,
        HueRole = Qt::UserRole+2,
        SaturationRole = Qt::UserRole+3,
        BrightnessRole = Qt::UserRole+4
    };

    explicit RoleEntryModel(QObject *parent = 0);
    ~RoleEntryModel();

    // QAbstractItemModel interface
public:
    virtual int rowCount(const QModelIndex &parent) const override;
    virtual QVariant data(const QModelIndex &index, int role) const override;
protected:
    // return the roles mapping to be used by QML
    virtual QHash<int, QByteArray> roleNames() const override;
private:
    QList<QColor> m_data;
    QHash<int, QByteArray> m_roleNames;
};

#endif // ROLEENTRYMODEL_H
In the header, we added the role mapping to be used for QML. When QML tries now to access a property from the model (e.g. “model.name”) the listview will lookup the mapping for “name” and ask the model for data using the NameRole. User-defined roles should start with Qt::UserRole and need to be unique for each model.
在头文件中,我们添加了用于QML的角色映射。当QML现在尝试从模型(例如“model.name”)访问属性时,listview将查找“name”的映射,并使用NameRole请求模型提供数据。用户定义的角色应该以Qt::UserRole开头,并且对于每个模型都必须是唯一的。
#include "roleentrymodel.h"

RoleEntryModel::RoleEntryModel(QObject *parent)
    : QAbstractListModel(parent)
{
    // Set names to the role name hash container (QHash<int, QByteArray>)
    // model.name, model.hue, model.saturation, model.brightness
    m_roleNames[NameRole] = "name";
    m_roleNames[HueRole] = "hue";
    m_roleNames[SaturationRole] = "saturation";
    m_roleNames[BrightnessRole] = "brightness";

    // Append the color names as QColor to the data list (QList<QColor>)
    for(const QString& name : QColor::colorNames()) {
        m_data.append(QColor(name));
    }

}

RoleEntryModel::~RoleEntryModel()
{
}

int RoleEntryModel::rowCount(const QModelIndex &parent) const
{
    Q_UNUSED(parent);
    return m_data.count();
}

QVariant RoleEntryModel::data(const QModelIndex &index, int role) const
{
    int row = index.row();
    if(row < 0 || row >= m_data.count()) {
        return QVariant();
    }
    const QColor& color = m_data.at(row);
    qDebug() << row << role << color;
    switch(role) {
    case NameRole:
        // return the color name as hex string (model.name)
        return color.name();
    case HueRole:
        // return the hue of the color (model.hue)
        return color.hueF();
    case SaturationRole:
        // return the saturation of the color (model.saturation)
        return color.saturationF();
    case BrightnessRole:
        // return the brightness of the color (model.brightness)
        return color.lightnessF();
    }
    return QVariant();
}

QHash<int, QByteArray> RoleEntryModel::roleNames() const
{
    return m_roleNames;
}
The implementation now has changed only in two places. First in the initialization. We now initialize the data list with QColor data types. Additionally, we define our role name map to be accessible for QML. This map is returned later in the ::roleNames function.
现在的实施只在两个地方发生了变化。首先是初始化。现在我们用QColor数据类型初始化数据列表。此外,我们将角色名称映射定义为可供QML访问。该映射稍后在::roleNames函数中返回。
The second change is in the ::data function. We extend the switch to cover the other roles (e.g hue, saturation, brightness). There is no way to return an SVG name from a color, as a color can take any color and SVG names are limited. So we skip this. Storing the names would require to create a structure struct { QColor, QString } to be able to identify the named color.
第二个变化是::data函数。我们将开关扩展到其他角色(例如色调、饱和度、亮度)。无法从颜色返回SVG名称,因为颜色可以采用任何颜色,并且SVG名称受到限制。所以我们跳过这个。存储这些名称需要创建一个结构struct{QColor,QString},以便能够识别命名的颜色。
After registering the type we can use the model and its entries in our user interface.
注册类型后,我们可以在用户界面中使用模型及其条目。
ListView {
    id: view
    anchors.fill: parent
    model: RoleEntryModel {}
    focus: true
    delegate: ListDelegate {
        text: 'hsv(' +
              Number(model.hue).toFixed(2) + ',' +
              Number(model.saturation).toFixed() + ',' +
              Number(model.brightness).toFixed() + ')'
        color: model.name
    }
    highlight: ListHighlight { }
}
We convert the returned type to a JS number type to be able to format the number using fixed-point notation. The code would also work without the Number call (e.g. plain model.saturation.toFixed(2)). Which format to choose, depends how much you trust the incoming data.
我们将返回的类型转换为JS数字类型,以便能够使用定点表示法格式化数字。代码也可以在没有数字调用的情况下工作(例如,model.saturation.toFixed(2))。选择哪种格式取决于您对传入数据的信任程度。
Dynamic Data
动态数据
Dynamic data covers the aspects of inserting, removing and clearing the data from the model. The QAbstractListModel expect a certain behavior when entries are removed or inserted. The behavior is expressed in signals which need to be called before and after the manipulation. For example to insert a row into a model you need first to emit the signal beginInsertRows, then manipulate the data and then finally emit endInsertRows.
动态数据包括插入、删除和清除模型中的数据。当条目被删除或插入时,QAbstractListModel期望有某种行为。该行为以信号形式表达,需要在操作前后发出这些信号。例如,要在模型中插入行,首先需要发出信号beginInsertRows,然后操纵数据,最后发出endInsertRows。
We will add the following functions to our headers. These functions are declared using Q_INVOKABLE to be able to call them from QML. Another way would be to declare them as public slots.
我们将在头文件中添加以下函数。这些函数是使用Q_INVOKABLE声明的,以便能够从QML调用它们。另一种方法是将它们声明为公有槽。
// inserts a color at the index (0 at begining, count-1 at end)
Q_INVOKABLE void insert(int index, const QString& colorValue);
// uses insert to insert a color at the end
Q_INVOKABLE void append(const QString& colorValue);
// removes a color from the index
Q_INVOKABLE void remove(int index);
// clear the whole model (e.g. reset)
Q_INVOKABLE void clear();
Additionally, we define a count property to get the size of the model and a get method to get a color at the given index. This is useful when you would like to iterate over the model content from QML.
此外,我们还定义了一个count属性来获取模型的大小,以及一个get方法来获取给定索引处的颜色。当您想从QML迭代模型内容时,这很有用。
// gives the size of the model
Q_PROPERTY(int count READ count NOTIFY countChanged)
// gets a color at the index
Q_INVOKABLE QColor get(int index);
The implementation for insert checks first the boundaries and if the given value is valid. Only then do we begin inserting the data.
insert的实现首先检查边界,以及给定的值是否有效。只有到那时,我们才开始插入数据。
void DynamicEntryModel::insert(int index, const QString &colorValue)
{
    if(index < 0 || index > m_data.count()) {
        return;
    }
    QColor color(colorValue);
    if(!color.isValid()) {
        return;
    }
    // view protocol (begin => manipulate => end]
    emit beginInsertRows(QModelIndex(), index, index);
    m_data.insert(index, color);
    emit endInsertRows();
    // update our count property
    emit countChanged(m_data.count());
}
Append is very simple. We reuse the insert function with the size of the model.
append函数很简单。我们根据模型的大小重用插入函数。
void DynamicEntryModel::append(const QString &colorValue)
{
    insert(count(), colorValue);
}
Remove is similar to insert but it calls according to the remove operation protocol.
remove与insert类似,但它根据remove操作协议进行调用。
void DynamicEntryModel::remove(int index)
{
    if(index < 0 || index >= m_data.count()) {
        return;
    }
    emit beginRemoveRows(QModelIndex(), index, index);
    m_data.removeAt(index);
    emit endRemoveRows();
    // do not forget to update our count property
    emit countChanged(m_data.count());
}
The helper function count is trivial. It just returns the data count. The get function is also quite simple.
辅助函数计数很小。它只返回数据计数。get函数也很简单。
QColor DynamicEntryModel::get(int index)
{
    if(index < 0 || index >= m_data.count()) {
        return QColor();
    }
    return m_data.at(index);
}
You need to be careful that you only return a value which QML understands. If it is not one of the basic QML types or types known to QML you need to register the type first with qmlRegisterType or qmlRegisterUncreatableType. You use qmlRegisterUncreatableType if the user shall not be able to instantiate its own object in QML.
您需要小心,只返回QML理解的值。如果它不是基本QML类型或QML已知的类型之一,则需要首先使用qmlRegisterType或qmlRegisterUncreatableType注册该类型。如果用户不能在QML中实例化自己的对象,则使用qmlRegisterUncreatableType。
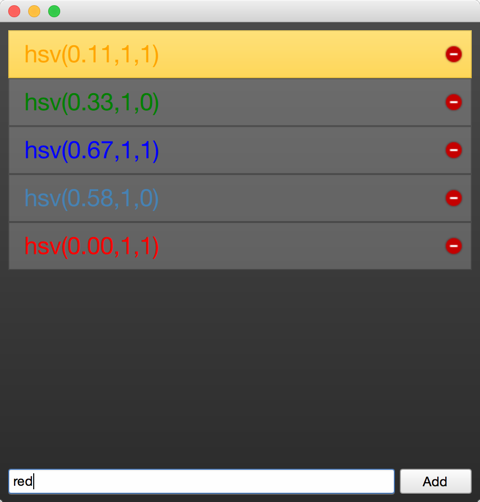
Now you can use the model in QML and insert, append, remove entries from the model. Here is a small example which allows the user to enter a color name or color hex value and the color is then appended onto the model and shown in the list view. The red circle on the delegate allows the user to remove this entry from the model. After the entry is to remove the list view is notified by the model and updates its content.
现在,您可以在QML中使用模型,并从模型中插入、附加、删除条目。下面是一个小示例,允许用户输入颜色名称或颜色十六进制值,然后将颜色附加到模型上,并显示在列表视图中。委托上的红色圆圈允许用户从模型中删除此条目。删除条目后,模型会通知列表视图并更新其内容。
And here is the QML code. You find the full source code also in the assets for this chapter. The example uses the QtQuick.Controls and QtQuick.Layout module to make the code more compact. These controls module provides a set of desktop related UI elements in Qt Quick and the layouts module provides some very useful layout managers.
这是QML代码。您可以在本章的资产中找到完整的源代码。该示例使用QtQuick.Controls和QtQuick.Layout模块,使代码更加紧凑。这些控制模块在Qt Quick中提供了一组与桌面相关的UI元素,而布局模块提供了一些非常有用的布局管理器。
import QtQuick 2.5
import QtQuick.Window 2.2
import QtQuick.Controls 1.5
import QtQuick.Layouts 1.2

// our module
import org.example 1.0

Window {
    visible: true
    width: 480
    height: 480


    Background { // a dark background
        id: background
    }

    // our dyanmic model
    DynamicEntryModel {
        id: dynamic
        onCountChanged: {
            // we print out count and the last entry when count is changing
            print('new count: ' + count);
            print('last entry: ' + get(count-1));
        }
    }

    ColumnLayout {
        anchors.fill: parent
        anchors.margins: 8
        ScrollView {
            Layout.fillHeight: true
            Layout.fillWidth: true
            ListView {
                id: view
                // set our dynamic model to the views model property
                model: dynamic
                delegate: ListDelegate {
                    width: ListView.view.width
                    // construct a string based on the models proeprties
                    text: 'hsv(' +
                          Number(model.hue).toFixed(2) + ',' +
                          Number(model.saturation).toFixed() + ',' +
                          Number(model.brightness).toFixed() + ')'
                    // sets the font color of our custom delegates
                    color: model.name

                    onClicked: {
                        // make this delegate the current item
                        view.currentIndex = index
                        view.focus = true
                    }
                    onRemove: {
                        // remove the current entry from the model
                        dynamic.remove(index)
                    }
                }
                highlight: ListHighlight { }
                // some fun with transitions :-)
                add: Transition {
                    // applied when entry is added
                    NumberAnimation {
                        properties: "x"; from: -view.width;
                        duration: 250; easing.type: Easing.InCirc
                    }
                    NumberAnimation { properties: "y"; from: view.height;
                        duration: 250; easing.type: Easing.InCirc
                    }
                }
                remove: Transition {
                    // applied when entry is removed
                    NumberAnimation {
                        properties: "x"; to: view.width;
                        duration: 250; easing.type: Easing.InBounce
                    }
                }
                displaced: Transition {
                    // applied when entry is moved
                    // (e.g because another element was removed)
                    SequentialAnimation {
                        // wait until remove has finished
                        PauseAnimation { duration: 250 }
                        NumberAnimation { properties: "y"; duration: 75
                        }
                    }
                }
            }
        }
        TextEntry {
            id: textEntry
            onAppend: {
                // called when the user presses return on the text field
                // or clicks the add button
                dynamic.append(color)
            }

            onUp: {
                // called when the user presses up while the text field is focused
                view.decrementCurrentIndex()
            }
            onDown: {
                // same for down
                view.incrementCurrentIndex()
            }

        }
    }
}
Model view programming is one of the more complex development tasks in Qt. It is one of the very few classes where you have to implement an interface as a normal application developer. All other classes you just use normally. The sketching of models should always start on the QML side. You should envision how your users would use your model inside QML. For this, it is often a good idea to create a prototype first using the ListModel to see how this best works in QML. This is also true when it comes to defining QML APIs. Making data available from C++ to QML is not only a technology boundary it is also a programming paradigm change from imperative to declarative style programming. So be prepared for some setbacks and aha moments:-).
模型视图编程是Qt中更复杂的开发任务之一。作为一名普通的应用程序开发人员,它是为数不多的几个必须实现接口的类之一。所有其他的类正常使用。模型的概述应始终从QML侧开始。您应该设想用户将如何在QML中使用您的模型。为此,首先使用ListModel创建一个原型通常是一个好主意,以了解它在QML中的最佳工作方式。在定义QML API时也是如此。使数据从C++到QML不仅是技术边界,而且也是从命令到声明式编程的编程范式的改变。所以要为一些挫折和aha时刻做好准备:-)。
示例源码下载


 611
611


 被折叠的 条评论
为什么被折叠?
被折叠的 条评论
为什么被折叠?
 到【灌水乐园】发言


