


Qt Quick 3D Architecture
Qt Quick 3D架构
Qt Quick 3D extends Qt Quick to support the rendering of 3D content. It adds extensive functionality, including several new public QML imports, as well as a new internal scene graph and renderer. This document describes the architecture of Qt Quick 3D from the public API to the details of how the rendering pipeline works.
Qt Quick 3D扩展了Qt Quick以支持3D内容的渲染。它添加了广泛的功能,包括几个新的公共QML导入,以及一个新的内部场景图和渲染器。本文档描述了从公共API到渲染管道如何工作的详细信息的Qt Quick 3D架构。
Module Overview
模块概述
Qt Quick 3D consists of several modules and plugins that expose the additional 3D APIs as well as utilities for conditioning and importing existing 3D assets.
Qt Quick 3D由几个模块和插件组成,这些模块和插件公开了额外的3D API以及用于调节和导入现有3D资产的实用程序。
QML Imports
QML导入
- QtQuick3D - The main import which contains all the core components of Qt Quick 3D
- QtQuick3D-主导入,包含Qt Quick 3D的所有核心组件
- QtQuick3D.AssetUtils - A library for importing 3D assets at runtime
- QtQuick3D.AssetTils-用于在运行时导入三维资源的库
- QtQuick3D.Helpers - A library of additional components which can be used to help design 3D and debug 3D scenes.
- QtQuick3D.Helpers-一个附加组件库,可用于帮助设计3D和调试3D场景。
C++ Libraries
C++库
- QtQuick3D - The only public C++ module. Contains the definitions of all types exposed to the QtQuick3D QML import as well as a few C++ APIs
QtQuick3D-唯一的公共C++模块。包含暴露于QtQuick3D QML导入的所有类型的定义以及一些C++API- QQuick3DGeometry - Subclass to create procedural mesh data
- QQuick3DGeometry-用于创建程序网格数据的子类
- QQuick3DTextureData - Subclass to create procedural texture data
- QQuick3DTextureData-用于创建程序纹理数据的子类
- QQuick3D::idealSurfaceFormat - used to get the ideal surface format
- QQuick3D::idealSurfaceFormat-用于获得理想的曲面格式
QtQuick3DAssetImport- An internal and private library to aid in importing assets and convert assets to QML.- QtQuick3DAssetImport-一个内部和私有库,用于帮助导入资产并将资产转换为QML。
QtQuick3DRuntimeRender- An internal and private library that contains the spatial scene graph nodes and renderer.- QtQuick3DRuntimeRender-一个内部和专用库,包含空间场景图节点和渲染器。
QtQuick3DUtils- An internal and private library used as a common utility library by all of the other C++ modules.- QtQuick3DUtils-一个内部和私有库,被所有其他C++模块用作公共实用程序库。
AssetImporters Plugins
资产导入器插件
The asset import tooling is implemented using a plugin based architecture. The plugins shipped with Qt Quick 3D extend the functionality of the asset importer library and tool, Balsam.
资产导入工具是使用基于插件的体系结构实现的。Qt Quick 3D附带的插件扩展了资产导入程序库和工具Balsam的功能。
- Assimp - This plugin uses the 3rd party library libAssimp to convert 3D assets in 3D interchange formats to Qt Quick 3D QML components.
- Assimp-此插件使用第三方库libAssimp将3D交换格式的3D资产转换为Qt Quick 3D QML组件。
How does Qt Quick 3D fit into the Qt Graphics Stack
Qt Quick 3D如何融入Qt图形堆栈
 The above diagram illustrates how Qt Quick 3D fits into the larger Qt graphics stack. Qt Quick 3D works as an extension to the 2D Qt Quick API, and when using 3D scene items in conjunction with View3D the scene will be rendered via the Qt Rendering Hardware Interface (RHI). The RHI will translate API calls into the correct native rendering hardware API calls for a given platform. The diagram above shows the options available for each platform. If no native backend is explicitly defined, then Qt Quick will default to a sensible native backend for rendering for each platform.
该图说明了Qt Quick 3D如何适应更大的Qt图形堆栈。Qt Quick 3D作为2D Qt Quick API的扩展,当将3D场景项与View3D结合使用时,将通过Qt渲染硬件接口(RHI)渲染场景。RHI将把API调用转换为给定平台的正确本地呈现硬件API调用。上图显示了每个平台的可用选项。如果没有明确定义本机后端,那么Qt Quick将默认为一个合理的本机后端来为每个平台渲染。
The integration between the Qt Quick 3D components of the stack and the Qt Quick stack are described below in the next sections.
堆栈的Qt Quick 3D组件和Qt Quick堆栈之间的集成将在下面的部分中进行描述。
3D in 2D Integration
3D in 2D集成
Displaying 3D content in 2D is the primary purpose of the Qt Quick 3D API. The primary interface for integrating 3D content into 2D is the View3D component.
以2D显示3D内容是Qt Quick 3D API的主要目的。将三维内容集成到二维内容的主要界面是View3D组件。
The View3D component works like any other QQuickItem derived class with content and implements the virtual function QQuickItem::updatePaintNode. Qt Quick calls updatePaintNode for all "dirty" items in the Qt Quick scenegraph during the synchronization phase. This includes the 3D items managed by a View3D, which also undergo their synchronization phase as a result of the updatePaintNode call.
View3D组件与任何其他具有内容的QQuickItem派生类一样工作,并实现虚拟函数QQuickItem::updatePaintNode。在同步阶段,Qt Quick为Qt Quick场景图中的所有“脏”项目调用updatePaintNode。这包括View3D管理的3D项目,这些项目也会由于updatePaintNode调用而经历同步阶段。
The updatePaintNode method of View3D performs the following actions:
View3D的updatePaintNode方法执行以下操作:
- Set up a renderer and render target if one doesn't exist already
- 设置渲染器并渲染目标(如果还不存在)
- Synchronize items in the 3D scene via SceneManager
- 通过SceneManager同步3D场景中的项目
- Update any "dynamic" textures that were rendered by Qt Quick (2D in 3D Texture path below)
- 更新由Qt Quick渲染的任何“动态”纹理(下面的2D in 3D纹理路径)
The rendering of the 3D scene, however, does not occur in the View3D updatePaintNode method. Instead updatePaintNode returns a QSGNode subclass containing the renderer for Qt Quick 3D, which will render the 3D scene during the preprocess phase of the Qt Quick render process.
但是,三维场景的渲染不会出现在View3D updatePaintNode方法中。相反,updatePaintNode返回一个包含Qt Quick 3D渲染器的QSGNode子类,该子类将在Qt Quick渲染过程的预处理阶段渲染3D场景。
The plumbing for how Qt Quick 3D will render depends on which View3D::renderMode is used:
Qt Quick 3D渲染方式的管道取决于使用的View3D::renderMode:
Offscreen
屏幕外
The default mode for View3D is Offscreen. When using offscreen mode View3D becomes a texture provider by creating an offscreen surface and rendering to it. This surface can be mapped as a texture in Qt Quick and rendered with a QSGSimpleTextureNode.
View3D的默认模式为“屏幕外”。使用屏幕外模式时,View3D通过创建屏幕外表面并渲染到该表面而成为纹理提供程序。该表面可以在Qt Quick中映射为纹理,并使用QSGSimpleTextureNode进行渲染。
This pattern is very close to how QSGLayerNodes work already in Qt Quick.
此模式非常接近QSGLayerNodes在Qt Quick中的工作方式。
Underlay
底图
When using the Underlay mode the 3D scene is directly rendered to the QQuickWindow containing the View3D. Rendering occurs as a result of the signal QQuickWindow::beforeRenderPassRecording() which means that everything else in Qt Quick will be rendered on top of the 3D content.
使用参考底图模式时,3D场景将直接渲染到包含View3D的QQuickWindow中。渲染是信号QQuickWindow::beforeRenderPassRecording()的结果,这意味着Qt Quick中的所有其他内容都将在3D内容的顶部进行渲染。
Overlay
叠加
When using the Overlay mode the 3D scene is directly rendered to the QQuickWindow containing the View3D. Rendering occurs as a result of the signal QQuickWindow::afterRenderPassRecording() which means that the 3D content will be rendered on top of all other Qt Quick content.
使用叠加模式时,3D场景将直接渲染到包含View3D的QQuickWindow中。渲染是信号QQuickWindow::afterRenderPassRecording()的结果,这意味着3D内容将在所有其他Qt Quick内容之上进行渲染。
Inline
内联
The Inline render mode uses QSGRenderNode, which enables direct rendering to Qt Quick's render target without using an offscreen surface. It does this by injecting the render commands inline during the 2D rendering of the Qt Quick Scene.
“内联”渲染模式使用QSGRenderNode,它可以在不使用屏幕外曲面的情况下直接渲染到Qt Quick的渲染目标。它通过在Qt Quick场景的2D渲染过程中内联注入渲染命令来实现这一点。
This mode can be problematic because it uses the same depth buffer as the Qt Quick renderer, and z values mean completely different things in Qt Quick vs Qt Quick 3D.
这种模式可能会有问题,因为它使用与Qt Quick渲染器相同的深度缓冲区,而z值在Qt Quick与Qt Quick3D中的含义完全不同。
2D in 3D Integration
2D in 3D集成
When rendering a 3D scene, there are many scenarios where there is a need to embed 2D elements into 3D. There are two different ways to integrate 2D content inside of 3D scenes, each of which has its own path to get to the screen.
在渲染3D场景时,有许多场景需要将2D元素嵌入到3D中。有两种不同的方式将2D内容集成到3D场景中,每种方式都有自己的屏幕路径。
Direct Path
直接路径
The direct path is used to render 2D Qt Quick content as if it existed as an flat item in the 3D scene. For example, consider the following scene definition:
直接路径用于渲染2D Qt Quick内容,就好像它作为平面项目存在于3D场景中一样。例如,请考虑以下场景定义:
Node {
    Text {
        text: "Hello world!"
    }
}
What happens here is: when a child component is set on a spatial node of type QQuickItem, it is first wrapped by a QQuick3DItem2D, which is just a container that adds 3D coordinates to a 2D item. This sets the base 3D transformation for how all further 2D children are rendered so that they appear correctly in the 3D scene.
这里发生的情况是:当在类型为QQuickItem的空间节点上设置子组件时,它首先由QQuick3DItem2D包装,QQuick3DItems2D只是一个将三维坐标添加到二维项目的容器。这将为所有其他2D子对象的渲染方式设置基本3D变换,以便它们在3D场景中正确显示。
When the time comes to render the scene, these 2D items' QSGNodes are passed to the Qt Quick Renderer to generate the appropriate render commands. Because the commands are done inline and take the current 3D transformation into consideration, they are rendered exactly the same as in the 2D renderer, but show up as if they were rendered in 3D.
渲染场景时,这些2D项目的QSGNode将传递给Qt Quick渲染器,以生成适当的渲染命令。由于这些命令是以内联方式执行的,并考虑到当前的三维变换,因此它们的渲染与二维渲染器中的渲染完全相同,但显示时就像在三维中渲染一样。
The drawback of this approach is that no lighting information of the 3D scene can be used to shade the 2D content, because the Qt Quick 2D renderer has no concept of lighting.
这种方法的缺点是3D场景的照明信息不能用于对2D内容进行着色,因为Qt Quick 2D渲染器没有照明的概念。
Texture Path
纹理路径
The texture path uses a 2D Qt Quick scene to create dynamic texture content. Consider the following Texture definition:
纹理路径使用2D Qt Quick场景来创建动态纹理内容。请考虑以下纹理定义:
Texture {
    sourceItem: Item {
        width: 256
        height: 256
        Text {
            anchors.centerIn: parent
            text: "Hello World!"
        }
    }
}
This approach works in the same way that Layer items work in Qt Quick, in that everything is rendered to an offscreen surface the size of the top-level Item, and that offscreen surface is then usable as a texture that can be reused elsewhere.
这种方法的工作方式与“层”项目在“Qt Quick”中的工作方式相同,因为所有内容都渲染到一个与顶级项目大小相同的屏幕外表面,然后该屏幕外表面可用作纹理,可以在其他地方重复使用。
This Texture can then be used by materials in the scene to render Qt Quick content on items.
然后,场景中的材质可以使用该纹理来渲染项目上的Qt Quick内容。
Scene Synchronization
场景同步
Scene Manager
场景管理器
The scene manager in Qt Quick 3D is responsible for keeping track of spatial items in a 3D scene, and for making sure that items are updating their corresponding scene graph nodes during the synchronize phase. In Qt Quick, this role is performed by QQuickWindow for the 2D case. The scene manager is the primary interface between the frontend nodes and the backend scene graph objects.
Qt Quick 3D中的场景管理器负责跟踪3D场景中的空间项目,并确保项目在同步阶段更新其相应的场景图节点。在Qt Quick中,此角色由二维案例的QQuickWindow执行。场景管理器是前端节点和后端场景图对象之间的主要接口。
Each View3D item will have at least one Scene Manager, as one is created and associated with the built-in scene root on construction. When spatial nodes are added as children of the View3D, they are registered with the View3D's scene manager. When using an imported scene, a second SceneManager is created (or referenced if one exists already) to manage the nodes that are not direct children of the View3D. This is needed because, unlike the View3D, an imported scene doesn't exist on a QQuickWindow until it is referenced. The additional SceneManager makes sure that assets belonging to the imported scene are created at least once per QQuickWindow they are referenced in.
每个View3D项目将至少有一个“场景管理器”,因为其中一个已创建并与构建时的内置场景根相关联。将空间节点添加为View3D的子节点时,它们将在View3D的场景管理器中注册。使用导入的场景时,会创建第二个场景管理器(如果已经存在,则会引用),以管理不是View3D直接子级的节点。之所以需要这样做,是因为与View3D不同,导入的场景在被引用之前不会存在于QQuickWindow上。附加的SceneManager确保属于导入场景的资源在每个引用的QQuickWindow中至少创建一次。
While the scene manager is an internal API, it is important to know that the scene manager is responsible for calling updateSpatialNode on all objects that have been marked dirty by calling the update() method.
虽然场景管理器是内部API,但重要的是要知道场景管理器负责通过调用update()方法对所有已标记为脏的对象调用updateSpatialNode。
Frontend/Backend Synchronization
前端/后端同步
The objective of synchronization is to make sure that the states set on the frontend (Qt Quick) match what is set on the backend (Qt Quick Spatial Scene Graph Renderer). By default the frontend and backend live in separate threads: the frontend in the Qt Main thread, and the backend in Qt Quick's render thread. The synchronization phase is where the main thread and render thread can safely exchange data. During this phase, the scene manager will call updateSpatialNode for each dirty node in the scene. This will either create a new backend node or update an existing one for use by the renderer.
同步的目标是确保在前端(Qt Quick)上设置的状态与在后端(Qt QuickSpatial Scene Graph Renderer)设置的状态相匹配。默认情况下,前端和后端位于不同的线程中:前端位于Qt主线程中,后端位于Qt Quick的渲染线程中。同步阶段是主线程和渲染线程可以安全地交换数据的阶段。在此阶段,场景管理器将为场景中的每个脏节点调用updateSpatialNode。这将创建一个新的后端节点或更新现有节点以供渲染器使用。
Qt Quick Spatial Scene Graph
Qt Quick空间场景图
Qt Quick 3D is designed to use the same frontend/backend separation pattern as Qt Quick: frontend objects are controlled by the Qt Quick engine, while backend objects contain state data for rendering the scene. Frontend objects inherit from QObject and are exposed to the Qt Quick engine. Items in QML source files map directly to frontend objects.
Qt Quick 3D被设计为使用与Qt Quick相同的前端/后端分离模式:前端对象由Qt Quick引擎控制,而后端对象包含用于渲染场景的状态数据。前端对象继承自QObject,并公开给QtQuick引擎。QML源文件中的项目直接映射到前端对象。
As the properties of these frontend objects are updated, one or more backend nodes are created and placed into a scenegraph. Because rendering 3D scenes involves a lot more state than rendering 2D, there is a separate set of specialized scene graph nodes for representing the state of the 3D scene objects. This scene graph is know as the Qt Quick Spatial Scene Graph.
随着这些前端对象的属性更新,将创建一个或多个后端节点并将其放置到场景图中。因为渲染3D场景比渲染2D场景涉及更多的状态,所以有一组单独的专用场景图节点用于表示3D场景对象的状态。此场景图称为Qt Quick空间场景图。
Both the frontend objects and backend nodes can be categorized into two classes. The first are spatial, in the sense that they exist somewhere in the in 3D space. What this means in practice is that each of these types contains a transform matrix. For spatial items the parent child relationship is significant because each child item inherits the transform of its parents.
前端对象和后端节点都可以分为两类。第一种是空间的,从某种意义上说,它们存在于三维空间中的某个地方。这在实践中意味着,这些类型中的每一个都包含一个变换矩阵。对于空间项,父子关系是重要的,因为每个子项都继承了其父项的变换。
The other class of items are resources. Resource items do not have a position in 3D space, but rather are just state that is used by other items. There can be a parent-child relationship between these items, but it has no other meaning than ownership.
另一类项目是资源。资源项在三维空间中没有位置,而只是其他项使用的状态。这些物品之间可能存在父子关系,但除了所有权,没有其他意义。
Unlike the 2D scene graph in Qt Quick, the spatial scene graph exposes resource nodes to the user directly. So for example in Qt Quick, while QSGTexture is public API, there is no QQuickItem that exposes this object directly. Instead the user must either use an Image item, which describes both where the texture comes from as well as how to render it, or write C++ code to operate on the QSGTexture itself. In Qt Quick 3D these resources are exposed directly in the QML API. This is necessary because resources are an important part of the scene state. These resources can be referenced by many objects in the scene: for example, many Materials could use the same Texture. It is also possible to set properties of a Texture at runtime that would directly change how a texture is sampled, for example.
与Qt Quick中的2D场景图不同,空间场景图直接向用户公开资源节点。因此,例如,在Qt Quick中,虽然QSGTexture是公共的API,但没有QQuickItem直接公开此对象。相反,用户必须使用一个Image项,该项描述纹理来自何处以及如何渲染纹理,或者编写C++代码来操作QSGTexture本身。在Qt Quick 3D中,这些资源直接暴露在QML API中。这是必要的,因为资源是场景状态的重要组成部分。这些资源可以被场景中的许多对象引用:例如,许多材质可以使用相同的纹理。例如,也可以在运行时设置纹理的属性,该属性将直接更改纹理的采样方式。
Spatial Objects
空间对象
All spatial Objects are subclasses of the Node component, which contains the properties defining the position, rotation, and scale in 3D space.
所有空间对象都是节点组件的子类,该组件包含定义三维空间中的位置、旋转和比例的特性。
Resource Objects
资源对象
Resource objects are subclasses of the Object3D component. Object3D is just a QObject subclass with some special helpers for use with the scene manager. Resource objects do have parent/child associations, but these are mostly useful for resource ownership.
资源对象是Object3D组件的子类。Object3D只是一个QObject子类,带有一些特殊的辅助对象,可用于场景管理器。资源对象确实具有父/子关联,但这些关联对资源所有权非常有用。
- Texture
- TextureData
- Geometry
- Material
- DefaultMaterial
- PrincipledMaterial
- CustomMaterial
- Effect
- SceneEnvironment
View3D and Render Layers
View3D和渲染层
With regard to the frontend/backend separation, View3D is the separation point from the user perspective because a View3D is what defines what scene content to render. In the Qt Quick Spatial Scene Graph, the root node for a scene that will be rendered is a Layer node. Layer nodes are created by the View3D using a combination of the the View3D's properties and the properties of the SceneEnvironment. When rendering a scene for a View3D, it is this Layer node that is being passed to the renderer to render a scene.
关于前端/后端分离,View3D是从用户角度来看的分离点,因为View3D定义了要渲染的场景内容。在“Qt Quick空间场景图”中,将渲染的场景的根节点是“层”节点。层节点由View3D使用View3D的属性和SceneEnvironment的属性的组合创建。为View3D渲染场景时,正是此层节点被传递给渲染器以渲染场景。
Scene Rendering
场景渲染

Set up Render Target
设置渲染目标
The first step in the rendering process is to determine and set up the scene render target. Depending on which properties are set in the SceneEnvironment, the actual render target will vary. The first decision is whether content is being rendered directly to a window surface, or to an offscreen texture. By default, View3D will render to an offscreen texture. When using post processing effects, rendering to an offscreen texture is mandatory.
渲染过程中的第一步是确定并设置场景渲染目标。根据在场景环境中设置的属性,实际渲染目标会有所不同。第一个决定是将内容直接渲染到窗口表面,还是渲染到屏幕外纹理。默认情况下,View3D将渲染为屏幕外纹理。使用后期处理效果时,必须渲染到屏幕外纹理。
Once a scene render target is determined, then some global states are set.
一旦确定了场景渲染目标,就会设置一些全局状态。
- window size - if rendering to a window
- 窗口大小-如果渲染到窗口
- viewport - the size of the scene area being rendered
- viewport-正在渲染的场景区域的大小
- scissor rect - the subset of a window that the viewport should be clipped to
- 剪裁矩形-视口应该剪裁到的窗口的子集
- clear color - what color to clear the render target with, if any.
- 清除颜色-清除渲染目标的颜色(如果有的话)。
Prepare for Render
准备渲染
The next stage of rendering is the prepare stage where the renderer does house-keeping to figure out what needs to be rendered for a given frame, and that all necessary resources are available and up to date.
渲染的下一个阶段是准备阶段,渲染器在这个阶段进行内务管理,以确定给定帧需要渲染什么,并且所有必要的资源都是可用的和最新的。
The prepare stage itself has two phases: the high-level preparation of determining what is to be rendered and what resources are needed; and the low-level preparation that uses RHI to actually set up rendering pipelines and buffers, as well as setting up the rendering dependencies of the main scene pass.
准备阶段本身有两个阶段:确定要提供什么和需要什么资源的高级别准备;以及使用RHI实际设置渲染管道和缓冲区以及设置主场景过程的渲染依赖性的低级准备。
High level render preparation
高级渲染准备
The purpose of this phase is to extract the state of the spatial scene graph into something that can be used to create render commands. The overview here is that the renderer is creating lists of geometry and material combinations to render from the perspective of a single camera with a set of lighting states.
此阶段的目的是将空间场景图的状态提取到可用于创建渲染命令的内容中。这里的概述是,渲染器正在创建几何体和材质组合的列表,以便从具有一组照明状态的单个摄影机的角度进行渲染。
The first thing that is done is to determine the global common state for all content. If the SceneEnvironment defines a lightProbe, then it checks if the environment map associated with that light probe texture is loaded, and if its not, a new environment map is is loaded or generated. The generation of an environment will itself be a set of passes to convolve the source texture into a cube map. This cube map will contain both specular reflection information as well as irradiance, which is used for material shading.
要做的第一件事是确定所有内容的全局公共状态。如果SceneEnvironment定义了lightProbe,则会检查是否加载了与该lightProbe纹理关联的环境贴图,如果没有,则会加载或生成新的环境贴图。环境的生成本身就是将源纹理卷积到立方体贴图中的一组过程。此立方体贴图将包含镜面反射信息以及用于材质着色的辐照度。
The next thing is that the renderer needs to determine which camera in the scene to use. If an active camera is not explicitly defined by a View3D, the first camera available in the scene is used. If there are no cameras in the scene, then no content is rendered and the renderer bails out.
接下来,渲染器需要确定要使用场景中的哪个摄影机。如果View3D未明确定义活动摄影机,则使用场景中可用的第一个摄影机。如果场景中没有摄影机,则不会渲染任何内容,并且渲染器会退出。
With a camera determined, it is possible to calculate the projection matrix for this frame. The calculation is done at this point because each renderable needs to know how to be projected. This also means that it is now possible to calculate which renderable items should be rendered. Starting with the list of all renderable items, we remove all items that are not visible because they are either disabled or completely transparent. Then, if frustum culling is enabled on the active camera, each renderable item is checked to see if it is completely outside of the view of the camera's frustum, and if so it is removed from the renderable list.
在确定相机的情况下,可以计算该帧的投影矩阵。计算是在这一点上完成的,因为每个可渲染对象都需要知道如何投影。这也意味着现在可以计算应该渲染哪些可渲染项目。从所有可渲染项目的列表开始,我们删除所有不可见的项目,因为它们要么被禁用,要么完全透明。然后,如果在活动摄影机上启用了截头体剔除,则会检查每个可渲染项目,以查看它是否完全在摄影机的截头体视图之外,如果是,则会将其从可渲染列表中删除。
In addition to the camera projection, the camera direction is also calculated as this is necessary for lighting calculations in the shading code.
除了摄影机投影外,还计算摄影机方向,因为这对于着色代码中的照明计算是必要的。
If there are light nodes in the scene, these are then gathered into a list the length of the maximum available lights available. If more light nodes exist in the scene than the amount of lights the renderer supports, any additional light nodes over that limit are ignored and don't contribute to the lighting of the scene. It is possible to specify the scope of light nodes, but note that even when setting a scope the lighting state of each light is still sent to every material which has lighting, but for lights not in scope the brightness will be set to 0, so in practice those lights will not contribute to the lighting of those materials.
如果场景中有灯光节点,则会将这些节点收集到可用最大灯光长度的列表中。如果场景中存在的光节点多于渲染器支持的光的数量,则超过该限制的任何其他光节点都将被忽略,并且不会对场景的照明产生影响。可以指定灯光节点的范围,但请注意,即使在设置范围时,每个灯光的照明状态仍会发送到具有照明的每个材质,但对于不在范围内的灯光,亮度将设置为0,因此在实践中,这些灯光不会对这些材质的照明产生影响。
Now with a hopefully shorter list of renderables, each of these items need to be updated to reflect the current state of the scene. For each renderable we check that a suitable material is loaded, and if not a new one is created. A material is a combination of shaders and a rendering pipeline, and it is needed for creating a draw call. In addition the renderer makes sure that any resources needed to render a renderable is loaded, for example geometry and textures set on the Model. Resources that are not loaded already are loaded here.
现在,有了一个更短的可渲染列表,这些项目中的每一个都需要更新,以反映场景的当前状态。对于每个可渲染对象,我们会检查是否加载了合适的材质,如果没有,则会创建新材质。材质是着色器和渲染管道的组合,创建绘制调用时需要它。此外,渲染器确保加载渲染可渲染对象所需的任何资源,例如在模型上设置的几何体和纹理。此处加载了尚未加载的资源。
The renderables list is then sorted into 3 lists.
然后将可渲染列表排序为3个列表。
- Opaque Items: these are sorted from front to back, or in other words from items that are closest to the camera to items that are furthest from the camera. This is done to take advantage of hardware occlusion culling or early z detection in the fragment shader.
- 不透明项目:这些项目从前到后排序,或者换句话说,从离相机最近的项目到离相机最远的项目。这样做是为了利用碎片着色器中的硬件遮挡剔除或早期z检测。
- 2D Items: these are QtQuick Items that are rendered by the Qt Quick renderer.
- 2D项目:这些是由QtQuick渲染器渲染的QtQuick项目。
- Transparent Items: these are sorted from back to front, or in other words from items that are farthest from the camera to items that are nearest to the camera. This is done because transparent items need to be blended with all items that are behind them.
- 透明项目:这些项目是从后到前排序的,或者换句话说,从离相机最远的项目到离相机最近的项目。这样做是因为透明项目需要与它们后面的所有项目混合。
Low Level render preparation
低级别渲染准备
Now that everything that needs to be considered for this frame has been determined, the plumbing and dependencies for the main render pass can be addressed. The first thing that is done in this phase is to render any pre-passes that are required for the main pass.
现在,已经确定了此帧需要考虑的所有内容,可以解决主渲染过程的管道和依赖关系。此阶段要做的第一件事是渲染主过程所需的任何预过程。
- Render DepthPass - Certain features like Screen Space Ambient Occlusion and Shadowing require a depth pre-pass. This pass consists of all opaque items being rendered to a depth texture.
- 渲染深度过程-某些功能,如屏幕空间环境光遮挡和阴影,需要深度预过程。此过程由渲染到深度纹理的所有不透明项目组成。
- Render SSAOPass - The objective of the Screen Space Ambient Occlusion pass is to generate an ambient occlusion texture. This texture is used later by materials to darken certain areas when shading.
- 渲染SSAOPass-“屏幕空间环境光遮挡”过程的目标是生成环境光遮挡纹理。材质稍后会使用此纹理来在着色时使某些区域变暗。
- Render ShadowPasses - Each light in the scene that has shadow enabled, contributes to an additional shadow pass. There are two different shadowing techniques employed by the renderer, so depending on the light types there will be different passes. When rendering shadows from a directional light, the scene is rendered to a 2D occlusion texture from a combination of the directional light's direction and the size of the camera frustum. When rendering shadows from a point or spot light the light's occlusion texture is a cube map representing the occlusion contribution relative to each face direction of the light.
- 渲染阴影过程-场景中启用阴影的每个灯光都会产生额外的阴影过程。渲染器使用两种不同的阴影技术,因此根据灯光类型,会有不同的过程。从平行光渲染阴影时,场景将根据平行光的方向和摄影机平截头体的大小的组合渲染为2D遮挡纹理。从点光源或聚光灯渲染阴影时,灯光的遮挡纹理是一个立方体贴图,表示相对于灯光的每个面方向的遮挡贡献。
- Render ScreenTexture - This pass will only occur when using a CustomMaterial that requires a screen texture, which can be used for rendering tecniques such as refraction. This pass works like a depth pass, but instead renders all opaque items to a color texture.
- 渲染屏幕纹理-此过程仅在使用需要屏幕纹理的CustomMaterial时发生,该屏幕纹理可用于渲染技术(如折射)。此过程类似于深度过程,但会将所有不透明项目渲染为颜色纹理。
After the dependency renders are done, the rest of the passes are prepared but not rendered. This preparation involves taking the state gathered in the high-level prep stage and translating that to graphics primitives like creating/updating uniform buffers values, associating samplers with dependency textures, setup for shader resource bindings, and everything else involved in creating a pipeline state necessary for performing a draw call.
完成依赖项渲染后,将准备其余过程,但不进行渲染。此准备工作包括获取在高级准备阶段收集的状态,并将其转换为图形基元,如创建/更新统一缓冲区值、将采样器与依赖纹理关联、设置着色器资源绑定,以及创建执行绘制调用所需的管道状态所涉及的所有其他内容。
Scene Rendering
场景渲染
Now that the hard work of preperation is done, the easy part is running the commands that contribute to the main scene's content. That rendering works in this order:
现在,艰苦的准备工作已经完成,简单的部分是运行有助于主场景内容的命令。该渲染按以下顺序工作:
- Clear Pass - This isn't really a pass, but depending on what backgroundMode is set on SceneEnvironment, different things can happen here. If the background mode is either transparent or color, then the color buffer will be cleared with either transparency or the color specified. If, however, the background mode is set to SkyBox, then a pass will be run that renders the SkyBox from the perspective of the camera, which will also fill the buffer with initial data.
- 清除过程-这不是真正的过程,但根据场景环境中设置的背景模式,这里可能会发生不同的事情。如果背景模式是透明的或彩色的,则颜色缓冲区将被清除为透明或指定的颜色。但是,如果背景模式设置为SkyBox,则将运行一个过程,从摄影机的角度渲染SkyBox,这也将用初始数据填充缓冲区。
- Opaque Pass - Next all opaque items will be drawn. This just involves setting the pipeline state, and running the draw command for each item in the order in the list since they are already sorted at this point.
- 不透明过程-接下来将绘制所有不透明项目。这只需要设置管道状态,并按列表中的顺序为每个项目运行draw命令,因为此时它们已经排序。
- 2D Pass - If there are any 2D items in the scene, then the Qt Quick renderer is invoked to generate the render commands necessary to render those items.
- 2D过程-如果场景中有任何2D项目,则会调用Qt快速渲染器来生成渲染这些项目所需的渲染命令。
- Transparent Pass - Then finally the transparent items in the scene are rendered one by one in the same manner as the opaque items.
- 透明过程-最后,以与不透明项目相同的方式逐个渲染场景中的透明项目。
This concludes the rendering of the scene.
场景渲染到此结束。
Post-Processing
后处理
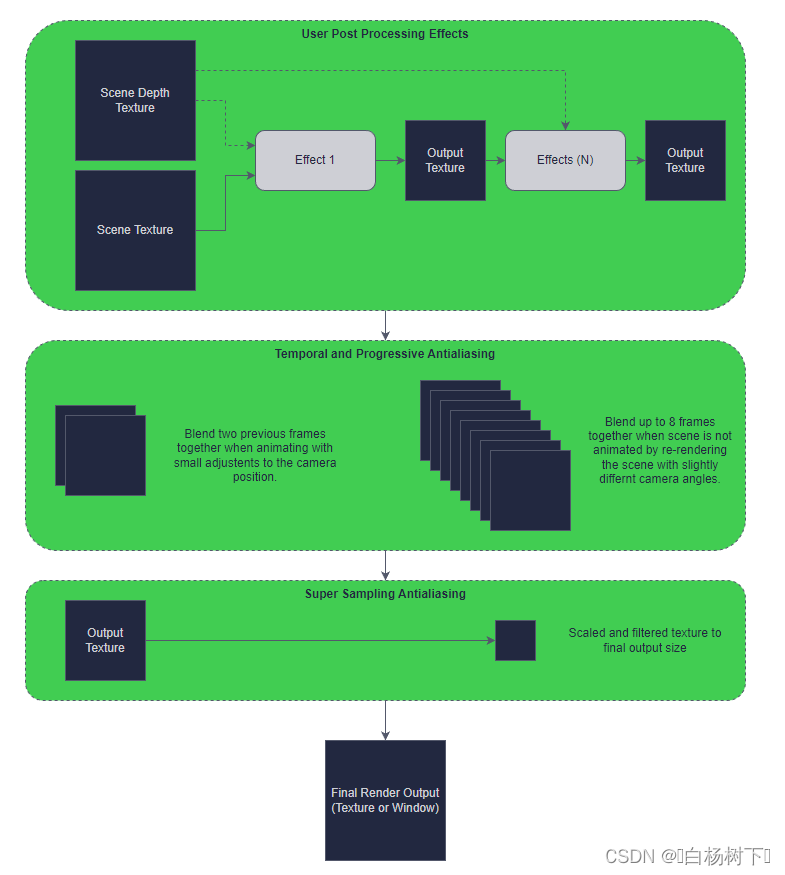
If any post-processing functionality is enabled, then it can be assumed that the result of the scene renderer was a texture that is an input for the post processing phase. All post-processing methods are additional passes that operate on this scene input texture.
如果启用了任何后处理功能,则可以假设场景渲染器的结果是作为后处理阶段输入的纹理。所有后处理方法都是对该场景输入纹理进行操作的附加过程。
All steps of the Post-Processing phase are optional, and if no built-in features and no user-defined effects are enabled, the output of the scene render is what is used by the final render target. Note however that tonemapping is enabled by default.
后处理阶段的所有步骤都是可选的,如果未启用内置功能和用户定义的效果,则场景渲染的输出将是最终渲染目标所使用的。但是请注意,默认情况下会启用色调映射。
Built-in Post-Processing
内置后处理
ExtendedSceneEnvironment and its parent type SceneEnvironment offer the most common effects used in 3D scenes, as well as tonemapping that is used to map the high dynamic range color values generated by the renderer to the 0-1 LDR range. The effects include depth of field, glow/bloom, lens flare, vignette, color adjustment and grading, fog, and ambient occlusion.
ExtendedSceneEnvironment及其父类型SceneEnvironment提供了3D场景中使用的最常见效果,以及用于将渲染器生成的高动态范围颜色值映射到0-1 LDR范围的色调映射。效果包括景深、光晕、镜头光斑、渐晕、颜色调整和分级、雾和环境遮挡。
Post-Processing Effects
后处理效果
Applications can specify their own custom post-processing effects as an ordered list in the SceneEnvironment::effects property. When this list is non-empty, the effects in it are applied before the built-in effects provided by ExtendedSceneEnvironment. Each post-processing effect is part of a chain such that the output of the previous effect is the input for the next. The first effect in this chain gets its input directly from the output of the scene renderer step. It is also possible for effects to access the depth texture output of the scene renderer.
应用程序可以在SceneEnvironment::effects属性中将自己的自定义后处理效果指定为有序列表。当此列表不为空时,其中的效果将在ExtendedScenneEnvironment提供的内置效果之前应用。每个后处理效果都是一个链的一部分,因此前一个效果的输出就是下一个的输入。该链中的第一个效果直接从场景渲染器步骤的输出中获取其输入。效果也可以访问场景渲染器的深度纹理输出。
Each effect in this process can consist of multiple sub-passes, which means it is possible to render content into intermediate buffers. The final pass of a multi-pass effect is expected to output a single texture containing the color data to be used by the next steps of the post-processing phase.
此过程中的每个效果都可以由多个子过程组成,这意味着可以将内容渲染到中间缓冲区中。多通道效果的最后一个通道预计将输出包含颜色数据的单个纹理,该颜色数据将由后处理阶段的下一个步骤使用。
Temporal and Progressive Antialiasing
临时和渐进抗锯齿
The Temporal and Progressive antialiasing steps are optionally enabled by setting properties in the SceneEnvironment. While not strictly a part of the post-processing phase, the actual results of Temporal and Progressive antialiasing are realized during the post-processing phase.
通过在场景环境中设置属性,可以选择性地启用“临时”和“渐进”抗锯齿步骤。虽然不是严格意义上的后处理阶段的一部分,但时间和渐进抗锯齿的实际结果是在后处理阶段实现的。
Temporal Antialiasing is performed when a scene is being actively updated. When enabled, the active camera makes very small adjustments to the camera direction for each frame while drawing the scene. The current frame is then blended with the previously rendered frame to smooth out what was rendered.
“临时消除混叠”是在场景被主动更新时执行的。启用后,活动摄影机在绘制场景时会对每帧的摄影机方向进行非常小的调整。然后将当前帧与先前渲染的帧混合,以平滑渲染的内容。
Progressive Antialiasing is only performed when a scene is not being updated. When enabled, an update is forced and the current state of the scene is rendered with very small adjustments to the active cameras direction. Up to 8 frames are accumulated and blended together with pre-defined weights. This has the effect of smoothing out a non-animating scene, but comes at a performance cost because several extra frames will be rendered for each update.
只有在场景未更新时才执行渐进抗锯齿。启用后,将强制进行更新,并通过对活动摄影机方向进行非常小的调整来渲染场景的当前状态。最多可累积8帧,并将其与预定义的权重混合在一起。这具有平滑非动画场景的效果,但会以性能为代价,因为每次更新都会渲染几个额外的帧。
Super Sampling Antialiasing (SSAA)
超级采样抗锯齿(SSAA)
Super Sampling Antialiasing is a brute force way of smoothing out a scene. It works by rendering to a texture that is a multiple of the requested size of the scene, and then afterwards downsampling it to the target size. So for example if 2X SSAA is requested, then the scene would be rendered to a texture that is 2 times the intended size, and then downsampled as part of this phase. This can have a huge impact on performance and resource usage so should be avoided if possible. It's also possible for the View3D size to be too large to use this method, since the texture needed for this method may be larger than what is supported by the rendering hardware.
超级采样抗锯齿是一种强力平滑场景的方法。它的工作原理是将纹理渲染为所需场景大小的倍数,然后将其下采样到目标大小。因此,例如,如果请求2X SSAA,则场景将被渲染为预期大小的2倍的纹理,然后作为该阶段的一部分进行下采样。这可能会对性能和资源使用产生巨大影响,因此应尽可能避免。View3D的大小也可能太大而无法使用此方法,因为此方法所需的纹理可能大于渲染硬件所支持的纹理。
© 2024 The Qt Company Ltd. Documentation contributions included herein are the copyrights of their respective owners. The documentation provided herein is licensed under the terms of the GNU Free Documentation License version 1.3 as published by the Free Software Foundation. Qt and respective logos are trademarks of The Qt Company Ltd. in Finland and/or other countries worldwide. All other trademarks are property of their respective owners.


 562
562


 被折叠的 条评论
为什么被折叠?
被折叠的 条评论
为什么被折叠?
 到【灌水乐园】发言


