在Spring框架中引入redis缓存
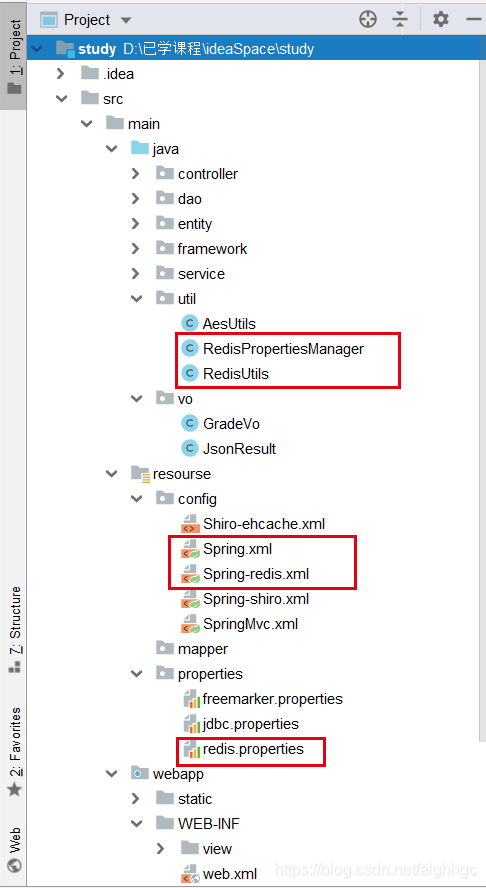
首先看一下完成后的结构图
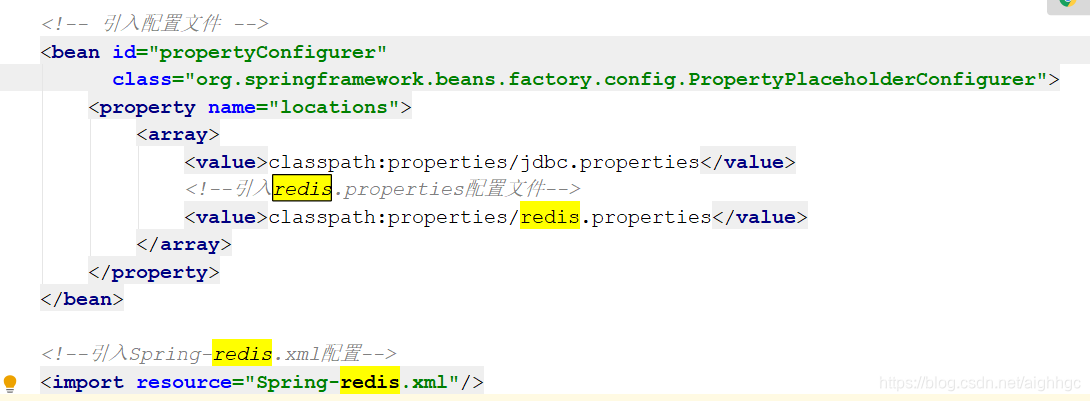
1.在Spring.xml中插入
 <!-- 引入配置文件 -->
    <bean id="propertyConfigurer"
          class="org.springframework.beans.factory.config.PropertyPlaceholderConfigurer">
        <property name="locations">
            <array>
                <value>classpath:properties/jdbc.properties</value>
                <!--引入redis.properties配置文件-->
                <value>classpath:properties/redis.properties</value>
            </array>
        </property>
    </bean>

    <!--引入Spring-redis.xml配置-->
    <import resource="Spring-redis.xml"/>
2.新建Spring-redis.xml
<?xml version="1.0" encoding="UTF-8"?>
<beans xmlns="http://www.springframework.org/schema/beans"
       xmlns:xsi="http://www.w3.org/2001/XMLSchema-instance"
       xsi:schemaLocation="http://www.springframework.org/schema/beans
       http://www.springframework.org/schema/beans/spring-beans.xsd">

    <!--jedis pool config-->
    <bean id="jedisPoolConfig" class="redis.clients.jedis.JedisPoolConfig">
        <property name="maxTotal" value="${redis.pool.maxTotal}"/>
        <property name="maxIdle" value="${redis.pool.maxIdle}"/>
        <property name="maxWaitMillis" value="${redis.pool.maxWaitMillis}"/>
        <property name="testOnBorrow" value="${redis.pool.testOnBorrow}"/>
    </bean>

    <!--jedis connection factory config-->
    <bean id="jedisConnectionFactory" class="org.springframework.data.redis.connection.jedis.JedisConnectionFactory">
        <property name="hostName" value="${redis.hostname}"/>
        <property name="port" value="${redis.port}"/>
        <property name="password" value=""/>
        <property name="poolConfig" ref="jedisPoolConfig"/>
    </bean>

    <!--redisTemplate config-->
    <bean id="redisTemplate" class="org.springframework.data.redis.core.RedisTemplate">
        <property name="connectionFactory" ref="jedisConnectionFactory"/>
    </bean>

</beans>
3.在Properties文件夹中创建redis.properties
#redis config
redis.pool.maxTotal=100
redis.pool.maxIdle=20
redis.pool.maxWaitMillis=1000
redis.pool.testOnBorrow=true
redis.hostname=127.0.0.1
redis.port=6379
redis.password=
4.在util包下,建RedisPropertiesManager.java
package util;
import java.io.*;
import java.net.URISyntaxException;
import java.util.Properties;
public class RedisPropertiesManager {
private static volatile RedisPropertiesManager instance;
static Object object = new Object();
private RedisPropertiesManager() {
}
public static RedisPropertiesManager getInstance() {
if (null == instance) {
synchronized (object){
if (null == instance) {
instance = new RedisPropertiesManager();
}
}
}
return instance;
}
public Properties loadProperties(String propertiesName) {
Properties properties = new Properties();
try {
InputStream in = new FileInputStream(new File(RedisPropertiesManager.class.getResource(
"/properties/" + propertiesName).toURI()));
properties.load(in);
} catch (IOException e) {
e.printStackTrace();
} catch (URISyntaxException e) {
e.printStackTrace();
}
return properties;
}
}
5.在util包下建RedisUtils.java
package util;
import redis.clients.jedis.Jedis;
import java.util.ArrayList;
import java.util.Collection;
import java.util.List;
import java.util.Properties;
public class RedisUtils {
private static String hostname;
private static int port;
private static String password;
static {
Properties properties = RedisPropertiesManager.getInstance().loadProperties("redis.properties");
hostname = properties.getProperty("redis.hostname", "127.0.0.1");
port = Integer.valueOf(properties.getProperty("redis.port", "6379"));
password = properties.getProperty("redis.password", "");
}
public static boolean getRedisServiceIsAlive() {
boolean isAlive = false;
try {
Jedis jedis = new Jedis(hostname, port);
String pong = jedis.ping();
if ("PONG".equals(pong)) {
isAlive = true;
}
} catch (Exception e) {
isAlive = false;
System.out.println("Redis 服务已经死掉了");
} finally {
return isAlive;
}
}
public static <T> List<T> getCollectionObjectList(Collection<Object> collection, Class T) {
List<T> list = new ArrayList<T>(collection.size());
for (Object obj : collection) {
T target = (T) obj;
list.add(target);
}
return list;
}
}
6.当你想在某个实体类上使用redis缓存数据,该实体类需要实现Serializable接口。
7.在serviceImpl中使用RedisTemplate,首先需要先注入
@Service
public class StudentServiceImpl implements StudentService {
@Autowired
private StudentMapper studentMapper;
@Autowired
private RedisTemplate<String, Object> redisTemplate;
public static final String STUDENT_MAP_KEY = "studentMap";
@Override
public StudentEntity findOneByStuNo(int stuNo) {
StudentEntity studentEntity = null;
if (RedisUtils.getRedisServiceIsAlive()) {
studentEntity = (StudentEntity) redisTemplate.opsForHash().get(STUDENT_MAP_KEY, stuNo);
if (null == studentEntity) {
studentEntity = studentMapper.findOneByStuNo(stuNo);
redisTemplate.opsForHash().put(STUDENT_MAP_KEY, stuNo, studentEntity);
}
} else {
studentEntity = studentMapper.findOneByStuNo(stuNo);
}
return studentEntity;
}
8.redis通常写在serviceImpl中,用于帮助处理业务逻辑。
查找具体步骤是:
		 1.首先@Autowired
		 private RedisTemplate<String, Object> redisTemplate;

		 2.然后在对应方法中,首先调用RedisUtils.getRedisServiceIsAlive()方法,判断redis是否存活,如果存活则从缓存数据库中调用数据。
		 studentEntity = (StudentEntity) redisTemplate.opsForHash().get(STUDENT_MAP_KEY, stuNo);

		 3.如果redis中查到的结果为null,则从数据库查询,然后将查询出的结果redisTemplate.opsForHash().put(STUDENT_MAP_KEY, stuNo, studentEntity);调用该方法放入redis缓存数据库中。

		 4.如果redis没有存活,则从数据库中进行查询
添加具体步骤是:
		 1.首先@Autowired
		 private RedisTemplate<String, Object> redisTemplate;(若写过一遍不用重复写)

		 2.首先调用对应mapper中添加的方法,然后if 方法只想成功也就是返回值>0,则将该值put进redis缓存中。
		 redisTemplate.opsForHash().put(STUDENT_MAP_KEY, studentEntity.getStuNo(), studentEntity);
删除具体步骤:
		 1.首先@Autowired
		 private RedisTemplate<String, Object> redisTemplate;(若写过一遍不用重复写)

		 2.首先调用对应mapper中删除的方法,然后if 方法只想成功也就是返回值>0,则delete redis缓存中对应的值。
		 redisTemplate.opsForHash().delete(STUDENT_MAP_KEY, stuNo);
修改具体步骤:
 	      1.首先@Autowired
		 private RedisTemplate<String, Object> redisTemplate;(若写过一遍不用重复写)

		  2.首先调用对应mapper中修改的方法,然后if 方法只想成功也就是返回值>0,则将新的值put到 redis缓存中。
		  redisTemplate.opsForHash().put(STUDENT_MAP_KEY, studentEntity.getStuNo(), studentEntity);


 322
322


 被折叠的 条评论
为什么被折叠?
被折叠的 条评论
为什么被折叠?
 到【灌水乐园】发言


