


Spring boot整合Mybatis一中我新建了一个整合了MyBatis的Spring boot工程。现在此工程架构上作编码操作,使用注解方式实现与数据库交互。(写博客期间工作事务耽搁了一下,所以有些类的创建日期不同。)
1、新增几个包,改application.properties文件为application.yml(这样使配置更简洁,少写很多前缀),现工程机构如下:

2、 配置pom.xml文件,增加json依赖,增加lombok插件引用,配置启动路径。下面是我的pom文件全部:
<?xml version="1.0" encoding="UTF-8"?>
<project xmlns="http://maven.apache.org/POM/4.0.0" xmlns:xsi="http://www.w3.org/2001/XMLSchema-instance"
         xsi:schemaLocation="http://maven.apache.org/POM/4.0.0 http://maven.apache.org/xsd/maven-4.0.0.xsd">
    <modelVersion>4.0.0</modelVersion>
    <parent>
        <groupId>org.springframework.boot</groupId>
        <artifactId>spring-boot-starter-parent</artifactId>
        <version>2.1.4.RELEASE</version>
        <relativePath/> <!-- lookup parent from repository -->
    </parent>
    <groupId>com.aigov.springboot-mybatis</groupId>
    <artifactId>springboot-mybatis</artifactId>
    <version>0.0.1-SNAPSHOT</version>
    <name>springboot-mybatis</name>
    <description>Demo project for Spring Boot</description>
    <properties>
        <java.version>1.8</java.version>
    </properties>

    <dependencies>
        <dependency>
            <groupId>org.springframework.boot</groupId>
            <artifactId>spring-boot-starter-web</artifactId>
        </dependency>
        <dependency>
            <groupId>org.mybatis.spring.boot</groupId>
            <artifactId>mybatis-spring-boot-starter</artifactId>
            <version>2.0.1</version>
        </dependency>

        <dependency>
            <groupId>mysql</groupId>
            <artifactId>mysql-connector-java</artifactId>
            <scope>runtime</scope>
        </dependency>
        <dependency>
            <groupId>org.springframework.boot</groupId>
            <artifactId>spring-boot-starter-test</artifactId>
            <scope>test</scope>
        </dependency>
        <!-- 增加json依赖 -->
        <dependency>
            <groupId>com.alibaba</groupId>
            <artifactId>fastjson</artifactId>
            <version>1.2.12</version>
        </dependency>
        <!-- 增加lombok插件引用-->
        <dependency>
            <groupId>org.projectlombok</groupId>
            <artifactId>lombok</artifactId>
        </dependency>
    </dependencies>

    <build>
        <plugins>
            <plugin>
                <groupId>org.springframework.boot</groupId>
                <artifactId>spring-boot-maven-plugin</artifactId>
                <!-- 配置启动入口路径 -->
                <configuration>
                    <mainClass>com.aigov.springbootmybatis.springbootmybatis.SpringbootMybatisApplication</mainClass>
                </configuration>
            </plugin>
        </plugins>
    </build>

</project>
3、配置application.yml文件:端口,数据库。下面是我的application.yml文件全部内容:
server:
  port: 8001

spring:
  datasource:
    driver-class-name: com.mysql.cj.jdbc.Driver
    name: test
    url: jdbc:mysql://localhost:3306/aigov_core?characterEncoding=UTF-8&zeroDateTimeBehavior=convertToNull&serverTimezone=GMT%2B8
    username: root
    password: 123456
  mvc:
    servlet:
      path: /springboot_mybatis
以上项目基础配置就完成了。
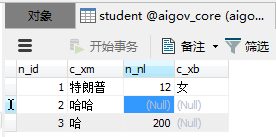
4、用mysql的客户端Navicat 新建一个student表,表结构:

5、新建实体类 Student.java,这里用到了lombok的@Data注解,省去了geter seter.下面是我的Student 类的全部:
package com.aigov.springbootmybatis.springbootmybatis.domain;

import lombok.Data;

/**
 * @author : aigoV
 * @date :2019/5/7
 * 对应数据表的学生实体类
 **/
@Data
public class Student {
    private Integer n_id;
    private String c_xm;
    private Integer n_nl;
    private String c_xb;
}
6、编写dao层的 mapper接口 StudentMapper.java。以下是该文件里的代码:
package com.aigov.springbootmybatis.springbootmybatis.mapper;

import com.aigov.springbootmybatis.springbootmybatis.domain.Student;
import org.apache.ibatis.annotations.*;

/**
 * @author : aigoV
 * @date :2019/5/14
 * 定义学生的增删改查接口
 * 这里就是用注解的方式实现与数据库交互
 **/
@Mapper
public interface StudentMapper {
    /**
     * 新增学生信息
     * @param s
     * @return
     */
    @Insert("INSERT INTO aigov_core.student (n_id,c_xm,n_nl,c_xb) VALUES(#{n_id},#{c_xm},#{n_nl},#{c_xb});")
    int addStudent(Student s);

    /**
     * g根据学生id删除学生信息
     * @param n_id
     * @return
     */
    @Delete("DELETE FROM aigov_core.student WHERE n_id = #{n_id}")
    int deleteStuById(@Param("n_id") Integer n_id);

    /**
     * 根据姓名修改学生信息
     * @param n_nl
     * @param c_xm
     * @return
     */
    @Update("UPDATE aigov_core.student SET n_nl = #{n_nl} WHERE c_xm = #{c_xm}")
    int updateStudent(@Param("n_nl") Integer n_nl,@Param("c_xm") String c_xm);

    /**
     * 根据性别查询学生信息
     * @param c_xb
     * @return
     */
    @Select("SELECT * FROM aigov_core.student WHERE c_xb = #{c_xb}")
    Student findByXb(@Param("c_xb") String c_xb);
}
7、service业务层--处理相关业务。
在这个案例里没有复杂业务要处理,所以你可能会感觉这一层没有存在意义。实际工作中业务是重中之重,所以我还是按照三层架构思想把这一层写出来,便于新手了解。
package com.aigov.springbootmybatis.springbootmybatis.service;

import com.aigov.springbootmybatis.springbootmybatis.domain.Student;
import com.aigov.springbootmybatis.springbootmybatis.mapper.StudentMapper;
import org.springframework.beans.factory.annotation.Autowired;
import org.springframework.stereotype.Service;


/**
 * @author : aigoV
 * @date :2019/5/14
 * 处理学生对象信息的业务层
 **/
@Service
public class StudentService {

    @Autowired
    StudentMapper studentMapper;//如果这里报错:注入不了。就在mapper类上加一个 @Component

    /** 插入学生信息 **/
    public void addStu(Student s){
        studentMapper.addStudent(s);
    }

    /** 删除学生信息 **/
    public void deleteStu(int n_id){
        studentMapper.deleteStuById(n_id);
    }

    /**修改学生信息*/
    public void upddateStu(Integer n_nl,String c_xm){
        studentMapper.updateStudent(n_nl,c_xm);
    }

    /** 查询学生信息**/
    public Student findStu(String c_xb){
        return studentMapper.findByXb(c_xb);
    }

}
8、控制层
主要把处理前端发送过来得到请求,并在这里将相应请求转发给相应业务层处理。
我这里前端使用postman,模拟发送请求。这里对请求相关不做详解,简单了解一下,之后会再写个详细的基于Springboot框架下的请求及响应的demo。
控制层简单解释及代码如下:
@RestController:相当于@ResponseBody+@Controller
@RequestMapping("/xxx"):处理请求地址的映射,若用于类上,表示类中的所有响应请求的方法都是以该地址作为父路径。
package com.aigov.springbootmybatis.springbootmybatis.controller;

import com.aigov.springbootmybatis.springbootmybatis.domain.Student;
import com.aigov.springbootmybatis.springbootmybatis.service.StudentService;
import org.springframework.beans.factory.annotation.Autowired;
import org.springframework.web.bind.annotation.RequestMapping;
import org.springframework.web.bind.annotation.RestController;

/**
 * @author : aigoV
 * @date :2019/5/14
 * 学生信息--控制层
 **/
@RestController
public class StudentController {

    @Autowired
    StudentService studentService;

    //增加
    @RequestMapping("/addStu")
    public void addStu(Student s){
         studentService.addStu(s);
    }

    //删除
    @RequestMapping("/deleteStu")
    public void deleteStu(int n_id){
        studentService.deleteStu(n_id);
    }

    //更新
    @RequestMapping("/updateStu")
    public void updateStu(int n_nl,String c_xm){
        studentService.upddateStu(n_nl,c_xm);
    }

    //查询
    @RequestMapping("/findStu")
    public Student findStu(String c_xb){
        return studentService.findStu(c_xb);
    }

}
9、启动入口类
添加事务注解 @EnableTransactionManagement。详细代码如下:
package com.aigov.springbootmybatis.springbootmybatis;

import org.springframework.boot.SpringApplication;
import org.springframework.boot.autoconfigure.SpringBootApplication;
import org.springframework.transaction.annotation.EnableTransactionManagement;

@EnableTransactionManagement
@SpringBootApplication
public class SpringbootMybatisApplication {

    public static void main(String[] args) {
        SpringApplication.run(SpringbootMybatisApplication.class, args);
    }

}
10、测试:
启动项目
保证mysql本地服务处于开启状态
打开postman 模拟发送请求,开始测试。(没有postman,百度下载安装)

测试每一个方法,全部通过,数据库数据正确发生变更:
至此,基于Springboot+mybatis的sql注解开发方式的案例写完了,有问题欢迎交流斧正。
注:
1、我在编写过程中出现的小bug及解决办法:
https://blog.csdn.net/aigoV/article/details/90202671
https://blog.csdn.net/aigoV/article/details/90201572


 1563
1563


 被折叠的 条评论
为什么被折叠?
被折叠的 条评论
为什么被折叠?
 到【灌水乐园】发言


