


之前的这篇文章,html页面和java代码是写死的只能向greetings这个主题发送信息,很显然有很大的局限性,现在我们看下如何传递参数。html页面中通过stomp给服务端传递参数有2种方式:在消息头中添加参数,在路径中添加参数。
方式1:在消息头中添加参数
function sendName() {
            var name = document.getElementById('name').value;
            stompClient.send("/app/hello", {atytopic:"greetings"}, name);
        }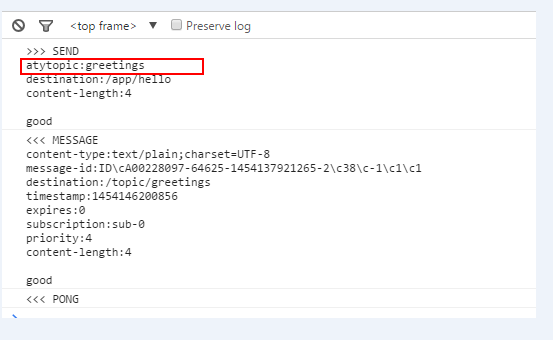
对应的java代码可以通过如下方式来接收参数:使用@Header或者@Headers
@Controller
public class ChatController {

	@Autowired
	private SimpMessagingTemplate template;

	@MessageMapping("/hello")
	public String send(String message, @Header("atytopic") String topic,
			@Headers Map<String, Object> headers) {

		System.out.println("message==" + message);
		System.out.println("topic==" + topic);
		System.out.println("headers==" + headers);

		template.convertAndSend("/topic/" + topic, message);

		return "";
	}

}
方式2:在路径中添加参数,这个类似于rest服务在url中写参数。
function sendName() {
            var name = document.getElementById('name').value;
            stompClient.send("/app/hello/aty/greetings", {}, name);
        }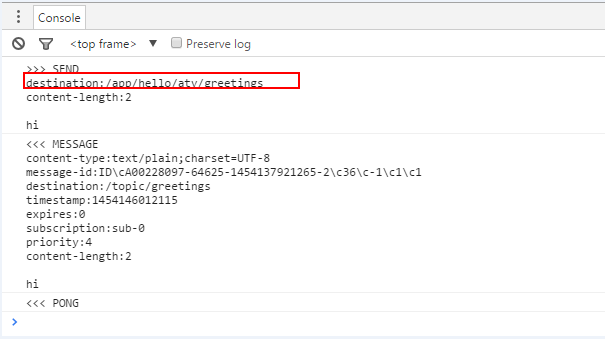
后台java代码如下:使用@DestinationVariable接收
@Controller
public class Chat2Controller {

	@Autowired
	private SimpMessagingTemplate template;

	// 如果只有一个模板变量,那么可以直接使用@DestinationVariable
	@MessageMapping("/hello/{userName}/{topic}")
	public String send(String message, @DestinationVariable("topic") String topic, @DestinationVariable(value="userName") String userName) {

		System.out.println("message=="+message);
		System.out.println("topic=="+topic);
		System.out.println("userName=="+userName);

		template.convertAndSend("/topic/"+topic, message);

		return "";
	}


}
可以看到这2种方式都可以正确传递参数到服务端。


 713
713


 被折叠的 条评论
为什么被折叠?
被折叠的 条评论
为什么被折叠?
 到【灌水乐园】发言


