


第三章:使用字符串
基本字符串操作
>>> format = "Hello,%s,%s enough for ya?"
>>> values = ('world','Hot')
>>> print format % values
Hello,world,Hot enough for ya?
>>> format = "Pi with three decimals: %.3f"
>>> from math import pi
>>> print format % pi
Pi with three decimals: 3.142>>> 'Price of eggs: $%d' % 42
'Price of eggs: $42'
>>> 'Hexadecimal price of eggs: %x' % 42
'Hexadecimal price of eggs: 2a'
>>> from math import pi
>>> 'Pi: %f...' % pi
'Pi: 3.141593...'
>>> 'Very inexact estimate of pi: %i' % pi
'Very inexact estimate of pi: 3'
>>> 'Using str: %s' % 42L
'Using str: 42'
>>> 'Using repr: %r' % 42L
'Using repr: 42L'
字段宽度和精度
>>> '%10f' % pi
'  3.141593'
>>> '%10.2f' % pi
'      3.14'
>>> '%.5s' % 'Guido van Rossum'
'Guido'
>>> '%.*s' % (5,'Guido van Rossum')    #可以通过表达式来自定义数字
'Guido'>>> '%010.2f' % pi
'0000003.14'
>>> 010
8
>>> '%-10.2f' % pi
'3.14 '
>>> print('%5d' % 10) + '\n' + ('%5d' % -10)
   10
  -10
>>> print('%+5d' % 10) + '\n' + ('%+5d' % -10)
+10
-10# Print a formatted price list with a given width
width = input('Please enter width: ')
price_width = 10
item_width = width - price_width
header_format = '%-*s%*s'
format = '%-*s%*.2f'
print '=' * width
print header_format % (item_width, 'Item', price_width, 'Price')
print '-' * width
print format % (item_width, 'Apples', price_width, 0.4)
print format % (item_width, 'Pears', price_width, 0.5)
print format % (item_width, 'Cantaloupes', price_width, 1.92)
print format % (item_width, 'Dried Apricots (16 oz.)', price_width, 8)
print format % (item_width, 'Prunes (4 lbs.)', price_width, 12)
print '=' * width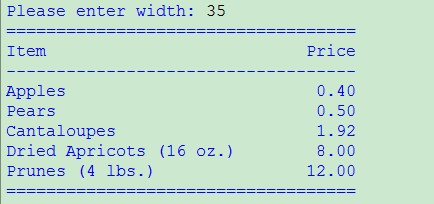
字符串方法
find
>>> 'With a moo-moo here, and a moo-moo there'.find('moo')
7
>>> title = "Monty Python's Flying Circus"
>>> title.find('Monty')
0
>>> title.find('Python')
6
>>> title.find('Flying')
15
>>> title.find('Xircus')
-1

>>> subject = '$$$ Get rich now!! $$$'
>>> subject.find('$$$')
0
>>> subject.find('$$$',1)
19
>>> subject.find('!!')
16
>>> subject.find('!!',0,16)
-1
>>> seq = ['1','2','3','4','5']
>>> sep.join(seq)
'1+2+3+4+5'

>>> dirs = '','usr','bin','env'
>>> '/'.join(dirs)
'/usr/bin/env'
>>> ''.join(seq)
'12345'
>>> print 'C:' + '\\'.join(dirs)
C:\usr\bin\env>>> name = 'Gumby'
>>> names = ['gumby','smith','jones']
>>> if name.lower() in names: print 'Found it!'
Found it!>>> 'This is a test'.replace('is','eez')
'Theez eez a test'>>> '1+2+3+4+5'.split('+')
['1', '2', '3', '4', '5']
>>> '/user/bin/env'.split('/')
['', 'user', 'bin', 'env']
>>> 'Using the default'.split()
['Using', 'the', 'default']>>> ' internal whitespace is kept '.strip()
'internal whitespace is kept'
>>> names = ['gumby','smith','jones']
>>> name = 'gumby'
>>> if name.strip() in names: print 'Found it!'
Found it!
>>> '***SPAM * for * everyone!!! ***'.strip(' *!')
'SPAM * for * everyone' 第四章:字典:当索引不好用时
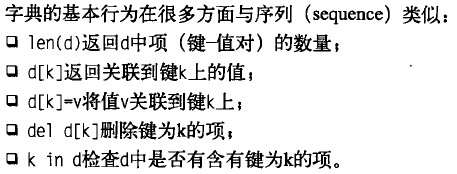
创建和使用字典
>>> phonebook = {'Alice':'2341','Beth':'9102','Cecil':'3258'}
>>> phonebook['Alice']
'2341'>>> items = [('name','Gumby'),('age',42)]
>>> d = dict(items)
>>> d
{'age': 42, 'name': 'Gumby'}
>>> d = dict(name = 'Gumby' , age = 32)
>>> d
{'age' : 32, 'name' : 'Gumby'}
>>> x = {}
>>> x[42] = 'Foobar'
>>> x
{42: 'Foobar'}
4-1 字典示例
# A simple database

# A dictionary with person names as keys. Each person is represented as
# another dictionary with the keys 'phone' and 'addr' referring to their phone
# number and address, respectively.

people = {

    'Alice': {
        'phone': '2341',
        'addr': 'Foo drive 23'
    },

    'Beth': {
        'phone': '9102',
        'addr': 'Bar street 42'
    },

    'Cecil': {
        'phone': '3158',
        'addr': 'Baz avenue 90'
    }

}

# Descriptive labels for the phone number and address. These will be used
# when printing the output.
labels = {
    'phone': 'phone number',
    'addr': 'address'
}

name = raw_input('Name: ')

# Are we looking for a phone number or an address?
request = raw_input('Phone number (p) or address (a)? ')

# Use the correct key:
if request == 'p': key = 'phone'
if request == 'a': key = 'addr'

# Only try to print information if the name is a valid key in
# our dictionary:
if name in people: print "%s's %s is %s." % \
    (name, labels[key], people[name][key])
>>> phonebook = {'Beth':'9102','Alice':'2341','Cecil':'3258'}
>>> phonebook
{'Beth': '9102', 'Alice': '2341', 'Cecil': '3258'}
>>> phonebook['Alice']
'2341'
>>> "Cecil's phone number is %(Cecil)s." % phonebook
"Cecil's phone number is 3258."
字典方法
clear
>>> d = {}
>>> d['name'] = 'Gumby'
>>> d['age'] = 42
>>> d
{'age': 42, 'name': 'Gumby'}
>>> returned_value = d.clear()
>>> d
{}
>>> print returned_value
None

>>> x = {}
>>> y = x
>>> x['key'] = 'value'
>>> y
{'key': 'value'}
>>> x = {}
>>> y
{'key': 'value'}
>>> x
{}

>>> x = {}
>>> y = x
>>> x['key'] = 'value'
>>> y
{'key': 'value'}
>>> x.clear()
>>> y
{}

>>> x = {}
>>> x['key'] = 'value'
>>> x
{'key': 'value'}
>>> x.clear()
>>> x
{}
>>> x = {'username':'admin','machines':['foo','bar','baz']}
>>> y = x.copy()
>>> y['username'] = 'mlh'
>>> y
{'username': 'mlh', 'machines': ['foo', 'bar', 'baz']}
>>> y['machines'].remove('bar')
>>> y
{'username': 'mlh', 'machines': ['foo', 'baz']}>>> from copy import deepcopy
>>> d = {}
>>> d['names'] = ['Alfred','Bertrand']
>>> c = d.copy()
>>> dc = deepcopy(d)
>>> d['names'].append('Clive')
>>> c
{'names': ['Alfred', 'Bertrand', 'Clive']}
>>> dc
{'names': ['Alfred', 'Bertrand']}>>> {}.fromkeys(['name','age'])
{'age': None, 'name': None}
>>> dict.fromkeys(['name','age'],'Unknow')
{'age': 'Unknow', 'name': 'Unknow'}>>> d = {}
>>> print d['name']
Traceback (most recent call last):
File "<pyshell#67>", line 1, in <module>
print d['name']
KeyError: 'name'
>>> print d.get('name')
None
>>> d.get('name','N/A')
'N/A'
>>> d['name'] = 'Eric'
>>> d.get('name')
'Eric'>>> d = {} >>> d.has_key('name')>>> d = {'title':'Python Web Site','url':'http://www.python.org','spam':0} >>> d.items() [('url', 'http://www.python.org'), ('spam', 0), ('title', 'Python Web Site')] >>> it = d.iteritems() >>> it <dictionary-itemiterator object at 0x01F526F0> >>> list(it) [('url', 'http://www.python.org'), ('spam', 0), ('title', 'Python Web Site')] >>>
False>>> d['name'] = 'Eric'>>> d.has_key('name')True>>> items和iteritems>>> d = {'title':'Python Web Site','url':'http://www.python.org','spam':0} >>> d.items() [('url', 'http://www.python.org'), ('spam', 0), ('title', 'Python Web Site')] >>> it = d.iteritems() >>> it <dictionary-itemiterator object at 0x01F526F0> >>> list(it) [('url', 'http://www.python.org'), ('spam', 0), ('title', 'Python Web Site')] >>>keys和iterkeys
pop
popitem>>> d = {'x':1,'y':2} >>> d.pop('x') 1 >>> d {'y': 2}setdefault>>> d = {'url':'http://www.python.org','spam':0,'title':'Python Web Site'} >>> d.popitem() ('url', 'http://www.python.org') >>>update>>> d = {} >>> d.setdefault('name','N/A') 'N/A' >>> d {'name': 'N/A'} >>> d['name'] = 'Gumby' >>> d.setdefault('name','N/A') 'Gumby' >>> d {'name': 'Gumby'} >>>values和itervalues>>> d = {'title':'Python Web Site','url':'http://www.python.org','changed':'Mar 14 22:09:15 MET 2008'} >>> x = {'title':'Python Language Website'} >>> d.update(x) >>> d {'url': 'http://www.python.org', 'changed': 'Mar 14 22:09:15 MET 2008', 'title': 'Python Language Website'} >>>>>> d = {} >>> d[1] = 1 >>> d[2] = 2 >>> d[3] = 3 >>> d[4] = 1 >>> d.values() [1, 2, 3, 1] >>> d {1: 1, 2: 2, 3: 3, 4: 1} >>>


 被折叠的 条评论
为什么被折叠?
被折叠的 条评论
为什么被折叠?
 到【灌水乐园】发言


