


GUI
- 概念:图形用户界面(Graphical User Interface,简称 GUI,又称图形用户接口)是指采用图形方式显示的计算机操作用户界面。
- Swing和AWT 都是java开发GUI常用的技术,本篇主要介绍AWT技术。
一、AWT
(一)AWT介绍
- AWT(Abstract Window Toolkit)包括了很多类和接口,用于Java Application的GUI编程。
- GUI的各种元素(如:窗口,按钮,文本框等)由Java类来实现。
- 使用AWT所涉及的类一般在Java.AWT包及其子包中。
- Container和Component是AWT中的两个核心类。
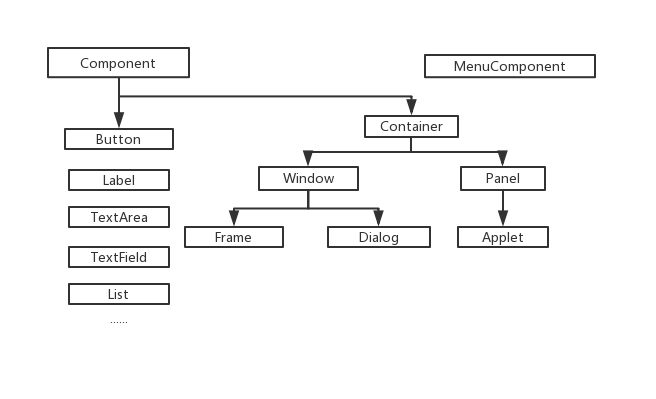
下图展示了AWT中常见的类和类与类之间的关系:
-
所有的可以显示出来的图形元素都称为Component,Component代表了所有的可见的图形元素,Component里面有一种比较特殊的图形元素叫Container,Container(容器)在图形界面里面是一种可以容纳其它Component元素的一种容器,Container本身也是一种Component,Container里面也可以容纳别的Container。
-
Container里面又分为Window和Pannel,Window是可以独立显示出来的,平时我们看到的各种各样的应用程序的窗口都可以称为Window,Window作为一个应用程序窗口独立显示出来,Pannel也可以容纳其它的图形元素,但一般看不见Pannel,Pannel不能作为应用程序的独立窗口显示出来,Pannel要想显示出来就必须得把自己装入到Window里面才能显示出来。
-
Pannel应用比较典型的就是Applet(JAVA的页面小应用程序),现在基本上已经不用了,AJAX和JAVASCRIPT完全取代了它的应用。
-
Window本身又可以分为Frame和Dialog,Frame就是我们平时看到的一般的窗口,而Dialog则是那些需要用户进行了某些操作(如点击某个下拉菜单的项)才出现的对话框,这种对话框就是Dialog。
(二)组件和容器(Component和Container)
1.Component
- Java的图形用户界面的最基本组成部分是Component,Component类及其子类的对象是用来描述以图形化的方式显示在屏幕上并能与用户进行交互的GUI元素,例如,一个按钮,一个标签等。
- 一般的Component对象不能独立地显示出来,必须将它“放在”某一Container对象中才可以显示出来。
2.Container
- Container是Component的子类,Container子类对象可以“容纳”别的Component对象。
- Container对象可使用方法
add(...)向其中添加其他Component对象。 - 因为Container是Component的子类,所以Container对象也可以被当作Component对象添加到其他Container对象中。
- 有两种常用的Container:
- Window:其对象表示自由停泊的顶级窗口。
- Panel:其对象可作为容纳其他Component对象,但不能独立存在,必须添加到其他Container中(如Window或Applet)。
(1)Frame
- Frame是Window的子类,由Frame或其子类创建的对象为一个窗体。
- Frame的常用构造方法:
Frame()Frame(String s)创建一个标题栏为字符串s的窗口。
- Frame的常用方法:
setBounds(int x,int y,int width,int height)设置窗体位置和大小,x,y是左上角坐标,width和height是窗体宽度和高度。setSize(int width,int height)设置窗体的位置,width和height是窗体宽度和高度。setLocation(int x,int y)设置窗体的大小,x,y是左上角坐标。setBackground(Color c)设置窗体背景颜色,参数为Color对象。setVisible(boolean b)设置窗体是否可见。setTitle(String s)设置窗体的标题为字符串s。String getTitle()获取窗体的标题。setResizable(boolean b)设置是否可以调整窗体的大小。
案例一
import java.awt.*;

//学习JAVA的GUI编程编写的第一个图形界面窗口
public class TestFrame {
    public static void main(String[] args) {

        //这里只是在内存里面创建了一个窗口对象 还不能真正显示出来然我们看到
        Frame frame = new Frame("我的第一个JAVA图形界面窗口");

        //设置窗体的背景颜色
        frame.setBackground(Color.blue);

        //设置窗体是否可见
        //要想看到在内存里面创建出来的窗口对象
        //必须调用setVisble()方法
        //并且把参数true传入才能看得见窗体
        //如果传入的参数是false
        //那么窗体也是看不见的
        frame.setVisible(true);

        //设置窗体的初始大小
        frame.setSize(400,400);

        //设置窗体出现时的位置,如果不设置则默认在左上角(0,0)位置显示
        frame.setLocation(200,200);

        // 设置窗体能否被改变大小
        // 设置为false后表示不能改变窗体的显示大小
        // 这里将窗体显示的大小设置为200X200
        // 那么窗体的显示只能是这个大小了,不能再使用鼠标拖大或者缩小
        frame.setResizable(false);
    }
}
运行
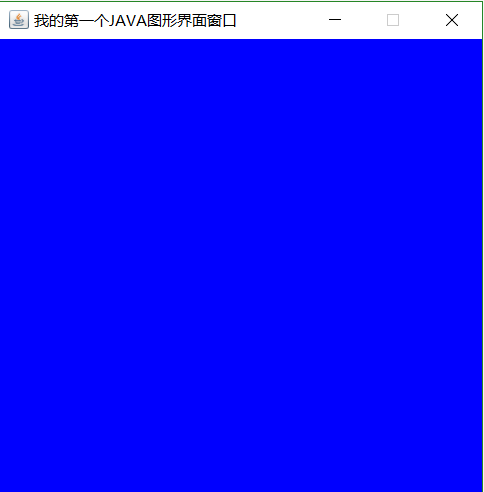
发现问题: 该窗体无法关闭,只能通过停止Java程序的运行才能关掉。
解决:
加上这样一段代码和两项声明即可关闭:
import java.awt.event.WindowAdapter;
import java.awt.event.WindowEvent;
frame.addWindowListener(new WindowAdapter() {
    @Override
    public void windowClosing(WindowEvent e) {
        System.exit(0);
    }
});
这里引入了Window事件和监听的概念,Window事件所对应的事件类为WindowEvent,所对应的事件监听接口为WindowListener,与WindowListener对应的适配器为WindowAdapter。
什么意思呢?就是给窗体frame创建一个监听对象,当监听到有关闭窗体的动作(事件)时,正常退出。
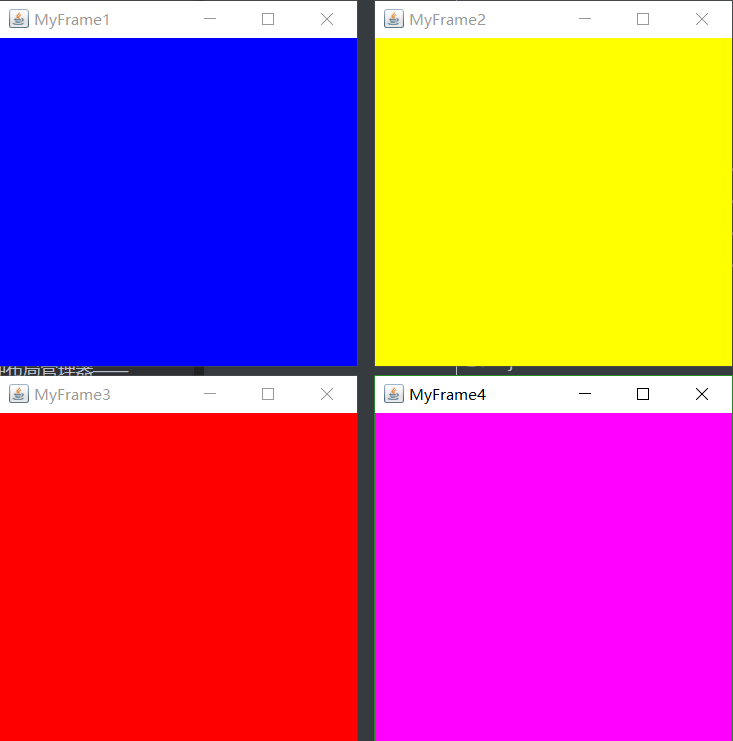
案例二:展示多个窗口
import java.awt.*;

public class TestMultiFrame {
    public static void main(String[] args) {

        MyFrame f1 = new MyFrame(100,100,300,300,Color.blue);
        MyFrame f2 = new MyFrame(400,100,300,300,Color.yellow);
        MyFrame f3 = new MyFrame(100,400,300,300,Color.red);
        MyFrame f4 = new MyFrame(400,400,300,300,Color.MAGENTA);

    }
}

	//自定义一个类MyFrame,并且从Frame类继承
	//这样MyFrame类就拥有了Frame类的一切属性和方法
	//并且MyFrame类还可以自定义属性和方法
	//因此使用从Frame类继承而来的自定义类来创建图形窗口比直接使用Frame类来创建图形窗口要灵活
	//所以一般使用从Frame类继承而来的自定义类创建图形窗口界面比较好,
	//不推荐直接使用Frame类来创建图形窗口界面
class MyFrame extends Frame{

    //定义一个静态成员变量id,用来记录创建出来的窗口的数目,从而使每个窗体标题与id关联
    static int id = 0;

    //自定义构成方法,在构造方法体内使用super调用父类Frame的构造方法
    public MyFrame(int x,int y,int w,int h,Color color){
        super("MyFrame"+(++id));
        /*使用从父类Frame继承而来的方法设置窗体的相关属性*/
        setBackground(color);
        setLayout(null);
        setBounds(x,y,w,h);
        setVisible(true);
    }

}
运行
(2)Panel
- Panel对象可以看成可以容纳Component的空间
- Panel对象可以拥有自己的布局管理器
- Panel类拥有从其父类继承来的方法:
setBounds(int x,int y,int width,int height)setSize(int width,int height)setLocation(int x,int y)setBackground(Color c)setLayout(LayoutManager mgr)
…
- Panel的构造方法:
Panel()使用默认的FlowLayout类布局管理器初始化。Panel(LayoutManager layout)使用指定的布局管理器初始化。
案例
import java.awt.*;
import java.awt.event.WindowEvent;
import java.awt.event.WindowAdapter;
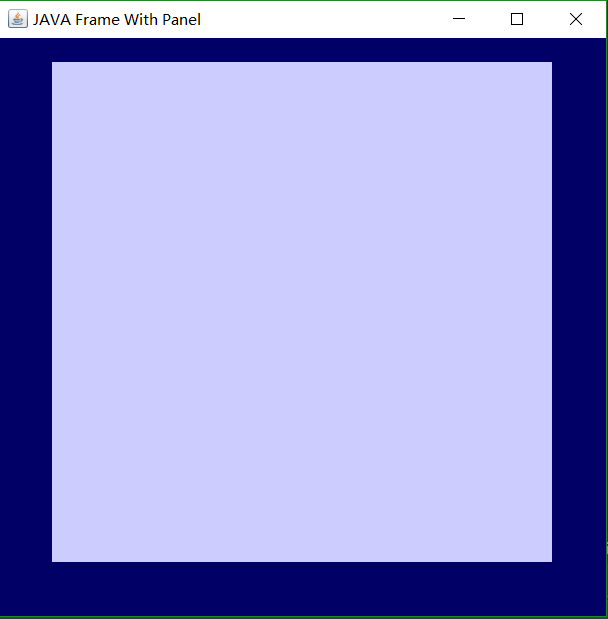
public class TestPanel {
public static void main(String[] args) {
Frame frame = new Frame("JAVA Frame With Panel");
Panel panel = new Panel(null);
frame.setLayout(null);
//这里设置的坐标(300,300)是相对于整个屏幕的
frame.setBounds(300,300,500,500);
//设置背景颜色时使用三基色(红,绿,蓝)的比例来调配背景色
frame.setBackground(new Color(0,0,102));
//这里设置的坐标(50,50)是相对于Frame窗体的
panel.setBounds(50,50,400,400);
panel.setBackground(new Color(204,204,255));
//把Panel容器装入到Frame容器中,使其能在Frame窗口中显示出来
frame.add(panel);
frame.setVisible(true);
//解决关闭问题
frame.addWindowListener(new WindowAdapter() {
@Override
public void windowClosing(WindowEvent e) {
System.exit(0);
}
});
}
}
运行
(三)布局管理器
- Java语言中,提供了布局管理器类的对象
- 可以管理Component和Container中的布局,不必直接设置Component位置和大小。
- 每个Container都有一个布局管理器对象,当容器需要对某个组件进行定位或判断其大小尺寸时,就会调用其对应的布局管理器,调用Container的setLayout方法改变其布局管理器对象。
- Awt提供了5种布局管理器类
- FlowLayout
- BorderLayout
- GridLayout
- CardLayout
- GridBagLayout
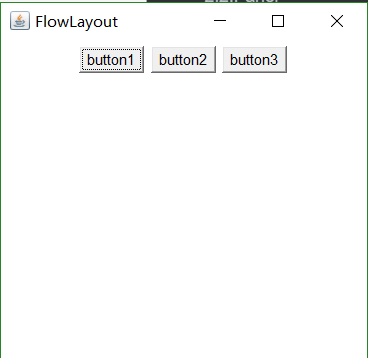
1.第一种布局管理器———FlowLayout
- FlowLayout是Panel类的默认布局管理器。
- FlowLayout布局管理器对组件逐行定位,行内从左到右,一行排满后换行。
- 不改变组件的大小,按组件原有尺寸显示组件,可设置不同的组件间距,行距以及对齐方式。
- FlowLayout布局管理器默认的对齐方式是居中。
FlowLayout的构造方法: new FlowLayout(FlowLayout.RIGHT,20,40);右对齐,组件之间水平间距20个像素,垂直间距40个像素。new FlowLayout(FlowLayout.LEFT);左对齐,水平和垂直间距为缺省值(5)。new FlowLayout();使用缺省的居中对齐方式,水平和垂直间距为缺省值(5)。
案例
import java.awt.*;

public class TestFlowLayout {
    public static void main(String[] args) {
        Frame frame = new Frame("FlowLayout");

        //使用Button类创建按钮
        // 按钮类的其中一个构造方法:Button(String label) label为按钮显示的文本
        Button button1 = new Button("button1");
        Button button2 = new Button("button2");
        Button button3 = new Button("button3");

        // setLayout方法的定义:public void setLayout(LayoutManager mgr)
        // 使用流水(Flow)线般的布局
        frame.setLayout(new FlowLayout());
        // 使用了布局管理器FlowLayout,这里的布局采用默认的水平居中模式

        // frame.setLayout(new FlowLayout(FlowLayout.LEFT));
        // 这里在布局的时候使用了FlowLayout.LEFT常量,这样就将按钮设置为左对齐

        // frame.setLayout(new FlowLayout(FlowLayout.RIGHT));
        //这里在布局的时候使用了FlowLayout.RIGHT常量,这样就将按钮设置为右对齐


        frame.setSize(200,200);

        frame.add(button1); // 把创建出来的按钮放置到Frame窗体中
        frame.add(button2); // 这里并没有设置按钮的大小与位置
        frame.add(button3); // 设置按钮的大小与位置都是由布局管理器来做的

        frame.setVisible(true);

    }
}
运行
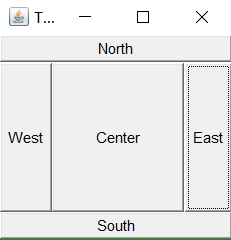
2.第二种布局管理器——BorderLayout
- BorderLayout是Frame类的默认布局管理器。
- BorderLayout将整个容器的布局划分成
- 东(EAST)
- 西(WEST)
- 南(SOUTH)
- 北(NORTH)
- 中(CENTER)
五个区域,组件只能被添加到指定的区域。
- 如不指定组件的加入部位,则默认加入到CENTER区。
- 每个区域只能加入一个组件,如加入多个,则先前加入的会被覆盖。
- BorderLayout型布局容器尺寸缩放原则:
- 北、南两个区域在水平方向缩放。
- 东、西两个区域在垂直方向缩放。
- 中部可在两个方向上缩放。
什么意思呢?看个例子:
案例
import java.awt.*;

public class TestBorderLayout {
    public static void main(String[] args) {
        Frame frame = new Frame("TestBorderLayout");

        Button buttonEast = new Button("East");
        Button buttonWest = new Button("West");
        Button buttonSouth = new Button("South");
        Button buttonNorth = new Button("North");
        Button buttonCenter = new Button("Center");

        //把按钮放置到Frame窗体时按照东西南北中五个方向排列好,推荐使用这种方式去排列窗体元素
        //这样容易检查出错误 因为这样写如果写错了编译器会提示出错

        frame.add(buttonEast,BorderLayout.EAST);
        frame.add(buttonWest,BorderLayout.WEST);
        frame.add(buttonSouth,BorderLayout.SOUTH);
        frame.add(buttonNorth,BorderLayout.NORTH);
        frame.add(buttonCenter,BorderLayout.CENTER);

        //也可以使用这样的方式排列按钮 在把按钮放置到Frame窗体时使用方向定位的字符串指定按钮的放置位置
        //这种使用方向定位的字符串指定按钮的放置方式不推荐使用 一旦写错了方向字符串就不好检查出来
        //因为即使是写错了仍然可以编译通过
        /*
        frame.add(buttonEast,"EAST");
        frame.add(buttonWest,"West");
        frame.add(buttonSouth,"South");
        frame.add(buttonNorth,"North");
        frame.add(buttonCenter,"Center");
        */

        frame.setSize(200,200);
        frame.setVisible(true);

    }
}
运行
3.第三种布局管理器——GridLayout(表格布局管理器)
- GridLayout型布局管理器将空间划分成规则的矩形网格,每个单元格区域大小相等。组件被添加到每个单元格中,先从左到右填满一行后换行。
- 在 GridLayout构造方法中指定分割的行数和列数:
- 例如:
GridLayout(3,4)
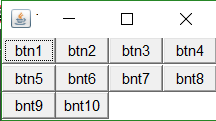
案例
- 例如:
import java.awt.*;

public class TestGridLayout {
    public static void main(String[] args) {
        Frame frame = new Frame("TestGridLayout");

        Button btn1 = new Button("btn1");
        Button btn2 = new Button("btn2");
        Button btn3 = new Button("btn3");
        Button btn4 = new Button("btn4");
        Button btn5 = new Button("btn5");
        Button btn6 = new Button("bnt6");

        // 把布局划分成3行2列的表格布局形式
        frame.setLayout(new GridLayout(3,2));

        frame.add(btn1);
        frame.add(btn2);
        frame.add(btn3);
        frame.add(btn4);
        frame.add(btn5);
        frame.add(btn6);

        // Frame.pack()是JAVA语言的一个函数
        // 这个函数的作用就是根据窗口里面的布局及组件的preferredSize来确定frame的最佳大小。
        frame.pack();
        frame.setVisible(true);

    }
}
运行

4.布局嵌套
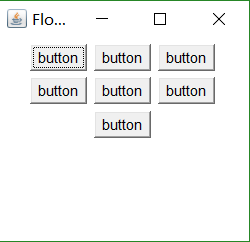
使用Container的嵌套实现下面布局
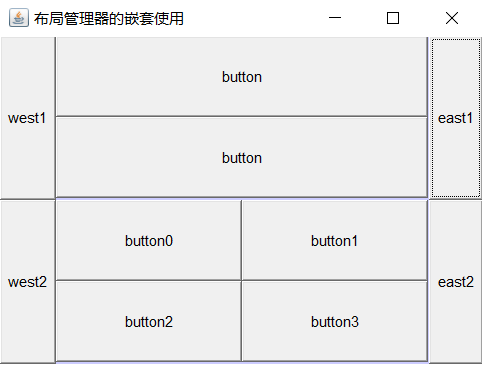
思路:先把它看成2行1列的表格布局(GridLayout),即上面四个按钮为一行,下面六个为一行;再把上面一行嵌套BorderLayout实现,west1和east1分别放在WEST和EAST部分,两个button放在CENTER部分,CENTER部分又嵌套一个2行1列的GridLayout;下面一行同理。
import java.awt.*;

public class LayoutNesting {
    public static void main(String[] args) {
        //这里主要是对显示窗体进行设置
        Frame frame = new Frame("布局管理器的嵌套使用");

        //把整个窗体分成2行1列的表格布局
        frame.setLayout(new GridLayout(2,1));

        frame.setLocation(300,400);
        frame.setSize(400,300);
        frame.setVisible(true);
        frame.setBackground(new Color(204,204,255));

        //这里主要是对Panel进行布局的设置
        Panel p1 = new Panel(new BorderLayout());
        //p2使用2行1列的表格布局
        Panel p2 = new Panel(new GridLayout(2,1));
        Panel p3 = new Panel(new BorderLayout());
        //p4使用2行2列的表格布局
        Panel p4 = new Panel(new GridLayout(2,2));

        //这里主要是把按钮元素加入到Panel里面
        p1.add(new Button("east1"),BorderLayout.EAST);
        p1.add(new Button("west1"),BorderLayout.WEST);

        p2.add(new Button("button"));
        p2.add(new Button("button"));

        //p1里面嵌套p2,把p2里面的按钮作为p的中间部分装入到p1里面
        //把p2作为元素加入到p1里面
        p1.add(p2,BorderLayout.CENTER);

        p3.add(new Button("east2"),BorderLayout.EAST);
        p3.add(new Button("west2"),BorderLayout.WEST);

        for(int i=0;i<4;i++){
            p4.add(new Button("button"+i));
        }

        //p3里面嵌套p4,把p4里面的按钮作为p的中间部分装入到p3里面
        p3.add(p4,BorderLayout.CENTER);

        //把Panel装入Frame里面,以便于在Frame窗体中显示出来
        frame.add(p1);
        frame.add(p3);

    }
}
5.布局管理总结
- Frame是一个顶级窗口,Frame的缺省布局管理器为BorderLayout。
- Panel无法单独显示,必须添加到某个容器中。
- Panel的缺省布局管理器为FlowLayout。
- 当把Panel作为一个组件添加到某个容器中后,该Panel仍然可以有自己的布局管理器。
- 使用布局管理器时,布局管理器负责各个组建的大小和位置,因此用户无法在这种情况下设置组件大小和维位置属性,如果试图使用Java语言提供的
setLocation(),setSize(),setBounds()等方法,则都会被布局管理器覆盖。 - 如果用户确实需要亲自设置组件大小或位置,则应该取消该容器的布局管理器,方法为:
setLayout(null)
(四)事件监听
案例一
import java.awt.*;
import java.awt.event.*;

public class TestActionEvent {
    public static void main(String[] args) {
        Frame frame = new Frame("TestActionEvent");

        Button button = new Button("Press Me");
        // 创建一个监听对象
        MyActionListener listener = new MyActionListener();

        // 把监听加入到按钮里面,监听按钮的动作,
        // 当按钮触发打击事件时,就会返回一个监听对象e
        // 然后就会自动执行actionPerformed方法
        button.addActionListener(listener);

        frame.add(button, BorderLayout.CENTER);
        frame.pack();

        addWindowClosingEvent(frame);

        frame.setVisible(true);

    }

    //点击窗体上的关闭按钮关闭窗体

    private static void addWindowClosingEvent(Frame frame){
        frame.addWindowListener(new WindowAdapter() {
            @Override
            public void windowClosing(WindowEvent e) {
                System.exit(0);
            }
        });
    }


}

// 自定义Monitor(监听)类实现事件监听接口ActionListener
// 一个类要想成为监听类,那么必须实现ActionListener接口
class MyActionListener implements ActionListener{

    //重写ActionListener接口里面的actionPerformed(ActionEvent e)方法
    @Override
    public void actionPerformed(ActionEvent e) {
        System.out.println("A Button has been Pressed");
    }
}
运行
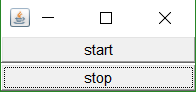
案例二
import java.awt.*;
import java.awt.event.ActionEvent;
import java.awt.event.ActionListener;
public class TestActionEvent2 {
public static void main(String[] args) {
Frame frame = new Frame("TestActionEvent");
Button btn1 = new Button("start");
Button btn2 = new Button("stop");
//创建监听对象
MyMonitor monitor = new MyMonitor();
//一个监听对象同时监听两个按钮的动作
btn1.addActionListener(monitor);
btn2.addActionListener(monitor);
//设置btn2的执行单击命令后的返回信息
btn2.setActionCommand("GameOver");
frame.add(btn1,BorderLayout.NORTH);
frame.add(btn2,BorderLayout.CENTER);
frame.pack();
frame.setVisible(true);
}
}
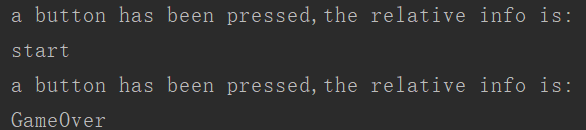
class MyMonitor implements ActionListener{
@Override
public void actionPerformed(ActionEvent e) {
//使用返回的监听对象e调用getActionCommand()方法获取两个按钮执行单击命令后的返回信息
//根据返回信息的不同区分开当前操作的是哪一个按钮,btn1没有使用setActionCommand()方法设置
//则btn1返回的信息就是按钮上显示的文本
System.out.println("a button has been pressed,"+"the relative info is:\n"
+e.getActionCommand());
}
}
运行
(五)TextField事件监听
- TextField对象可能发生Action(光标在文本框内敲回车)事件。与该事件对应的事件类是
java.awt.event.ActionEvent。 - 用来处理ActionEvent事件,是实现了
java.awt.event.ActionListener接口的类的对象。ActionListener接口定义有方法:public void actionPerformed(ActionEvent e)
- 实现该接口的类要在该方法中添加处理该事件(Action)的语句。
- 使用
addActionListener(ActionListener I)方法为TextField对象注册一个ActionListener对象,当TextField对象发生Action事件时,会生成一个ActionEvent对象,该对象作为参数传递给ActionListener对象的actionPerformer方法在方法中可以获取该对象的信息,并做相应的处理。
import java.awt.*;
import java.awt.event.ActionEvent;
import java.awt.event.ActionListener;

public class TestTextField {
    public static void main(String[] args) {
        new MyFrameTextField();
    }
}

class MyFrameTextField extends Frame{
    MyFrameTextField(){
    	setTitle("TextField");
        TextField textField = new TextField();
        add(textField);
        textField.addActionListener(new MyMonitor2());

        //这个setEchoChar()方法是设置文本框输入时显示的字符,这里设置为*,
        //这样输入任何内容就都以*显示出来,不过打印出来时依然可以看到输入的内容
        textField.setEchoChar('*');
        setVisible(true);
        pack();
    }
}

class MyMonitor2 implements ActionListener{

    //接口里面的所有方法都是public(公共的)
    //所以从API文档复制void actionPerformed(ActionEvent e)时 要在void前面加上public
    @Override
    public void actionPerformed(ActionEvent e) {
        //事件的相关信息都封装在了对象e里面,通过对象e的相关方法就可以获取事件的相关信息

        //getSource()方法是拿到事件源,注意:拿到这个事件源的时候
        //是把它当作TextField的父类来对待
        //getSource()方法的定义是:“public Object getSource()”返回值是一个Object对象
        //所以要强制转换成TextField类型的对象
        //在一个类里面想访问另外一个类的事件源对象可以通过getSource()方法
        TextField textField = (TextField) e.getSource();

        // textField.getText()是取得文本框里面的内容
        System.out.println(textField.getText());

        // 把文本框里面的内容清空
        textField.setText("");
    }
}
运行
输入123456

输出:

案例:使用TextField类实现简单的计算器
import java.awt.*;
import java.awt.event.ActionEvent;
import java.awt.event.ActionListener;

public class TestMath {
    public static void main(String[] args) {
        new Calculator();
    }
}

//这里主要是完成计算器元素的布局
class Calculator extends Frame{
    Calculator(){
    	setTitle("Calculator");
        //创建3个文本框,并指定其初始大小分别为10个字符和15个字符的大小 这里使用的是TextField类的另外一种构造方法 public TextField(int columns)
        TextField num1 = new TextField(10);
        TextField num2 = new TextField(10);
        TextField num3 = new TextField(15);

        //创建等号按钮
        Button btnEqual = new Button("=");

        //给等号按钮加上监听,让点击按钮后有响应事件发生
        btnEqual.addActionListener(
            new MyMonitor(num1, num2, num3)
        );

        //“+”是一个静态文本,所以使用Label类创建一个静态文本对象
        Label lblPlus = new Label("+");

        //把Frame默认的BorderLayout布局改成FlowLayout布局
        setLayout(new FlowLayout());

        add(num1);
        add(lblPlus);
        add(num2);
        add(btnEqual);
        add(num3);
        pack();
        setVisible(true);

    }
}

class MyMonitor implements ActionListener{
    //为了使对按钮的监听能够对文本框也起作用
    //所以在自定义类MyMonitor里面定义三个TextField类型的对象 num1,num2,num3,
    //并且定义了MyMonitor类的一个构造方法 这个构造方法带有三个TextField类型的参数,
    //用于接收 从TFFrame类里面传递过来的三个TextField类型的参数
    //然后把接收到的三个TextField类型的参数赋值给在本类中声明的 三个TextField类型的参数num1,num2,num3
    //然后再在actionPerformed()方法里面处理num1,num2,num3

    TextField num1, num2, num3;

    public MyMonitor(TextField num1, TextField num2, TextField num3) {
        this.num1 = num1;
        this.num2 = num2;
        this.num3 = num3;
    }

    //事件的相关信息都封装在了对象e里面,通过对象e的相关方法就可以获取事件的相关信息
    @Override
    public void actionPerformed(ActionEvent e) {
        // num对象调用getText()方法取得自己显示的文本字符串
        int n1 = Integer.parseInt(num1.getText());
        int n2 = Integer.parseInt(num2.getText());

        //num3对象调用setText()方法设置自己的显示文本
        //字符串与任意类型的数据使用“+”连接时得到的一定是字符串,
        //这里使用一个空字符串与int类型的数连接,这样就可以直接把(n1+n2)得到的int类型的数隐式地转换成字符串了,
        //这是一种把别的基础数据类型转换成字符串的一个小技巧。
        //也可以使用“String.valueOf((n1+n2))”把(n1+n2)的和转换成字符串
        num3.setText("" + (n1 + n2));
        //num3.setText(String.valueOf((n1+n2)));


        //计算结束后清空num1,num2文本框里面的内容
        num1.setText("");
        num2.setText("");
    }
}
结果:

点击“=”键

(六)Graphics 类
每个Component都有一个paint(Graphics g)用于实现绘图目的,每次重画该Component时都自动调用paint方法。
Graphics类中提供了许多绘图方法,如:
[外链图片转存失败,源站可能有防盗链机制,建议将图片保存下来直接上传(img-JojFmmUv-1579103669575)(https://blog.kuangstudy.com/usr/uploads/2019/05/89050190.png)]
案例
import java.awt.*;

public class TestPaint {
    public static void main(String[] args) {
        new MyPaint().launchFrame();
        //在main()方法里面并没有显示调用paint(Graphics g)方法
        //可是当创建出Frame窗体后却可以看到Frame窗体上画出了圆和矩形
        //这是因为paint()方法是一个比较特殊的方法
        //在创建Frame窗体时会自动隐式调用
        //当我们把Frame窗体最小化又再次打开时
        //又会再次调用paint()方法重新把圆和矩形在Frame窗体上画出来
        //即每次需要重画Frame窗体的时候就会自动调用paint()方法
    }
}

class MyPaint extends Frame{
    public void launchFrame(){
    	setTitle("Graphic");
        setBounds(200,200,640,480);
        setVisible(true);
    }

    public void paint(Graphics g){
        //paint(Graphics g)方法有一个Graphics类型的参数g
        //我们可以把这个g当作是一个画家,这个画家手里拿着一只画笔
        //我们通过设置画笔的颜色与形状来画出我们想要的各种各样的图像

        /*设置画笔的颜色*/
        g.setColor(Color.red);
        g.fillOval(100,100,100,100);/*画一个实心椭圆*/
        g.setColor(Color.green);
        g.fillRect(150,200,200,200);/*画一个实心矩形*/

        //这下面的两行代码是为了写程序的良好编程习惯而写的
        //前面设置了画笔的颜色,现在就应该把画笔的初始颜色恢复过来
        //就相当于是画家用完画笔之后把画笔上的颜色清理掉一样
        Color c = g.getColor();
        g.setColor(c);

        //判断是否调用了paint()方法
        System.out.println("执行了paint方法");

    }

}
运行


 1039
1039


 被折叠的 条评论
为什么被折叠?
被折叠的 条评论
为什么被折叠?
 到【灌水乐园】发言


