| 资料 |
|---|
| 资料地址 |
| 后台管理系统目录 | 前台展示系统目录 |
|---|---|
| 1 - 构建工程篇 | 7 - 渲染前台篇 |
| 2 - 前后交互篇 | 8 - 前台登录篇 |
| 3 - 文件上传篇 | 9 - 前台课程篇 |
| 4 - 课程管理篇 | 10 - 前台支付篇 |
| 5 - 章节管理篇 | 11 - 统计分析篇 |
| 6 - 微服务治理 | 12 - 项目完结篇 |
一、阿里云OSS对象存储
1.1、创建账户
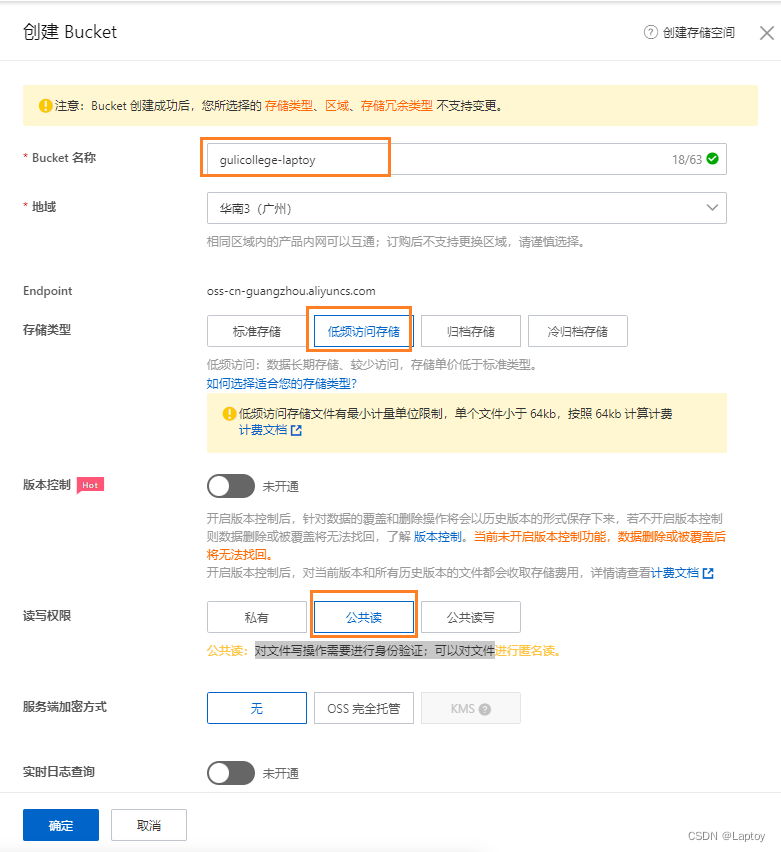
1、创建 bucket

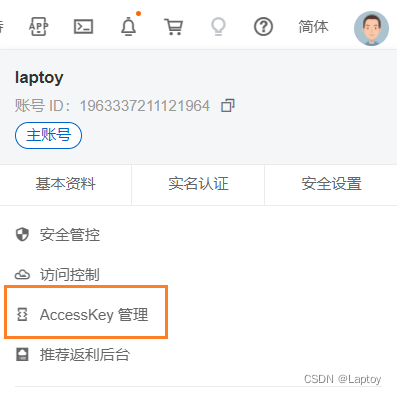
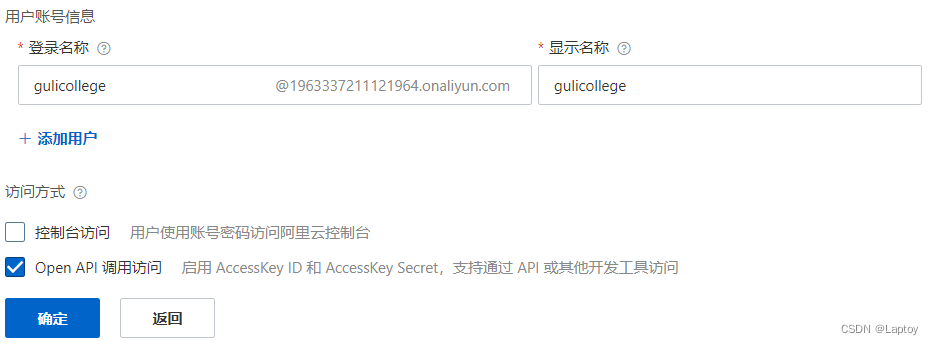
2、创建子账户
一般在公司中,我们没有权限可以直接操作公司的阿里云账户,所以我们需要获取创建阿里云OSS许可证(阿里云颁布id和秘钥)

3、创建子账户

AccessKeyID: LTAI5tL5FrVJBuQadij4KRvJ
AccessKeySecret: Xs7dHUvxCdHLd0K5iFK7NWEbdUN7GG
1.2、搭建文件上传模块
1、新建 service_oss Maven模块 (父模块为 service)
2、POM
<!-- 阿里云oss依赖 -->
<dependency>
    <groupId>com.aliyun.oss</groupId>
    <artifactId>aliyun-sdk-oss</artifactId>
</dependency>
<!--日期工具栏依赖-->
<dependency>
    <groupId>joda-time</groupId>
    <artifactId>joda-time</artifactId>
</dependency>
3、properties
# 服务端口
server.port=8002

# 服务名
spring.application.name=service-oss

# 环境设置:dev、test、prod
spring.profiles.active=dev

# 阿里云 OSS
aliyun.oss.file.endpoint=oss-cn-guangzhou.aliyuncs.com
aliyun.oss.file.keyid=LTAI5tL5FrVJBuQadij4KRvJ
aliyun.oss.file.keysecret=Xs7dHUvxCdHLd0K5iFK7NWEbdUN7GG
aliyun.oss.file.bucketname=gulicollege-laptoy
4、启动类
package com.laptoy.oss;

@SpringBootApplication(exclude = DataSourceAutoConfiguration.class)
@ComponentScan(basePackages = {"com.laptoy"})
public class OssApplication {
    public static void main(String[] args) {
        SpringApplication.run(OssApplication.class, args);
    }
}
1.3、实现文件上传
1、业务层
public interface OssService {
    String uploadFileAvatar(MultipartFile file);
}

@Service
public class OssServiceImpl implements OssService {

    @Value("${aliyun.oss.file.endpoint}")
    private String endpoint;

    @Value("${aliyun.oss.file.keyid}")
    private String accessKeyId;

    @Value("${aliyun.oss.file.keysecret}")
    private String accessKeySecret;

    @Value("${aliyun.oss.file.bucketname}")
    private String bucketName;

    @Override
    public String uploadFileAvatar(MultipartFile file) {
        InputStream inputStream = null;
        try {
            OSS ossClient = new OSSClientBuilder().build(endpoint, accessKeyId, accessKeySecret);
            // 获取上传文件的输入流
            inputStream = file.getInputStream();
            //获取文件名称
            String fileName = file.getOriginalFilename();
            //调用oss实例中的方法实现上传
            ossClient.putObject(bucketName, fileName, inputStream);
            ossClient.shutdown();
            String url = "http://" + bucketName + "." + endpoint + "/" + fileName;
            return url;
        } catch (IOException e) {
            e.printStackTrace();
            return null;
        }
    }

}
2、控制层
@Api(tags="阿里云文件管理")
@CrossOrigin 	//跨域
@RestController
@RequestMapping("/eduoss/fileoss")
public class OssController {

    @Autowired
    private OssService ossService;

    //上传头像
    @ApiOperation(value = "文件上传")
    @PostMapping("/upload")
    public R uploadOssFile(@RequestParam("file") MultipartFile file){
        //返回上传到oss的路径
        String url = ossService.uploadFileAvatar(file);

        return R.ok().data("url",url).message("文件上传成功");
    }
}
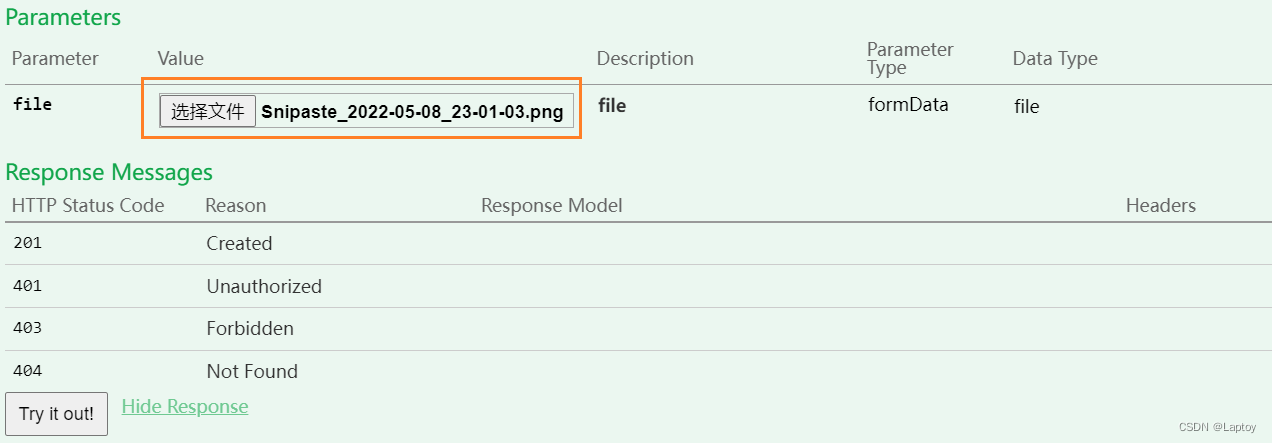
4、测试 - http://localhost:8002/swagger-ui.html


http://gulicollege-laptoy.oss-cn-guangzhou.aliyuncs.com/Snipaste_2022-05-08_23-01-03.png
5、优化文件上传
多次上传相同的名称文件会导致最后一次上传把之前的文件覆盖
- 把文件名称拼接 uuid,让每个文件名不同
- 并将文件进行按日期分类管理
public String uploadFileAvatar(MultipartFile file) {

    String uuid = UUID.randomUUID().toString().replaceAll("-", "");
    String datePath = new DateTime().toString("yyyy/MM/dd");

    InputStream inputStream = null;
    try {
        OSS ossClient = new OSSClientBuilder().build(endpoint, accessKeyId, accessKeySecret);
        // 获取上传文件的输入流
        inputStream = file.getInputStream();
        //获取文件名称
        String fileName = file.getOriginalFilename();
        fileName = datePath + "/" + uuid + fileName;
        //调用oss实例中的方法实现上传
        ossClient.putObject(bucketName, fileName, inputStream);
        ossClient.shutdown();

        return "http://" + bucketName + "." + endpoint + "/" + fileName;
    } catch (IOException e) {
        e.printStackTrace();
        return null;
    }
}

二、Nginx配置反向代理
这里直接用 Window版本的(资料里有)
将 9001 端口 根据正则表达式匹配对应的端口 8001、8002
1、 nginx.conf 添加
server {
	listen       9001;
    server_name  localhost;

    location ~ /eduservice/ {
		proxy_pass http://localhost:8001;
    }

    location ~ /eduoss/ {
		proxy_pass http://localhost:8002;
    }
}
2、修改前端端口号 - config/dev.env.js
module.exports = merge(prodEnv, {
  NODE_ENV: '"development"',
  BASE_API: '"http://localhost:9001"',
})
三、上传讲师头像
1、将资料的上传组件复制到 src/components 下

2、使用组件 save.vue
<!-- 讲师头像 -->
<el-form-item label="讲师头像">
  <!-- 头衔缩略图 -->
  <pan-thumb :image="teacher.avatar" />
  <!-- 文件上传按钮 -->
  <el-button type="primary" icon="el-icon-upload" @click="imagecropperShow = true">更换头像</el-button>
  <!--
      v-show:是否显示上传组件
      :key:类似于id,如果一个页面多个图片上传控件,可以做区分
      :url:后台上传的url地址
      @close:关闭上传组件
      @crop-upload-success:上传成功后的回调
  -->
  <image-cropper v-show="imagecropperShow" :width="300" :height="300"
				 :key="imagecropperKey"
				 :url="BASE_API + '/eduoss/fileoss/upload'"
				 field="file"
				 @close="close" @crop-upload-success="cropSuccess" />
</el-form-item>
//引入头像组件
import ImageCropper from '@/components/ImageCropper'
import PanThumb from '@/components/PanThumb'

export default {
  components: { ImageCropper, PanThumb },
  data() {
    return {
    	...
      imagecropperShow: false,
      imagecropperKey: 0,
      BASE_API: process.env.BASE_API,
    };
  },
  methods: {
    // 关闭上传弹框的方法
    close() {
      this.imagecropperShow = false;
      //上传组件初始化 id+1
      this.imagecropperKey = this.imagecropperKey + 1
    },
    // 文件上传
    cropSuccess(data) { //上传成功的方法
      this.imagecropperShow = false;
      //参数resp.data被封装到了方法参数data中了
      this.teacher.avatar = data.url
      this.imagecropperKey = this.imagecropperKey + 1
    },
  }
}
上传成功后:图片地址


 299
299


 被折叠的 条评论
为什么被折叠?


