


今天学习了做一个携程旅行的页面。
同时也学到了一些新的知识点
.header,.footer :对class=header和class=footer设置相同的属性
header,footer : 对元素header 和footer这是相同的属性,用逗号隔开
.header img 用空格隔开 : 设置的是class= header下边的img元素
效果如下
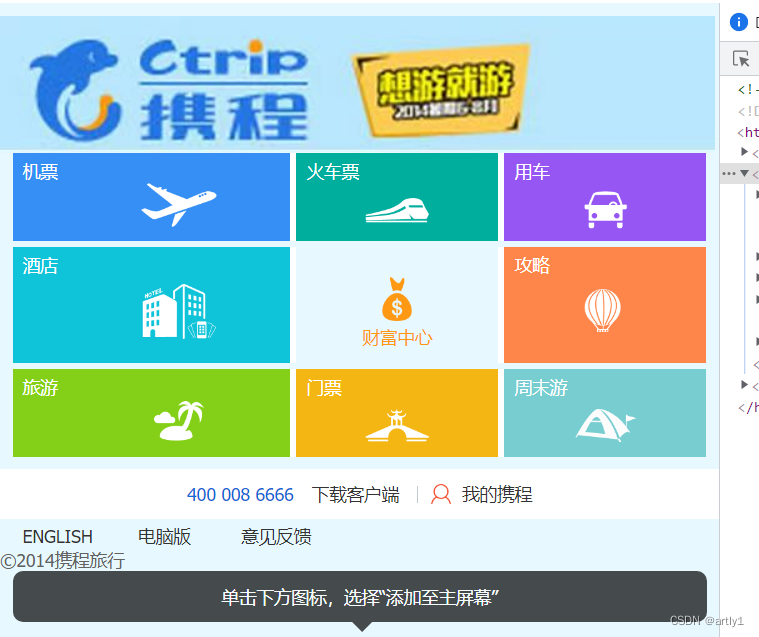
用到了一些素材
https://pan.baidu.com/s/17z7ahAFdIQJsyrM6BvCGdg
提取码 1234
代码部分
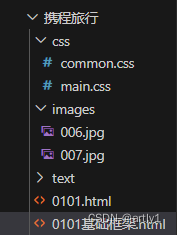
这是我们的项目结构,我们分两部分来讲html和css
html
<!-- 这个我们这个项目的html代码 -->
<!DOCTYPE html>
<html>
<head>
<meta http-equiv="Content-Type" content="text/html; charset=UTF-8" />
<meta charset="utf-8" />
<title>酒店预订,机票预订查询,旅游度假-携程旅行网无线版官网</title>
<!-- 将common.css和main.css两个CSS文件引入HTML文档中 -->
<link href="css/common.css" rel="stylesheet" type="text/css" media="screen" />
<link href="css/main.css" rel="stylesheet" type="text/css" media="screen" />
</head>
<body>
<header>
<div class="img-item img-size">
<!-- <a>标签是 HTML 中常用的链接标记,它用于在网页中创建链接/锚点。该标记包含 href 属性,用于指定链接的目标地址。 ,这里为#意思是空路径-->
<a href="#"><img src="images/006.jpg" title="携程旅行" /></a>
</div>
</header>
<!-- <nav> 标签表示页面的导航部分,可以使用无序列表(<ul>)或有序列表(<ol>)来创建链接列表 -->
<nav>
<ul class="nav-list">
<li class="nav-flight">
<h2><a title="机票" href="#">机票</a></h2>
</li>
<li class="nav-train">
<h2><a title="火车票" href="#">火车票</a></h2>
</li>
<li class="nav-car">
<h2><a title="用车" href="#">用车</a></h2>
</li>
<li class="nav-hotel">
<h2><a title="酒店" href="#">酒店</a></h2>
</li>
<li class="nav-fortun">
<h2><a title="财富中心" href="#">财富中心</a></h2>
</li>
<li class="nav-strategy">
<h2><a title="攻略" href="#">攻略</a></h2>
</li>
<li class="nav-trip">
<h2><a title="旅游" href="#">旅游</a></h2>
</li>
<li class="nav-ticket">
<h2><a title="门票" href="#">门票</a></h2>
</li>
<li class="nav-week">
<h2><a title="周末游" href="#">周末游</a></h2>
</li>
</ul>
</nav>
<footer class="tool-box">
<div class="tool-cn">
<!-- href属性使用了"tel:"协议,表示该链接可以呼叫电话号码。具体来说,当用户点击该链接时,设备会启动拨号界面,并自动输入电话号。 -->
<a href="tel:4000086666" class="link-tel">400 008 6666</a>
<a href="#" class="link-down">下载客户端</a>
<a href="#" class="link-mc">我的携程</a>
</div>
<div class="tool-ver">
<a href="#" class="english">ENGLISH</a>
<a href="#" class="computer">电脑版</a>
<a href="#" class="wap">意见反馈</a>
</div>
<!-- ©这是HTML实体字符,表示版权符号"©" -->
<p>©<label id="label1">2014</label>携程旅行</p>
</footer>
<aside class="c_pop_wrap">
<!-- 这段代码是为网站添加一种交互式外观设计,通过使用 HTML 和 CSS 元素来创建一个简单的侧边面板 -->
<div class="c_pop">
<!-- i 标签,这个标签通常用于添加箭头或三角形图标,以便示意某个元素具有下拉菜单、弹出窗口或某些行为 -->
<i class="c_pop_trigon"></i>
<div class="c_pop_cont"> 单击下方图标,选择“添加至主屏幕”</div>
</div>
</aside>
</body>
</html>css
通用css
html,body,nav,ul,li,h2 {
    padding: 0px;
    margin: 0px;
  }
  body {
    min-width: 320px;
    font: normal 14px/1.5em Tahoma,
        "Lucida Grande",Verdana,
        "Microsoft Yahei",STXihei,hei ;
    color: #000;
    background: #e7f8ff;
    overflow-x: hidden;
  }
  html,body {
    height: 100%;
  }
  li {
    list-style-type: none;
  }

  img {
    border: none
  }

  a {
    color: #000;
    text-decoration: none;
  }

  h2 a:link,h2 a:visited {
    color: #fff;
  }
主体css
/* 这里是代码主体的css */
对header这个隔间进行外观设计 header {
    position: relative;
    width: 100%;
    min-height: 50px;
    overflow: hidden;
    background: #e4f2fc
}

.nav-list {
    padding: 10px 10px 5px 10px;
}

/* 伪元素   :after,用于消除浮动 */
.nav-list:after {
    content: '\0020';
    display: block;
    clear: both;
    height: 0;
    overflow: hidden;
}

/* header里顶部的css */
.img-item {
    height: 100%;
    overflow: hidden;
    float: left;
    /* 上 右 下 左 */
    margin: 10px 0px 0px;
    padding: 0px;
}

.img-size {
    width: 1280px;
    height: 110px;
}

.item img {
    width: 100%;
}
/* nav下nav—list下的li的属性 */
.nav-list li {
    position: relative;
    float: left;
    margin-bottom: 5px;
    /* 通过使用 box-sizing 属性,指定元素内容框的大小,同时不受它的内边距和边框的影响。 */
    -webkit-box-sizing: border-box;
    -moz-box-sizing: border-box;
    -ms-box-sizing: border-box;
    box-sizing: border-box;
}

/* 图片精灵定位 */
/* 伪元素选择器,用于在每个列表项(<li>)的内容之前插入生成的内容 */
.nav-list li:before {
    content: "";
    position: absolute;
    -webkit-transform: translate(-50%, 0);
    -moz-transform: translate(-50%, 0);
    -ms-transform: translate(-50%, 0);
    transform: translate(-50%, 0);
    background-image:
        url(../images/007.jpg);
    background-size: 170px 160px;
    background-repeat: no-repeat;
}

.nav-list h2 {
    position: absolute;
    left: 8px;
    top: 8px;
    font: 500 14px/1 "Microsoft Yahei";
    color: #fff;
}

/* nav部分的标签属性 */
.nav-flight,
.nav-train,
.nav-car,
.nav-trip,
.nav-ticket,
.nav-week {
    height: 70px;
}

.nav-hotel,
.nav-fortun,
.nav-strategy {
    height: 93px;
}

.nav-train,
.nav-car,
.nav-fortun,
.nav-strategy,
.nav-ticket,
.nav-week {
    border-left: 5px solid #fff;
}

.nav-flight,
.nav-hotel,
.nav-trip {
    width: 40%;
}

.nav-train,
.nav-car,
.nav-fortun,
.nav-strategy,
.nav-ticket,
.nav-week {
    width: 30%;
}

.nav-flight {
    background-color: #368ff4;
}

.nav-train {
    background-color: #00ae9d;
}

.nav-car {
    background-color: #9556f3;
}

.nav-hotel {
    background-color: #0fc4d9;
}

.nav-fortun {
    background-color: #e7f8ff;
}

.nav-strategy {
    background-color: #ff864a;
}

.nav-trip {
    background-color: #84d018;
}

.nav-ticket {
    background-color: #f3b613;
}

.nav-week {
    background-color: #78cdd1;
}

.nav-list .nav-fortun h2,
.nav-list .nav-fortun h2 a {
    color: #ff9913;
}

.nav-list .nav-fortun h2 {
    top: 66px;
    left: 0;
    width: 100%;
    text-align: center;
}

.nav-flight:before {
    top: 24px;
    left: 60%;
    width: 60px;
    height: 35px;
    background-position: 0 0;
}

.nav-train:before {
    top: 36px;
    left: 50%;
    width: 50px;
    height: 20px;
    background-position: -70px 0;
}

.nav-car:before {
    top: 30px;
    left: 50%;
    width: 35px;
    height: 31px;
    background-position: -130px 0;
}

.nav-hotel:before {
    top: 30px;
    left: 60%;
    width: 58px;
    height: 44px;
    background-position: 0 -40px;
}

.nav-fortun:before {
    top: 24px;
    left: 50%;
    width: 24px;
    height: 35px;
    background-position: -60px -30px;
}

.nav-strategy:before {
    top: 34px;
    left: 50%;
    width: 34px;
    height: 34px;
    background-position: -120px -80px;
}

.nav-trip:before {
    top: 25px;
    left: 60%;
    width: 40px;
    height: 34px;
    background-position: 0 -90px;
}

.nav-ticket:before {
    top: 32px;
    left: 50%;
    width: 50px;
    height: 26px;
    background-position: -65px -70px;
}

.nav-week:before {
    top: 32px;
    left: 50%;
    width: 49px;
    height: 26px;
    background-position: -50px -100px;
}
 /* 以下为最底部边缘的代码 */
.tool-cn {
    margin-bottom: 3px;
    padding: 8px 0;
    height: 24px;
    background-color: #fff;
    line-height: 24px;
    text-align: center;
  }
  .tool-cn a {
    display: inline-block;
    padding: 0 5px;
    line-height: 1;
    color: #333;
  }

  .tool-cn .link-mc {
    position: relative;
    margin-left: 5px;
    padding-left: 35px;
    border-left: 1px solid #c4cbce;
  }


  .tool-cn a.link-tel {
    color: #0e68d5;
  }
  .tool-cn .link-mc:before {
    content: "";
    position: absolute;
    top: -2px;
    left: 10px;
    width: 16px;
    height: 16px;
    background:
           url(../images/007.jpg)
           no-repeat -30px -130px;
    background-size: 170px 160px;
  }
  .computer {
    margin-left:-4px;
  }
  .tool-ver a {
    padding:0 18px;
    text-align:center;
    color:#333;
  }
  footer p {
    margin: 0;
    line-height: 18px;
    color: #626262;
  }
  /* 以下为侧边代码 */
  .c_pop {
    position: relative;
    z-index: 9;
    height: 100%;
    margin: 0 10px;
    border-radius: 8px;
    background: #000;
    opacity: 0.7;
    /* :用不了写= */
    filter: alpha(opacity=70);
  }

  .c_pop_trigon {
    position: absolute;
    width: 0;
    height: 0;
  }
  .c_pop_trigon {
    z-index: -1;
    left: 50%;
    margin-left: -6px;
    bottom: -8px;
    border-top: 8px solid #000;
    border-left: 8px solid transparent;
    border-right: 8px solid transparent;
  }

  .c_pop_cont {
    padding: 10px;
    font-size: 600;
    text-align: center;
    color: #fff;
  }
精灵定位
我们在这次的学习中使用到了精灵定位来把图片上我们需要的部分找出来。
关于精灵定位的使用如果有机会我会单独出一期。
我在找到一篇关于精灵图的使用方法的帖子,大家可以现看这个进行学习


 3018
3018


 被折叠的 条评论
为什么被折叠?
被折叠的 条评论
为什么被折叠?
 到【灌水乐园】发言


